Payment for goods and downloading of the book in electronic form (PDF format) is made on the website.
To do this, you need to find the book you are interested in and click on the “Buy” button. The price of the book is indicated on the button.
For convenience, the price on the website for residents of Russia, Belarus and Kazakhstan is presented in rubles.
For residents of Ukraine in hryvnias, and for all other countries - dollars.
After clicking on the “BUY” button, a payment window will open where you can select a payment system with which you can pay for the selected book using any bank card (Visa, MasterCard, MIR, etc.)
When you click on the “Pay by bank card” button, the Portmone payment system will open, which is the easiest way to make a payment.
In addition, the website offers four payment systems for payment:
- Yandex (payment from any bank cards, Yandex Money account, QIWI Wallet, terminals, etc.);
- Portmone (payment from any bank cards, Portmone account);
- PayPal (payment from any bank cards, PayPal account);
- WebMoney (payment from any bank cards, payment from WebMoney wallets).
Payment via Yandex Cashier
After selecting payment via Yandex, the Yandex Cashier payment system will launch, where you need to select a convenient payment method (bank card, QIWI, Yandex Money account, etc.)
After specifying payment details and confirming payment, payment for the goods will occur.
If you have a bank card in a currency other than the ruble, then the money will be debited from the card at the rate of the Central Bank of Russia at the time of the purchase.
This payment method is optimal for residents of Russia, Kazakhstan and Belarus.
Official website of the Yandex Kassa payment system https://kassa.yandex.ru
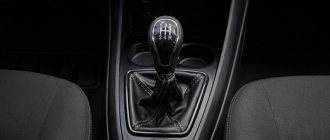
The clutch pedal of Lada Vesta, Largus, XRAY has failed: what to do?
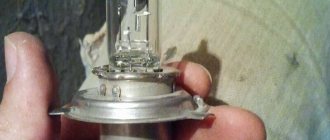
When operating cars with a hydraulic clutch (Lada Vesta, Lada Largus, Lada XRAY, a number of Nissan, Renault models, etc.), when you press the clutch pedal, you can hear a loud click under the dashboard in the pedal area. After this, the clutch pedal falls to the floor. We will understand the causes of the malfunction, as well as how the design can be improved to prevent this problem from occurring again.
Cause of a failed clutch pedal
— a breakdown of the plastic retainer, which causes the clutch master cylinder rod to fly off the pedal axis. As a temporary solution, you can snap the rod into place to get there, but it will still fly off in the future.
At the service station you will be asked to replace the clutch master cylinder assembly with a new one:
- for Lada Vesta - article number 8450007300, price from 1200 rub.
- for Lada Largus - article 306107623R, price from 2200 rub.
- for Lada XRAY - article 306104118R, price from 1900 rub.
In order not to replace the part with a new one, it is proposed to modify the fastening. It will be cheaper and more reliable. It is not necessary to remove the clutch master cylinder.
- washer 10 (3mm thick);
- lock washer for 8 (or fixation washer with petals, article number 8200748573);
- lithol or other lubricant.
- Remove the rod from the pedal axle.
- Using pliers, bite off part of the plastic from the rod along with the latches.
- Lubricate the connection between the rod and axle with lithol.
- Install the washer and snap the lock washer into place.
The refinement process is also shown in the video:
After modification, it was also noted: the disappearance of creaking when squeezing the clutch pedal, and the pedal itself began to be pressed more softly and without rattling.
Payment via Portmone
After selecting payment through Portmone, the payment system will launch, where you need to select the payment method: bank card or Portmone account.
The price in the Portmone payment system is converted into dollars at the exchange rate of the Central Bank of the country where you are located.
If you have a bank card in a currency other than the dollar, then the money will be debited from the card at the rate of the Central Bank of your country at the time of the purchase.
After specifying payment details and confirming payment, payment for the goods will occur.
Official website of the Portmone payment system https://www.portmone.com
Features of adjusting the clutch release drive of VAZ 2105, 2107 cars
Correct and precise operation of the clutch on VAZ 2105, 2107 vehicles is ensured by certain adjustments to its drive. There are two of them: adjusting the gap between the pusher and the piston of the clutch master cylinder and adjusting the free play of the clutch pedal.
The gap between the pusher and the clutch master cylinder piston is 0.1 - 0.5 mm. It is regulated by rotating the clutch pedal free travel limiter. In this case, a certain free play of 0.4 - 2.0 mm is formed at the clutch pedal, which the driver selects when starting to press the pedal.
the gap between the pusher and the piston, free play of the clutch pedal of VAZ 2105, 2107 cars
It is measured with a ruler or tape measure, which is installed from the floor to the middle of the lower part of the pedal platform. We move the platform with our hand relative to the ruler scale by pressing the pedal. If there is a gap, at first the pedal moves very easily, and then with difficulty. If there is no gap, turn the pedal travel limiter out a little. We ensure that the free movement along the ruler fits within the required two millimeters.
This gap is necessary for the clutch to disengage completely. If it is missing, then the piston will not be able to fully return to the rear position when the pedal is released and in the working cavity of the master cylinder, and excess pressure will remain in the entire drive. As a result, the clutch will not disengage completely, since the release bearing will press on the leafs of the pressure spring, and the discs will slip (not be fully pressed against the flywheel). Increasing this gap will lead to the fact that the clutch will not disengage completely and will “drive” (the discs do not fully move away from the flywheel).
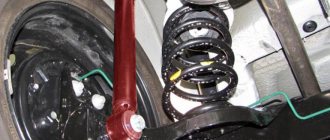
Adjusting the clutch pedal free play (the gap between the release bearing and the plane of the pressure flange of the clutch “basket” pressure spring)
It is adjusted by a nut on the clutch slave cylinder pusher. With proper adjustment, the free play of the clutch release fork is 4–5 mm (checked by hand: the fork is pulled away from the stop against the adjusting nut on the pusher), and the free play of the clutch pedal is 25–35 mm. It is necessary to unscrew the lock nut on the pusher and rotate the adjusting nut to set the required free play of the fork. The pedal free play of 25 - 35 mm (until the clutch is disengaged) can be checked using a ruler. It is this value that means there is a gap between the release bearing and the plane of the pressure flange of the clutch “basket” pressure spring.
free movement of the clutch slave cylinder pusher for VAZ 2105, 2107 cars
In the absence of this gap, the release bearing presses on the pressure spring of the “basket” - the clutch “slips”. With an increased gap, it “leads.”
The clutch pedal free play of 0.4 – 2.0 mm is included in the pedal free play of 25 – 35 mm. That is, 25 - 35 mm is the total required size.
Notes and additions
— The clutch on VAZ 2105, 2107 cars is of a constantly closed type, that is, constantly on: when the pedal is released, the driven disk is pressed by the drive disk to the flywheel and rotates with it, as well as the release bearing and the input shaft of the gearbox. There is a gap of 1.5 - 2.0 mm between the release bearing and the lining of the thrust flange of the clutch basket pressure leaf spring. This gap is selected when the driver begins to press the pedal.
— The full travel of the clutch pedal on VAZ 2105, 2107 cars is 140 mm.
— After adjusting the clutch drive, check for smooth gear shifting
Particular attention to reverse gear. The smoothness of its activation is an indicator of successful adjustment
More articles on VAZ 2105, 2107 cars
Payment via PayPal
After selecting payment via PayPal, the PayPal payment system will launch, where you need to select the payment method: bank card or PayPal account.
If you already have a PayPal account, then you need to log into it and make a payment.
If you do not have a PayPal account and you want to pay using a bank card via PayPal, you need to click on the “Create an Account” button - shown with an arrow in the picture.
PayPal will then prompt you to select your country and provide your credit card information.
After specifying the information required to make the payment, you must click on the “Pay Now” button.
Official website of the PayPal payment system https://www.paypal.com
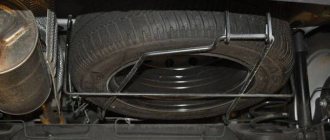
Replacing the friction clutch
Design and self-diagnosis of faults in the VAZ 2107 cooling system
Repairing the Larugsa clutch, like any other car, does not make sense; all worn parts must be replaced. To work, you will need a standard set of tools, amplifiers, a hammer and a new set of spare parts. First, the car must be placed on a lift or its front part raised on jacks above the inspection hole. The front wheels and engine protection are removed. After unscrewing the screws, you need to remove the left shield under the bumper. This will give you access to the shield fasteners in the wheel arch, which must also be removed.
The gearbox oil is drained into a suitable container; to do this, first unscrew the plastic and then the metal plug. Do not remove the reservoir until maximum oil has been drained. Dismantle the brake caliper and put it aside along with the pads.
Removing the steering knuckle
Removal is carried out according to the following scheme:
- disconnect the ABS sensor;
- Using a 16 mm wrench, unscrew the nut on the tie rod screw, use a screwdriver to open the two sides of the knuckle, and press out the ball joint rod;
- on the steering end stud, unscrew the nut with a 16 mm wrench and press out the stud;
- Using two 18 mm wrenches, unscrew the fastening nuts that secure the fist to the stand. Now you can remove the steering knuckle, and also dismantle the CV joint from the gearbox (in this case, the rollers will probably fall out).
It is impossible to replace the clutch on a Largus without draining the oil, since the internal drive mechanisms (CV joints) cannot be unscrewed if there is lubricant in the gearbox.
Working in the engine compartment
First you need to disconnect the negative terminal of the battery and remove the cable. To do this, the counterweight is pulled forward, removed through the slot, after which the rubber coupling is removed through it. The engine harness holder is attached to the gearbox housing. To remove it, just loosen the fastener. Now you need to disconnect all the wire terminals:
- unscrew the two mounting screws and remove the terminal from the TDC sensor;
- Disable the reverse sensor at the gearbox;
- disconnect the speed sensor terminal;
- The oxygen concentration sensor (lambda probe) is also disconnected.
The breather hose needs to be loosened and moved away from the box, unscrew the two wires to ground. Next, find the gearshift knob rod, loosen the fastening and pull out the rod.
A mark is left on the fastening clamp using paint so that the rod can be placed correctly during installation.
https://youtube.com/watch?v=WFyYSC08Aiw
Removing the gearbox
It is impossible to replace the clutch on a Lada Largus without removing the gearbox. First you need to remove the subframe by unscrewing the three bolts securing it to the bumper. Then the rear support bracket is removed, the steering mounting bolts and the power steering mounting bolt on the left on the subframe are unscrewed. The exhaust pipe is disconnected from the exhaust manifold and removed from the rubber hangers. The subframe is attached to the body with 4 bolts - they need to be unscrewed. Additionally, you will have to remove the starter.
It remains to remove the two screws on top - they secure the gearbox to the engine - and the four bolts with which the clutch housing is attached to the oil sump. Suitable supports are first installed under the engine and gearbox. At the very end, the left engine mount bracket is dismantled, after which the nuts on the lower studs are unscrewed.
Replacing the mechanism
To remove the basket, perform the following operations:
- using an 11 mm wrench, unscrew 6 bolts that hold the basket, fixing it on the flywheel - one turn at a time, sequentially;
- holding the friction disc, remove the basket.
After replacing all worn elements, the assembly is assembled, and the steps are performed in the reverse order. For installation you will need to use heat-resistant grease and a centering mandrel.
Clutch adjustment
Ideally centering and balancing the friction clutch by doing the assembly yourself will be problematic, but possible. To adjust the tension with your own hands, you need to perform a number of actions:
- find the nuts for adjusting the clutch pedal (located under the power steering reservoir);
- unscrew the outer nut to the end of the stud;
- using the second nut, the travel of the clutch pedal is adjusted to the desired cable tension;
- After this, the external nut secures the fastener so that in the future it does not loosen and the cable does not fly off.
If the Largus clutch is adjusted correctly, first gear will engage easily. When the engine is running and the clutch pedal is fully depressed, there should be no crunching, crackling, spontaneous increase or decrease in speed.
Payment via WebMoney
After selecting payment via WebMoney, the payment system will launch, where you need to select the payment method: bank card or WebMoney wallet.
If you already have a WebMoney wallet, then you need to log into it and make a payment.
If you do not have a WebMoney wallet and you want to pay in another way, you need to select any of the methods that WebMoney offers and make the payment
After specifying payment details and confirming payment, payment for the goods will occur.
Official website of the WebMoney payment system https://www.webmoney.ru/
Articles
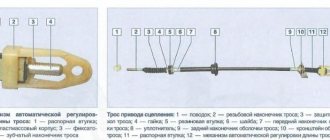
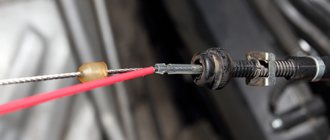
For all cables suitable for cars of the first and second generation, the Renault catalog contains two article numbers - 8200215961 and 6001546867. We are talking about different designations of one part.
But number 307705043R is a new generation of cars, that is, 2014. Make no mistake!
Substitutes
3074 600 294 - the most common option for replacing the original spare part
3074 600 294 in Exist
We list analogues suitable for machines from the first two generations:
- CABOR 10.2890
- TRISCAN 8140 25250
- ATE 24372810312 or 591031
- AUTOMOTOR FRANCE AVC6867SAE1 or AVC6867
- BAV DISAN96
- CAUTEX 28439
- ADRIAUTO AD41180, AD410180, 41180, 410180
- CEF RT01186
- CMB AN96
- QUARTZ QZ-154-6867
- FRANCECAR FCR210148
- COFLE 102890
- FTE FKS20023
- KAWE RT01186
- HI-DRIVE CC708
- MALO 26545
- NPA NP51105151
- SPJ 911112
- QH KA93657
- TRW GCC109
- TIMMEN 01441528
- SACHS 3074600294 (pictured above)
- MASTER-SPORT 6001546867PRPCSMS
- ABS K27640
- ASAM 30360 or 31071
- HELLA 8AK 355 700-921
- BRECKNER BK19004
- SEIM 401712
- KAGER 192756
- LEX TR2193
- RICAMBIFLEX 01441528
- METZGER 102890
- TEXTAR 58013900
Downloading a book
After successfully completing the payment (by any method) and returning to the KrutilVertel store from the payment system website, you will be taken to the successful payment page:
On this page you need to indicate your e-mail, where access to download the book will be sent.
If you are already registered on our website, then simply follow the link to your personal account.
The book you purchased will be in your personal account, from where you can always download it.
Please note that after making the payment, you need to return back from the payment system website to the KrutilVertel website.
If for some reason you did not return back to the site and closed the payment system tab with a message about the successful completion of the payment, please let us know - we will send you a letter indicating access to download the book.
Bleeding the clutch of Lada Largus
Bleeding is only relevant for the hydraulic drive on the JR5 gearbox. This must be done if air has entered the hydraulic system and an air lock has formed. Signs of a problem: the clutch begins to “drive”, and when the pedal is fully pressed, the friction clutch does not disengage completely. When you engage any gear, a characteristic grinding sound of gears is heard, and the lever becomes difficult to control.
To bleed the clutch, you must first replace the brake fluid and restore the sealing of the brake and clutch systems. Without this, the pedal will simply fail. To work, you will need a flat-head screwdriver, new brake fluid, a suitable container and a hose that matches the diameter of the fitting. The pumping process is as follows:
- Check the brake fluid level in the reservoir and top up to the maximum level if necessary.
- Remove the protective cap from the clutch slave cylinder fitting and put on a suitable hose (for example, from a dropper). The second end must be lowered into a container to drain the brake fluid.
- Next you will need an assistant. Its task is to press the clutch pedal at least 10 times at intervals of several seconds.
- Use an 8 mm wrench to loosen the fitting, use a screwdriver to pry up the spring clamp and lift it until it clicks. The tip from the cylinder pipe is displaced by 1 cm.
- The assistant depresses the clutch and holds the pedal, at which time the liquid from the cylinder flows through the hose into the container.
- After the liquid stops flowing, the fitting is tightened, the tip of the cylinder pipe is pushed back and secured with a spring retainer.
- After this, the pedal can be released and the operation repeated after 5-10 seconds.
You need to pump until only liquid begins to flow out of the hose - there should be no air bubbles in it. After completing the procedure, place the protective cap on the fitting.
As you pump, you need to monitor the amount of liquid in the tank. A drop in its level below the minimum level is not allowed, since air will enter the system again and all actions will become meaningless. Brake fluid should be added periodically.
Problems when paying with bank cards
Sometimes difficulties may arise when paying with Visa/MasterCard bank cards. The most common of them:
- There is a restriction on the card for paying for online purchases
- A plastic card is not intended for making payments online.
- The plastic card is not activated for making payments online.
- There are not enough funds on the plastic card.
In order to solve these problems, you need to call or write to the technical support of the bank where you are served. Bank specialists will help you resolve them and make payments.
That's basically it. The entire process of paying for a book in PDF format on car repair on our website takes 1-2 minutes.
If you still have any questions, you can ask them using the feedback form, or write us an email at [email protected]
Replacing clutch parts without removing the gearbox (discs, bearing, fork)
A typical clutch replacement job and other information are shown here.
When replacing clutch parts, you don’t have to completely remove the gearbox (since this requires removing the subframe, which is very labor-intensive), but only move it away from the engine to the required distance.
Disconnect the terminal from the negative side of the battery.
Remove the left wheel drive (see here).
We unscrew the bolt securing the left subframe bracket to the body and loosen the nut securing the bracket to the suspension arm (see here).
Disconnect the clutch cable from the clutch fork and the bracket on the gearbox (see here).
We disconnect the gearbox control rod from the switch on the gearbox (see here).
Remove the crankshaft position sensor.
Disconnect the wiring connector from the reverse light switch.
Disconnect the ECM wiring connector from the wiring block of the control oxygen concentration sensor.
Remove the sensor block from the holder on the gearbox and remove the wiring harness from the holder.
Unclench the holder on the gearbox housing and remove the wiring harness from it. We unscrew the four bolts securing the engine oil pan to the gearbox (see here).
We place adjustable stops under the engine and gearbox. We remove the rear and left supports of the power unit (see here and here).
We disconnect the ground wires from the gearbox, unscrew the bolts and nuts securing the gearbox to the cylinder block (see here).
Holding the right wheel drive inner joint housing.
. We move the gearbox away from the engine, removing the input shaft from the hub of the driven clutch disc.
In this case, the splined shaft of the differential side gear will come out of the tip of the right wheel drive inner joint housing.
We move the gearbox away from the engine to the required distance and rest the left side of the box on the subframe.
When removing and installing the gearbox, do not rest the input shaft of the gearbox on the petals of the diaphragm spring, so as not to damage them.
To replace the clutch release bearing , slide it along the guide sleeve to the end of the gearbox input shaft, disengaging the clutch release fork legs from engagement with the bearing clutch.
Remove the bearing (for clarity, shown on the removed gearbox).
Remove the fork from the ball joint and remove the end of the fork from the dirt cover.
Before installing the bearing, apply grease to the surface of the guide bushing, the clutch release fork tab, and also to the fork ball joint. We replace the torn rubber cover of the clutch release fork with a new one.
Install the clutch release bearing in the reverse order.
When installing the bearing, the 2 forks must fit into the plastic hooks 1 of the bearing clutch.
Further, the operations for replacing clutch discs are similar to replacing them with the gearbox removed (see here)
Source
Basic malfunctions and methods for their elimination
The most obvious reason for the failure of the Lada Largus clutch is oil contamination. If this happens, the clutch cannot be replaced until the leak is fixed. There can be two sources of leakage: engine or gearbox. Oil can leak out of the engine due to a worn oil seal behind the flywheel. Changing it is quite difficult due to the labor-intensive dismantling process.
If lubricant gets in from the gearbox, the culprit is a worn oil seal located on the front of the gearbox. To replace the unit, you will need to drain the oil from the gearbox and separate the final drive housing from the gearbox housing. The process is labor-intensive, but necessary. To remove the oil seal, you will also need to remove the flywheel.
Before proceeding with the removal and disassembly of the clutch, it is necessary to check the reliability of the fixing elements that attract the assembly to the Largus frame and engine. If the fasteners are loose or the rubber bushings are worn out, when pressing the pedal the driver will feel shaking and jerking when moving away.
To describe characteristic clutch problems, special terms are used, for example, seizing. This is a situation when strong vibrations are felt during operation of the mechanism, and when you try to move, sharp jerks begin. When the clutch is driven, the disc is not pressed away from the flywheel, that is, the friction clutch does not disengage, and it is impossible to engage the gear.