Comments: no Published: 02/12/2016
Rating:
Tags:Philips ledVAZ 2170Daytime running lightsLED backlightLED running lights
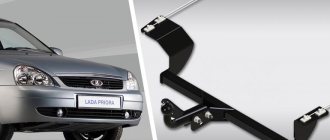
The function of daylight, which must be turned on on every car according to the new traffic regulations, can be performed by fog lights, side lights, low beams, or special daytime running lights. The latter have been installed since 2011 on all models produced in EU countries, but the bulk of the cars on our roads were produced earlier and therefore you need to take care of installing DRLs yourself. Thus, if your Lada Priora is not equipped with running lights, you should eliminate this deficiency, which you can do yourself.
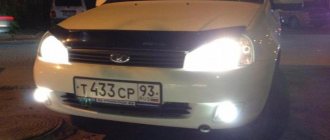
Priora daytime running lights - economical and stylish
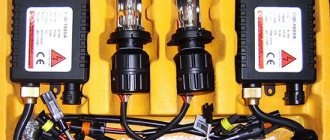
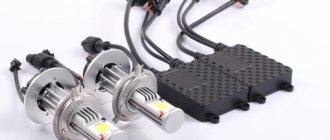
Special LED DRLs
Special LED lights designed for daytime driving are the best option for any car. If they are not installed by the manufacturer, you can buy and install them yourself. The advantages of such equipment:
- High brightness LEDs with minimal power consumption.
- Long service life - 50 thousand hours, which corresponds to a period of 6 years.
- Extending the life of the energy supply system.
- Automatic turning on and off of lights.
Block headlight VAZ-2170 (Lada Priora) disassembled
addelectronics › Blog › DRL (long-range incandescent) - do it yourself!
Greetings to all blog readers. Congratulations to everyone on the new year 2020, and since it’s a new year, we need to do something new, so I decided to quietly post developments on devices so that people can repeat, share thoughts on improvements, and so on. There are a lot of devices to describe, but I’ll start with the most “running” one - full-heat DRLs with auto mode.
The idea of this device began its journey back in my 2109, and this is already more than 6 years ago, and each time the device was gradually refined, something changed, something was upgraded. It all started with a simple 555 timer, then it all evolved into a device based on attiny13, but turning it on and off was forced (+12V appeared from the generator, turn on the DRL), then it all evolved to setting the thresholds for turning on/off the DRL by voltage (we manually set the thresholds )
Well, in the end, it all evolved to the automatic calculation of the threshold for turning on the DRL based on the voltage in the on-board network (it doesn’t matter what the voltage on the battery is - fully charged, or extremely discharged)
As I wrote above, it all started with Attini13, but time and technology do not stand still, and that’s why I recently switched to STM8S003F3P6 processors.
The advantages are obvious - the cost is half the price (I always buy from 100 pieces, the price tag is generally minimal) - 8 times more FLASH memory. Yes, yes, it’s been a long time since you have to sit and masturbate with assembler if something doesn’t fit into your flash volume. -5 channels 10 bit ADC -much more advanced timers Well, now, yes, someone will definitely say - but to do this you don’t need anything at all. But firstly, I always make devices that are intended for my car and actually for myself. Do I want to make for myself some kind of wretched blinker on 1 transistor? - definitely not! And you can do it, good luck!)
Actually speaking about programming. I write programs for STM8S in IAR Embedded Workbench with a license (for training with a code limit of 8 kb). I don’t need more than 8kb, because for toys and larger devices I already use STM32 :) and there are no restrictions.
Installation of special running lights on Priora
Installing daytime running lights in standard places is quite simple. This procedure takes a minimum of time and does not even require the involvement of highly qualified craftsmen. Each DRL kit contains detailed installation instructions and the materials necessary for its implementation.
Installation process:
- Before installing the daytime running lights on the Priora in their regular places, you need to thoroughly degrease the surface, removing any contaminant particles from it. Do not use solvents or similar products containing aggressive substances; a detergent with a sponge is sufficient.
- The adhesive tape is glued to the bracket after removing the protective film from one side. The other side of the tape is pressed tightly against the installation site of the headlights, due to which the bracket is fixed in it.
- The wire must be threaded into the hole before the bracket is installed, but the flashlight must not be snapped into the bracket (otherwise it will be difficult to get it back later).
- If you don’t have adhesive tape, mount the daytime running lights like this: you will have to drill holes in the bracket, which should correspond to the location of the mounting holes, and secure the bracket with self-tapping screws.
- The headlights are fixed after the power supply is installed in the engine compartment. Fixation is carried out as follows: the flashlight is inserted into the bracket and snaps into place. Next, the wires are pulled under the hood and secured with the ties provided in the equipment kit.
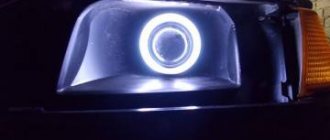
Headlight reflector for VAZ-2170 (Lada Priora) with built-in LED DRLs
Replacing lamps in the Kalina 2 headlight unit
| Replacement of lamps in car headlights is carried out in case of their burnout or to replace them with more efficient ones. Do you know how to replace the bulbs in the headlights of Kalina 2? |
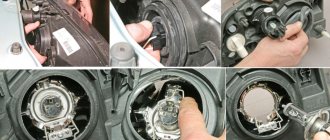
Replacing the low beam lamp (H7)
It is recommended to replace the lamp with cotton gloves. Procedure:
- remove the protective rubber cover 3;
- disconnect the block with wires from the lamp;
- press the spring clamp 4 and tilt it to the side;
- pull out lamp 5 by the base.
Install the new lamp without touching the lamp bulb. Make sure that the protective rubber cover 3 fits tightly to the headlight unit body.
Replacing the high beam lamp (h2)
It is recommended to replace the lamp with cotton gloves. Procedure:
- remove the protective rubber cover 1;
- disconnect the block with the wire from the lamp;
- press the spring clamp 4 and tilt it to the side;
- pull the lamp out by the base.
Install the new lamp without touching the lamp bulb. Make sure that the protective rubber cover 1 fits tightly to the headlight unit housing.
Replacing the daytime running and side light bulb (W21/5W)
- turn lamp socket 2 counterclockwise until it stops;
- remove the lamp socket from the headlight housing;
- remove the lamp from the socket.
Installing a new lamp is carried out in the reverse order.
Replacing the turn signal lamp (PY21W)
- turn lamp socket 4 towards you until it stops;
- remove the lamp socket from the headlight housing;
- press and turn the lamp counterclockwise until it stops;
- remove the lamp from the socket.
Installing a new lamp is carried out in the reverse order. By the way, do you know that the mode of operation of the low and high beam headlights may differ depending on the configuration of the Kalina 2?
Keywords:
Installation of control
- The control unit is installed in the engine compartment. It is best to mount the control unit near the battery, as far away from the engine as possible. Excessive heat in the vicinity of the engine can lead to subsequent operational problems with the running light system. The unit is reliably protected by the housing from moisture or contamination, therefore there are no special restrictions on the choice of its installation location.
- The unit should be connected according to the usual diagram. The “plus” terminal has a red wire, and the “minus” terminal has a black wire.
- The orange wire is designed to automatically turn off the running lights when low beam is on or switch the DRL to the sidebar mode . If you neglect the functions of the orange wire and do not connect it. Daytime running lights will continue to shine even when the headlights are on, which can lead to dazzling of oncoming drivers and is a violation of the rules. The orange wire connects to the side lights or headlights.
- The headlights are connected to the unit using a special connector that is supplied with the kit initially . The wires are inserted into the connector and snapped there. Turn on the engine and check how the lights work - when the engine starts, if installed correctly, they turn on automatically, when it stops, they turn off.
- If the system passes the test, you can attach the control unit . After this, the lights themselves are fixed.
Connecting the DRL control unit on Lada Priora in accordance with GOST R 41.48-2004
5 pin automotive relay
Hi all. In today's review, I will share with you my impressions of a 5-pin automotive relay purchased on eBay, and also show one of the possible options for its use. The relay was ordered almost simultaneously with the DRL kit that I talked about a few days ago. For what? Because when using a standard connection, when turning on the side lights or low/high beams, the DRLs still continued to light up. I didn’t find anything good in this, and therefore I began to think about automating their shutdown when turning on the headlights or low beam. The simplest and most logical option seemed to me to be using a relay.
By the way, this is one of the few purchases that I went to the local auto parts store before making. Imagine my surprise when I saw the price in the VAZ store: relay - 5 rubles (about $2.5), a block for it - 2.5 rubles ($1). Total, $3.5 per set offline with us without waiting, versus $1.66 with them. The choice is obvious
The seller sent the parcel a few days after payment, assigning it a track, all available events for which can be viewed here.
It took the parcel about a month to get from China to Belarus, after which it was safely received at my post office. They are supplied in ordinary plastic bags without any identification marks or inscriptions (except for the barcode sticker).
Externally, the relays are not much different from those that can be seen on the shelves in local stores. I have no particular complaints about their workmanship. The relays themselves generally look very decent. The contacts are securely sealed with a resin-like sealant:
As you can see in the photo, each contact is signed, so there should be no problems with connection
On the top of the relay the principle of operation of the relay is shown, as well as the manufacturer and brief characteristics.
As you can see, this relay is designed for a voltage of 12-14 V and a maximum current of 40A. I can’t say whether it can really withstand such a load, since I didn’t have anything suitable for checking this parameter at the time of connection.
To secure the relay, the design includes a metal plate, which can be easily removed if necessary.
The delivery set includes the relay itself and a socket for it. The block comes immediately with wires, which greatly simplifies the installation process. The manufacturing quality of the pad will be somewhat worse. The main disadvantage is the abundance of flash that was not removed after the pad was cast. The length of the wires going to the block is about 15 centimeters.
But here the appearance rather suffers, since this does not affect the functionality in any way. If you believe the description, then each relay is capable of operating 10,000 on-off cycles, which is quite good.
In principle, there is nothing else interesting in the appearance of the relays, which means you can move on to checking their performance. But before doing this, I think it would be useful to remind you why these relays are needed at all.
In the normal state, the relay has 2 contacts that are permanently closed. These are contacts marked on the relay with numbers 30 and 87a (in some cases 88). When voltage is applied to contacts 86 and 85, circuit 30-87a is broken, and circuit 86-85 is closed. There is a free plus on the free contact (87) (we don’t need it). So we remove the wire from the block that goes to pin 87.
So let's get started. First of all, we cut the positive wire going to the DRL. Since in mine it is common, you can get by with one relay, installing it near the place where it is connected. We connect the wires going to contacts 30 and 87a into the section. Contact 86 was connected to ground, and contact 85 to the positive wire going to the side lights. We insulate the connection points of the wires and attach the relay somewhere under the hood. I got it something like this (I connected the ground wire to the fastening bolt):
All that's left to do is check how everything works. We turn on the ignition and see that our DRLs are glowing. So they didn't make things worse.
Next, turn on the dimensions/low beam:
As you can see, everything works as intended. When the headlights/low beams are turned on, the DRL lights turn off. For greater clarity, I made a short video on what it looks like live:
If desired, the relay can be used in a wide variety of variations. As far as I know, some even assemble anti-theft devices on them
That's probably all
Thank you for your attention and your time
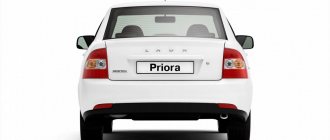
Other solutions for daytime lights on the Lada Priora
According to traffic regulations, the installation of additional equipment is not required, and instead of DRLs, you can use low beams, side lights or connected Prior fog lights. However, such solutions in practice are not the most effective for increasing vehicle visibility.
Disadvantages of neglecting special running lights:
- The side lights, which have a power of 5 W, are clearly visible in the dark. During the day they become almost completely discolored and are almost invisible.
- The low beam headlights make it possible to clearly identify the car on the road; it becomes truly distinguishable. But this option, when driving frequently with the headlights on during the daytime, leads to their rapid wear and excessive fuel consumption. It is necessary to ensure the simultaneous consumption of electricity for the dashboard and side lights. More than 0.4 liters of gasoline are required to travel 100 km in a Lada Priora car.
- It is not recommended to use high beam headlights as daytime running lights, both for the reasons stated for low beam and because of the risk of dazzling the drivers of cars moving opposite.
- Fog lights do not provide a good range of light and vehicle visibility is insufficient.
Fog lights can replace running lights in Lada Priora
There is an exit!
But we didn’t give up, looking at everything described above, and came up with this. Installing DRLs does not necessarily mean beautiful LED headlights. This can be any legal light source. What is legal? These are the headlights that are installed at the car manufacturer or installed by the car owner independently, but with the tolerances provided for by the design.
For example, fog lights (FTL). They are found on almost all cars, and their installation by owners does not require permission for conversion. And most importantly, PTF, according to traffic regulations, can be used as daylight. In other words, the only thing left to do is to make sure that conventional fog lights turn on automatically and turn off themselves when the low beam is on or the engine is turned off. But at the same time, we will retain the function of the fog light, getting a two-in-one effect.
Before installing headlights or converting existing ones into DRLs, check that your headlights are positioned correctly. It’s unlikely that they will check on the roads, but if they do, it will be done right away correctly
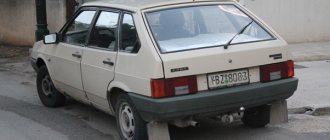
To install DRLs, we took the editorial Niva. We bought the necessary components at the auto store, namely: two relays (one five-pin, the other four-pin), electrical wiring, a 25 A fuse block and electrical tape - for a total of 2,000 tenge. We looked for some tools in the garage and got to work. The fog lights on our car were installed directly on the bumper when we purchased it. Except that later they were changed to others.
Chinese LEDs "Eagle Eye"
This is a fairly common way to install running lights on cars. It is often used on Lada Priora models. Since such LEDs do not have a clearly defined purpose, their equipment is not sufficient to be used for a complete DRL installation. Simple tips will help you get rid of problems that may arise during the installation process. You can do all this yourself:
- Plates are cut out of plexiglass and holes are made in them.
- On separately purchased eyelashes, the places where the plates will be installed are cut out.
- The plate in the eyelashes is fixed with hot glue, and epoxy is poured onto the joints.
- After the resin has dried, the eyelashes need to be puttied, trying to do it with your own hands as carefully as possible.
- Final work: filing, degreasing, priming and painting with varnish.
Chinese LEDs "eagle eye" for Lada Priora - The excess length of the LEDs can be sawed off so that the threads do not rest against the headlights.
- Further installation can be carried out similarly to installing DRLs in standard places on a Lada Priora car.
Author: Vysotsky Alexander Petrovich
Higher education: Chita State University, Institute of Technological and Transport Systems, specialty - cars and automotive industry. Repair of passenger cars of domestic and foreign origin. Chassis repair,…
How to connect daytime running lights?
Many motorists have wondered how to connect the DRLs so that they turn on when the engine is started. Garage craftsmen have found 10 ways to turn daytime lights on and off, as an example:
- From the handbrake;
- Battery;
- Instead of fog lights, etc.
And each of the methods requires money, as well as good knowledge of wiring diagrams.
Let's watch a video on how to install and connect daytime running lights via the control unit:
One of the main schemes is to connect the DRL via a 4-5 contact relay; some craftsmen connect the wires to the pressure sensor. Since when the engine starts, the pressure sensor on the dashboard automatically lights up, which means that when the DRLs are connected to it, the lights themselves light up.
We connect the DRL via a 5-pin relay
To work we will need:
- The relay itself, for example, from an alarm system;
- Several wires with a cross section of 4 mm;
- 3 male-female terminals;
- Daytime Running Lights;
- Heat shrink.
The first way to connect DRLs is as follows:
- Take the DRL and attach it where it is most convenient for you. We solder the negative wire to the body and secure it well. The positive wire is supplied with a “mother”, insulated with heat shrink and left for a while.
- In the car wiring you need to find the wire that goes to the low beam of any headlight. We connect to it, output it, solder the “mother” in the same way and forget about it for now. The same must be done with the positive ignition wire.
- Let's move on to the relay. It has 5 contacts, we will use all but 87. You can remove it or leave it, decide for yourself. Number 86 will need to be connected to the negative on the body, 85 will be connected to the headlight, 87a will be connected to the positive from the ignition. Contact number 30 is connected to the free DRL terminal. Assess the reliability of the insulation of the terminals on the relay so that there are no short circuits and the contact is good.
Another video, installing DRLs using a five-contact relay on a VAZ 2111, be sure to watch:
That's all, check your installation to see if it works. Turn on the engine and see how the daytime lights function. Then turn on the low beam, the lights should turn off. After turning off the lights, the DRLs should light up again, and after stopping the engine, they should go out. In order for the decay to occur smoothly, it is worth placing a good capacitor in the circuit in parallel.
Connecting DRL without relay
If you don't have a relay on hand, you can do without it. DRLs are very simple in electrical terms. At the output we have only two wires, red and black. By all rules, red is a “plus”, and black is a “minus”. Open the hood and look for a “+” on any of the car systems that starts when you turn the ignition key. As an example, these could be the wires going to the fuel sensor or any others. Connect the red DRL wire to the positive terminal of your chosen vehicle system. And connect the negative wire to another contact of the same charge.
The result of such a connection scheme will be that when the ignition is turned on, the DRLs light up, and when they are turned off, they go out. Be careful, after installing the lights, check the functionality of all electrical appliances. And do not drive on the road if there are any malfunctions in the car.
Remember, not every car can have DRLs installed. And if installed incorrectly, you will be fined for changing the intended design of the vehicle.
Why the headlights don't light up - reasons
The most common reason for headlights not working is a burnt out light bulb. Its service life is indicated in hours on the packaging. For a low beam bulb, this limit can be 400 hours of operation. The second extremely possible reason could be a wiring malfunction due to water leakage, or the wire simply frayed. This problem is already more serious, because you will have to fuss with it much longer than with a regular replacement of consumables.
Often, car enthusiasts are too lazy to change light bulbs, driving out onto the road in “one-eyed” cars. This is very unsafe - it is recommended that immediately after a malfunction is noticed, you go for a spare part to replace a new lamp.
Difficulties with replacement
The most convenient thing is to replace the turn indicators. In other cases, you have to twist very tightly and stand in this uncomfortable position for a couple of minutes until the job is done. This is not very convenient, because the light bulb is a consumable, but the engineers could make sure that replacing it was as easy as the plastic steering wheel insert on the “ten”.
Another inconvenience is that you have to remove the battery. Nobody argues that it is better to turn off everything before starting work. But the battery is removed for reasons of rationality - the battery takes up a lot of space and interferes with working with your hands while you stand in an awkward position.