Fuses and relays in Lada Priora, electrical diagrams
Lada Priora is another car in the line of new VAZ cars, which is gaining popularity among segments of the population.
External similarities with the 10th model attract the attention of young people; the relatively low price is also a reason for purchase for most car enthusiasts. Along with the growth in popularity, the owners of this model are gaining experience in repair and maintenance, which is becoming more and more every year.
If your Priora has electrical problems, do not rush to get upset; first, check the fuses and relays in your Lada Priora. These are the ones that will be discussed in this article.
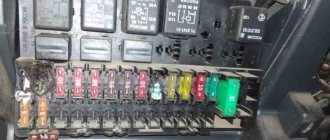
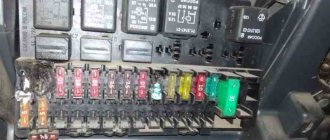
Fuse box in the passenger compartment of VAZ-2170, -2171, -2172
The fuse box in Priora is located at the bottom of the dashboard, on the left side of the steering wheel. To get to it, you need to open the cover, which is held on by three latches. Rotate each locking knob 90 degrees and pull the lid down and it will snap open.
Fuses in the interior mounting block
F1 (25 A) - radiator cooling fan.
- If your fan does not work, check its motor by applying 12 V directly to it from the battery. If the engine is working properly, then most likely the problem is in the wiring or connectors. Check the serviceability of relay K1.
- The fan in the Priora usually turns on at a temperature of 105-110 degrees. Do not allow the engine to overheat, watch the arrow of the temperature sensor.
- If the fan runs constantly and does not turn off, check the coolant temperature sensor located on the thermostat.
- If you remove the connector from the working sensor, the fan should turn on. Check the wiring to this temperature sensor, as well as the contacts of relay K1, move this relay, clean the contacts. If this is the case, replace it with a new relay.
F2 (25 A) - heated rear window.
- Check together with fuse F11 and relay K2. If the rear window does not fog up, the heating element threads may have broken. Inspect all the threads and if you find a break, seal it with special glue or varnish, which can be bought at car dealerships for 200-300 rubles.
- Check the connection contacts at the terminals to the heating elements at the edges of the glass, as well as the switch on the dashboard and the wiring from it to the rear window.
F3 (10 A) - high beam, right headlight.
F4 (10 A) - high beam, left headlight.
- If the headlights do not shine on high beam, check the K7 relay and the headlight bulbs. The steering column switch, wiring or connectors may also be faulty.
F5 (10 A) - sound signal.
- If the signal does not work when you press the steering wheel button, check relay K8. The signal itself is located under the radiator grille; you can get to it by removing the plastic casing from above. Test it by connecting 12V voltage.
- If it doesn't work, try turning the adjusting screw, or replace it with a new one.
F6 (7.5 A) - low beam, left headlight.
F7 (7.5 A) - low beam, right headlight.
- When replacing lamps, be careful; there are separate lamps for the low and high beams, so they can be easily confused. It is better not to install lamps in high-power headlights; the reflectors may melt and the desired effect will not be achieved.
- Most low beam headlight problems that cannot be corrected by conventional means can be related to the light control module (LCM).
- The low beam relay is only available in cars equipped with a light sensor, it is located in the place of relay K1; on most cars this relay is not in the mounting block; the low beam circuit goes through the MUS block.
- It happens that the tracks in the block burn out; if there are problems, it is better to replace it with a new one.
- If the windshield wipers turn on spontaneously when the low beam is not working correctly, the problem is most likely in the windshield wiper control unit, located in the center of the dashboard, the topmost block, next to the radio, is best reached from the glove compartment, or by hand through the removed console covers at the feet.
F8 (10 A) - alarm signal.
- If the alarm does not work, also check relay K9.
F9 (25 A) - stove fan.
- If your stove does not work in any mode, the problem may be with the stove speed controller or with the engine. Check the stove motor by applying 12 V voltage directly to it.
- If it doesn't work, remove it, open the cover and check the condition of the brushes. If the stove does not work only in the first modes, but works in the last mode, most likely you need to replace the heater resistance, located under the hood on the fan scroll.
- The price of these resistors is about 200 rubles. Also check that the filter and all pipes are clean and that air flows normally into the stove.
- If the stove fan squeaks or turns with difficulty, try lubricating it.
- If the stove turns on and off, check the connectors and contacts in them, they could have melted or oxidized, in this case, replace the connector.
- If the car has an air conditioner, the thermal fuse may burn out; it is located near the additional resistance; the fan fuse in the configuration with the air conditioner is located under the hood in the power fuse box.
F10 (7.5 A) - instrument panel, interior lights, brake lights.
- If your instrument needles and gauges on the panel stop working, most likely the problem is in the connector that fits it.
- Check to see if it has fallen out and inspect its contacts. It may also be due to burnout of the tracks on the panel board. In this case, you need to disassemble the panel and inspect it. It can be easily disassembled by unscrewing the screws on top under the trim, on the bottom near the fuse cover and on the side.
- If your brake lights do not work, none of them including the additional interior light, most likely the problem is in the switch, which is located at the base of the brake pedal, check and replace it.
- If some of the brake lights work and some don't, the bulbs are most likely burnt out. To replace the lamp you need to remove the headlight. To prevent the lamps from burning out, replace them with better ones.
Location of Priora fuses under the hood
- F1 (30 A) – power supply fuse for the electronic engine control system (ECM);
- F2 (60 A) – fuse for the power supply circuit of the engine cooling system fan (power circuit), additional relay (ignition relay), rear window heating, electrical package controller;
- F3 (60 A) – fuse for the power supply circuit of the electric fan of the engine cooling system (relay control circuit), sound signal, alarm signal, ignition switch, instrument cluster, interior lighting, brake light, cigarette lighter;
- F4, F6 (60 A) – generator power circuit fuses;
- F5 (50 A) – fuse for the power supply circuit of the electromechanical power steering
Relay and fuse box for Halla air conditioner
- right electric fan power supply fuse (30 A);
- fuse for the power supply circuit of the left electric fan (30 A).
- right electric fan relay;
- additional relay (sequential activation of left and right electric fans);
- left electric fan relay;
- heater fan power supply fuse (40 A);
- compressor power supply fuse (15 A);
- heater fan relay;
- compressor relay.
Panasonic air conditioner relay and fuse box
Checking and adjusting the operation of the mechanism
Regular preventative examinations will help you avoid sudden breakdowns. According to the manufacturer's recommendations, these are carried out at least once every 3 months. Unscheduled, you will need to look under the hood if the Priora's light has become dim. Regardless of the reason, a key at “6” is required for operation.
The car owner must check the air pressure in the tires. Even a slight deviation from the norm will negatively affect the efficiency of lighting devices. After this, the vehicle is installed on the most level surface of the garage. Lada Priora is placed at a distance of 5 m from a smooth wall. The further procedure is as follows:
Direct adjustment is carried out in the vertical and horizontal plane. In order to adjust the position of the light spot as accurately as possible, you should first turn on the low beam. The setting is made for each headlight separately. In order to comply with technical recommendations, when adjusting one of the headlights, the second one must be covered with material that does not transmit light.
If you don’t have one at hand, then you just need to turn off the power. Only after this does the transition to high beam adjustment take place. The lighting adjustment process ends with a mandatory check. A vehicle rolls out of a garage onto the street at night.
The high beam turns on, and then the low beam. A visual inspection is carried out. If asymmetry of the light spots is noted, then the adjustment is made again. In some cases it is necessary to visit a service station.
Repair and replacement of individual elements
Wear of headlight elements, physical damage or short circuit are only a small part of the reasons why the luminous flux is lost or noticeably weaker.
In this case, you need a “10” key and a Phillips screwdriver. To begin, carefully remove the negative terminal from the battery and the front bumper. Only after this Lada Priora is ready for work:
- release the lock;
- disconnect the bundle of wires;
- Unscrew the screw for the side mounting of the headlight on the Priora;
- remove 4 clips;
- Unscrew the housing fastening bolts.
Installation of new lighting elements is carried out in the reverse order. If problems arise with the rear lights, then their dismantling on the Priora is carried out in a similar way. In some cases, the functionality of the lighting element can be restored by replacing one of the parts. For example, if the headlight burns dimly, then the bulb needs to be replaced.
To complete this task you will need an industrial hair dryer. It works at a distance of 2-4 cm from the surface of the headlight. The duration of thermal exposure is 30 seconds. After the industrial hair dryer is turned on, it is necessary to act in a circumferential manner on the entire surface of the top cover. The result of the work done will be melted sealant. It does not cause technical malfunctions, while allowing you to carefully remove the lighting element on the Priora.
How to make DRLs on a Priora with your own hands from high beam headlights using a relay?
the DRL-30 electronic makes it possible to turn on the high-beam lamps at only 30% of their full power. This is enough to use them as running lights. They turn on when the ignition is on, the lights are off and the handbrake is released. The relay is installed in place of the standard microprocessor device and connected using the following technology:
- Disconnect the ground terminal from the battery.
- Open the cover of the relay block, remove the high beam relay K7 and install DRL 30 in its place.
- Unscrew the screws securing the instrument panel frame and remove the instrument cluster by pressing the latch.
- Route the relay wires under the panel so that the ends are level with the instrument connector.
- Connect the wires using connecting elements according to the diagram.
- Connect the connector and ground terminal of the battery.
After completing the work, you should check the operation of the electronic relay in the following sequence:
Technically difficult stages
More difficulties will arise at the next stage. If the luminous flux is lost due to a short circuit, you will need to remove the glass from the headlight. It is fixed using a fairly dense sealant, so you will need an installation cutter. A standard industrial hair dryer will not work here. Prolonged thermal exposure will destroy the structure of the lighting element.
Use a cutter to carefully pry off the surface of the glass and slowly cut the sealant. After this, both parts are separated. The work is completed by replacing the failed element and restoring the integrity of the headlights.
To check, you need to turn on the lighting device, making sure that it is working correctly. If for some reason the high or low beam does not turn on, you need to make sure the wires are connected correctly.
Correctly setting the headlights is the key to the safety of the driver and other road users. The slightest failure will significantly impair road visibility at night. In many ways, this contributes to an increase in the number of possible accidents.
Having problems with the wires
headlight is off. To eliminate this malfunction, you will need to check all the blocks through which the relay and fuse box are connected. The possibility of poor-quality connections, as well as oxidation of the contacts, is possible, which leads to an increase in the current flowing in these places and their heating. To eliminate such malfunctions, it is enough to stretch all the pad fastening elements, having first thoroughly cleaned all contacts with sandpaper or a file.
It would be a good idea to check the button that turns on the headlights, since its contacts are also susceptible to oxidation, and they may also have a poor-quality connection. Practical experience suggests that it is with this button that you should start troubleshooting and only after making sure that it is fully operational, continue searching for the reason why the low beam does not work.
Why does the low beam on the Lada Priora not light up, and what fuse is it?
As practice shows, problems with low and high beams on products of the Volzhsky Automobile Plant are observed quite often. According to statistics, this problem occurs in every third car. However, most owners do not know what to do in such a situation and turn to a car service, while the breakdown is usually easily fixed and does not require any special knowledge.
In this article we will tell you what to do if for some reason the low beam on your Priora does not light up at all or only one headlight does not turn on. To be fair, it is worth noting that this kind of breakdown occurs not only in domestic cars, but is often found on foreign cars as well. For the most part, there is only one problem - wear and tear of one or more elements of the lighting system.
Replacing the Priora light module
Replacing the ICC is quite simple. The first step is to remove the fuse box cover by turning the three latches 90 degrees and pulling the cover towards you.
Then unscrew one screw that secures the light block and take it out. We disconnect the chip and install the new MUS in the reverse order.
Light module chip
The cost of a light module may vary depending on the vehicle configuration; the initial price of a module is from 1000 rubles and above.
Please note that it is best to buy an ICC with your own sample and depending on the configuration of your car. If you install a module from a car of a different configuration, its correct operation is not guaranteed. Most often, when installing a non-native module, the side lights remain constantly on.
Source: enginehack.ru
Causes
If the far one is on, but the near one does not turn on, first of all, you should suspect the following malfunctions:
- destruction of the light bulb filament;
- fuse blown;
- electrical circuit problems (broken wiring).
Of course, there are more reasons, but the above are typical. All of them can be eliminated very easily.
It is important to remember that every car owner should have a multimeter in their car - this device is easy to use and allows you to detect most problems in the electrical network.
Burnt out light bulbs
The halogen lamps that the headlights are equipped with have two filaments. The first is responsible for the high beam, and the second for the low beam.
If one of them is destroyed, the other will most likely burn normally. This is important to keep in mind when starting to troubleshoot.
Burnout is also indicated by the following circumstance - for example, there is no light in the left headlight, while the right device is working normally.
Replacing the light bulb is very easy. The procedure is as follows:
- open the hood;
- remove the headlight protection;
- disconnect the power connector;
- unfasten the fixing springs;
- take out the lamp;
- insert a new one.
It is important to remember that halogen appliances require careful handling. Traces of fat on the flask usually lead to their rapid failure - therefore, before installation, the glass surface is wiped with alcohol or acetone.
It is necessary to wear gloves when working with lamps - this will keep their surface clean.
Lamp burned out
Naturally, if any light source does not turn on, the first thing that comes to mind is that the light bulb has burned out. The design of car lamps is such that the low beam may indeed be absent, but the high beam remains available. Halogen lamps have two filaments. It is quite possible for one of them to rupture - in this case, the light for which it is responsible will be absent.
To replace the bulb, the services of an auto electrician are not required. It is enough to open the hood with the ignition off, remove the protective box on both sides of the headlight, pull out the contact group, disconnect the spring clips, remove the burnt out bulb and install a new one.
A small detail: the flask should be wiped with alcohol before installation, otherwise it will instantly burn. It is also not recommended to handle the bulb with unprotected hands: there is always some greasy and damp secretions on them, which can damage the light bulb. The best way to do this (replace the lighting) is with a dry cloth or rag.
Circuit breakers
This is the second most common cause of low beam failure. If the left headlight does not light, then it is worth inspecting fuse F6.
Where is he located? It is located in a block hidden under the steering wheel. To get there, you need to remove the protective cover, which is held in place by three clips.
When the right light fixture does not function, look at fuse F7.
The protective devices mentioned above have the same rating - 7.5 amperes. The easiest way is to replace the damaged fuse with a working one. If one is not at hand, then as a temporary measure a “bug” is installed, that is, a jumper made of any suitable piece of copper or aluminum wire. In a pinch, even regular foil will do.
It is worth knowing that frequent blown fuses clearly indicate problems with the wiring. As a rule, a malfunction here often occurs due to the fact that the insulation of current-carrying elements is frayed. It is important to find the defective location and insulate it as soon as possible, since the occurrence of a short circuit leads to a fire in the vehicle.
Wiring
First of all, when the low beam stops working, check the reliability of the connections in all the blocks involved in the low beam electrical circuit. Their contacts often simply oxidize and after cleaning the problem is eliminated. Sometimes also due to vibration the connectors come loose and the circuit breaks.
The contact groups need to be cleaned of oxides - a needle file or a school eraser is suitable for this. A nail file will also work (this tool will probably be found in any car lady’s purse).
Sometimes the light does not come on because the button that turns it on fails. There are contacts inside it, which, in turn, can also be damaged by corrosion. It is not difficult to verify that the starting device has failed - just disconnect the wires from it and short-circuit them. If this is the reason, then the light will come on. There is no point in repairing a button that has become unusable - it is easier to replace it with a new one.
How to turn on headlights without MUS
You can turn on the headlights when the light control module has failed by dismantling and removing the chip from it. On the chip you need to find contacts numbered 10 and 12 and insert a copper wire jumper between them. After installing the jumper, the headlights turn on when you turn the ignition key.
Contacts between which you need to insert a jumper (marked with a red circle)
This method will help you get to the nearest service station in the evening. It is not recommended to use the jumper for an extended period of time as it does not provide proper contact and can cause heat to build up, putting you and your vehicle at risk.
Other reasons
Sometimes the high or low beam fails due to the fact that the car owner thoughtlessly makes changes to the electrical circuits of his vehicle, without having a proper understanding of their operation. If such interference took place, then you should carefully analyze your actions and check what exactly was done wrong.
When none of the above recommendations helped fix the problem, it would be better to contact a car repair shop, since, most likely, attempts to search will lead to an even worse situation. In this case, you will subsequently need much more money to eliminate the fruits of your inept actions.
