The old Chevrolet Niva has a problem with the brakes, maybe check yours too!
Niva Chevrolet. Personal experience. Reworking the brake system.
ADJUSTMENT OF THE SORCERER NIVA 21214
Which is better ABS or Sorcerer for NIVA. Operation of the Brake Force Regulator. Pressure regulator. Brakes. 2h
Chevy Niva brakes
Adjusting the sorcerer on front-wheel drive vases
Is a rear brake pressure regulator (sorcerer) necessary or not?
Brake pressure regulator "KOLDUN" VAZ, LADA
Posted by admin: at the request of Salavat
Description: The dimensions are as follows: length - 3763, width - 1100, height - 1229 mm. The wheelbase is 2723 mm. Ground clearance 161 mm. The car is equipped with a hybrid power unit. The 4-cylinder engine is equipped with a system that provides engine power output. There are 4 valves per cylinder. The diameter of one cylinder is 71 mm, the piston stroke is 70 mm. The engine crankshaft accelerates to 7000 rpm. Maximum torque is maintained up to 4000 rpm.
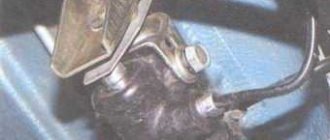
Watch the VIDEO about removing the sorcerer on a Chevrolet Niva.
Criticism of a car owner named Khetag: Clear operation of all controls. Pleasant interior. Reliability. Reliability. Reliability.
Category: Repair yourself
Original name: . . ?? . . ?? . Niva
Release date: April 12, 2022
Laughter on topic: I come home and say at the entrance: “They sell these cucumbers at the vegetable store!” 9 cm in diameter and half a meter long!” (I show with my hands). Everyone was surprised... And the deaf grandmother said: “The main thing is... so that you get married later!”
Why do you need a pressure regulator?
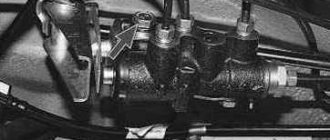
— Pressure regulator 8 (Fig. A ) adjusts the pressure in the hydraulic drive of the brake mechanisms of the rear wheels depending on the position of the body relative to the rear axle beam, i.e. depending on the load on the rear axle of the vehicle. It acts as a restriction valve that automatically cuts off the flow of brake fluid to the rear brakes and reduces the likelihood of rear wheel skidding when braking.
Chevrolet Niva brake system
The machine has two independent brake systems - a hydraulic working system and a mechanical parking system.
The parking brake is applied when stopping to keep the vehicle in place. It uses brake pads only on the rear wheels and is operated by a lever located in the cabin. When the lever is placed in the upper position, the brake pads move apart and are pressed tightly against the inner surface of the brake drums, firmly fixing their position. The movement of the pads is ensured by a cable and drive levers.
- “right front-left rear” contour;
- “left front-right rear” contour;
- master cylinder reservoir;
- hydraulic brake master cylinder;
- vacuum booster;
- brake pedal;
- rear brake pressure regulator;
- parking brake cable;
- rear wheel brake;
- parking brake adjusting tip;
- parking brake lever;
- front wheel brake
Checking the tightness of the hydraulic drive
Check the tightness by external inspection:
from above from under the hood;
from below the car (on a lift or inspection ditch);
from the sides with the wheels removed.
Inspect the part of the hydraulic drive that operates under pressure with an assistant. He should press the brake pedal 4-5 times (thereby creating pressure in the hydraulic drive) and hold it pressed while you inspect the hydraulic drive. Inspecting a hydraulic drive that is not under pressure is acceptable, but less effective.
If connections are found to be leaking, tighten the clamps, plugs, and nuts.
Replace hoses and pipelines that have mechanical damage.
If wheel cylinders are found to be leaking, repair or replace the cylinders.
You will need: a 15mm wrench, a special wrench for pipeline fastening nuts or a 10mm wrench.
This is what a special wrench for pipeline fastening nuts looks like.
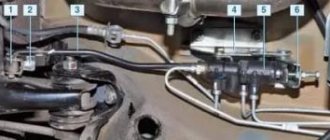
1. Inspect the master cylinder reservoir,
2. connections of pipelines with the main cylinder.
3. Check for fluid leaks at the connections of the brake pipes with tees,
4. with pressure regulator. If a leak is detected, tighten the brake pipe ends (use a special wrench).
5. Carefully inspect the brake hoses. They should not have cracks, tears or signs of wear. Press the brake pedal all the way. If swelling appears on the hose, it means that the hose braiding threads have broken and it needs to be replaced.
6. Check the fastening of the pipelines in the holders. Loose or broken holders lead to vibration and, as a result, pipeline failure.
Read also: Tis bmw online Russian
7. Check the condition of the pipelines on the rear axle housing.
8. Inspect the connection of the hose with the wheel cylinder, the air bleeder of the front and rear brakes.
Chevrolet Niva car diagram
Cars of the Chevrolet Niva family represent a further development of the concept of domestic comfortable SUVs, which began with the VAZ-2121 Niva car. They differ from their predecessors in modern design, increased comfort and more advanced design.
VAZ-2123 (Chevrolet Niva) and its modifications are all-terrain passenger cars with a monocoque station wagon body, produced by the GM-AVTOVAZ joint venture. The number of doors is five, the number of seats is five for the L and GLS modifications or four for the LX and GLX modifications.
The engine is located longitudinally in front. The transmission is made according to the scheme of permanent all-wheel drive with a locking center differential and a range of multipliers. The front suspension is independent lever-spring, the rear suspension is dependent spring.
Also interesting: Which is better to choose Chevrolet Niva or Renault Duster
The front wheel brakes are disc, the rear wheels are drum brakes, and the LX and GLX versions are equipped with an anti-lock braking system (ABS). The ZF power steering is equipped with a steering column position adjustment device.
Chevrolet Niva cars of the 2005 model year are available in the following trim levels.
25 January 2022 LadaOnline 55 777
The Niva 4x4 SUV has a hydraulic, dual-circuit braking system. One circuit is connected to the brake cylinders of the front and rear wheels, and the other only to the front ones. This scheme allows you to maintain vehicle braking even if one of the circuits fails.
1 – master cylinder reservoir; 2 – main cylinder; 3 – front brake circuit pipeline; 4 – front and rear brake circuit pipeline; 5 – front wheel brake mechanism; 6 – vacuum booster; 7 – parking brake lever; 8 – brake pedal; 9 – front parking brake cable;
The front brakes of the Niva 4x4 are disc brakes with a three-piston floating caliper. The upper piston operates from one circuit (together with the rear wheels), the two lower ones - from another. Brake discs are cast iron. The minimum permissible thickness of discs is 9.5 mm, pads - 1.5 mm.
The rear brakes are drum brakes (aluminum, with cast iron rings), with two piston cylinders. The nominal inner diameter of the drum is 250 mm, the permissible diameter is 251 mm.
Design of the working hydraulic system
In order to increase the reliability and safety of control, the hydraulic brake system of the Chevrolet Niva is built according to a dual-circuit diagonal design. The first hydraulic drive circuit drives the front right and rear left wheels, and the second drive drives the front left and rear right wheels. Thus, controllability is maintained in the event of failure of one of the hydraulic drive circuits. The hydraulic braking system includes:
- brake pedal located in the cabin under the driver’s right foot;
- vacuum pedal pressure booster;
- master cylinder with reservoir for filling brake fluid;
- dual-circuit hydraulic drive pipeline;
- working brake cylinders of the rear and front wheels;
- pressure regulator with actuating lever.
The pressure of the driver's foot on the brake pedal is increased by a vacuum booster and transmitted to the piston of the master cylinder, which, moving, compresses the brake fluid. The fluid pressure increases and is transmitted through pipelines to the working cylinders of the front wheels and the brake pressure regulator of the rear wheels. The pistons of the front calipers and rear working cylinders, under pressure from the brake fluid, extend and press the Chevrolet Niva brake pads to the surface of the discs and drums, slowing down their rotation.
Possible malfunctions of the regulator
In general, there are few malfunctions that can occur in the sorcerer. These include:
- Valve jamming;
- Misalignment of position;
- Brake fluid leaks.
A deregulated sorcerer can be adjusted. You can determine the need for adjustment by the behavior of the car when you press the brake. If the regulator is set incorrectly, the car starts to toss to the side.
If the valve jams or fluid leaks, the mechanism must be replaced. Theoretically, it can be repaired. However, the process of such repairs is complex and expensive, which makes it unprofitable.
Removal and installation
To replace the sorcerer on a VAZ 2110, you need wrenches 13 and 10. Instead of 10, a special wrench for brake fittings is very desirable; it is more gentle than a regular open-end wrench when handling soft copper nuts due to the large contact area.
Replacing a wheel bearing in a garage is not difficult if you have the necessary tools on hand. The work procedure is presented here:
This type of wrench is similar to a socket wrench, but has a slot for inserting a tube into it and high jaws. You need about half a liter of brake fluid and 4 rubber plugs for the brake hoses.
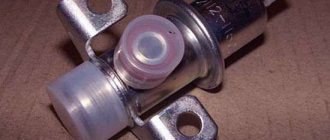
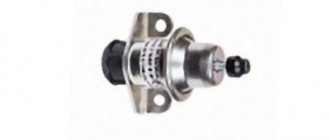
RTD (sorcerer) Fenox
Purpose and operation of the pressure regulator
The pressure regulator (“sorcerer”) is designed to prevent the car from skidding during sudden braking. This is achieved due to the fact that the rear wheels begin to brake after the front ones. The time delay is provided by the regulator lever, which, when the car brakes sharply (the nose drops and the rear rises), pulls the piston in the regulator cylinder and closes the fluid supply channel to the working cylinders of the rear wheels.
In this case, the rear brakes do not work and the wheels spin until the rear of the car drops back. Thus, the “sorcerer” automatically regulates the fluid pressure in the rear cylinder path in inverse proportion to the load on the rear axle. In addition, it increases the braking efficiency of an empty vehicle when the load on the front axle is higher than on the rear.
If the car does not brake effectively, skids or is pulled to the side, then this is a reason to check and adjust the regulator.
This work must be carried out at every maintenance and after repair of the rear suspension.
The rear brake regulator is also a sorcerer. adjustment
The rear brake regulator is also a sorcerer. adjustment
Post by David » 20 Dec 2022, 15:51
Hi all! I want to share with everyone some information regarding the rear brake adjuster and what to do with it. 1. You can’t refuse it, no matter how much they tell you. He's really needed. Any imitation of his work will not lead to anything good. 2. It can be adjusted in two ways, but the best is the second, which I will describe below. 3. After 7 years of operation on the car, it is better to replace the regulator with a new one, as well as the brake pipes and reservoir pipes under the hood. Because over time they swell, expand and lose their elasticity and rigidity. 4. Torsion thrust for some sources should be set at a distance of 15 cm, for others - 20 cm.
Method one: hang up the rear axle so that the wheels hang. Next, we unscrew the bolt that secures the long part of the torsion bar to the bridge, or more precisely to the X-shaped bracket. We take out the small silent block and bushing from the round eye of the torsion bar so as not to lose it. Loosen the two bolts on the bracket of the regulator itself. Then we take a ruler, rest it against the body or floor of the car, mark 15 cm there, bring the long, free part of the torsion bar to this mark, fix it, and someone else (assistant) moves the regulator along the adjustment guide of the bracket until the regulator itself The torsion bar arm will not be positioned so that it barely touches the adjuster piston. Once this is done, the regulator can be tightened with two bolts, and the torsion bar itself can be returned and secured in its place. From me personally: such a scheme and such a plan of action is not possible purely physically, because at this distance and ruler from the floor, it is not possible to adjust the torsion bar and the regulator itself so that the torsion bar barely touches. Tested by me personally. There won't be a miracle.
How to replace the brake pressure regulator Niva Chevrolet
The pressure regulator (Fig. 1) regulates the pressure in the hydraulic drive of the rear wheel brakes depending on the load on the rear axle of the vehicle
It is included in both circuits of the brake system, and through it brake fluid flows to both rear brake mechanisms.
The regulator has four chambers: A and D (Fig. 1) are connected to the main cylinder, “B” to the right, and “C” to the left wheel cylinders of the rear brakes.
In the initial position of the brake pedal, piston 2 is pressed against pusher 20, which, under this force, is pressed against seat 14 of valve 18.
In this case, valve 18 is pressed away from the seat and a gap “H” is formed, as well as a gap “K” between the piston head and seal 21.
Through these gaps, chambers “A” and “D” communicate with chambers “B” and “C”.
When you press the brake pedal, fluid flows through the gaps “K” and “H” and chambers “B” and “C” into the wheel cylinders of the brake mechanisms.
As the fluid pressure increases, the force on the piston increases, tending to push it out of the housing.
When the force from the liquid pressure exceeds the force from the elastic lever, the piston begins to move out of the body, and after it, under the action of springs 12 and 17, the pusher 20 moves together with the sleeve 19 and rings 10. In this case, the gap M increases, and the gaps “H” and "K" decreases.
When the gap H is completely selected and valve 18 isolates chamber D from chamber “C”, pusher 20, together with the parts located on it, stops moving after the piston.
Now the pressure in chamber “C” will change depending on the pressure in chamber “B”.
With a further increase in the force on the brake pedal, the pressure in chambers D, B and A increases, piston 2 continues to move out of the body, and sleeve 19, together with sealing rings 10 and plate 11, moves towards plug 16 under increasing pressure in chamber B.
In this case, the gap M begins to decrease. Due to the decrease in the volume of chamber “C”, the pressure in it, and therefore in the brake drive, increases and will be practically equal to the pressure in chamber “B”.
When the gap K becomes zero, the pressure in chamber “B”, and therefore in chamber C, will increase to a lesser extent than the pressure in chamber A, due to throttling of the liquid between the piston head and seal 21.
The relationship between the pressure in chambers “B” and “A” is determined by the ratio of the difference in the areas of the head and piston rod to the area of the head.
If the brake circuit “right front – left rear brake” fails, the sealing rings 10, bushing 19 under the fluid pressure in chamber “B” will move towards the plug 16 until the plate 11 stops in the seat 14.
The pressure in the rear brake will be regulated by a part of the regulator, which includes piston 2 with seal 21 and sleeve 7.
The operation of this part of the regulator in the event of a failure of the said circuit is similar to the operation with a working system.
The nature of the change in pressure at the outlet of the regulator is the same as with a working system.
If the brake circuit “left front – right rear brake” fails, the pressure of the brake fluid forces the pusher 20 with the bushing 19 and sealing rings 10 toward the piston, pushing it out of the housing.
The M gap increases and the H gap decreases. When valve 18 touches seat 14, the increase in pressure in chamber “C” stops, that is, the regulator in this case works as a pressure limiter. The achieved pressure is sufficient for reliable operation of the rear brake.
There is a hole in housing 1, closed by plug 24. Liquid leakage from under the plug when it is squeezed out indicates a leak in rings 10.
Chevrolet Niva Manual
Chevrolet Niva Checking the functionality and adjusting the rear brake pressure regulator drive
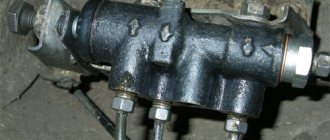
We check the performance of the pressure regulator in accordance with the maintenance regulations every 30 thousand km. We carry out the work with an assistant, placing the car on an overpass or inspection ditch. We inspect the pressure regulator and its drive parts. They must not be damaged. Leakage of brake fluid from the regulator and its brake pipes is not allowed.
The plug in the hole in the regulator body must be recessed by 1–2 mm (otherwise the regulator is faulty).
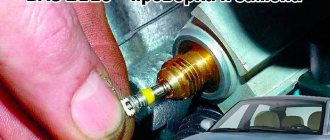
After shaking the elastic lever, we check for the absence of play in the connections of the lever with the rod and the axis of the regulator drive lever (play is unacceptable). When you press the brake pedal...
...the pressure regulator piston should move out of the regulator body by 1.6–2.4 mm, compressing the spring. If, when you press the pedal, the regulator piston does not move, or moves by an amount greater or less than specified, the pressure regulator or its drive is faulty. Adjusting the pressure regulator drive is necessary when loosening its mounting bolts, as well as after any work related to removing the rear axle beam, replacing springs and shock absorbers of the rear suspension. To adjust the drive, we hang up the rear axle of the car.
Using a 10mm wrench, unscrew the nut of the bolt securing the tip of the elastic adjuster lever to the rear axle bracket rod, holding the bolt from turning with a wrench of the same size.
Having removed the bolt, we disconnect the elastic lever of the regulator drive from the rear axle bracket rod.
Using a 10mm wrench, loosen the locknut of the adjusting bolt, holding the bolt from turning with a wrench of the same size.
Raising or lowering the end of the elastic lever, we install it at a distance of 200 ± 5 mm from the body floor (we measure the distance with a ruler, the end of which rests on the body floor).
To fix the lever at the required distance, insert a wooden block of the required length between it and the rear axle beam.
Holding the elastic lever in this position, use a 10mm wrench to turn the adjusting bolt until it touches the piston lever 1 so as to ensure contact between the regulator drive lever 2, into which the adjusting bolt is screwed, and spring 3. Holding the adjusting bolt with the wrench, tighten the locknut. We connect the elastic lever of the regulator drive with the rod on the rear axle beam. With a correctly adjusted regulator, when braking on a horizontal section of a paved road, the front wheels should lock a little earlier than the rear ones.
Source
"CHEVROLE-NIVA"
By the way, before testing tires on cars without ABS, each time we slightly adjust the regulator taking into account the road condition (snow, ice, asphalt), ensuring that the rear wheels lock a little later than the front ones. Let's not break tradition. Our Shniva found the gap between the cheeks of the regulator to be 16 mm, which was adjusted using a stop screw.
Several brakings, and the braking distance from 80 km/h for a car with a partial load is determined: 34.4 m. With a full load... 33.6! Almost a meter shorter! At the same time, the driver noted a heavier pedal and rapid heating of the brakes, which required cooling before each measurement. Let’s remember these parameters and make adjustments to the “sorcerer” adjustment. First, let's reduce the gap to 8 mm. Now the regulator significantly limits the pressure in the rear brakes, transferring almost all the hard work to the front ones.
Braking has become more difficult, keeping the front wheels from skidding is not so easy - they lock very sharply and the car, naturally, loses control. However, the result, to our surprise, is the same as in the basic version: 34.4 m. At full load, you have to press the pedal much harder, the front brakes begin to overheat. The result is 37.8 m. This is 4.2 m more than with the basic adjustment (33.6 m).
Checking and adjusting the free play of the brake pedal
If the pedal free play is greater than normal, the effectiveness of the brakes decreases due to a decrease in the full pedal travel. If there is excessively little or no free play, spontaneous braking and heating of the brakes may occur.
Read also: How to cover a car ceiling
The free play of the brake pedal when the engine is not running should be 3–5 mm.
You will need: a stop, a ruler, a 19mm wrench.
1. Place a ruler next to the pedal with its end on the floor, oriented in the middle of the pedal pad. Mark on a ruler or remember the position of the pedal.
2. Press the pedal with a stop (you can use the handle of a hammer), moving it until a noticeable increase in the moving force appears. Using a ruler, determine the movement of the pedal, which will be the free play of the pedal.
3. If the free play of the brake pedal is outside the permissible limits, adjust it by loosening the brake light switch mounting nut and
4. by screwing or unscrewing the switch in the bracket (if there is a large free stroke, screw the switch into the bracket towards the pedal; if there is little or no free stroke, turn the switch out of the bracket, moving it away from the pedal).
5. Check the free play of the brake pedal again. Tighten the brake light switch mounting nut.
6. Connect the wires to the switch (if they were disconnected) and check the operation of the brake lights.
To avoid damaging the wires and connectors of the brake light switch, we recommend disconnecting them.
"LADA KALINA"
We set the regulator so that the rear is slightly late in locking the wheels. With this setting and partial load, the car needed only 27 m to stop. Fully loaded - 29.5 m. There are slight difficulties in preventing the front wheels from skidding. We reduce the gap in the regulator to zero - the half-empty Kalina stops after 31.8 m. The braking distance increases by 4.8 m, accompanied by a sharp blocking of the front wheels. The loaded one slows down after 35.2 m, the deterioration is even greater - 5.7 m! The pedal effort is increased and the brakes become noticeably hot.
Now we move the adjuster so that the rear brakes work as efficiently as possible. At partial load, the rear wheels suddenly lock and the car drifts off course—you have to release the pedal. On the verge of blocking it is very difficult to brake. The result is 30 m, which is 3 m worse than the “norm”. Full load gave a result of 26.9 m, which is 2.6 m better than the base (29.5 m). There are no comments regarding deceleration control. At the basic position of the regulator, the braking distance increases with increasing load. At partial load the spread of results is 4.8 m, so the base position is most effective. When you deviate from it in any direction, the braking distance increases.
On a fully loaded vehicle, depending on the position of the regulator, the spread of the braking distance is 8.3 m.
The best results, as on the Niva, come with increasing pressure in the rear brakes.
However, on a slippery road, even in smooth turns, early locking of the rear wheels is possible, leading to a skid.
And at partial load, with the regulator position different from the base one, the braking distance only increases.
Sorcerer VAZ 2114. Design and replacement with a tee
“Sorcerer” is a special device designed to regulate braking forces. After pressing the brake pedal, the Renault Logan wheels front and rear receive different loads. The reason is that the force of gravity is mostly concentrated on the front axle. Because of this, the risk of brake locking and loss of vehicle control increases. The sorcerer's task is to regulate the braking forces. First, the brakes are applied on the front wheels, and after 2-3 seconds - on the rear wheels.
What happens if you remove the sorcerer?
Some car owners remove the distributor with the confidence that in this way they reduce the braking distance. This is mistake. After such actions, the brakes are applied synchronously. As a result, the risk of an accident increases due to the fact that the driver of the car behind does not have time to react to the braking.
Thus, the presence of a brake force distributor is important for the car, and it is prohibited to remove it from the system. Moreover, adjusting the sorcerer is a precise procedure that requires experience and knowledge from the performer.
Examination
The operation of the VAZ-2109, 2110 and other AvtoVAZ models is checked on the move, in closed areas. To do this, accelerate the car to a speed of 40 km/h and sharply press the brake. The rear wheels should lock 1/2 second later than the front wheels.
The wheels are monitored by an assistant located outside the car. If wheel locking occurs noticeably later or does not occur at all, and also if the rear axle is locked simultaneously with the front, the sorcerer adjustment procedure is repeated.
To increase the response time of the rear brakes, the gap between the adjuster and the bracket is increased; to shorten it, it is reduced accordingly.
please explain why this regulator number 8 is needed? From the master’s cursory explanations, I understood that for some reason there was no need to use it. that something in the brakes will be worse. and that because of this regulator you may not brake in time. How does everything work in practice and does it need to be restored?
Rules of service
Before you begin adjusting the force distributor of the Renault brake system, inspect the device. Remember that during operation, dirt, water and snow enter the device, which gradually wear out the device and cause corrosion. In this case, rust covers the body of the device and the spring, so it is unlikely to do without treating the device.
A general inspection of the Logan brake force distributor is done as follows:
- Clean everything from rust.
- Remove the old rubber casing.
- Clean out old and useless grease from under the boot.
- Clean all elements from dirt, and then apply a new lubricant.
Give preference to high-quality lubricants that have good characteristics (primarily, they are resistant to high temperatures). As an option, a special Blue composition is suitable, which is in demand among Renault car owners.
In addition to the part that regulates the force and improves the braking mechanism, Blue can be used to treat the brake calipers on the front wheels. As an alternative, the use of Litol or other lubricant is allowed. The main thing is that the composition reliably protects the mechanism from corrosion.
Lubrication process:
- Raise your Renault on a lift.
- Find the brake force distributor (it's easy to find from below).
- Find the boot retainer. Take a screwdriver and pry up the ring (you can use a regular knife).
- Remove the boot, remove the grease and install a new one.
- Remove traces of rust using a special brush equipped with metal bristles. Proceed carefully to avoid damaging the rubber band.
How to adjust the sorcerer on a VAZ 2114
To correctly distribute workloads between front and rear drives, it is necessary to manually adjust the operation of the device. The adjustment principle is as follows. The preliminary gap between the end of the piston and the plate is from two to three millimeters, but in your case this parameter must be determined “experimentally”. To make more precise adjustments, you need to move the regulator along the bracket.
The clearance parameters are selected depending on the behavior of the wheels in each specific case. For example: - There is no skidding of the rear wheels - we reduce the gap. — When triggered early (skidding), we increase the distance.
How is the adjustment made?
As mentioned above, finding the sorcerer when inspecting the bottom is not difficult. The device is located somewhere in the middle between the front wheels of a Renault car. One of the most difficult tasks for many is adjusting the unit and setting up its performance. It is believed that such actions allow you to correctly distribute the force and achieve more effective braking.
"Wizard" OR ABS?
And yet, such a regulator on a modern car is a legend of deep antiquity. It cannot compete with ABS, especially if the driver is an average driver who does not know extreme driving techniques. The curb weights of Kalina and Priora are almost the same - the difference is less than a percent. Using the same tires that were on the Kalina, the Priora with ABS showed the best results under any load. Moreover, no dosing of force on the brake pedal was required, you just press with all your heart, and the electronics do the rest.
Test results:
Lada
“The sorcerer”, or, according to the catalogue, the pressure regulator in the brake drive, it was not for nothing that people received such an apt nickname: no one really knows how it works, but, they say, being faulty, it can present an unpleasant surprise - make the car dance in an emergency. braking. This is where the insidiousness of the “sorcerer” lies: during normal operation, without braking to the floor, its work or inaction is practically not felt, but when its help is especially needed, it may not come. The pistons have soured, the rod or drive lever has broken off, or you installed a new one instead of a faulty regulator, but for the time being you don’t know that the unit is defective or out of adjustment... How dangerous is this?
Let’s check in our experiment how “witchcraft” affects the effectiveness of the brakes at partial and full load of the Chevrolet Niva and Kalina and what the owner should be wary of if he does not monitor the condition of the regulator. We can simulate a malfunction, from excessive activity to complete inaction, with adjustments. Let us remind you that the regulator’s task is to reduce the braking force on the rear axle, reducing the likelihood of skidding when braking to skid. The regulator, mounted on the body and connected by an elastic lever to the axle beam, limits the pressure in the rear brake mechanisms depending on the position of the rear of the body relative to the road, that is, on the vehicle load.
What is the meaning of the "sorcerer" design?
The main purpose of the brake force regulator on the Chevrolet Niva is to distribute the braking force between the front and rear circuits, depending on the vehicle load. In simple words, if the car is moving under load or without it, then the rear brake circuit during braking is activated a little later than the front, thereby preventing skidding.
The sorcerer’s goal is sacred, but in road conditions, this mechanism becomes overgrown with dirt, corrodes and fails.
We adjust the sorcerer after installing the spacers
What is done
the pads have been changed, all the springs have been changed, the rear brake cylinders have been changed, the guide pins have been changed along with the boots on the front brake calipers and coated with graphite grease, everything under the drum has been amazingly cleaned) the sorcerer (brake force regulator) has been adjusted, the brake fluid has been changed
Reasons for replacement
the ass didn't slow down, the rear cylinders were leaking, the pads were almost dead, they were shorter than puss =)
Key Points
don’t forget to lower the handbrake if you get into the drums =) and loosen it to the roots, don’t crumble the drum! because he is fragile. even cast iron (like mine) can be crumbled. when I knocked them down I used a rubber mallet. If you don’t have one, a block will help! don’t wear the anthers on your fingers upside down =)) don’t forget to buy a cotter pin at the store. Because of this little thing, work can stop. if the new pads do not come together completely, thereby preventing the drum from getting dressed, then read below.
If the drum doesn't fit
then you need to grind down the small seat on the boat for the spacer bar between the pads or sharpen the bar itself (I chose this option, the photo shows how much I ground) loosen the broken handbrake and pull out the cable
How I regulated the sorcerer
The car must stand on 4 wheels. We open the trunk and sit down on this bar in front of our eyes and jump. to sag the suspension. We climb under the car and find the sorcerer. We spray it everywhere with a stick or a brake pad to make it easier to move. Loosen the bolt by 13. Take a pre-purchased 2mm drill and set the gap (you can by eye). Tighten the bolt by 13. That is. The smaller the gap, the sooner the ass will slow down. If the gap is 0, then you can fly away in winter))) It is necessary to adjust the sorcerer if something has been done to the suspension, because he “casts a spell” looking at the beam.
"Chevrolet Niva"
“Chevrolet-Niva” “Chevrolet-Niva”
Third condition - we reduce the influence of the regulator, increasing the gap from the original one by 8 mm, that is, we set it to 24 mm. When there are two people in the car, the braking distance remains virtually unchanged - 34.3 m. However, now the rear wheels are blocked. But at full load the braking is very effective, the deceleration is easy to control and the result is a record: only 30.8 m!
- In the normal position of the regulator, as the vehicle's weight increases, its braking distance decreases - this affects the more complete use of the traction weight by the rear wheels.
- The best braking is at full load, when the regulator minimally limits the pressure in the rear brakes.
- However, at partial load this can lead to skidding. The high center of gravity and short wheelbase of the Shnivy contribute to a significant redistribution of mass during braking, therefore, at partial load, the contribution of the rear axle to braking is small.