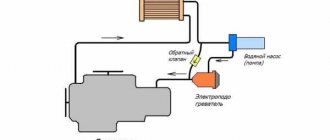
An engine pre-heater is equipment designed to heat the power unit and guarantee its starting in severe frost. After activating the system, the engine warms up and starts easier.
Additionally, preheating is used to create comfortable conditions in the cabin when the engine is not running.
Below we will consider what types of such devices there are, we will present the best pre-start heaters for 220 / 12 V with and without a pump, according to user reviews.
We will separately highlight the recommendations of specialists on the selection of equipment.
TH "Avtopogreva.net"
Wholesale sales department: +7(9044)914140 tel/fax (Call within Russia is free) tel/fax 625051, Russia, Tyumen, 30 Let Pobedy, 113a k2,
Email / ICQ: 596374251/ Skype: podogrevavto
"Gazelle" with two doors UMZ-42160 (Installation kit No. 30)
Operation
INSTRUCTIONS FOR IMPLEMENTATION
Prepare: tools – wrenches; screwdriver (for tightening clamps); knife (for cutting hose); coolant (coolant) in the amount of 1 liter; container for draining coolant.
Preparing the heater for installation
Cut the rubber sleeve into lengths: output sleeve L2 = 880 mm; inlet hose L1 = 450 mm. Secure the bracket to the heater with studs through the bushings using washers and nuts (see Appendix PRM-0030, Fig. 1). Place the sleeves on the corresponding heater pipes and secure the connections with clamps.
Drain the coolant. Unscrew the nut on the frame, supporting the bolt from below (on the left side along the direction of the car, Fig. 2, arrow A).
Attach the bracket with the heater to the frame, as shown in Fig. 2; in this case, it is necessary to ensure a slight (5-10 degrees) downward slope of the heater inlet pipe. The heater should not touch any parts (frame, brackets, etc.) of the vehicle in order to avoid damage to the housing during vehicle operation.
Installation of the heater inlet tee
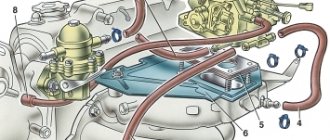
Cut the hose connecting the expansion tank and the lower radiator hose (see Fig. 3 callout B). Install tee 8311 with clamps into the hose section with the side outlet directed towards the heater. Secure the tee with clamps. Fig.2, 3 callout B.
Installation of the heater outlet tee
Cut the hose connecting the additional electric pump to the thermostat housing in the place shown in Fig. 4 callout D. Install a tee in the cut, with the side outlet directed towards the heater. Secure the tee with clamps.
Connection of the heater to the cooling system
Install a spring in the upper part of the outlet hose and connect it to the outlet of the tee installed in the section of the hose from the electric pump to the thermostat housing. Crimp the connection with a clamp. Secure the hose in the place indicated in Fig. 4, callout D, to prevent it from getting under the fan blades and onto the generator belt. Pour 250 ml of coolant into the heater through the inlet sleeve. Place the inlet hose with a clamp onto the outlet of the tee connecting the expansion tank and the lower radiator hose. Secure the connection with a clamp (it is possible to adjust the length of the sleeves to eliminate kinks). Secure the position of the sleeve with a strap through the protective hose (Fig. 2 arrow B) Fill the cooling system.
Fixing the network cable
The power cable should be laid and secured with fastening straps to ensure its safety from mechanical damage, as well as to exclude possible contact with moving and heated parts of the engine.
Check connections for coolant leaks and repair if present. Install the removed elements when preparing the vehicle for installation. Start the engine for 3-5 minutes, and after stopping the engine, add coolant to the required level.
Checking the heater operation
Turn on the heater to a 220 V network (after a few seconds you will hear the noise of the heating coolant), check the heating of the outlet hose. After 3-5 minutes, turn off the heater.
ATTENTION! The heater can be operated only after the engine has warmed up to operating temperature (the thermostat must be open) and the efficiency of the interior heater has been checked. This must be done to eliminate air locks in the cooling system.
We are on social networks - join us!
Location: Tyumen, 30 Let Pobedy, 113a k2
Types of antifreeze heaters
All devices of this type are divided into two main types:
- Autonomous - which are distinguished by the presence of an additional unit responsible for storing energy; also in more advanced models there is an additional battery, which eliminates damage to the main one. This is the choice of people who love complete comfort or do not have their own garage. They have only one drawback - if the device does not have its own battery and is charged from the main one, it significantly reduces its service life.
Battery heater
- Non-autonomous - such devices have access to an external power source from a 220 Volt network. Among the disadvantages, it can be noted that if you do not have a garage with an outlet, the operation of this device will turn into a living hell. One of the positive aspects that deserves attention is that this type of device does not damage the battery, is much more powerful than its autonomous counterpart and warms up the car faster.
Electric heater
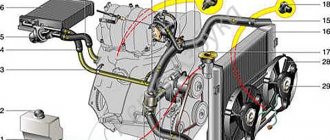
Design of the cooling system for UMZ-4213 and UMZ-4216 engines on UAZ and GAZelle vehicles.
To increase energy performance, improve fuel efficiency, reduce toxicity and noise, models with an integrated microprocessor fuel injection and ignition control system were developed on the basis of the UMZ-421 carburetor engine: the UMZ-4213 engine for UAZ cars and the UMZ-4216 engine for GAZelle cars. The design of the cooling system on the UMZ-4213 and UMZ-4216 is somewhat different, since it has differences in the connection diagram of the expansion tanks and heating radiators.
General design of the cooling system of UMZ-4213 and UMZ-4216 engines on UAZ and GAZelle vehicles.
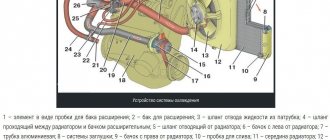
The cooling system is liquid, closed, with forced circulation of liquid and an expansion tank, with liquid supply to the cylinder block. Includes a water pump, thermostat, water jackets in the cylinder block and cylinder head, radiator, expansion tank, fan, connecting pipes, as well as body heating radiators.
For normal operation of the UMZ-4213 and UMZ-4216 engines, the coolant temperature must be maintained within plus 80-90 degrees. It is permissible to operate the engine for a short time at a coolant temperature of 105 degrees. This mode can occur in the hot season when driving a car with a full load on long climbs or in urban driving conditions with frequent accelerations and stops.
Design of the UMZ-4213 engine cooling system on a UAZ vehicle.
Design of the UMZ-4216 engine cooling system on a GAZelle car.
Operation of the cooling system of UMZ-4213 and UMZ-4216 engines on UAZ and GAZelle vehicles.
Maintaining normal coolant temperature is carried out using a two-valve thermostat TS-107-01 with a solid filler. When the engine warms up, when the coolant temperature is below 80 degrees, a small circle of coolant circulation operates. The upper thermostat valve is closed, the lower valve is open.
The coolant is pumped into the cooling jacket of the cylinder block by a water pump, from where, through holes in the upper plate of the block and the lower plane of the cylinder head, the liquid enters the head cooling jacket, then into the thermostat housing and through the lower thermostat valve and connecting pipe to the inlet of the water pump. The radiator is disconnected from the main coolant flow.
For more efficient operation of the interior heating system when circulating liquid in a small circle, and this situation can be maintained for quite a long time at low negative ambient temperatures, there is a throttle hole with a diameter of 9 mm in the liquid outlet channel through the lower valve of the thermostat. Such throttling leads to an increase in the pressure drop at the inlet and outlet of the heating radiator and more intense circulation of liquid through this radiator.
In addition, throttling the valve at the liquid outlet through the bottom valve of the thermostat reduces the likelihood of emergency overheating of the engine in the absence of a thermostat, since the shunting effect of the small circle of liquid circulation is significantly weakened, so a significant part of the liquid will go through the cooling radiator.
Additionally, to maintain the normal operating temperature of the coolant during the cold season, UAZ vehicles can have shutters installed in front of the radiator, with which you can regulate the amount of air passing through the radiator.
When the liquid temperature rises to 80 degrees or more, the upper thermostat valve opens and the lower valve closes. The coolant circulates in a large circle through the radiator.
For normal operation, the cooling system must be completely filled with liquid. When the engine warms up, the volume of liquid increases, its excess is pushed out due to increased pressure from the closed circulation volume into the expansion tank. When the temperature of the liquid decreases, for example after stopping the engine, the liquid from the expansion tank, under the influence of the resulting vacuum, returns to a closed volume.
On UAZ vehicles with a UMZ-4213 engine, the expansion tank is directly connected to the atmosphere. The regulation of fluid exchange between the tank and the closed volume of the cooling system is regulated by two valves, inlet and outlet, located in the radiator plug.
Owners' opinions
Reviews of Gazelles with Cummins engines show that many purchased this car because of the desire to have a diesel engine. Some were confused by the production in China, but given the reputation of the American company, they still purchased the car. Buyers are not disappointed; the engine met their expectations. There are few negative reviews; some honestly indicate that this or that problem arose due to improper use.
Owners of new Gazelles with Cummins describe their first impressions, in which they note that the car is not inferior to foreign cars of a similar class, but costs much less. Pay attention to the good engine thrust, low noise and vibration levels even after a cold start. After a short period of operation (a month or two), they write about the absence of oil and coolant leaks. The engine has no loose mounts and is in excellent condition. Owners of cars that have undergone maintenance note the convenience of changing the oil, which does not require removing the engine protection, as well as the constant availability of consumables. Prices for them and for maintenance are quite affordable. Some authors with longer experience in operating a Gazelle with a Cummins engine indicate that they have never used the warranty during its entire period of validity (two years). Efficiency is also confirmed - fuel consumption is 10–12 liters per 100 km. Post-warranty repairs, if you have to do them, are also not too expensive.
Gazelle stove diagram
Models and their characteristics
Longfey electric heaters are divided into series. The models included in each of them differ in performance characteristics.
The manufacturer offers customers a choice of series:
"Little Q"
Heaters of this series have a square shape with parallel pins. In terms of power they come in 1.5 kW, 1.8 kW and 2.0 kW. The pump capacity for all models is 8 l/min. Designed for insertion into a small circle of the cooling system. Installed in a small circle of the cooling system;
"Little Dragon"
Models in this series are rectangular, the terminals are located perpendicularly. It includes three models, identical in power and performance to the previous series;
"Decepticon"
A series of powerful rectangular heaters (2.0 kW, 2.5 kW and 3.0 kW) and perpendicular pin arrangement. At the same time, their pump performance is still the same 8 l/min;
"King"
Includes only one model - 3 kW. This heater has a rectangular shape with terminals installed perpendicularly. Electric pump capacity – 8 l/min. It is placed in a small circle of the system;
"Brothers"
The series also consists of one 3-kilowatt barrel-shaped model. Its leads are installed perpendicularly, the pump pumps 8 l/min;
In general, all models differ from each other only in the power of the heating element and the shape of the body.
Sources
- https://kaminguru.com/obogrevatel/ustanovka-nagrevatelja-dvigatelja-lunfej.html
- https://jmc-motors.ru/cms.php?id_cms=109
- https://remcat.ru/stati/ustanovka-lunfey/
- https://radir.ru/ustanovka-podogrevatelya-lunfej
- https://remont-avtovaz.ru/ustanovka-podogrevatelya-lunfej/
[collapse]
How the stove works in Gazelle Business
For correct diagnostics and repairs, it is necessary to know the structure and operating principle of the heater in order to diagnose a breakdown or carry out repairs at the first sign of a malfunction, preventing failure of the entire unit as a whole. Most faults can be predicted by indirect signs and their progression can be prevented. To do this, you need to know and understand what each element is responsible for and what the principle of its operation is.
Car cooling system
In Gazelle Business the stove is an integral part of the engine cooling system. When the engine operates, a large amount of heat is generated that must be removed. Heat is released due to fuel combustion and from rubbing surfaces. If the heat is not removed, the engine will heat up very quickly and fail. The cooling system has two circuits (small and large circle), they are separated by a thermostat. When the liquid is cold, it circulates in a small circle, and when it warms up, it circulates in a large circle. This allows you to quickly reach operating temperature and not overheat. During the warm season, heat is released into the atmosphere, and when cold weather sets in, part of the heat is spent on heating the cabin.
Heating
After we have figured out how the cooling system works, we can move on to heating the interior. The heater circuit on a Gazelle car is identical to the heaters of other cars that have a liquid-cooled engine. Fluid can circulate through the heater core whether the thermostat is open or not. For better heating, the heater fluid comes from the hottest part of the engine (the cylinder head). Therefore, on an engine that has not yet reached operating temperature, warm air still comes out of the deflectors. The heater has a valve in its design that either allows liquid to flow into the radiator or dumps it back. And the temperature of the air leaving the deflectors depends on how much it is open. The valve position is adjusted from the heater control panel. The faucet is equipped with an electric drive that changes the position of the valve. It is also possible to change the blowing intensity and direction from the control panel. The intensity is controlled by a motor with an impeller, the rotation speed of which changes the intensity of the airflow.
Changing the position of the dampers changes the direction of the airflow (to the face, to the legs, to the chest, to the glass). The heated coolant from the engine enters the heater radiator through the highways, causing it to heat up. At this time, air blown by a fan passes through it. Then it passes through air ducts, the dampers of which are open. The hot air then enters the car interior and heats it. To repair or diagnose a malfunction of this equipment, there is an electrical diagram that shows all the components of the electrical devices. And in case of breakdowns or incorrect operation of devices, it is necessary to read it in detail in order to understand where it is powered from and how the failed device is regulated.
When you know the principle of operation and the device, it is much easier to navigate in case of breakdowns. After all, to successfully carry out repairs, it is important to understand the cause of the malfunction, otherwise the repair will not be completed successfully. For correct diagnosis, it is also important to understand the algorithm of operation of the entire mechanism as a whole. Currently, a driver does not have to know how to repair a car; there are service stations that can handle repairs of any complexity. But it happens that a breakdown catches you on the road, and there is no opportunity to use the services of specialists. This is when knowledge of the structure of a car and its mechanisms comes in handy. When you know how the Gazelle stove works, then if a malfunction occurs on another car, it will be easier to navigate when repairing or diagnosing, since in all cars they are almost the same, with the exception of small nuances. And you can easily diagnose the problem.
Troubleshooting
Most problems arise due to overloads, the use of low-quality fuel, oils and coolants, untimely maintenance or illiterate operation. Reviews from owners often contain complaints about poor performance of fuel equipment, especially injectors. To prevent problems, it is necessary to change filters and oil on time, and fill up diesel fuel at reliable gas stations (unfortunately, there are cases of fuel being diluted with water). If problems occur frequently, you can add an additional separator to the fuel system.
This is what the injectors look like for Cummins isf 2.8
- Black smoke from the muffler;
- Knock in the engine;
- “Swimming” speed at idle;
- Power reduction;
- Difficulty starting the engine.
You cannot operate an engine with faulty injectors; this can lead to serious consequences. If more fuel enters the cylinders, the piston and valves begin to melt; if less, the engine is difficult or impossible to start, and power drops significantly.
Despite all the filters, there may be water in the fuel. In this case, problems arise with the fuel pump. Metal shavings are supplied along with diesel fuel, which leads to damage to the nozzles. Before replacing, you should determine the cause of the malfunction and, if necessary, flush the entire fuel system. Another common malfunction is the pipe through which oil from the turbocharger drains bursts. This occurs due to vibration and leads to rapid loss of oil. The Gorky Automobile Plant admitted the mistake in the design and announced the free installation of a special bracket to protect the tube. If your car does not have this, contact any official GAZ dealer. Before that, you will have to check whether oil leaks have appeared on the drain tube.
Sometimes malfunctions occur in the turbine of the Holset HE211W compressor. The reasons may be a lack of oil, frequent operation at extreme conditions, overheating or accidental damage to the compressor. Signs include bluish smoke and the characteristic smell of burnt oil. The turbine should be replaced with an original one; if you use another one, new problems may arise. Another problem is that the gap between the radiator and the intercooler is too small, which becomes clogged with dirt, leaves and all sorts of debris.
Gap between radiator and intercooler of Cummins isf 2.8 engine
Heavy loads on the engine sometimes lead to rotation of the liners and crankshaft. Seizures form on the journals, and defective parts will have to be replaced. If this happens, try to purchase original spare parts. Reviews mention frequent contamination of the electronic gas pedal contacts. Signs of a malfunction include poor response to changes in pedal position and jerking when driving. Remove the pedal and clean the contacts with alcohol.
Adjustment of valves
Adjusting valves on a Cummins isf 2.8 engine
A sign of a problem is a characteristic knocking sound when the engine is running. For normal operation, the clearances should not exceed 0.38 mm in the intake valves and 0.76 in the exhaust valves.
The manufacturer recommends checking every 80 thousand km, but if knocking occurs, adjustment should not be delayed. It is necessary to set the gaps for the intake (short) valves to 0.25 mm, for the exhaust (long) valves - 0.5 mm.
The short ones are for the intake valves, and the long ones are for the exhaust valves.
- Remove the breather tube.
- Disconnect the fuel lines from the injectors.
- Loosen the nuts and remove the fuel line (rail).
- Remove the clamps of the fittings and injectors.
- Remove the injectors.
- Remove the valve cover.
- Check and adjust (if necessary) clearances.
- Reassemble everything in reverse order.
To check the clearances, you need to turn the crankshaft until the hole on its pulley coincides with the same one on the engine block, the protrusions of the camshaft cams on the first cylinder should be directed downward.
Camshaft Cummins isf 2.8
Rotate the crankshaft 360 degrees and also check and adjust the remaining clearances: 2 OUT, 3 OUT, 4 OUT, 4 OUT.
Exploitation
In order for a Gazelle with a Cummins ISF2.8 engine to serve for a long time and without breakdowns, you must follow some rules. One of the most important is to fill up with fuel that is appropriate for the season. Before starting the engine, check the oil and coolant levels. Make sure that the lighting and alarm devices, the windshield wiper and the windshield washer system are in working order. Before driving, check the condition of the wheels.
Start the engine (use preheater if necessary) and allow it to warm up. For some time after starting to drive, you should drive in lower gears without heavy loads so that the oil in the manual transmission and rear axle warms up. This is especially important at low air temperatures. You can gradually increase the load and use all gears.
Be careful when driving through deep puddles and immediately after washing your car. If water gets into the wheel brakes, their effectiveness drops sharply. In this case, you should move at low speed and slow down to heat the mechanism and evaporate the water.
To avoid unnecessary loads on the engine and transmission, you should not drive for a long time at low engine speeds (less than 1500 rpm), it is better to switch to a lower gear. For the same reason, it is desirable to move smoothly, without sudden acceleration and braking.
After completing your trip, do not stop the engine immediately, let it idle for a minute or two to evenly reduce the temperature of the engine and turbocharger. This is especially important after high loads of movement.
According to reviews from Gazelle owners with Cummins, when treated with care, the engine works well and problems rarely arise. But, unfortunately, there are no ideal mechanisms; problems sometimes occur.
Security measures
Finally, a little about the safety rules when using such a preheater:
- Do not leave the equipment turned on for a long period of time. For normal warming up of the engine, 1-1.5 hours is enough;
- If an extension cord is used for connection, its wires must have a cross-section appropriate for the load;
- If the equipment is used on a car parked on the street, you need to mark or fence off the area through which the power cable runs.
For ease of use of the device, it should be connected to a power outlet through an adapter with a timer, on which you can set the time for turning the heater on and off.
Related articles:
P O P U L A R N O E:
How to protect the body of your car from corrosion without overpaying a car mechanic.
Since I am an avid motorist, I am interested in everything related to cars. Every car owner is faced with the task of protecting the car body from corrosion. I had read about this original method before; back at the beginning of the last century it was used to protect ship hulls. But this is the first time I have encountered the commercial application of such a miracle technology. While reading advertisements in newspapers, I came across an advertisement for “Electrochemical protection of the car body against corrosion.” After reading the short article, I decided to find out more in the car service center itself. Read more…
Source
