Installation kits have been developed for all heaters of Leader JSC. They can come in a single package with a heater or be sold separately. The installation kit is a set of all necessary parts for installation. Everything is at hand! No need to run to the store and urgently look for spare parts! Each installation kit is supplied with detailed installation instructions with photographs. By following its requirements, you can install the heater yourself. As practice shows, even self-installation takes only 2-4 hours (even faster for professionals at service stations). You can also find instructions for installing heaters right now on the website. Select the installation kit number or car brand you are interested in.
Heating severs operates from 220 V. It is connected to the engine cooling system, fluid circulation occurs by changing the heating temperature of the fluid.
Severs M 1.5 kW, At -30, heats engine coolant to 50 degrees in 25 minutes
Prepare: tools – wrenches; screwdriver (for tightening clamps); sealant type "Avtosil" (for sealing threaded connections); socket head for size 32; knife (for cutting hose); coolant (coolant) in the amount of 1 liter; container for draining coolant.
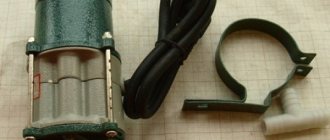
Cut the rubber sleeve into lengths: output sleeve L2 = 480 mm; inlet sleeve L1 = 190 mm.
Secure the bracket to the heater with studs through the bushings using washers and nuts
Place the sleeves on the corresponding heater pipes and secure the connections with clamps.
Install the spring from the kit into the inlet sleeve.
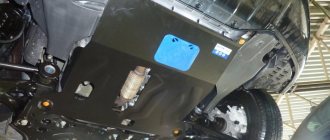
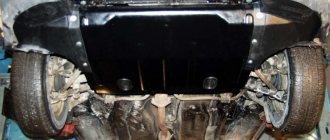
Remove the Gazelle Next engine protection.
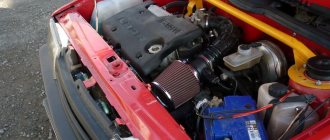
Disconnect the air intake pipe.
Provide access to the plug in the engine head: disconnect the inlet hose from the engine; Unscrew the fastening of the interior heater pipe at the rear of the engine; disconnect the interior heater pipe hose from the engine; Unscrew the oil dipstick tube.
History of GAZelles with HBO
Gazelles with gas equipment are a common sight on domestic roads, but until recently these were cars on which gas equipment was installed parallel to the standard gasoline fuel system by third-party companies.
And only in the last year have GAZelles with standard gas equipment installed at the manufacturing plant begun to appear. Why was GAZ in no hurry with the mass production of gas-powered cars? The thing is that to switch to gas, you need not just the installation of gas equipment, but also an engine designed specifically to run on natural gas or a propane-butane mixture. So for the production of gas-powered trucks, it was necessary to develop new units, components and spare parts for GAZelle, which did not yet exist.
This issue was first resolved in 2011, when, on the basis of the well-known Ulyanovsk engine UMZ-4216, engineers of the GAZ Group and the Research and Production Enterprise Inzh-KA created the UMZ-421647 bi-fuel gas-gasoline engine. The new engine was shown in 2012, and from the same time the production of cars equipped with this power plant began. It was this engine that became the basis for the new generation of gas GAZelles, which are now becoming increasingly widespread.
Adaptation of “Gazelle Business” and “Gazelle Next” for Cummins ISF2.8
Compared to the standard UMZ-4216.70 engine, the American diesel engine has significantly greater torque and a different thermal regime.
Standard gazelle engine UMZ-4216.70
- Cooling system. An electric intake air heater has appeared (used if necessary). It also reduces the emission of white smoke in the first minutes after the engine starts running. A new fan with support was installed, hoses were replaced.
- Transmission. The manual transmission is housed in a more powerful crankcase, for smooth movement of the car the gear ratios have become different, the shafts and gears are made of steel with increased strength. Hoerbirger synchronizers and SKF bearings are installed. The clutch has acquired an additional idle damper.
- Steering. A ZF power steering pump and a V-belt pulley are used.
- Exhaust system. An updated receiving tube and vibration compensator were installed.
- Electrical equipment. The package includes a larger capacity battery (75 Ah). A new control unit has appeared that remains operational in severe frosts.
- Fuel system. The possibility of manual pumping of fuel is provided.
- Minibuses are equipped with an autonomous Eberspacher interior heater (for other models this is an option).
Pre-heater with pump
Mitsubishi L200 WOLF Logbook Binar 5D compact, 2nd day of installation
Heating pre-starting devices for an engine with a pump (pump) are remote electric heaters operating from a 220-volt power supply. Unlike simple electric heaters, devices with a pump are more efficient, since the heated coolant circulates in the system forcibly, heating occurs faster and more evenly.
Pump heaters are produced both in Russia and abroad; among Russian models the following are known:
- Start-TURBO;
- "Severs+";
- "Atlant" made in Tyumen.
Among foreign devices, the most popular products are those of the following companies:
- "Longfei" (China);
- OWL (Germany);
- Defa (Norway);
- Calix (Sweden).
Electric heaters with a pump can have a power from 0.7 to 3 kW; for a car, the power is calculated depending on the volume of coolant in the car’s cooling system.
Installation features
Installation features differ for different types of engine heaters; much depends on the manufacturer and design features of the devices, the type of fuel used, and the car model.
As a rule, the kit already includes everything that is necessary for installation, and instructions are also included.
IMPORTANT: the material below is not an instruction; it will only allow you to become familiar with the general principles of installing heaters in order to guide the reader for further work.
Electrical 220 V
Before installation, you need to inspect the kit, study the instructions and find a nearby outlet.
The last factor forces you to do the work closer to the garage or other place where it is possible to connect to 220 V.
Below we will look at installing a self-made engine heater.
The general algorithm is:
- Assemble the kit. Most often it includes heating elements, fittings and fittings.
- Buy a one-inch (standard) pipe tee. It can be found at any plumbing store. The heating element, which is needed to heat the unit, is also sold here. It is better to take a heater with a built-in 1500 W thermostat.
- Install the heating element at the end of the tee, and connect a 10-centimeter pipe at the other end. It is needed to warm up the system faster.
- Place plugs on the unused outlet and the end of the pipe for subsequent connection of the pipes.
- Connect the resulting part to the coolant circulation system in the car. To do this, find the exit point to the stove and install a homemade unit into the gap.
- Connect a wire of the required cross-section to the heating element contacts.
- Install a pump so that when the power unit is turned off, the working fluid continues to circulate.
The pump is installed in front of the heating element using an open relay or using a simple socket. Use a pump from Gazelle, which has better functionality and won’t put a big dent in your pocket.
If you do not have the skills to perform such work, you can buy a ready-made kit.
In this case, there should be detailed installation instructions inside. Please note that in the absence of experience and independent work, there is a high risk of harming the car engine.
Installation of autonomous liquid
Let us separately consider the installation features for autonomous engine heaters using the Webasto Thermo Top as an example.
INSTALLATION OPTIONS:
The insertion of the pre-heater into the cooling system of the car is carried out using one of the methods discussed below:
- Universal. It involves connecting the heater into the gap between the engine and the interior heating radiator. The advantage of this method is that it quickly heats the air inside the machine. The antifreeze entering the engine cooling jacket has time to cool down. Consequently, it takes more time to heat up the power unit.
- Installation in a secondary circuit. It involves inserting the heater into the gap between the engine and the heater radiator with parallel placement of the check valve. This feature allows you to place the heater closer to the radiator to reduce heat loss.
- Installation in a large liquid circuit. This design option contributes to better heating of the interior with minimal losses in a large circuit.
- Installation oriented towards the primary heating of the engine. More suitable for quickly heating the unit.
Installation of preheater for UAZ 31512 engine
Heating diesel fuel Tips for motorists
Task: install a homemade 220V engine preheater on a UAZ 31512
Progress of work on installing a homemade 220V pre-heater for UAZ 31512
Installed it on the frame below the coolant drain valve from the block. I had some kind of bracket on the frame on purpose. I pulled him towards him with a clamp.
View from the radiator side
Instead of this tap, a fitting with a K1/4 thread was screwed in - this is the cold coolant intake.
At first I planned to route the supply of heated coolant also to the block, there is a plug for the K1/2 fitting above the oil filter...
It should have turned out something like this
...but I couldn’t unscrew it and had to connect it through a tee to the hose that goes from the block head to the heater radiator.
I filled in the drained antifreeze + about another liter. Started it up and cleared the system of air locks. In the morning, after the frost at night, I turned it on for heating. after 2-3 minutes the hose from the heater is already warm. After half an hour the block head got hot. after 40 minutes there is the block itself. Now the engine starts with half a turn, as in the summer, and does not stall for the first 5 seconds, as before.
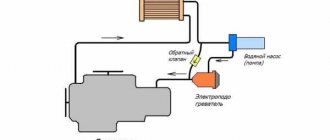
Heater operation diagram
Heater operation diagram. Stolen from the Internet
Added 02/02/2015
I am posting a short report on the work. The temperature after spending the night is -4.7 degrees. It was possible not to heat it, but the device was at hand and decided to take a measurement.
We turn on the heater and after 20 minutes the block head warms up to +12.2 degrees
in another 10 minutes - up to +21.9 degrees
In total, in half an hour the temperature of the block head rises by 26.6 degrees. In severe frost, of course, it takes a little longer to warm up, but it’s enough for easy starting.
Result: work on installing the engine pre-heater for UAZ 31512 has been completed
https://www.drive2.ru/l/2865635/
next article:
Stories from our readers
Pay special attention to the safety of operating the engine preheater. Sibir-M Devices from domestic manufacturers of the Sibir-M, Alliance, Strat brands have a lower cost with identical technical characteristics. Engine preheaters can be autonomous devices for heating the engine, which can work independently, and dependent devices, which cannot heat the engine without outside help. This article will talk about dependent engine heating, or more precisely about heating the engine from an outlet. In this article we will look at heating the engine using a heating element from V.
And at the same time - about the features of operating the pre-launch mechanism. Therefore, before purchasing a pre-heater, you should first of all clarify what brand of car it is suitable for.
One of the advantages is its low cost and simplicity, so almost anyone can install such a device on their car; Autonomous pre-heaters, the operation of which does not require a connection to the electrical network.
Its size ultimately affects the rate of circulation of the flow. After these manipulations, the unit is considered completely ready for use. Additionally, the Webasto B engine preheater is available with fans. All variations of the electric engine preheater for diesel or gasoline operate according to the same principle: the power cord is connected to an outlet; the heating element receives electricity and turns on, and the pump starts at the same time; the coolant circulating through the pipes receives thermal energy and heats up; The coolant passes through the engine hoses and head, thereby warming it up. Hi all! Their purpose is to maintain a certain temperature regime directly in the cylinder block. Installation of preheater start-m 1.5 kW on Ford Transit 2.5 turbo diesel
Is it profitable?
Suzuki SX4 4WD, 1.6 VVT, AT Logbook Atlant engine preheater with forced circulation 220 Volt part 2
But it is necessary to install HBO after carefully considering everything. GAZelle is a commercial vehicle, which means you need to know exactly when your investment will pay off. There are special calculators for calculations. But you can do everything manually.
So, installed on the GAZelle manufactured by Digitronic, for example, is intended for methane. Installation work on an injection engine will cost 50,000 rubles. The car's mileage per day is at least 400 km. Fuel consumption is 18 liters of fuel. The cost of 1 liter of gasoline in our country is about 35 rubles. 1 m 3 of methane costs only 9 rubles. So, if the car runs on gasoline, then the cost of fuel alone will be 2,160 rubles per day. And the cost of filling with gas will be a ridiculous 648 rubles. You can save about 1,500 rubles per day. Thus, the installed gas equipment on a GAZelle will pay for itself in a little more than a month or 13,000 km. Further savings will go to the budget.
Pre-heater 220V
Electric heating devices are among the simplest and most inexpensive, but their main drawback is that they are connected to a 220-volt network.
At its core, an electric heater is in many ways similar to an ordinary boiler; it can heat the engine to 90 degrees in 30 minutes. This type of heater has become widespread in Europe; for example, in Sweden or Finland, special 220-volt sockets are provided in car parks. In Russia, such a service is not developed; electric heaters are mainly used in private garages.
Pre-starting electric heaters can vary in design and degree of complexity. If the device is not equipped with a timer, then leaving it unattended is dangerous - you can not only overheat the engine, but also start a fire. All electric heaters are divided into types:
- remote (external);
- built into the cylinder block.
Pre-heaters built into the cylinder block
The structure of a “block” electric heater is very simple - it consists of a heating element, an electric wire and a plug. As a rule, such devices are low-power and, depending on the model, can consume an average of 400 to 800 watts. Advantages of a heater built into the cylinder block:
- warming comes from the engine itself, it occurs evenly;
- for its installation, hoses, fasteners and additional elements are not required - the design is simple, practically nothing can break here;
- Due to the low power, it is almost impossible to overheat the internal combustion engine, so such a device can be left unattended for a long time, for example, at night.
But electorate heaters with a timer are still more convenient - they are more economical, since when the engine is sufficiently warmed up, they are disconnected from the power supply.
Remote pre-heaters
Outdoor electric heaters are more common in Russia than “block” heaters. Here the device is inserted into the circuit using additional hoses; the heating element itself is more powerful: average electricity consumption is from 1 to 2 kilowatts; for trucks, 3 kW heaters are usually used.
Remote electric heaters are more complex in design; such devices additionally include:
- set of additional hoses;
- adapters;
- thermostat;
- various fastenings.
The pre-start electric heater can be either Russian or imported; there are systems with natural and forced circulation of coolant. There are also heaters with a bumper connector; they are very convenient to use, since when connecting the device there is no need to open the hood of the car.
Design of the cooling system for UMZ-4213 and UMZ-4216 engines on UAZ and GAZelle vehicles.
To increase energy performance, improve fuel efficiency, reduce toxicity and noise, models with an integrated microprocessor fuel injection and ignition control system were developed on the basis of the UMZ-421 carburetor engine: the UMZ-4213 engine for UAZ cars and the UMZ-4216 engine for GAZelle cars. The design of the cooling system on the UMZ-4213 and UMZ-4216 is somewhat different, since it has differences in the connection diagram of the expansion tanks and heating radiators.
General design of the cooling system of UMZ-4213 and UMZ-4216 engines on UAZ and GAZelle vehicles.
The cooling system is liquid, closed, with forced circulation of liquid and an expansion tank, with liquid supply to the cylinder block. Includes a water pump, thermostat, water jackets in the cylinder block and cylinder head, radiator, expansion tank, fan, connecting pipes, as well as body heating radiators.
For normal operation of the UMZ-4213 and UMZ-4216 engines, the coolant temperature must be maintained within plus 80-90 degrees. It is permissible to operate the engine for a short time at a coolant temperature of 105 degrees. This mode can occur in the hot season when driving a car with a full load on long climbs or in urban driving conditions with frequent accelerations and stops.
Design of the UMZ-4213 engine cooling system on a UAZ vehicle.
Design of the UMZ-4216 engine cooling system on a GAZelle car.
Operation of the cooling system of UMZ-4213 and UMZ-4216 engines on UAZ and GAZelle vehicles.
Maintaining normal coolant temperature is carried out using a two-valve thermostat TS-107-01 with a solid filler. When the engine warms up, when the coolant temperature is below 80 degrees, a small circle of coolant circulation operates. The upper thermostat valve is closed, the lower valve is open.
The coolant is pumped into the cooling jacket of the cylinder block by a water pump, from where, through holes in the upper plate of the block and the lower plane of the cylinder head, the liquid enters the head cooling jacket, then into the thermostat housing and through the lower thermostat valve and connecting pipe to the inlet of the water pump. The radiator is disconnected from the main coolant flow.
For more efficient operation of the interior heating system when circulating liquid in a small circle, and this situation can be maintained for quite a long time at low negative ambient temperatures, there is a throttle hole with a diameter of 9 mm in the liquid outlet channel through the lower valve of the thermostat. Such throttling leads to an increase in the pressure drop at the inlet and outlet of the heating radiator and more intense circulation of liquid through this radiator.
In addition, throttling the valve at the liquid outlet through the bottom valve of the thermostat reduces the likelihood of emergency overheating of the engine in the absence of a thermostat, since the shunting effect of the small circle of liquid circulation is significantly weakened, so a significant part of the liquid will go through the cooling radiator.
Additionally, to maintain the normal operating temperature of the coolant during the cold season, UAZ vehicles can have shutters installed in front of the radiator, with which you can regulate the amount of air passing through the radiator.
When the liquid temperature rises to 80 degrees or more, the upper thermostat valve opens and the lower valve closes. The coolant circulates in a large circle through the radiator.
For normal operation, the cooling system must be completely filled with liquid. When the engine warms up, the volume of liquid increases, its excess is pushed out due to increased pressure from the closed circulation volume into the expansion tank. When the temperature of the liquid decreases, for example after stopping the engine, the liquid from the expansion tank, under the influence of the resulting vacuum, returns to a closed volume.
On UAZ vehicles with a UMZ-4213 engine, the expansion tank is directly connected to the atmosphere. The regulation of fluid exchange between the tank and the closed volume of the cooling system is regulated by two valves, inlet and outlet, located in the radiator plug.
Pre-heater Binar
The manufacturer of pre-starting autonomous heaters under the Binar brand is the Samara holding company "Advers", the heating devices are designed to work with diesel and gasoline engines.
After turning on the heater, the fuel pump of the heating system supplies fuel to the glow plug of the device, where the air-fuel mixture is ignited, and the resulting heat heats up the coolant. With the help of a bleeder pump, coolant circulates, and according to this scheme, the engine and interior of the car are heated. As soon as the temperature reaches the desired value, the interior heater motor turns on and the interior of the car warms up.
The “Binar-5B” pre-heater model is suitable for passenger cars and commercial gasoline vehicles with an on-board voltage of 12 volts, “Binar-5D” is designed to work with diesel engines and is available in two versions - for a network with a voltage of 12 and 24 volts, its power is 15 kW .
Heaters "Start"
Most often, car owners give preference to Russian-made devices, including Start heaters, manufactured in Tyumen.
Such decisions are due to the fact that the products are of fairly good quality, cope with the assigned tasks, the devices are inexpensive, and installing them on a car is not difficult.
The range of heaters is quite extensive. It includes models with different capacities, providing both forced and gravity circulation of coolant through the system during operation.
In general, the operating principle of preheaters is very simple. There is a housing with leads for connection to the cooling system pipes. Inside this housing there are heating elements - heating elements.
In fact, the operation of the heater is no different from a conventional boiler. The only thing is that devices with a pump additionally have an electric motor with an impeller, which forcibly ensures the movement of the liquid. In gravity-flow devices, circulation is carried out due to temperature differences.
Operating principle of the pre-heater
Now almost no one uses water; antifreeze or antifreeze is poured into the cooling system. Many modern cars start quickly even in cold weather, but if the battery is weak or the ambient temperature is very low, the internal combustion engine (ICE) may not start. Preheaters are used to start the engine, and they come in different types.
Almost all pre-heating devices operate on the same principle:
- heating elements crash into the cooling system;
- Due to the heating boiler, the coolant is heated;
- The antifreeze is driven through the cooling system by a special pump - the engine warms up, and at the same time the car interior becomes warmer.
In a cold engine, the gaps between the rubbing parts are reduced, and friction reduces the service life of the engine. Therefore, the heater not only makes it easier to start a cold internal combustion engine, it also protects the parts of the power unit from premature wear. In addition, the starter operates in a more gentle mode with the heating system, which means it can last longer.
Modern devices can even work under the control of a cell phone; on many cars, the pre-heater is turned on by a timer on the instrument panel. Some cars are equipped with heaters from the factory.
TH "Avtopogreva.net"
Wholesale sales department: +7(9044)914140 tel/fax (Call within Russia is free) tel/fax 625051, Russia, Tyumen, 30 Let Pobedy, 113a k2,
Email / ICQ: 596374251/ Skype: podogrevavto
"Gazelle" with two doors UMZ-42160 (Installation kit No. 30)
Operation
INSTRUCTIONS FOR IMPLEMENTATION
Prepare: tools – wrenches; screwdriver (for tightening clamps); knife (for cutting hose); coolant (coolant) in the amount of 1 liter; container for draining coolant.
Preparing the heater for installation
Cut the rubber sleeve into lengths: output sleeve L2 = 880 mm; inlet hose L1 = 450 mm. Secure the bracket to the heater with studs through the bushings using washers and nuts (see Appendix PRM-0030, Fig. 1). Place the sleeves on the corresponding heater pipes and secure the connections with clamps.
Drain the coolant. Unscrew the nut on the frame, supporting the bolt from below (on the left side along the direction of the car, Fig. 2, arrow A).
Attach the bracket with the heater to the frame, as shown in Fig. 2; in this case, it is necessary to ensure a slight (5-10 degrees) downward slope of the heater inlet pipe. The heater should not touch any parts (frame, brackets, etc.) of the vehicle in order to avoid damage to the housing during vehicle operation.
Installation of the heater inlet tee
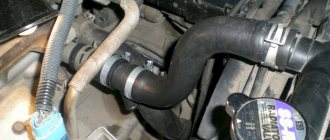
Cut the hose connecting the expansion tank and the lower radiator hose (see Fig. 3 callout B). Install tee 8311 with clamps into the hose section with the side outlet directed towards the heater. Secure the tee with clamps. Fig.2, 3 callout B.
Installation of the heater outlet tee
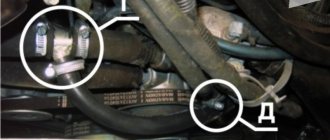
Cut the hose connecting the additional electric pump to the thermostat housing in the place shown in Fig. 4 callout D. Install a tee in the cut, with the side outlet directed towards the heater. Secure the tee with clamps.
Connection of the heater to the cooling system
Install a spring in the upper part of the outlet hose and connect it to the outlet of the tee installed in the section of the hose from the electric pump to the thermostat housing. Crimp the connection with a clamp. Secure the hose in the place indicated in Fig. 4, callout D, to prevent it from getting under the fan blades and onto the generator belt. Pour 250 ml of coolant into the heater through the inlet sleeve. Place the inlet hose with a clamp onto the outlet of the tee connecting the expansion tank and the lower radiator hose. Secure the connection with a clamp (it is possible to adjust the length of the sleeves to eliminate kinks). Secure the position of the sleeve with a strap through the protective hose (Fig. 2 arrow B) Fill the cooling system.
Fixing the network cable
The power cable should be laid and secured with fastening straps to ensure its safety from mechanical damage, as well as to exclude possible contact with moving and heated parts of the engine.
Check connections for coolant leaks and repair if present. Install the removed elements when preparing the vehicle for installation. Start the engine for 3-5 minutes, and after stopping the engine, add coolant to the required level.
Checking the heater operation
Turn on the heater to a 220 V network (after a few seconds you will hear the noise of the heating coolant), check the heating of the outlet hose. After 3-5 minutes, turn off the heater.
ATTENTION! The heater can be operated only after the engine has warmed up to operating temperature (the thermostat must be open) and the efficiency of the interior heater has been checked. This must be done to eliminate air locks in the cooling system.
We are on social networks - join us!
Location: Tyumen, 30 Let Pobedy, 113a k2
Installing engine heating using heating elements
Now it is necessary to consider an option to make the process of starting a car easier in cool weather. We are talking about a heater called a boiler or heating element. The main drawback of this type of device is the need to connect to a 220-volt outlet, but it is cheaper. In any case, the choice here will be purely personal. Which option is better is decided by the car enthusiast himself, taking into account his own needs and abilities.
In the production sector, there are now quite a few devices of this kind that can, of course, be installed on a VAZ-2110, so it is necessary to understand the general principle of their connection. In addition, there are no obstacles here, so you are unlikely to encounter any difficulties during the installation process.
Let's take a look at the installation process to see what you need. First you need to attach the electronic heater to the cylinder block - this is done using the supplied bracket. Next, you will need to unscrew the temperature sensor, then install a tee fitting in its place. Next, we insert a temperature sensor and a hose outlet into this unit, with the help of which heated antifreeze will be supplied from the heater.
Now there are only a few routine operations left to do. Namely, it is necessary to unscrew the drain plug on the cylinder block, installing instead a hose outlet where cool antifreeze will flow into the heater. That's basically all the rest. When installing the fuel metering pump, pay attention to the correct placement. To ensure reliable and long-term operation of this unit, it is recommended to install
narrow filter. When connecting, make sure that the fuel pipe fits into the fitting end-to-end.
Installation methods
The method of installing the device can be very different, so you should carefully study the instructions before starting installation. For many models, when inserting, it is necessary to strictly observe the placement of the device relative to the engine. Otherwise, the circulation of liquid (especially in gravity models) may be disrupted and the device will not be able to fully perform its functions.
Let's look at the most common methods of installing pre-heaters on cars. Since the “Start” model is structurally and externally identical to the “Start M” versions (the difference is only in size and power), we will consider installation using the example of the latter (they are often preferred by car owners).
Installation of the Start M engine heater according to the instructions is carried out in a parallel circuit. The peculiarity of this scheme is that antifreeze is supplied for heating from the cylinder block.
To do this, instead of a drain plug, a special adapter fitting is installed on the block. In some cases, a plug on the block can be used for supply (in some kits with a heater there is an identical plug, but with a hole for a fitting). The heated liquid is drained into the upper pipe leading from the radiator to the engine.
In this case, certain rules must be followed in order for the heater to function normally after installation:
Start Turbo heaters, since they have a pump in their design, do not require such harsh installation conditions, since liquid circulation is forced.
The installation method is selected depending on the purchased kit. Thus, the “Universal No. 1” set is intended for installation according to a sequential circuit.
This method implies that the device cuts into only one pipe - the supply or discharge of coolant to the heater radiator. That is, for installation it is enough to cut the required tube, install the heater into this cut and secure the connections with clamps. After this, you need to vertically attach the device using a bracket to the engine.
But the “Universal No. 2” set contains all the necessary elements for inserting into the system in both serial and parallel ways. As for the second method, some drain the heated antifreeze not into the upper radiator pipe, but into the pipe supplying the stove.
As for the “Start Classic” heater, its installation does not differ from the installation of the “Start M” model with only one difference - the device must be positioned vertically (with a slight tilt angle possible).
All other models - M1, M2, MP, since they are flow-through, they are installed only in a sequential manner and they cut into the pipes leading from the radiator.
RECOMMENDATIONS FOR INSTALLATION OF ELECTRIC ENGINE HEATER Severs 1.5 kW 220 V ON GAS CARS with engines 406, 405
This installation manual serves to ensure the installation of the SEVERS heater (103.3741) and its modifications, hereinafter referred to as the “heater,” on GAZ vehicles with engines 406, 405 when using installation kit No. 6.
General preparation
Prepare: tools – keys, screwdriver (for tightening clamps); sealant or sealing tape (for sealing threaded connections); coolant in the amount of 1 liter; container for draining coolant with a volume of 7-10 liters.
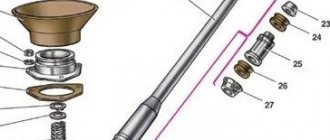
Preparing the heater for installation Cut the rubber sleeve into lengths: first of all (outlet sleeve) L 2 = 220 mm; remainder (inlet sleeve) L 1 = 430 mm. Secure the bracket to the heater with studs (M5x45 bolts) using washers and nuts (see Fig. 1).
Place the sleeves on the corresponding heater pipes and secure the connections with clamps. Install a spring L = 200 mm into the inlet sleeve so that it rests against the inlet pipe of the heater.
Preparing the car engine Open the drain valve and drain the coolant. Unscrew the emergency temperature sensor from the cylinder head and the drain valve. Clean the holes. Remove the upper right engine mount bolt (see Fig. 1).
Installation of the K1/4″ fitting Apply sealant to the thread of the fitting, or seal it with tape. Instead of the drain valve, screw in the K1/4″ fitting.
Heater installation Secure the bracket with the heater with a bolt with spring and flat washers.
Installation of the temperature sensor and adapter Wipe the thread of the temperature sensor and apply sealant or sealing tape to it. Screw the temperature sensor into the axial hole of the adapter. Apply sealant or sealing tape to the male threads of the adapter. Screw the adapter into the hole for the temperature sensor so that the side hole is directed towards the heater.
Types of preheaters
Systems for warming up the coolant in cars can be of various types:
- autonomous, running on automobile fuel (petrol, gas, diesel);
- electric, powered from a 220 volt network.
There are also “thermos” type battery pre-heaters, they work on the principle of heat accumulation - a “thermos” is built into the cooling system of the car. But such devices are used quite rarely, and although they are very economical, they have significant disadvantages:
- a bulky “thermos” takes up a lot of space;
- The installation of the system itself is quite complicated.
Preheater 14TS-10
Manufacturers of the liquid pre-heater 14TS-10 are also "Advers", the pre-start device operates on diesel fuel. Model 14TS-10 is designed for two modes - economical and pre-start, and is installed on trucks, buses and special equipment with a 24-volt network voltage.
Model 14TS-10 is equipped with a control unit that controls the coolant temperature. According to the pre-start program, the antifreeze heats up to +70ºC, and then switches from maximum mode to moderate mode. The control unit can maintain a constant temperature, and if the coolant cools below +55ºC, the pre-heater turns on again in “full” mode.
Do-it-yourself installation of a 220V engine preheater. Tell the frost - that's enough
Do-it-yourself installation of a 220V engine preheater. Tell the frost - that's enough
If your car lives under your house or in an open parking lot, such equipment will not save you. You will have to splurge on a more expensive, but not dependent on the mains, version. A 220 heater is only suitable for those who park their car in an unheated garage or box, under a roof. Or his parking space is located next to the guard's guardhouse, and for a small bribe he will agree to throw an extension cord through the window.
The second upsetting fact is the gluttony of the electric heater. Overnight he can add an additional 15 kW to the meter. On the other hand, you will save significantly on fuel, which is consumed 3-4 times more intensely when warming up; Extend the life of the motor and reduce the time it takes to warm up. For those who have a heated garage, or live in areas where the temperature in winter does not drop below -10-15°C, such a unit is unnecessary.
Installing a 220V engine pre-heater with your own hands is, in principle, not difficult. However, when deciding to do so, remember: the warranty on the device will automatically be voided. If you are not too confident in yourself, it is better to invest in the services of a specialist.
Recommendations for selection
Craftsmen make heaters from scrap materials. Even spirals from electric kettles are used. Honestly, this is not the best idea. Firstly, their effectiveness is questionable; secondly, there is not always enough space under the hood for homemade products; thirdly, a short circuit becomes not just probable, but practically inevitable. It’s better to buy a factory device instead of doing it yourself.
You can, without a doubt, buy the cheapest heater and put up with its manual controls and electricity bills. However, it is better to spend a little more money and ensure a more comfortable existence.
Choose a model that has a timer. Its presence alone means that you won’t have to wind the meter all night: an hour will be enough to warm up the system.
The remote control will provide additional convenience: if you left the car at work and need to drive unexpectedly, you can start the heater while you are getting ready to go outside. The range of the remote controls reaches a kilometer, but power lines and buildings cut off the signal.
The heater power is selected depending on the engine power. A weak device on a strong engine will not produce any effect.
Heater installation
The first step is to assess the degree of filling of the engine compartment and decide where to place the unit. Several rules must be followed here:
- The base under it must be solid and as level as possible. Vertical misalignment leads to abnormal operation of the heater;
- The air vent should not come into contact with pipes, hoses and wires - the air being removed is hot and can damage them;
- In case of possible shaking, the heater should not come into contact with its neighbors - the housing is not designed for impact. It is even recommended to secure it to the body with brackets;
- For any selected device model, the main steps remain the same;
- Antifreeze is drained from the cooling system. Guides may advise not to pour out all of it, 2 liters, they say, you can leave it. From experience: not necessary. Mixing used and fresh antifreeze is not very useful, but the remainder can still interfere;
- The pipe that goes from the engine to the stove is removed. You can understand which one is needed by looking at the diagram or by the temperature during operation;
- The heater is placed and secured to a designated place;
- Hoses are connected to the device;
- If there is a control panel, the wires from it are routed to the panel; in this case, you need to find a free hole in advance or make one;
- The system is refilled with antifreeze.
When installing the Longfei heater, follow the recommendations
We connect it to the stove using hoses.
I’ll say right away that I am against loans and taking a car, especially not a new one, on credit is unreasonable. High-quality sealing of all joints is ensured by a set of gaskets and clamps.
The main chamber of the device is made of stainless steel, so it keeps the temperature high.
When installing the Longfei heater, follow the recommendations. Do not leave the Longfei turned on overnight. But you won’t have to warm it up at idle for a long time.
We recommend: Rd 34 45 51 300 97
Do not turn on the engine heater if there is no coolant in the cooling system. It is precisely the preheating of the engine that is the task of the heater.
As a result of using cheap heating elements, high temperatures “kill” antifreeze, or rather its anti-corrosion, anti-foaming additives, etc. The bracket is attached to the heater boiler. Before you begin installation, consult with experienced people who have positive experience or look into the service of experts.
Known types of devices
A preheater operating from a V network consumes quite a lot of electricity, since the heating element installed inside the device has a fairly high power. It is located immediately above the tubular electric heater. In this way, the driver has the opportunity to take care of the environment. Installing a preheater with your own hands Installing a preheater with your own hands will not require a lot of time and any special knowledge.
They can be installed in any free space under the hood of the car. Most car owners have their cars idle overnight in the open air or in a regular garage, at best. You need to connect a longer piece to the input, and a shorter piece to the output. Parallel connection diagram for electric heaters Video with an example of self-installation of the Longfei pre-heater on a car Published on the official channel of user Nikolay Beketov. Installation of a 2.2 kW "longfey" preheater with a pump on a Toyota Corolla
Diesel preheater
For diesel cars, the presence of a preheater is of great importance, since in the cold it is much more difficult to start a diesel engine than a gasoline engine. The use of a heater on cars with a diesel engine provides the following advantages:
- saves money on expensive additives and additives that are necessary for reliable starting of a cold engine in winter;
- Fuel consumption is reduced, since very long warm-up of the internal combustion engine is no longer necessary;
- The car is guaranteed to start in any weather, even at temperatures below -30ºC.
For diesel engines, both electric (220 volts) and autonomous pre-heater are used.