A huge hello to everyone who reads me)))
In general, I’m crawling around reading forums about injectors and their interchangeability, I didn’t find much information about their interchangeability, I decided to make a small note here for myself, and it might be useful for everyone, not everyone knows)))
In general, there is the following information on injectors:
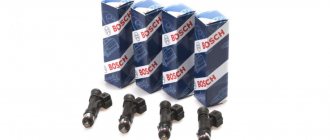
BOSCH injectors 0 280 158 996 are used with ECU January 5.1, MP 7.0 (V8, V16, 1.5 engines) are replaced with BOSCH 0 280 158 110 or SIEMENS DEKA 1D VAZ 6238.
BOSCH injectors 0 280 158 502 are used with the January 7.2 M 7.9.7 ECU (V8, V16, 1.6 engines) and are replaced with SIEMENS DEKA 1D VAZ 6393.
BOSCH injectors 0 280 158 017 are used with the January 7.2 M 7.9.7 computer and are replaced with SIEMENS DEKA 20734.
BOSCH injectors 0 280 158 022 are used with the January 7.2 M 7.9.7 computer and are replaced with SIEMENS DEKA 20735.
Recently, AvtoVAZ has significantly expanded the range of injectors installed on the assembly line. Currently, 4 types of Siemens Deka injectors are “seen” on VAZs: “thin” 20734 (orange) / 20735 (blue) and “thick” 6393 (beige) / 20734 (yellow). The situation with the same number of injectors of different design is incomprehensible, but it is a fact.
BOSCH injectors with catalog numbers 0 280 158 502 and 0 280 158 022 are also installed.
Bosch 0 280 158 022
Bosch 0 280 158 502
Bosch 0 280 158 017
These injectors have so far been encountered only once on the Kalina car.
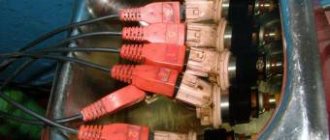
“Thin” Siemens differ in the location of the nozzles, in 20734 all 4 nozzles are located in the same plane in a cone-shaped recess, and in 20735 they are spaced apart in pairs in two different planes (see photo). Such injectors are called “double-flare”, each torch pours fuel onto “its own” inlet valve, and not onto the partition between them.
“Thick” Siemens Deka nozzles are available in two types: 6393 (beige) and 20734 (yellow). It is unclear what caused the use of the same code (20734) for structurally different injectors. I don’t want to think that there weren’t enough numbers or imagination :). There is an assumption that the “thin” nozzles for some reason did not suit Siemens-Deka and they were replaced with ordinary ones.
No clear relationship has been found at this time between engine type and installed injectors. At this time, statistics are being collected on installed injectors on different engines. At the moment, the generalized table looks like this:
The injector is an important element of the fuel injection system. The performance of the part determines the nature of the car’s movement, the power and throttle response of the engine, and environmental parameters. How to maintain them and replace them if necessary on VAZ 2110–2112 cars?
Types of injectors VAZ 2110 8 valves
Recently, AvtoVAZ has significantly expanded the range of injectors installed on the assembly line.
Currently, 4 types of Siemens Deka injectors are “seen” on VAZs: “thin” 20734 (orange) / 20735 (blue) and “thick” 6393 (beige) / 20734 (yellow). The situation with the same number of injectors of different design is incomprehensible, but it is a fact. BOSCH injectors with catalog numbers 0 280 158 502 and 0 280 158 022 are also installed.
These injectors have so far been encountered only once on the Kalina car.
“Thin” Siemens differ in the location of the nozzles, in 20734 all 4 nozzles are located in the same plane in a cone-shaped recess, and in 20735 they are spaced apart in pairs in two different planes (see photo). Such injectors are called “double-flare”, each torch pours fuel onto “its own” inlet valve, and not onto the partition between them.
“Thick” Siemens Deka nozzles are available in two types: 6393 (beige) and 20734 (yellow). It is unclear what caused the use of the same code (20734) for structurally different injectors. I don’t want to think that there weren’t enough numbers or imagination :). There is an assumption that the “thin” nozzles for some reason did not suit Siemens-Deka and they were replaced with ordinary ones.
No clear relationship has been found at this time between engine type and installed injectors. At this time, statistics are being collected on installed injectors on different engines. At the moment, the generalized table looks like this:
Source
Interior and salon
The interior of the VAZ-2112 (16 valves) features all the best from two brothers. The best features of the station wagon's interior are combined here. The backs of the rear seats are divided into two parts. Each of them can be folded. This significantly increases the volume of the trunk. And this is the only advantage. Inside, everything is more modest than in all foreign cars of the same classes and the same years.
Another disadvantage, according to owners of the VAZ-2112 (16 valves), is the complete absence of any sound insulation. When driving with music on, you can clearly hear the engine and power steering working.
VAZ 2110 injectors: how to find out what they cost?
The injector is an electromechanical valve that acts as an electric magnet. When voltage is applied to the injector winding, an electromagnetic field arises that can retract the core and needle of the shut-off device, while allowing a flow of fuel to the engine combustion chamber. An additional fuel filter is mounted on the input channel of the devices.
The injector is the final element of the fuel system, into which fuel enters under high pressure. The entire operation of an internal combustion engine directly depends on the performance of this component. When the pressure level drops when opening the injector, it opens earlier, which causes black smoke to form. If the pressure at the moment of opening increases, then it opens later and white smoke appears.
Performance Comparison
The original nozzle, produced by renowned manufacturers, differs from cheap analogues by the following criteria:
- Coking speed. The outlets of no name injectors are made of materials prone to deposit accumulation, so they become clogged much faster;
- Valve stuck. Low precision in manufacturing counterfeits leads to constant jamming inside the device;
- Leaky closure. It can even be observed on new injectors of unknown origin.
The stability of the original injectors is ensured by the thoughtfulness of the entire production cycle of injection systems. From engineering design to tolerances and fits, branded injectors ensure high quality. Because of this, the price increases.
The performance characteristics of original injectors and fakes are very different. It is not recommended to save on the fuel system, since the stability of the entire engine depends on it. Poor quality products can increase the wear rate of the power plant and major repairs will occur ahead of schedule.
Signs of injector failure
1. The operation of the engine starting elements slows down, which is especially pronounced in cold weather.
2. The occurrence of dips and some twitching of the car at the time of acceleration or change of transient modes.
3. Poor dynamics and reduction in engine power.
4. The amount of fuel consumed increases.
5. When idling, the car engine may run unevenly.
To avoid untimely car repairs, you should promptly check the performance of the injectors.
Cleaning
There are two ways to clean fuel nozzles, each of which has its own nuances. Choose for yourself which one you like best or is more affordable, taking into account the available funds.
Spray to the rescue
Cleaning method
Necessary materials
Features of the event
- Injector cleaner;
- Carburetor cleaner in spray form;
- Spare O-ring
- Carburetor cleaning spray;
- Pump;
- Pressure gauge;
- Sealing ring
A simple cleaning method Both operations take approximately 2-3 hours, but cost several hundred rubles. This is ten times cheaper than replacement and about the same amount more affordable than service stations.
After cleaning the injectors, check their operation. If this does not work, you will have to change it.
How to check injectors without removing them from the engine?
Checking the winding resistance level on the injectors
1. You can carry out an inspection by turning off the ignition and removing the negative terminal from the battery.
2. Using a thin screwdriver or an awl, you need to unclip the spring clip on the block.
3. Disconnect the connector from the injector.
4. Attach an ohmmeter to the injector terminals and measure the winding resistance.
5. If the resistance between the side and central pins of the connector is within 11–15 Ohms, then the injector is working properly. If the device shows more or less than required, it should be changed.
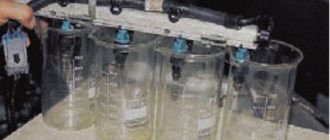
Checking the functionality of all injectors
1. Initially, you need to remove the fuel rail on which the injectors are installed.
2. Then you should connect the wire block to the ramp harness. If the “-” terminal was removed from the battery, then put it back on.
3. Connect the fuel pipes to each other and, using a wrench, tightly tighten the fittings securing them.
4. Place a measuring cup or any other container with markings under each nozzle.
5. Using the starter, crank the engine and monitor the operation of all injectors. Fuel should come out evenly from each.
6. Turn off the ignition and check the fuel level in the measuring cups, it should be the same. If the amount of fuel in the containers does not match, replace or clean the nozzle that has come out of alignment.
7. Inspect all injectors for flaws or defects. There should be no fuel leaks on the spray part when the ignition is turned off. If there are such flaws, then the part is not sealed and needs to be replaced.
Exhaust system.
As a rule, tuning cars are equipped with 4-2-1 “spiders” that work well in a fairly wide speed range. 4-1 systems have not taken root in civilian tuning due to a very narrow range of effective operation. The principle of operation of such an exhaust is based on creating a vacuum in front of the exhaust valve that is not yet open, which contributes to better purging of the cylinder. Learn more about setting up a release.
The most common “tuning” in our country is the installation of a “sports” muffler. The most common (and, naturally, the cheapest) products are Nex (IMHO - it sucks) and PowerFull, less common are Remus, Asso, Sebring... Such a muffler can only be useful in combination with a direct-flow “spider”, a proprietary main and additional muffler with pipes of increased diameter (at least 55 mm for engines 1.6 and above). Otherwise, it’s just a deeply pathetic sound. Moreover, Powerfull produces the least “noisy” models, ASSO – the most aggressive and loud. PRO-SPORT offers “cans” with the ability to adjust the “volume” +/- 10db using a removable earbud. Well, of particular interest is the Pro-Sport muffler with electric (from the cabin) volume control, from standard to “Super-Sport” (difference 30 db). The exhaust sound is a matter of taste, personally I like the quiet “roar” - this is the big PowerFull can (in the center) and the Remus twin-pipe (DTM). However, the price of the first is 75-80 USD, the second – more than 300...
Preparation for dismantling
Replacing injectors may not be necessary for much longer if you purchase special additives added to the fuel. Thanks to them, the injector stays clean longer. But you shouldn’t shift all the responsibility onto them, because with prolonged use, dirt and deposits formed create a kind of blockage for the passage of fuel, and this, in turn, causes irreparable damage to the engine.
Of course, you can contact a service center, where they will not only clean the injectors, but also check the machine. However, you can carry out the repairs yourself, because this way you can save a lot. Please keep in mind that the ramp on which the injectors are located is a kind of “center” in each machine. Any independent intervention, including cleaning the injectors, can result in significant damage.
To replace, you must purchase the goods that will be required for the job. First of all, this is a special product for cleaning the injector; it is sold in special aerosol cans. It is advisable to replace the rings on the injectors themselves. It would be useful to purchase any button, a light bulb whose power will not exceed 21 W, and a chip used to connect the wires to the injectors.
It is also necessary to pay attention to some features of dismantling. Before removing the injectors, be sure to ensure that the engine has cooled down. Then it is necessary to completely de-energize the fuel pump. To do this, all wires responsible for power will need to be disconnected. Next, you need to reduce the pressure in the motor as much as possible. They simply start the engine and wait for the engine to stall. Repeat several times until the engine stops starting.
Why is it not the brand of a German car that matters, but the assembly?
The brands Bosch and Siemens have been part of the same concern for a long time (since 1967) - BSH Hausgeräte GmbH. It has control over product development across the globe. In total, it produces household appliances at 43 factories, which are located in countries such as Spain, Germany, Russia, Slovenia, France, China, Poland, Mexico, Brazil, as well as in some other countries. The assembly process takes place using the same technologies and from the same parts. For this reason, the quality of the machines is approximately the same.
It is also noteworthy that in terms of build quality, Germany is followed by China. Chinese technology indeed had a bad reputation for a long time, but today this fact remains a thing of the past.
In factories in the People's Republic of China, household appliances under the Siemens and Bosch brands are assembled with due care, and quality control is monitored by numerous experts
After China, in terms of reliability, comes equipment assembled in Slovenia and Poland. Its quality is somewhat worse, however, in general, everything is pretty good with it. As for the Russian assembly, unfortunately, many buyers do not like it. This is explained by the fact that in many cases, washing machines produced at Russian factories arrive at sales points with existing defects. It can be expressed in torn hatch cuffs, transportation bolts may also be missing, and Aquastop hoses are sometimes damaged.
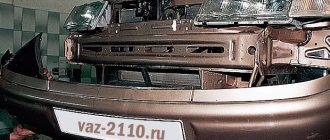
Sequence of replacement work
To replace the injectors, follow these steps:
- Disconnect all wires from the battery.
- Next, separate all the mounting brackets holding the engine guard in place.
- Proceed to remove the air filter on which the hoses are attached. Disconnect the hose from the device responsible for reading the gasoline pressure, the block from the idle air regulator. Keep in mind that it is held in place by a clamp. Next, disconnect the block from the wires, folded in the form of bundles.
- Now you need to carefully unscrew the two bolts located in the ramp mount. There are flat washers under the bolt heads. Therefore, in order to avoid losses, the excavation must be done using tweezers. Now unscrew the mounting screw used to hold the tubes through which the fuel passes. Carefully remove the holder itself so that the spring washer does not get lost. Next, the fuel rail is carefully moved along the injectors until it completely exits the holes in the engine pipe. To avoid breaking them, carefully remove the ramp from under the receiver. The slightest carelessness when performing this work will lead to catastrophic consequences and costly repairs.
- Remove the injectors from the ramp using a slight rocking motion. To ensure that as little dirt as possible gets on the parts, the already removed injectors are covered with a cloth, and the place where they were in the car is hidden under any material. The main thing is that there are no large gaps.
Products of the Japanese company Denso
Injector manufactured by the Japanese company Denso.
Denso injector has an individual thirty-digit code. With its help, you can determine the characteristics of the device. The denso injector has an advantage over its competitors in the form of a QR code, which makes it easier to find a suitable model by reading the information with a smartphone camera.
Testing of injectors shows their high quality. They can only be damaged by abrasive particles that penetrate through the filter along with the fuel. The denso injector is not intended for low-grade fuel, as it is produced mainly for countries with developed networks of branded gas stations. Oils and resinous substances reduce the cross-section of the hole, similar to plaque that clogs shower nozzles.
Troubleshooting
After you remove the injectors, proceed to carefully inspect them. When the removal of the VAZ 2110 injectors is completed, you can see that one of them remains in the inner pipe of the engine. It will be necessary to replace its retainer and the rings responsible for the seal. In addition, injectors are also replaced when the rings lose the elasticity of their coating or when there are cracks.
Check how the injectors spray. Connect the harnesses and attach everything to the battery. Then place the nozzle in a glass container and turn on the starter to see if the gasoline is spraying correctly. Each nozzle must have at least 4 jets, in addition, the gasoline that is carried through them in containers must be at the same level. If the sprayer begins to leak, the nozzle needs to be replaced.
Design Features
Nowadays, piezoelectric injectors are most often used. They allow for the most accurate supply of fuel to the cylinders. Initially, such parts were installed only on diesel engines; recently, similar options are used for all engine models.
During operation, under the influence of electric current, the piezoelement lengthens and ceases to press the valve, resulting in fuel injection. The opening and closing time of the valve is minimal, in order to ensure the supply of the optimal amount of fuel, it is necessary to ensure high pressure in the system
Therefore, the normal condition of the injection pump is important. The minimum can be called 2.5 bar, the higher this figure, the better
An increase to 3.8 bar allows you to increase motor efficiency by up to 15%.
Separately, it can be mentioned that modern injectors may have several holes for spraying fuel. This depends on the type of fuel, as well as the expected engine power. Actually, in recent years, only the spray tips have changed. Do not forget that the number of holes must be correlated with the engine settings. The more spray points, the faster the process of opening and closing the nozzle should be. Otherwise, destruction of parts elements may occur.
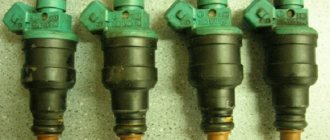
What injectors are installed on VAZ 2110–2112 cars
The main advantage of injectors for VAZ cars of the tenth family is that they are interchangeable. There are only two types of sprayers - produced by Bosch and Siemens. And each of them, regardless of marking and year of manufacture, can be replaced with another.
Bosch injectors are traditionally manufactured in black housing
When selecting, there is only one limitation - engine size. 1.5 injectors are not suitable for 1.6 liter engines.
The Siemens injector has a blue tip
Both Bosch and Siemens injectors of any marking can be installed on 8-valve and 16-valve engines.
Table: how to select injectors for VAZ 2110–2112 by marking
| Siemens | Bosch |
| Injector DEKA VAZ 6238 | 0 280 150 996 and 0 280 158 110 |
| Injector DEKA VAZ 6393 | 0 280 158 502 |
| Injector DEKA VAZ 20734 | 0 280 158 017 |
| Injector DEKA VAZ 20735 | 0 280 158 022 |
| Injector DEKA VAZ short 20734 | 280158017 |
| Injector DEKA VAZ short 20735 | 0 280 158 022 |
Recent comments
- admin to the post differences between 8v and 16v controllers using the example of January 7.2 8v and Bosch 7.9.7 16v
- admin to post Useful information
- admin to post Atomic soft
- admin to the post Answered questions (comments) over the past months
- admin to the entry Pinout of the connection block SUD M7.9.7./January7.2 to the interior wiring of the Europanel (VAZ 2114)
- admin to the entry Chiptuning - About the table of monitoring stations and control centers (for dummies)
- admin to the post Answer to a question about Atomic Tune 2.8.8
- daser on Angel Eyes
- Kirill on the entry Pinout of the connection block SUD M7.9.7./January7.2 to the interior wiring of the Europanel (VAZ 2114)
- Anonymous to the post Answered questions (comments) in recent months
- Uncategorized (16)
- Engine (40)
- injector (35)
- Gearbox (5)
- Personal experience (my breakdowns) (26)
- General (7)
- Salon (2)
- Ignition system (3)
- Power systems (16)
- Brakes (1)
- Brake system (2)
- Chiptuning (14)
- Electrical equipment (24)
Method for replacing injectors on 8- and 16-valve engines
Car owners cannot always diagnose faults in the fuel system. Often, failures in engine operation or unstable idle speed can be explained by completely different reasons, and not just interruptions in the fuel supply.
Symptoms of a problem
If all car systems are operating normally, then the following symptoms will directly indicate injector problems:
- failures in engine operation;
- increased fuel consumption;
- instability of idle speed;
- loss of power;
- black exhaust gas, etc.
Video: how to replace oil nozzles if they leak
Is it possible to determine the cause of the malfunction yourself?
The causes of injector malfunction are often clogged . When using low-quality fuel, the injector nozzle becomes clogged with gasoline deposits over time, which is why its throughput gradually decreases. Accordingly, the engine no longer receives enough fuel, so the engine power sharply decreases and the car’s dynamics deteriorate.
In addition, the rubber seal or ring may lose its tightness. In this case, the nozzle will leak, due to which the necessary pressure will not form in the system.
It should be noted that the service life of injectors on the VAZ 2110–2112, set by the manufacturer, does not exceed 150 thousand kilometers.
Video: how to disassemble and change injectors on a VAZ 21102
Increase in working volume
The most common option for increasing the working volume to 1600 cc. cm is to increase the piston stroke to 74.8 mm (standard - 71 mm) by replacing the crankshaft and pistons. There are several options here
a) “Forged” pistons, common sizes 82.0, 82.4, 82.5 84.0 mm of various classes. “Forged” pistons come in both regular and T-shape shapes. The latter are much lighter in weight. b) Standard pistons that have undergone special mechanical modification. c) Using pistons 21213 with mechanical modification and replacement of connecting rods for a “floating” piston pin.
In addition to the most common crankshaft with a piston stroke of 74.8 mm, there are also CVs with a piston stroke of 75.6 (standard from 1.6) 78, 79, 80 and even 84 mm. By using these crankshafts, volumes from 1580 to 1862 cc can be obtained. cm, and almost all configurations can be accommodated in a block of standard height. In this case, naturally, the “torque” of the engine suffers due to non-optimal R/S.
The crankshafts themselves are produced in three “weight categories” - light, medium and heavy, from different blanks - 2112, 11183, etc.
In production VAZ cars with a volume of 1.6 liters. a crankshaft of 75.6, 1.5 liters is used. – 71 mm.
Owners of 16-cl. engines (for whom money does not matter, they can avoid this hemorrhoids and purchase a VAZ 21128 engine with a volume of 1.8 liters (100 hp, 160 Nm) or a volume of 2.0 liters and a power of 118 hp.
In the 21128 engine, the weight of the crank mechanism is reduced by 190 g, a “high” block is used (1.9 mm higher), an original crankshaft, connecting rods 129 mm long, and lightweight pistons. According to the manufacturers, this modification does not bend the valves when the timing belt breaks.
For 8V, a new engine 21084 with a volume of 1.6 liters is produced at the same OPP. 21084 is available for OPP only in a carburetor version.
| Specifications | 21203 | 21128 | 21084 |
| Cylinder diameter, mm | 82 | 82,5 | 82 |
| Piston stroke, mm | 94 | 74,8 | |
| Working volume, cm³ | 1980 | 1580 | |
| Compression ratio | 10,6 | 10 | |
| Rated power, kW/rpm | 80/5400 | 60/5600 | |
| Rated torque N*m at rpm | 182/3200 | 160/? | 124/3600 |
| Number of cylinders | 4 | 4 | 4 |
| Valve drive | Hydraulic pushers | Hydraulic pushers | |
| Clutch/diameter mm | 21203/215 | ||
| Connecting rod length, mm | — | 129 | |
| Octane number of gasoline | AI 95 | AI 95 | AI 91 |
| checkpoint | 21203, 2123 |
Procedure for removing oil injectors
Before you begin removing injectors from any car of the tenth VAZ family, you will need to relieve the pressure in the fuel system. Removing any element that is under pressure in any way can result in personal injury.
How to get rid of excess fuel
To relieve the existing fuel pressure, you need to turn off the fuel pump and exhaust the remaining gasoline:
- Fold down the cushion from the back row of seats.
- Below it is the fuel tank hatch.
- Unscrew the screws securing the hatch.
- Disconnect the wiring harness from the pump housing (the wires supply power).
After this, start the engine and wait until it stalls. It is recommended to turn the ignition on several times to ensure that there is no gasoline left in the system.
Meet the model
With a new engine, the unit was given the name VAZ 21124, this car actively fights against the ecology of the external environment. In addition to everything, when the car starts, the traction at the bottom has become noticeable, and the engine now runs calmer, without sudden jumps. We often hear questions from owners of 16-valve engines: “What needs to be done so that the valves do not bend in the piston?” In the VAZ 21124, this problem will not exist; in the bottom of the piston there are holes and sports shafts that control the rise of the piston, and don’t let the knocking and noise of the VAZ 21124 engine scare you, this is its normal environment.
Upgrading a car is now the most important goal for every modern and self-respecting driver. Tuning the VAZ 21124 includes changes to both the internal and external characteristics of the car. Styling the appearance of a car includes installing a body kit on the bumper fenders, sills, hoods and doors, this gives your car an individuality, a sporty look, and also improves its aerodynamic performance. To create a sports car VAZ 21124, it is impossible to do without replacing body elements with plastic material. Plastic parts reduce the weight of the car, making it easy to drive on the road. The final feature of a sports car is the installation of alloy wheels and sports tires.
Repair of injectors VAZ 2110–2112
Repairing injectors means cleaning the product and replacing the O-rings. Simple measures to restore the functionality of the injectors can significantly increase the car’s power and make cold starts easier. Injector repair is possible in the following cases:
- there are no visible deformations on the body;
- the nozzle has not yet exhausted its service life;
- the car owner wants to optimize the operation of the power unit.
In all other cases (cracks and deformations, long service life), it is recommended to replace the nozzles with new ones.
How to blow out and clean oil molds
On cars of the tenth family, injector cleaning may be necessary after 40–50 thousand kilometers. In this case, it is best to carry out the procedure yourself, since you can always observe for yourself the true condition of the motor and its elements, and also save a significant amount on service station services.
Many drivers prefer to use the simplest method of cleaning injectors - fuel additives. Special liquids, along with gasoline, are poured into the tank and pass through all elements of the fuel system, cleaning them. This measure is justified for new cars in which the degree of pollution is at a minimum level. But additives will not be able to properly clean injectors and other elements of the system.
Video: a simple way to clean injectors using a repair kit
Gearbox rows, main pair
The choice of gearbox and GP depends on the goals and capabilities of the engine. The table lists the main popular rows of the budget series.
| Rows | 1 | 2 | 3 | 4 | 5 | 6 |
| Standard | 3,636 | 1,950 | 1,357 | 0,941 | 0,784 | |
| 21083-05 | 2,923 | 1,810 | 1,276 | 1,030 | 0,880 | |
| 21083-06 | 2,923 | 1,810 | 1,276 | 1,063 | 0,941 | 0,784 |
| 21083-07 | 2,923 | 2,053 | 1,555 | 1,310 | 1,129 | |
| 21083-08 | 3,416 | 2,105 | 1,357 | 0,969 | 0,784 | |
| 21083-11 | 3,636 | 2,222 | 1,538 | 1,167 | 0,941 | 0,784 |
| 21083-12 | 3,250 | 1,950 | 1,357 | 1,030 | 0,784 | |
| 21083-18 | 3,170 | 2,105 | 1,480 | 1,129 | 0,886 | 0,784 |
On cars 2108-09-99-15, a gearbox with a gear ratio of 3.9 is installed as standard, on the “tenth” family - 3.7. By installing a GP with a large gear ratio on a car, you can significantly increase the dynamics at the bottom, although losing in maximum speed. As a rule, ready-made “commercial” gearbox ranges are offered on the market, with which they can be used in addition to standard GP 3.7; 3.9; 4.1, tuning GP – 3.5; 4.3; 4.5; 4.7; 4.9 and 5.1. The most important parameter when calculating a transmission is the total gear ratio (gearbox + gearbox) in each gear.
A good example of an illiterate approach to transmission calculations is the standard gearbox of front-wheel drive VAZs. As a result of the inconsistency in speed in 1st and 2nd gear, the latter experiences strong overloads when shifting, which causes it to fail earlier than others. When installing rows in cars of the 10th family, it is desirable to use a 083 secondary shaft.
Gear ratios and speed characteristics of different options for “crossing” the gearbox and gearbox rows can be calculated here