Dangerous! there are a lot of letters and brilliant reasoning ahead, so if you are too lazy to read, go to the end and watch the video
There was a cheap tape recorder, I sang as best I could until I started to die... something like that. From the old owner I received a 1 DIN radio with a folding socket. The cheapest Mystery, it only reads flash drives, and even then every two times. You’re driving like this, listening to music from a flash drive, and suddenly the radio goes out and starts playing. And then the radio began to completely reboot. I teased her for a month until I got tired of this action. And it’s dangerous to constantly be distracted from the road by a fucking balalaika. In general, it's time for a change!
At the same time I decided to slightly transform the appearance of the center console. I didn’t really like the lid of the box with the inscription OPEL, like on my grandmother’s chest of drawers. I thought about connecting a 2-din radio to the Priorika. There are two options: - buy a new expensive 2din radio from a well-known car audio brand - find a standard 2-din GU that comes from the factory at a lower price. But for 2-din you will also need a center console with a corresponding cutout. Again, there are two options: 1) purchase a ready-made 2-din panel; 2) cut out unnecessary parts into the existing socket (but you will still need an adapter frame for the new radio). Right now a standard frame of the right size just came out of my hands. As a result, the cost of this frame became 0 rubles for me, my old 1 din frame was sold in a month for the same money. The silver color of the console, in my opinion, stood out from the overall color scheme of the dashboard, so I repainted it matte black. All that remains is to choose a registrar.
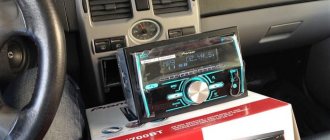
I was looking for a 2-din radio for a long time, I chose it. Well, I didn’t like the options up to 7 tr. And the ones I liked cost about 10 skewers (this was before the Basurman currency took off). I decided to take a regular tape recorder for the following reasons: - they can do everything I need (I don’t watch DVD movies in the car and don’t like video clips) - with the existing acoustics I won’t hear a difference in sound compared to expensive XVs (later, perhaps, when I change all the acoustics and will buy a new head) - I don’t need large color displays and even touchscreens - in the Priora the radio is too low to be distracted, too dangerous - I really liked the ergonomics, the location of the buttons is ideal for me personally (in expensive PGs without a touchscreen, all sorts of things scattered in front predominate buttons)
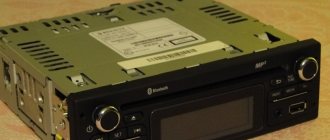
I made up my mind and started looking. It turned out that they were produced in two versions. In principle, I liked both of them. The cost for Novi is 6 thousand. The toad strangled something. I started searching with my hands. There were several options. As a result, after 2 weeks of searching, I bought the desired device for half the price, then in another city (a friend helped me buy it, then brought it). In fact, the manufacturer of the radio is our Russian Ural plant, and its full name is Ural Lada Priora 2170-7900010 (ACR-225SA).
BUT . purchasing is only half the battle. You still need to connect it correctly. And the thing is...
ENERGY CONSUMPTION PROBLEM When the cold weather just started, I left my charming assistant standing outside the house for 2 weeks. When I arrive, I try to start, the battery only lasted a couple of turns of the starter, and immediately the dashboard fell into place. Everything, I think, is equal to zero. This is not good for them at all. I started searching online for the reasons for this. I searched for a long time, checked it on my horse and found out the following. When the car's ignition is turned off, some consumers continue to consume a small current, the so-called “leakage current”. It is clear, for example, that the alarm system itself must waste energy (but since I don’t have a whitefish, this option immediately blows away). A standard immobilizer requires very little. In general, usually without unnecessary utilities (I mean the equipment supplied from the factory), the leakage current should not exceed 100mA. This is stated, and ideally, according to the experience of other owners, it should be below 60 mA. Let's do the math: I have a 60 Ah battery, the normal leakage current per day consumes 0.06 mAh * 24 hours = 1.44 A, it turns out that the battery should start losing voltage after 60 / 1.44 = 41.6 days. Taking into account the fact that my trips were short and the battery did not have time to fully charge, well, it should definitely hold a charge for a month in parking mode. I measured the leakage current on the negative and positive contacts of the battery with a multimeter -
In short, by turning on all sorts of fuses and connecting consumers one by one, he identified the culprit of the “triumph” - the tape recorder! With the panel removed the dog eats little, but still eats. And since I generally don’t like to do any manipulations when I get in / out of the car (I got in and left, I got in and out), I never removed the panel.
“But shouldn’t it be like this, haven’t the radio manufacturers taken this into account?” - I thought. It doesn't matter how it is. Everything is taken into account, in smart technologies everything is smart. Almost all radio tape recorders provide a contact; when a control signal is supplied, the radio tape recorder works, and when there is no signal, it does not work. Where does this “control signal” come from? It's simple: from the ignition switch, the ACC key position. But why doesn’t it work in my SuperVAZ? And why don’t our machines have such a key position. And the control signal in standard audio preparation is tightly screwed to the power cable directly from the battery. That is, the recorder always works, regardless of the position of the ignition key. And how can the owners of our automobile industry be happy? That's right, collective farms!
I found on the forum an option for using a simple circuit (the so-called “diode isolation”) to artificially “introduce” the position of the ACC key in a Rusav car. In addition to eliminating the leakage current of the radio, this circuit also solves the following problem: the radio continues to operate when the ignition key is pulled out until manual shutdown. You need this, such a suspicious bastard, so that you can take the car keys and go to work, and in the meantime the passengers can enjoy the music, or, if you want, just lock the car to the music of explosions)) I tried diode isolation according to Roman Toropov’s scheme (there is one megamind on the priorovoda website) on the old Mystery one-din radio - everything works as it should: it starts only when the ignition is turned on, when turned off manually on the radio itself.
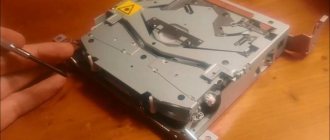
The next thing is the most interesting! I installed a standard Priorovskaya Ural double-din radio and a tested diode decoupler. Pins 4,5,7,8 of the ISO connector of standard audio preparation are connected. 7th pin (ACC control signal) via diode isolation. The threads are the same. However, the radio does not turn off completely - a weak backlight remains and a weak signal continues to arrive at the antenna (the status indicator lights up faintly). In addition, it turns on even without the ignition. I tried to disconnect the cable with the diode from the antenna output (fifth ISO connector) - it still turns on without ignition. What's wrong with this radio? Why the hell.. does it continue to power the antenna after turning off? And most importantly: WHERE does it receive the control signal to turn on, if I turned off both the ignition and the antenna?!
I turned it over in my hands for a couple of days, checked the circuit, finally disassembled this radio, played with the inputs and outputs and... Eureka! It became absolutely clear that just as there is no ACC key in our pelvis, there is none in the standard radio. She simply DOESN'T KNOW IT! Therefore, both pins 4 and 7 are connected to each other in standard audio preparation. Thanks to SignalMan for this thought. Also, due to “ignorance” of the ACC signal, it is CONSTANTLY in standby mode. It never goes out completely: there is always a subtle backlight and all ISO outputs (including antenna/remote) are constantly powered).
BUT this radio has one advantage: its memory is not volatile. Therefore, I radically solved the problem of current leakage by completely disconnecting it from the power supply (4th contact) through the relay. And now the relay is activated through a diode isolation so that the radio can operate without an ignition key. The control signal in my circuit was a signal sent to the USB output of the radio, which disappears when the radio's on/off button is pressed.
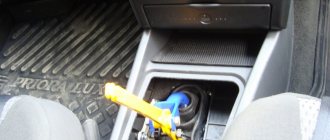
In principle, only 2 coils are added to the standard wiring. Externally it looks like this...
The result of the work is on video.
Currently, depending on the vehicle configuration, it is possible to install a 2 din radio of different types. The first is called “Audio system 2 DIN, without CD player, without TouchScreen”, the second is called “multimedia system without CD player, with 7-inch display with TouchScreen” (MMC). This review will focus on MMC with a touch screen. (LCD display), which is installed on Granta (sedan and liftback), as well as on Lada Kalina 2 and Lada Priora.
Lada MMC codes:
- Monoblock 2190-7900010-00 - MMC Lada Granta (luxury) and Lada Kalina 2 (standard)
- The screen is separated from the buttons 2192-7900200 - MMC Lada Kalina 2 (luxury) and Lada Priora (luxury)
MMC works with the Windows CE 6 operating system. It is specially optimized for devices with a minimum amount of memory, by the way, in our case the memory is only 128 MB. Despite this, turning on the radio does not take much time (about 2-3 seconds).
MMS screen
The display of the Grant and Kalina radio is resistive. Unlike a capacitive screen, it is able to work without interruption in harsher conditions, such as frost or heat. The display itself is quite bright and pressure sensitive. Due to the lack of a visor, it is blinding in sunny weather, but not critical.
Audio, video and photo
The radio supports audio formats: MP3, WMA and WAV. While a tune is playing, the display shows information about the album, artist, and cover art (if available). You can adjust the tone of the sound using the equalizer (there are 6 pre-programmed settings for jazz, rock, vocals, etc.). The sound quality is good, quite clear, without an audible cutoff in high or low frequencies.
MMS supports only one video format: WMV with a resolution of 320 * 240 pixels. To play video files, you will need a converter such as Xilisoft Video Converter Ultimate. You will not be able to play the video without conversion, for example, at 720p resolution the image will be slow and the sound will lag behind the video due to an insufficiently powerful processor.
Review of MMC Lada Granta (luxury) and Lada Kalina 2 (standard)
Review of MMC Lada Kalina 2 (deluxe) and Lada Priora (deluxe)
The radio can open photos, supported formats: JPEG, .JPG, .JPE, .BMP, GIF, .PNG. For example, a 1MB 1400x800px photo will open in about 1 second, while a 1978x3456px 7MB photo will open in 9 seconds.
It is worth noting that after purchasing a car, the antenna is provided as a gift. You will need to install it yourself.
J.V.S.
When tuning stations, it is possible to leave 30 FM radio channels and 15 AM channels in the tuner.
Installing stations manually:
- Select a broadcast band by pressing the TUNER BAND key.
- Click on button 4 to set the station.
- Hold down the key with any selected number on the panel to memorize the station in the radio's memory. The selected number will start blinking, after which you will see the station stored under the selected number. For example: To tune to station number 14, press the +10 key, followed by the 4 key for approximately three seconds or more.
- To store other radio stations in the device’s memory, you need to repeat steps one through three. And to change the settings of the entire station, you need to repeat the entire process from the beginning.
Tuning stations in automatic mode:
Stations will be given numbers by increasing the frequency range.
- Select the range by pressing the TUNER BAND key.
- Press and hold the AUTO PRESET button on the panel.
- To set a different range, you need to go through steps one through two again.
To replace selected stations in automatic mode, you must use manual installation.
Features of installing a radio on a Lada Priora
As a rule, installing a radio on a Priora involves several types of audio players:
Multimedia player 2 DIN for LADA Priora
These ratings mean the dimensions of the hole for installing the radio, which correspond to the dimensions 180x50x160 mm for 1 DIN and 180x100x160 mm for 2 DIN. If you want to install a more modern version of the 2 DIN radio, the car owner will have to perform the procedure of sawing the partitions of the front console of the car in order to widen the hole for the player. In some cases, adapting the dimensions requires cutting or purchasing a special adapter frame for the console, which is much more difficult than installing 1 DIN.
If you decide to install a standard 2 DIN system, it is better to entrust the installation work to an experienced specialist, otherwise there is a risk of damaging both the console itself and the interior trim of the car.
It is also worth noting that DIN 2 standard radios have a wide range of functions:
- long service life thanks to impact-resistant housing;
- paired amplifiers increase signal reception several times;
- the ability to switch the radio signal frequency for all car passengers thanks to the Music Zone system;
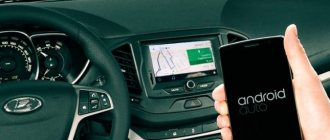
- built-in radio navigation function;
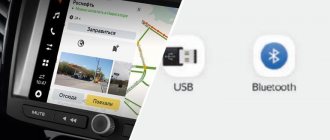
- built-in USB connector allows you to connect external devices to view and play files;
- the presence of a bass amplifier for music for better sound.
Built-in USB port and amplifier cables
Why the radio doesn’t pick up well in the car - what’s the matter?
Possible mechanical or technical damage may result from a breakdown of the antenna, contacts or the radio itself. Diagnostics of these elements will help identify the cause of the signal malfunction.
If the car has an external antenna, it is likely that it is damaged. Another reason related to the antenna is its poor connection to the radio. If the accessory has visually visible signs of damage, the receiver must be replaced with a new one.
Sometimes drivers install an additional radio signal amplifier on their vehicle.
Among the most common reasons for poor radio performance is a faulty, or more often outdated, radio tape recorder. Therefore, when buying a car, we recommend replacing this equipment first.
Do-it-yourself installation of a radio in a Lada Priora
In the first case, we are considering the installation of a 1 DIN audio player, which does not require changing the shape and parameters of the plastic base of the console. Before installation, disconnect the vehicle from the power source by removing the negative terminal of the battery.
It is recommended to divide the installation process of a standard audio player into several stages in the following sequence:
- 1. Preparing the hole for installation. To do this, remove the plastic cover covering the niche provided by the manufacturer for installing the audio player;
- 2. Determination of connectors for connection. The hole for installing the audio player contains several connectors: for gray power connectors and for brown speakers;
- 3. Connecting the player to car connectors. If the connectors of the audio player and the machine comply with the ISO standard, they must be connected according to the diagram or through an adapter;
- 4. Installing the radio in a normal hole. Remove the magnetic frame and install the housing into the standard hole in the car console. When installed correctly, there will be a slight click;
- 5. Activate the player by clicking the "Reset" button.
Installation of a 2 DIN type audio player is more labor intensive due to the formation of an appropriately sized hole in the Priora console. The installation process is similar to the 1 DIN installation system, the connection is made according to the same principle.
bluetooth adapter
Designed only for radios that have a Bluetooth function, but do not have a standard adapter installed. It is required to be selected individually for each radio model and is a small unit connected to the audio system. Most models have a USB input, AUX, a memory card slot and built-in memory, which expands its functionality and allows you to use it not only for Bluetooth communications, but also as a storage for data and music.
Bottom line: to connect a smartphone on the Android or iOS operating system to a car audio system, no special knowledge is required - just pair it once, and in the future there will be no problems with the connection.
This will allow you to play music from your phone or use the hands-free system, which will provide additional safety for the driver and passengers.
Firmware for Lada Priora radio
Modern technologies are developing rapidly, even car gadgets are improving. The firmware of the Lada Priora main unit allows motorists to expand the player’s capabilities by adding additional functions that are not included in the standard software. The updated radio interface can integrate a convenient touch keyboard, new programs and new versions of players with the ability to play all audio and video formats.
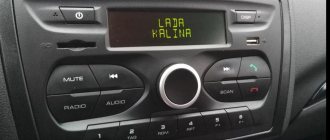
Priora 2 radio set
Firmware for the VAZ 2170 audio system is performed using an SD card with a capacity of at least 4 GB, formatted in the FAT system.
Firmware for the Lada 2170 radio is quite simple:
- 1. You need to find a suitable program on the Internet and save it to your computer. As a rule, motorists share such programs on thematic forums;
- 2. Save the downloaded files to a memory card;
- 3. Insert the SD card with the necessary information into the corresponding slot of the radio;
- 4. Reboot the player by clicking the “Reset” button, after which the update program will start automatically. Thus, the firmware is completed, as evidenced by the scale on the radio monitor;
- 5. After the firmware is completed, remove the memory card and restart the player, after which you will be able to use the updated interface.
When choosing a program with which the firmware of the Lada Priora main unit will work, special attention should be paid to its description. Various upgrade options may include unnecessary and unneeded features, which will subsequently overload the device's memory and slow down its performance.
You should also select a program to expand the device display, otherwise the firmware will require constant screen calibration. The best solution for updating the radio software would be to contact experienced specialists who provide this service. This will avoid some unexpected complications when installing the wrong firmware.
Tuning
A large number of domestic motorists appreciated the characteristics and equipment of the Lada Priora 2011, the price of which is affordable for everyone. The national manufacturer literally captured the imagination of potential buyers by adding to the possible configuration options for the Lada Priora (and the price did not increase) the presence of a standard radio and 4 speakers. The audio system with the proud name Ural should play any file formats and support connectivity via USB and Bluetooth. The emergence of such opportunities suggests that the domestic automotive industry, or more precisely the part of it that is responsible for packaging, is gradually reaching the global level. If you wish, you can immediately get a Lada Priora station wagon (the price will pleasantly surprise you), equipped with everything you need, get in and drive off. As practice shows, most car owners still prefer to buy speaker systems from well-known world manufacturers for their cars. Most often, a cassette player on a Lada Priora is purchased in a store that sells various car gadgets; here they will help you choose not only a cassette player with acoustics, but also GPS navigators, parking sensors and other useful car accessories. Audio equipment from Sony and Pioneer is extremely popular among our motorists. These brands constantly compete with each other in both the expensive and budget segments. But the main criterion when choosing a radio is your convenience, because your safety when driving a Lada Priora hatchback 2011 (the price of which is simply pleasing) depends on this. Pay attention to equipment that has convenient remote controls, as well as the ability to connect components and a subwoofer. The price of a standard Lada Priora radio is 6,000 rubles
Tips for installing a radio in Lada Priora
To avoid unexpected difficulties during the installation of the radio in the Lada Priora, it is recommended to use the advice of experienced motorists:
- 1. Before installing the radio, you need to thoroughly study the connection diagram for multimedia devices. If the player's connectors are connected incorrectly, there is a high probability of failure of some vehicle systems;
- 2. There are many models of radios from different manufacturers. Some have custom connectors with an optional ISO adapter included. This fact should be taken into account when choosing an audio device for Lada Priora, since one of the connection options in this situation would be to cut the wires and solder them directly to the car wiring;
- 3. When directly connected to the main unit, special terminals can be used;
- 4. The connection diagram for the ISO audio player will remain the same when replacing the radio with a new one.
Do not twist or wrap electrical tape to directly connect cables. This type of insulation is dangerous when using a car in winter, since at low temperatures the adhesive tape becomes deformed and breaks, causing a short circuit in the car's cables.
Connection and pairing
You can connect your phone with the Android operating system to your car audio system in a few steps:
- Put the radio into standby mode.
- Enable Bluetooth in the settings or in another way described in the instruction manual (for example, in Mystery radios you need to remove the front panel and hold the “Pair” button for 4 seconds).
- Pair your phone with the device. To do this, you need to turn on Bluetooth on your phone and find the Bluetooth audio system, then enter the PIN code on two devices (the standard PIN in most devices is 0000).
- The equipment is connected and ready for use.
The Bluetooth connection functionality includes the handsfree system, the ability to view images and listen to music from the phone.
How to find the function to turn on Bluetooth and synchronize devices correctly?
Inclusion
To turn on Bluetooth, you can use the tips from the device’s operating instructions or find the option yourself in the radio.
For popular brands of car radios (JVC, Pioneer, Sony, Ford and Priora stock radios), you need to do the following:
- To enable Bluetooth on a JVC radio, you need to go to the settings, find the Bluetooth section and put the device in the operating position, after which you can pair. In addition to turning it on, in this section you can configure the “hands-free” mode, microphone and select the device to be connected if pairing has already been carried out.
JVC radio
- You can turn on Bluetooth on the Pioneer radio by going to the initial settings and using MULTI-CONTROL to select BT-AUDIO. Afterwards, you can search for the phone from the radio or find the device from the phone for further actions.
- To enable bluetooth on your Sony radio, you need to go to the settings and select the desired section, after which you can pair. Further communication between devices will be carried out automatically.
- To enable Bluetooth on the Ford 6000CD radio, just go to the settings menu and enable Bluetooth in the appropriate subsection. In a Ford Focus 2 with a Ford 6000CD radio, after entering the menu, you need to press the right arrow once, and then press “select” 6 times. After this, an indicator should appear indicating whether Bluetooth is enabled or disabled.
Radio Ford 6000CD
- You can enable Bluetooth on the Priora by finding the corresponding section in the menu. After synchronization, the functionality will be available in full - calls using the car speakers (handsfree) and playing audio tracks.
Synchronization
The process of synchronizing with a new device on almost all radios is the same, and to complete it, you need to perform several steps:
- Bluetooth must be turned on on all devices.
- Conduct a search and find the equipment you need.
- Enter the pairing code on both devices (default is 0000).
- If everything is done correctly, the equipment is ready for use.
After pairing, the PIN code can be changed (up to 16 digits). To enter numbers on the audio system, MULTI-CONTROL is used - by rotating, the required combination of numbers is selected (using the Pioneer as an example).