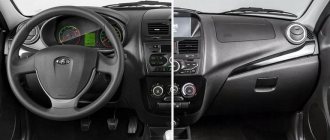
The definition of “standard radio, multimedia Granta FL” is rather a managerial ploy to promote audio systems for the restyled replacement of budget push-button ones with modern touch-screen MMCs. In fact, it is correct to call them “multimedia in regular places” of these cars.
The fact is that AvtoVAZ, as a rule, installs push-button MMC on budget assemblies, which means those intended for our brother, and touch-screen audio systems on the top-end configurations of the face-listed Grant.
However, to please our garage comrades, our Chinese comrades quickly mastered the production of restyled touchscreen multimedia for installation in standard places on torpedoes, including Grant FL instead of standard push-button audio systems.
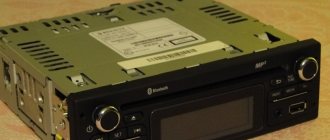
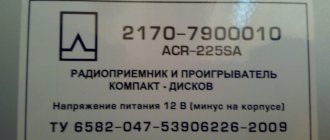
For an objective comparison of push-button and touch-sensitive MMCs, which are installed on Grants FL at the factory, we will consider both a standard MMC with buttons, namely Handsfree with article number 2190-7900010-20, and a 9-inch restyled “head unit”. Such as Winca S185.
Pinout diagrams for radios of various Lada models
Pinout of Lada head unit
Among Lada drivers there is a special type of driver who constantly improves and refines the car’s audio system. Changing, often in a circle, a bunch of head units, eventually arriving at the point where the standard radio is put in place. If you belong to this type, or simply, for some other reason, removed the radio from its original place, and now want to return it, then our material today is for you! The pinout of the standard Lada radio does not hide anything particularly complicated; anyone with growing hands can handle it. Well, at least from somewhere. To begin with, we will have to deal with the wires, namely their color. Which wire will be responsible for some component of the car's audio system, and it would be advisable not to confuse them. Although in this case there will be nothing terrible and it is not forbidden to search at random. But there’s no need for you and me to wander around; we’ll figure out the color marking of the Lada wires right away. So let's get started.
Let's look at the color scheme of the wires for cars of the Lada family of the following models: Vesta, Priora, Grenade, X-Ray, Largus, Kalina, Niva 4×4, Chevrolet Niva
Pinout diagrams for radios of various Lada models:
Color scheme used on new Lada cars
It is worth saying that connecting any third-party radio to a Lada car is not difficult, since the standard connectors on these cars are made according to ISO European standards - plugs.
Now let's look at the pinout diagrams of different models:
Lada X-ray Media NAV pinout
Pinout of Lada Largus (by analogy with the x-ray diagram)
+ Pinout of radio Lada CD-5151RMP
From the above diagrams it is clear that connecting a radio to a Lada family car is as easy as shelling pears! These cars not only have great potential for tuning audio systems and are easily soundproofed, but also have easy access to wiring and a standard ISO connector, allowing you to easily connect almost any GU (head unit, radio). I hope it won’t be difficult for you to understand the diagrams presented above. I wish you good luck in pinouting your Lada radios! Staff and non-staff. May the force be with you! Meet us on the pages of the site inmu3.ru!
Source
Other features of standard multimedia
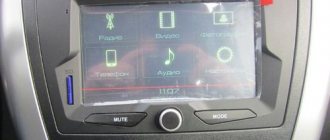
The general feelings of owners who have a standard radio in their car are positive. The display is informative and easy to read. The touch keyboard functions flawlessly. The standard radio itself is capable of high-quality reproduction of sound programs from micro-SD cards. However, using USB format media can be challenging.
The device also has some nice options:
- equalizer;
- activated replay mode;
- random sequence of playing tracks (“Random”).
Multimedia LADA Granta is capable of supporting images in 5 formats, which allows you to view photos without any problems. But not everyone can make the correct settings for the “phone” option on the first try. This function will be convenient for a busy owner who is forced to communicate by telephone even while on the road.
The standard speakers of the LADA Granta disappoint many, since even at a 45 percent volume level they emit wheezing, characteristic of bass overload. Some timid music lovers are alarmed by volume jumps when switching to “radio” mode.
Long mudguards on Granta
Lada Granta tow bar
On-board computer for Grant
Here is a list of shortcomings that provoked many Grantavods to purchase an alternative version of the radio. Today, the progressive version “2191” claims to replace the outdated standard device “2190”. The new device will please you:
- improved sound;
- interface for connecting with a rearview camera;
- navigation complex;
- integrated input for connecting a subwoofer.
Modern radio for Lada Granta FL 2019-2021
I want to share my joy. Not long ago I had to get rid of my old Lada Kalina 2008. I needed a new car with a large trunk for work. I purchased a new 2022 Lada Granta station wagon. The car is empty as a barrel. Well, at least they installed power steering and power windows. First of all, I took care of the safety and security of the car. For this purpose, an alarm system with auto start was installed.
Next came the question of music in the car. Having visited several car audio stores, I came to the conclusion that I don’t want to pay 1,500 rubles for connecting two connectors, and I don’t want to install the cheapest radio for 4,300 rubles. If you buy music for your car, then buy only a modern radio with a screen. The store “delighted” me by informing me that I would have to fork out for a car frame for the new Granta, because the panel has its own shape, and you can’t just install a standard 2 Din radio in it. They gave me a price tag of 12,800 rubles for the radio with a frame, and another 1,750 for installing all this in the car.
The amount is not small. I decided to hold off on music.
And then I remembered about the well-known Aliexpress. Maybe I’ll be able to find something there for my new Grant.
To be honest, I searched for a long time, but it was worth it.
It turns out that the Chinese quickly jumped in and created a ready-made solution for the Lada Granta FL. They made a car multimedia center with navigation, Internet, speakerphone, and all sorts of other bells and whistles. But what surprised me most was the price of this fancy radio. For only $98. Just imagine, 6500 for such a device!
Ordered on the same day. I understood that I was taking a risk. The product is new, there have been no buyers yet. And there’s no one to even ask. But who doesn't take risks?
Received it in 21 days, intact. They brought it straight to your home and handed it over personally. I open it, and there.
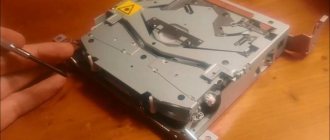
Radio with huge touch screen. On top of the sensor there is very high-quality anti-reflective glass, like on expensive Samsung devices. Everything is in films. I went to install it.
Installed it myself in 10 minutes. It turned out that everything fits perfectly.
I removed the regulators (left and right) on the heater control unit, pryed the unit with a screwdriver around the perimeter, and it snapped off. Next, I unscrewed the 2 screws that hold the radio, also pryed it open with a screwdriver, and it came out.
I disconnected the power connector, the antenna, and removed the radio. Next, I connected all the connectors that came with the radio to the radio, having previously extended the GPS and USB antenna into the glove compartment. I connected the main connector to the car, and that’s it.
The radio tape recorder fit like original, without gaps. The standard connectors for connecting power and speakers fit perfectly. Nothing needs to be redone.
The kit also included a bunch of wires for connecting a camera, an amplifier, an antenna for GPS navigation, USB extension cords, and much more.
I immediately switched the settings to Russian. Set up the radio and equalizer. The sound of the radio is amazing! Bass and treble are adjustable. And it’s normal to hammer like that! I turned on the video clips, the screen and the image are absolutely amazing! There is enough RAM. The memory is 16 GB, you can put a lot of things into the radio’s memory, and you don’t need to carry any flash drives with you. I installed Yandex navigator with Alice, talked, she understands everything, it works. There is already a microphone built into the radio. I tried calling and talking through the radio. Very comfortably.
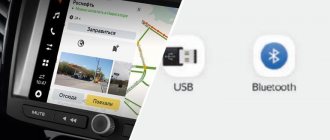
Now in one device Radio, Music, Video, Navigation, Bluetooth and speakerphone, Internet via Wi-Fi via smartphone, camera, DVR.
You can watch TV and YouTube via the Internet. The kids can play games, watch cartoons. Later I will install a rear view camera and a front camera with a DVR.
Before I ordered the radio, I found a way to save more than 1,200 rubles when purchasing this radio and two cameras. It turns out that you can get these cameras for free by applying special discount coupons when purchasing.
I cheated a little and registered again on the site, as if I was a new customer. Well, this is to get coupons for purchases.
Then I received coupons for $19 and applied them to the purchase. Link to coupons
I found a radio for 6500 here (I immediately added it to the cart so as not to have to look for it again)
Source
Video - Installing acoustics in Granta Liftback
Tools:
- Open-end wrench 10 mm
- Small flat screwdriver
- Knife (if necessary)
- Soldering iron (if necessary)
Parts and consumables:
Notes:
Initially, in this car model, the calculation is made for a 1-DIN radio. If the owner wants to install another type, a newer one, for example 2-DIN, he will need to start sawing the partitions in the console itself. And if the size is not suitable, then a suitable cantilever frame will have to be cut into the panel. This is much more complex than the first type of installation listed. In the second option, it is better to entrust the installation to a specialist, because there is a high risk of damaging the interior trim.
Here is a description of how to install a 1-DIN radio.
1. Remove the negative terminal from the battery.
Connecting the radio, connector pinout
From time to time I answer the question about the correct connection of the radio. Many people do not understand the process of connecting via an ISO connector. Today I’ll write down for everyone (and for myself too) a link to an article about the pinout of the ISO connector. vaz-2109.ru/avtozvuk/podklyuchenie-magnitoly.html
For Peugeot (Citroen) owners, I’ll add that in the power block it is necessary to change red with yellow - so that the radio does not reset the settings every time the ignition is turned off.
Comments 25
I have a similar problem. I called that there is constant power on pin 7, and after the ignition on pin 4. After turning off the ignition, there is no reset? The radio works as expected. What's wrong?
ps stock radio for Ford Galaxy 1999.
This means that the standard radio has a suitable pinout. A similar situation happened with Pioneer radios, when it was necessary to swap the red and yellow wires. Manufacturers of radio tape recorders provide this opportunity, implementing this in additional features. contacts on the cable
Connecting a car radio is a job that you can do yourself. But for this, it is worth understanding the rules and features of connecting the device. Despite the variety of audio systems and car brands, the connection is made according to a similar algorithm everywhere, but with minor nuances.
Types of radio tape recorders
Let's start by looking at the types of car radios. They are:
- Full-time. Such audio systems are installed at the factory during the assembly process of the car. The peculiarity of standard devices is the variety of sizes and design options.
- Built-in. As a rule, such devices come with a curtain or a removable panel.
Connecting the radio is carried out strictly according to the instructions, because errors in this work can lead to failure of not only the radio, but also the car itself. Consequences of incorrect connection:
- Rapid battery discharge.
- Spontaneous change of radio settings.
- Sound distortion, uncontrolled shutdown, severe interference.
A connection diagram with pinouts of connectors is usually easy to find on the top cover of the audio system head unit.
Types of connectors
When connecting a radio, different connectors can be used, the type and design of which depends on the make of the car and the model of the radio. Conventionally, there are two types of connectors:
- Individual. Such connectors have a number of inconveniences for the car owner, because in the absence of connection experience, difficulties arise. In such cases, it is better to buy adapters for ISO connectors.
- ISO is a standard type of connector found on almost all modern car models. Its presence eliminates problems when replacing the radio. All that is required of the car owner is to reposition the plug.
If during the installation process the connectors match, this is good. Otherwise, you will have to select suitable conductors.
Connector pinout
The next point that requires special consideration is connecting the audio system, in accordance with the connector pinout. To perform the work, it is important to know the markings of the wires (varies by color):
- Yellow (BAT or B+) - connects to the battery positive.
- Black (GROUND or GND) - connected to the negative of the battery.
- Red (ACC or A+) - ignition.
- Gray with stripes (FR-) - to the “minus” of the right, front speaker.
- Gray without stripes (FR+) - to the “plus” of the front speaker, on the right side.
- White with stripes (FL-) - to the negative of the left speaker, in the front of the car.
- White without stripes (FL+) - to the “plus” of the left, front speaker.
- Purple with stripes (RR-) - to the “minus” of the right, rear speaker.
- Purple without stripes (RR+) - to the “plus” of the right, rear speaker.
- Green striped (RL-) - to the negative of the rear speaker, on the left side.
- Green without stripes (RL+) - to the “plus” of the rear speaker, on the right side.
Please note that paired wires, one of which has stripes, belong to the acoustic part of the wiring and are connected to the speakers of the radio. During installation, be careful with polarity. If you confuse “plus” and “minus”, there may be problems with playing bass.
How to connect power
The greatest number of errors are made when connecting power to the car radio. To solve the problem, use separate wires to connect to the battery, having a cross-section of 2-4 sq. mm. To achieve maximum sound purity, connect the yellow and black wires to the battery. In the yellow wire circuit, install a fuse with a rating of 10-20 Amps. As for the red wire, it is connected to the ignition circuit.
In practice, the yellow and red wires are often connected together, because the audio system must work regardless of the position of the key in the ignition switch. But this option has a disadvantage - the risk of battery discharge while the car is parked. This is due to the fact that the car radio will be in standby mode all the time (even after turning off). To avoid draining the battery, place a shutdown button on the red wire. When the car is parked for a long time, the power will be turned off automatically.
How to change the standard radio
Many people are interested in how to remove the standard audio system and install a built-in type device. The reason for the replacement may be the low power of the standard radio or the lack of certain functions. In any case, when installing a new device, it is important to choose the right adapters and take into account the pinout of the connectors.
Watch the video about replacing the stock radio below.
For example, car radios of type KY832190A on Lifan cars have their own plugs. The device is installed in an existing 2DIN space provided by the manufacturer. To install a radio of this type on other cars, you will need special adapters to connect to ISO-type connectors.
Let's look at how to connect built-in radios from the JVC, Pioneer and Sony brands:
- Manufacturer JVC thought about its customers and provided everything necessary for connection. So, complete with a car radio, there are studs for mounting in the front and rear, and the switching itself is done using a classic ISO connector.
To improve sound quality, the fuse on the end of the head unit is moved to the socket located nearby. The CP and reinforced concrete wires, which need to be insulated, are connected to the battery. To improve sound quality, choose high quality wires. This recommendation applies to various types of radios.
- Sony radios, as a rule, are connected according to the classical scheme, using ISO connectors. Some audio system models provide ISO connectors, which have individual features and require the purchase of ISO adapters. As a last resort, you will have to cut the wires and connect them to the connectors, taking into account the diagram and pinout of the connectors.
It is worth noting that it is not advisable to cut the wires. If there is no other option, use heat shrink tubes instead of electrical tape. The disadvantage of insulating tape is that in cold weather it peels off, and the risk of a short circuit in the system increases. In any case, connecting the radio is faster if the manufacturer has provided an ISO connector.
- Pioneer car radios also have ISO connectors. Their peculiarity is the presence of two plugs. The black wire powers the audio system head unit, and the brown wire is intended for output to the acoustics. When installing Pioneer radios, it is important to correctly connect the positive wire and add a fuse to the circuit.
As can be seen from the article, the presence of an ISO connector in the radio greatly simplifies the process of replacing the device.
Video: How to identify the power contacts on a car radio
If the video doesn't show, refresh the page or click here
Video: Replacing the standard radio with a Pioneer in a Daewoo Nexia
If the video doesn't show, refresh the page or click here
Initially, it seems that installing a car radio is a simple matter that any car enthusiast can handle. But sometimes the installation procedure raises questions related to connecting the device. Then an adapter for the radio comes to the rescue. Read more about markings, types and pinouts below.
How to install a head unit on a car with basic equipment?
Since the Lada Granta base is not equipped with musical equipment, and only a push-button radio is installed on board, the question justifiably arises: how is the standard radio installed in the cabin? In reality, this is a simpler procedure than it might seem at first. The occurrence of problems during installation is excluded, since a seat is already provided for the standard device on the Lada Granta panel, regardless of the level of equipment.
You can purchase the device in a retail chain or on an Internet site, where you can actually find an improved version, equipped with a navigation system with a detailed map of the Russian Federation. Don't forget to buy an additional luxury panel. Although multimedia will fit into the standard panel without any problems, the appearance will not be so beautiful. The price for this device reaches 2.5 thousand rubles.
Next comes the installation of the radio. The design feature of the landing niche in the Grants panel does not provide for the need for additional wiring.
- The first step is to remove the plastic pocket in the audio system opening. This is done using a flat-profile screwdriver. There is access to several connectors that involve connecting a radio.
- We remove the frame from the head unit and fix it at the location of the pocket.
- Next we move on to the connection. To do this, connect a couple of connectors and install the device in the landing niche.
- After this, you can install the speakers in the front door cards. The procedure involves the need to dismantle door trims with unlocking handles and adjust the position of the glass. Using a special template, we begin cutting out the mounting holes.
We attach the speakers to the cards using self-tapping screws. We insert the cables from the speakers into the input connectors intended for this on the rear panel of the car radio. We install the decorative door panels in their original places and evaluate the sound provided by the standard head unit. Thus, the radio is connected.
Attention! We carry out all manipulations with the battery disconnected from the on-board network!
Markings and types of connectors
Today, all car radio connectors comply with the ISO standard, and two connectors are used. Each is a plug with eight pins, sometimes the manufacturer can combine them into a single housing. Energy consumption sources are connected to one of them; it is marked with the letter A. As for the second, acoustics, that is, speakers, are connected to it. The connector designation is marked with the letter B.
Adapters for car radio connectors
Head units with three outputs can be found on sale, but they are rare and usually represent an exception.
Even if the connected sockets do not correspond to each other, the car owner has several connection options:
- You buy a special adapter for the radio, which can be connected to the outputs of the speaker system.
- The second method is considered “collective farm” among car enthusiasts. Its essence is to cut off the non-standard output and wind the necessary wires to it. But we do not recommend using this option, because eventually the wires will begin to unwind, so the “collective farm” procedure will have to be repeated. In addition, the cost of adapters is not so high to use this method.
Method number 2 (simpler)
Required
: GPS U-Blox 7 VK 172 (price about 500 rubles), see in the AliExpress catalog.
Install the New Menu firmware (see instructions), which includes the driver for U-Blox 7. Install U-Blox 7 VK 172 into the USB port of the standard MMC and check operation (start navigation).
[media=https://www.youtube.com/watch?v=nikdTCsvLc4]
Let us remind you that there are other improvements to the MMC that expand its capabilities. For example, it would be useful to install a rear view camera on a hatchback, station wagon or liftback. Recently, AVTOVAZ has also begun to equip the standard MMC Lada Granta and Lada Kalina 2 with navigation.
Keywords: cassette player Lada Granta | cassette player Lada Kalina | cassette player Lada Priora | torpedo Lada Granta | torpedo Lada Kalina | Lada Priora torpedo
0 0 0 0 0 0
Share on social networks:
Pinout of a standard Euro connector
What does a car owner need to know about the pinout of the Euro connector? Let's look at the notation using output 10478 as an example.
Upper power connector "A"
As already reported, this output is intended for connecting power supplies to the electrical circuit of the vehicle.
| 1 | Not involved |
| 2 | Not involved |
| 3 | Not involved |
| 4 | Regular meals |
| 5 | To connect the antenna |
| 6 | To connect the backlight |
| 7 | To connect the ignition |
| 8 | Vehicle weight |
And although the device is equipped with eight contacts, all of them can not be used to connect the head unit. But these contacts would not exist if they did not perform certain functions. The first three outputs, as well as the sixth, are rarely used, especially for connecting budget device options. Typically, their use is due to the need to connect additional functionality, and we are talking about more advanced car radios. Please note that contact colors may vary.
If we talk about additional options, we mean:
- ANT output. This pin is used if the vehicle is equipped with a retractable antenna.
- Remote function, thanks to which external amplifiers can be connected to the head unit. This will increase the number of connected speakers. This is relevant for music lovers and owners of vehicles with a large interior, which, with proper installation of the speakers, will increase the sound quality.
- Illumination function. This option allows you to automatically change the brightness and color settings of the head unit display. If the car is moving at high speed, the screen brightness will drop so that the system does not distract the driver from driving the car. When the vehicle stops, the radio will return to the initial settings.
- Mute function. Today, many head units have this option. But this option can be activated either by clicking on the corresponding button or automatically. In particular, if an impulse from a mobile device passes through the head unit receiver, the system will automatically lower the volume so that the driver can talk on the phone without being distracted from driving.
Connectors for radios from different brands
The fourth contact is responsible for powering the vehicle's audio system. The wire from it must be connected to the ignition switch terminal and powered from the battery, but for this you should also use a fuse. This method of connecting the wiring will protect the battery from discharge, since activation of the head unit is possible after the key is turned in the ignition.
The fifth contact is for connecting the antenna wire. As for the seventh contact, it is important because it is responsible for powering the volatile memory of the head unit. That is, if it accidentally turns off, this will reset all settings of the car radio. It’s unlikely that anyone will like losing all the parameters after setting it up.
It is necessary that each of the power cables be protected by a fuse for safety purposes. If malfunctions sometimes occur in the operation of the audio system, it is advisable to install a capacitor between the seventh and eighth outputs. As for the capacitor capacity, this parameter must be selected individually. The capacitor performs a filtering function, that is, the element is designed to smooth out various fluctuations in the on-board network.
How to flash the firmware
- Buy an SD card, format it in FAT, exFAT format;
- We download the firmware for free on the manufacturer’s official website;
- We save the data in the root directory of the SD card;
- We insert the SD card into the slot on the radio, start it, wait for the update to finish;
- Turn on and off the module;
- We customize the new interface for ourselves.
If the firmware is installed incorrectly, additional screen calibration using the CAN bus will be required. It is impossible to do this yourself, only in a service station. After successful flashing, the following is available:
- graphic equalizer;
- viewing photos, pictures, videos;
- improved sound quality;
- possibility of installing a navigation system.
Disadvantages of a standard radio
- Outdated firmware from the “box”;
- Not all options are initially available;
- The need for periodic software updates;
- Push-button interface.