Regardless of whether there is a desire to overexpose or there is a need to replace failed light bulbs, repairing the Kalina heater backlight becomes a headache for car owners. Despite the apparent simplicity of the operation, the car's designers have implemented a complex design for mounting the center console. You need to disassemble and install it carefully, carefully and with patience.
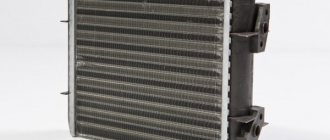
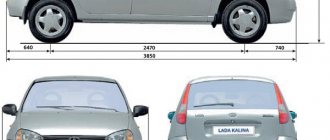
Dimensions of the standard radiator of the Lada Kalina stove
At one time, I was never able to find either the dimensions or a clear image of the radiator for Kalina’s stove; one might say, I had to select the radiator blindly, agreeing to return it if it didn’t fit. Therefore, I hasten to share this information with you, dear readers. I hope it will be useful, for example, if you decide to install a heater radiator from another car.
So, the dimensions of the Kalina stove radiator: 240x195x50 mm
You may also find the dimensions of the niche in which the Kalina heater radiator is installed useful: 54x198 mm. However, if you are planning to install a heater radiator from another car, keep in mind that the edges of this niche are strongly rounded:
help with the stove
help with the stove. Half the screen went dark. At first the light came on 20 minutes after driving, but now it doesn’t. help me how and what to do thanks in advance
Subscribe to topic
Notification by e-mail about replies to a topic during your absence from the forum.
Subscribe to this forum
Notification by e-mail about new topics on the forum during your absence from the forum.
Download/Print theme
Download the theme in various formats or view a printable version of the theme.
Lamp selection
When choosing lamps, you can go in two ways:
- Install regular incandescent lamps, such as those installed by the manufacturer.
- Install LED lamps.
We recommend installing LED lamps, since their lifespan is longer than standard ones and you can also slightly reduce the load on the generator. Also keep in mind that LED lamps have pros and cons. If you install an LED lamp and it does not light, turn the socket with the lamp 180 degrees.
The instrument panel on Kalina uses a type of lamp with a W1.2W socket. In any auto store you can buy a socket with a lamp or a light bulb separately.
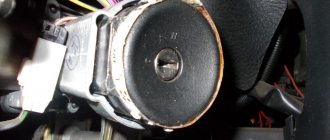
Removing the center trim
Before you begin the repair procedure for the Kalina stove backlight, you need to stock up on everything you need. The list of required tools is modest: you will need Phillips and flathead screwdrivers, LEDs with resistors or assembled lamps. The algorithm for removing the center console itself is as follows:
- Turn off the radio. The device is removed completely after first disconnecting the wires going to it.
- Removing the plugs. The plugs located next to the alarm button are removed by pressing them from the inside through the space vacated by the tape recorder.
- Freeing the emergency lights from the wires. The plug is held in place by a latch on the button, but there is enough space here for comfortable manipulation.
- Unscrewing the bolts. Two screws for a Phillips screwdriver are hidden under the plugs; if you unscrew them, the console will only be held in place by the latches around the perimeter.
- Removing the heater adjustment levers. To remove them, you need to pull them towards you with a slight force. It was possible to remove them earlier, the main thing is not to forget (note that the speed controller does not need to be removed).
- Removing the center console. Starting from the bottom, you need to pull the console towards you, removing it from the metal clips. Try not to make too sudden or rough movements to avoid damaging the panel.
- Disconnecting the last wires. After removing the console, you have access to the wires leading to the speed controller, as well as the lighting bulbs. This is the last thing holding the plastic module.
In situations where it is difficult to remove the radio, a flat-head screwdriver will come in handy - you can use it to remove the plugs. Then standard actions are carried out according to the algorithm, only the wires from the radio are disconnected in the last step.
Diagnostics
- Check the panel backlight brightness adjustment slider. It often happens that the brightness adjustment is at a minimum and the backlight is very dim or does not light at all;
- Check the panel hanger fuse. On Kalina, the fuses are located under the cover of the light switch block. In the block you need to check fuse F7, it is responsible for the panel illumination. The fuse location diagram is on the light switch block cover;
One of the most common problems is a wiring problem that causes the panel backlight to not work. This usually happens when some wire breaks. In this case, only an electrician can help you.
Replacing light bulbs
When the console is freed, you can disassemble the backlight of the Lada Kalina stove without unnecessary interference. Essentially, disassembly comes down to removing burnt out light bulbs. This is done with a slight twisting movement counterclockwise.
The light bulbs are sold assembled, but purchasing them can be problematic. Therefore, it is often necessary to resolder burned-out elements, for which it is recommended to stock up on LEDs. The lamp replacement process looks like this:
- by pressing with a thin screwdriver on the base of the housing lock, the sides of the light bulb are squeezed out one by one;
- at the base of the old lamp, the legs leading to the terminals are cut off;
- diodes purchased in advance are soldered to the terminals;
- the resulting structure is embedded into the lamp body.
Once the bulbs are back in place, you can reinstall the console. Here you need to pay attention to the fact that the top part of the panel is inserted first. You need to make sure that the air intake regulator slider fits into the space allotted to it - otherwise the console will not stand up. Care with the wires is important - after connecting them to the controls and buttons, they should not curl up under the panel; they must be returned to the tunnel.
When installing the center console, force will be required to secure the metal latches. Please note here that light pressure is enough to secure it, otherwise the console will burst. If problems occur, check what exactly is preventing the plastic cover from returning into place. Excessive force will lead to cracks and chips.
Compliance with the rules and recommendations described in the article will help solve problems in a situation where the backlight of the Kalina stove does not light up. The procedure is simple, but the integrity of the most noticeable element of the interior - the central lining of the instrument panel - depends on the dexterity and calmness of the master.
Replacing the stove on Kalina using the radiator reverse method
So, let's begin. We park the car so that on the left you can open the driver's door and carry out work in the area of the pedal assembly. Open the hood, remove the air filter and air duct.
We remove the battery and the platform under it (keys 10, 13, ratchet wrench with a head 13).
To completely remove the platform, unscrew the hard-to-reach nut with a 10mm head, which secures two pipelines to the platform. These hoses have to be unscrewed every time you remove the platform under the battery, so I connected them together and don’t screw them to the platform anymore, because they won’t go anywhere anyway
Next we need to drain the antifreeze, but this can be done in at least two ways.
How to change light bulbs on a Kalina stove - search on DRIVE2
[29] Replacing the ventilation control unit bulbs is overdone.
...eliminating crickets and finishing the wiring. It all started with the fact that I decided to replace
long-burnt-out
bulbs
of the ventilation control unit.
I bought light bulbs
. I removed the central torpedo (beard), it’s easy to remove - I won’t describe it.
Replacement of heater handle illumination lamps - Lada Kalina Sedan.
It's time to change
heater
control light bulbs , otherwise they haven't worked since the moment we bought the car.
I installed SMD LEDs, choosing between conventional light bulbs
and conventional LEDs based on the quality of illumination. The light is a little deeper.
Replacing light bulbs in the stove regulator. — Lada Kalina Hatchback.
A light bulb burned out a couple of months ago.
in the
stove
. I had some free time and a desire to tinker with the panel. So: remove the plugs and unscrew the two screws, remove the regulator wings (leave the middle one), carefully.
Replacing light bulbs in the heater illumination - Lada Kalina Sedan.
Due to the fact that I love it when everything that should work works, and everything that should burn burns, I changed
burnt out
bulbs
in the
heater
. It would seem like such a small thing, but it took me about two hours!
Replacing the heater light bulb - Lada Kalina Sport.
Hello friends! A post about how I decided to change
burnt-out
stove
light bulb . After reading Drive, I decided to tackle this seemingly simple task. Of course, removing the beard was not difficult.
Illumination of heater mode switches / Backlight.
Review from the owner of Lada Kalina
station wagon - spare parts.
I decided to start replacing
the backlight (nothing special, just standard
light bulbs
).
Lada Kalina
Station wagon "Robot" package.
› Logbook › Illumination of heater
/ Backlight switches.
Replacing backlight bulbs in the heater block - Lada Kalina.
I finally bought some light bulbs
with cartridges in the air conditioning unit: the
stove
and flow directions were not illuminated.
I did everything in 10 minutes. I didn’t remove the radio, everything is already available. heater
and flow knobs
Replacing the backlight of all instruments and interior buttons - Lada Kalina.
Review from the owner of Lada Kalina
sedan - tuning.
The first thing that caught my eye about Kalina
was when a friend showed it to me (to whom I
By the way, I want to note that in all the buttons and the stove
The LEDs are immediately set to 12 volts. And white ones are designed for 3. Therefore, everywhere there are.
Illumination of heater knobs - Lada Kalina Universal, 1.6 l., 2008.
Good day to all! Since today is a holiday, I will start this entry by congratulating all men on Defender of the Fatherland Day! Happy holiday, guys! Well, to those who do not celebrate this holiday, congratulations on Mexican Constitution Day.
replacing the “climate” backlight - Lada Kalina Hatchback, 1.4 l., 2008.
then changed
backlight in the
stove
, because I couldn’t re-solder the LED and had to go to a collective farm.
Lada Kalina
Hatchback 2008, petrol engine 1.4 l., 89 l. p., front drive, manual transmission — tuning.
Replacing dash and heater bulbs - Lada Kalina Universal.
Review from the owner of Lada Kalina
station wagon - accessories.
immediately
replaced
light bulbs
Lada Kalina
Station wagon 2012, petrol engine 1.6 l., 84 l. p., front drive
One of my dash burnt out. changing it there.
,
changed
, collected.
(135) Replacing the backlight lamps of the heater control unit.
Hi all ! I finally decided to change
Burnt out
lamps
in the backlight of the
heater
, I probably drove with faulty ones for more than a year.
There is nothing difficult to replace
. At the same time
I replaced
the burnt-out
lamp
in the cigarette lighter illumination. Now BLAP—everything is highlighted.
[30] Replacing the ventilation control unit bulbs is overdone.
Review from the owner of Lada Kalina
hatchback - electronics.
…beginning: [29] Replacing the light bulbs
of the ventilation control unit turned into
stove control unit illumination
at night. general form. The car became quieter, the ringing at 3000 rpm disappeared, but a new fat cricket appeared!
Replacing heater control bulbs. - Lada Kalina .
Review from the owner of Lada Kalina
station wagon - do it yourself.
It started when a light bulb
in the middle of the dashboard, where it shows the mileage, but I was told that it
to change
it, you have to solder it, a little later
the light bulbs
in the knobs for adjusting
the stove
.
13) Illumination of the heater control unit Lada Kalina - Lada.
After I
replaced
the backlight in the tidy and in the buttons, I began to think about how to
change
the backlight in the “
heater
.” In order to remove the center console, you need to remove the radio casing.
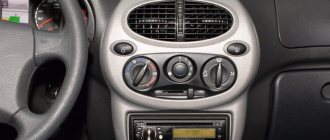
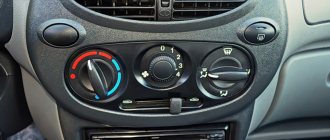
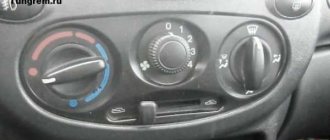
VENTILATION AND HEATING SYSTEM CONTROL UNIT
CONTROL UNIT FOR VENTILATION AND HEATING SYSTEM LADA KALINA
Ventilation and heating system control unit: i — air temperature regulator; 2 — fan operating mode switch; 3 — air flow distribution regulator; 4— air recirculation control lever; 5 - rear window heating switch
The intensity of the air supply into the cabin is regulated by turning the handle of the fan operating mode switch. This turns on one of four fan speeds.
By turning the switch handle clockwise, we increase the fan rotation speed.
The position of the flow distribution control handle sets the following directions of air flow in the cabin:
By turning the handle of the air temperature regulator, we change the temperature of the air entering the cabin. To increase the air temperature, turn the regulator handle to the left, to the red sector of the scale, and to decrease the air temperature, turn to the right, to the blue sector.
The air recirculation mode (stopping the flow of outside air into the cabin) is recommended to be used when you need to quickly lower or increase the air temperature in the cabin, as well as when driving in a dusty area or in dense traffic to prevent exhaust gases from entering the cabin. The recirculation mode can only be turned on for a short time, since this does not allow fresh air to enter the cabin and the windows may fog up. To turn on the air recirculation mode, move the air recirculation control lever to the extreme right position. To allow outside air to enter the cabin, move the lever to the extreme left position.
The directions and intensity of air flows through the side and central deflectors of the ventilation and heating system are regulated by corresponding rotation of the guide vanes and changing the position of the deflector flaps until they are completely closed.
Central deflectors of the ventilation and heating system:
1 — handwheel for adjusting the direction of air flow left and right; 2 handwheel for adjusting the flow intensity through the deflectors (when rotating up, the damper opens, down, it closes)
The direction of air flow through the deflector up and down is adjusted by pressing on the top or bottom of the deflector.
The directions and intensity of the air flow through the side deflectors of the ventilation and heating system are regulated in almost the same way (the flow intensity adjustment handwheel turns left and right).
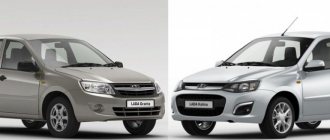
Who has more choice of engines and gearboxes?
Starting from 2011, the models are almost identical in terms of power units. Both are equipped with 1.6 liter engines with capacities of 87, 98, 106 horsepower. The difference in the number of “horses” under the hood is achieved by modifying the engines and timing belt. But the Granta in the Sport package has a special 16-valve unit with 118 hp. With.
As for gearboxes, the brainchild of AvtoVAZ has two of them - 5 manual transmissions (modernized, cable) and 4 automatic transmissions from Jatco. True, in 2018, Granta also received a robotic 5th gearbox. And a little later, “Kalina 2” also inherited the “robot”.
The engines of both models are quite economical. Fuel consumption for the engine is 87 l. With. and manual transmission - about 7 liters in mixed mode. Car enthusiasts also characterize the automatic robotic gearbox as reliable and easy to maintain.
Which car is right for you
If after reading the article you still cannot compare Kalina and Granta liftback and have not decided which car is best for you, pay attention to the most basic nuances:
Car appearance
It is of no small importance, because every day it is you who drives the car, and not someone else. Price. Think carefully about what you're willing to pay for and what doesn't seem necessary.
Based on this, choose the appropriate package Technical specifications. Decide what is more important to you - power and speed, or comfort and maneuverability on difficult roads? And perhaps the size of the trunk and the space in the cabin? Do you want to show off your car’s dynamic design to your friends and fly through the city at night, or just comfortably get from point A to point B? Only by thoughtfully and truthfully answering these questions can you choose the car that will completely satisfy you in all respects and will become a real “friend on wheels” for you!
And for a more visual comparison, we present to your attention a brief table of the main 6 characteristics:
| Lada Kalina 2 (hatchback) | Lada Granta Liftback | |
| Body length | 3893 | 4260 |
| Trunk | 355 l. | 440 l |
| Transmission | Manual/automatic | Manual/automatic |
| Engine capacity | 1600 | 1600 |
| Speed indicators | 171 km/h | 176 km/h |
| Price | 375,000 rub. | RUB 344,000 |
Differences between the algorithm on a car with air conditioning
“Kalina” with air conditioning has two heater radiators and a temperature controller in the cabin that is different from models without climate control. There are two radiators, since air conditioning freon passes through one of them, and antifreeze passes through the other, as in a car without an air conditioner. Accordingly, the temperature regulator allows air to pass through one of the radiators, depending on its position. It will be more difficult to dismantle such a structure and replace the necessary elements yourself.
It is not immediately possible to understand that the stove has become unusable, since the leaking liquid quickly evaporates and reminds of itself only by a specific smell. When replacing a radiator, you must carefully place the parts being removed, do not deviate from the instructions and follow safety precautions.
Replacing the low beam lamp:
The lamp that burns out most often, because the low beam is always used when driving in the city, except when daytime running lights or fog lights are turned on instead of the low beam, in order to change this lamp, first you will need to remove the rubber cap that covers the lamp, it sits in its place by means of tension, so as soon as you pull on it, it will immediately be removed from the back side of the headlamp unit (see photo 1), then disconnect the wires from the lamp, they are exposed and instead of a block of wires, just terminals are connected, so be carefully (see photo 2), again in the same way as with the high beam lamp, namely, hold the latch with your hands and disconnect it, moving it away from the lamp (see photo 3) and finally pulling the lamp, remove it and replace to a new one (H7 type lamps are installed in the low beam).
Cabin interior and noise insulation
The instrument panel on both models has similar characteristics and contours. The only difference is in the design of the ventilation devices, which have a different shape on each car. The new Kalina model is equipped with seats that adapt to the anatomical features of passengers, as was the case on the previous model. Grant's seats are made of cheap material, they look plain and are not very comfortable.
The interiors of both cars have impressive volumes both in the rear and in the front. The legs of the driver and passengers are positioned quite freely. It is no secret that in order to reduce the cost of the car, AvtoVAZ installed low-quality cladding in the Grant, which quickly wears out and looks unattractive. Both generations of Kalina are equipped with good quality plastic casing, which does not cause any complaints.
Which model is more comfortable?
The interiors of both cars are spacious. The legs of the driver and passengers are positioned freely. But Kalina 2 uses high-quality plastic and modern seat materials. The Grants interior is made of low-quality materials that creak and wear out quickly.
The new Kalina seats have an orthopedic structure and are comfortable for people with bad backs and drivers who often have to travel long distances. The Granta seats are made without pronounced lateral support and are not very comfortable.
Leather interior and cruise control are not available in Russian cars in any of the trim levels. But Kalina 2 has climate control in the “luxury” version, as well as a heated windshield, a rain and light sensor. Granta does not have all these options.
Both cars have poor sound insulation. But the ride in Kalina 2 is still quieter.
So, in terms of the quality of interior materials and sound insulation, Kalina 2 outperforms Granta.
Step-by-step instruction
- Before starting work, use a ten-point open-end wrench to loosen the nut securing the negative terminal of the battery and remove it. It is worth noting that when the instrument panel is removed, all readings except mileage are reset.
- For ease of operation, position the steering wheel as if driving straight.
Using a small Phillips screwdriver, unscrew the two screws securing the plastic cover of the shield.
Remove the plastic trim of the instrument panel by disengaging the two spring clips at the bottom.
Using a small Phillips screwdriver, remove the two screws securing the instrument panel.
Remove the instrument panel and go to a well-lit area to change light bulbs. It is worth noting that the lower part of the parting shield is inserted into the recess and supported by rollers on the sides.
To replace the lamp, grasp the socket with pliers and turn it counterclockwise. After turning, remove the socket along with the lamp.
Take a new lamp socket, install it in the seat and turn it clockwise until it stops. It is worth noting that if your lampshade is in good condition, the lamp can be replaced separately. You remove the lamp by simply pulling it towards you.
You can see the procedure for replacing light bulbs in the Lada Kalina dashboard in this video:
MODERNITY
Externally, GRANTA and KALINA 2 may seem very similar to a person who does not understand. But of course there are differences!
Kalina 2 has smoother body lines.
And “Granta” looks young and modern. Its design is made in strict lines. In the front bumper, the radiator grille is narrow, elongated and has clear, strict lower features.
But still, to sum up, Kalina 2 is a more modern and comfortable car, which is confirmed by the comparative characteristics of the models. See table below. The total number of points for "Kalina 2" is higher than that of "Granta", although not by much.
Summing up, we can definitely say that a car enthusiast with a budget of 500 thousand rubles should take a closer look at the Grant and Kalina family, there is plenty to choose from - four bodies: a hatchback and a station wagon for the Kalina, a sedan and a liftback for the Grant. These machines have been tested for years, and all their problem areas have been studied and already partially resolved. In the event of a breakdown, the price will not cost a pretty penny and repairs can be carried out in many services and even garages.