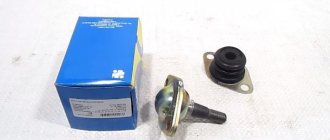
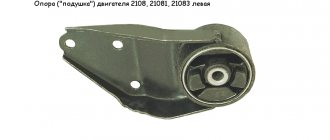
Standard engine mount - article number and price
On Lada Priora with 16 valve engines, four types of airbags are installed:
- The top support is also a guitar;
- Bottom.
- Right (front);
- Left(back);
By the way, engine mounts for Lada Priora are available in several versions. New sample parts have the best performance.
Some car enthusiasts additionally install another cushion attached to the gearbox. The VAZ-2110 with an 8-valve engine was standardly equipped with this element.
Right
The right (upper) front engine mount on the Priora is attached via a bracket to the engine, it is used for:
- Transferring the weight of the power unit to the body;
- Limitations on longitudinal movements of the motor.
Part number – 2110-1001240. In retail stores it costs 300-600 rubles. On sale you can find one pillow (only a rubber part) or assembled with metal stops.
Left
The left one, when viewed in the direction of travel, is the car engine mount, installed between the gearbox and the body, and performs the same functions as the right one. Another name is posterior (lower).
The rubber part of the cushion is identical to that used on the right, catalog number: 2110-1001240. But the fastening of the front and rear parts of the Lada Priora power unit is different, so the spare parts supplied assembled with limiters come as two different parts.
Upper
The upper support of the Priora power unit prevents the lateral movement of the motor. This part is a rod, along the edges of which there are large-diameter holes; rubber cushions are installed in them to dampen vibrations. Because of its shape, the top rod was popularly nicknamed “guitar.” In some repair manuals the part is called a rod.
The upper “guitar” is available in several modifications. A special aluminum frame and improved damping pads used on new parts increase the service life of the unit.
Replacing the upper support (rod) of the Lada Priora engine is easier and therefore faster than replacing other mountings of the power unit of this car.
Lower
The lower engine mount, also known as the right rod, in the Lada Priora is the same as the upper one, these are two identical parts. Therefore, everything that is said about the upper “guitar” is true for her. Sometimes the lower engine mount is called the rear engine mount, which in the Lada Priora spare parts catalog is designated as the left engine mount.
Additional at the checkpoint
Additional support is not provided for the 16-valve Lada Priora engine. But Prior owners often install it themselves. This does not require any modifications; the design of the gearbox housing and body of the Priora is similar to the VAZ-2110.
Its installation makes the engine mount more rigid, jerking when driving in low gears, and “nodding” of the power unit during sudden accelerations and stops stop. But the vibration transmitted to the body increases.
The rear gearbox rod is designated in the catalog number 2110-1001280 and is supplied assembled with a mount. Price – 500–800 rub.
Some features of engine mounts on a VAZ 2109 car
When developing cushion designs to reduce vibrations of the power unit, manufacturers are guided by the magnitude of the loads that the supports perceive. These devices constantly perceive loads that change periodically. One operates when the car is stationary - the weight of the unit; at start - the other. When the car moves backwards, the airbags perceive negative forces. Sharp acceleration, unexpected braking, encountering an obstacle or getting into a pothole cause the action of negative forces. The installed rear, front and side supports should extinguish them. For the manufacture of elements, natural rubber, high-grade rubber of the SKI-3 brand, high-quality steel and special glue are used. Engine mounts can withstand from (-45) to (+70) degrees Celsius. This indicates that for the VAZ 2109, the side left and right, front and rear engine mounts should be used only those manufactured by the manufacturer. In this case, they will meet all the requirements of manufacturing technology and are supplied to specialized stores. Car owners should purchase products from reliable suppliers who have proven themselves and have good reviews from customers.
Factors influencing the replacement of pillows for a VAZ 2109 engine
All manufactured products have a warranty period, after which they may fail. This also applies to the supports for the power unit of the VAZ 2109 car. Rubber naturally ages, it can crack from long-term use. In addition, there are also mechanical breakdowns associated with the consequences of an accident, an unexpected collision with an obstacle, an encounter with a sewer hatch along the way and many other reasons. Replacing the VAZ 2109 engine mounts is necessary when the following is detected:
- Body vibrations.
- A knocking sound that occurs when starting or braking a car, difficult gear shifting or unexpected acceleration.
- Replacing the timing belt is accompanied by great difficulties. This is due to the fact that the sagging engine “approaches” the right mudguard almost closely, and it may interfere with the removal of the timing belt cover, and servicing the engine will be difficult.
- Strong subsidence of the unit increases the load on the CV joints. The geometry of the work may change on them, which will reduce the service life of the structures.
- A barely perceptible knock appears in the backstage area. This occurs due to engine sagging. In this case, the gearbox slider may begin to touch the outer surface of the anti-roll bar.
- In the event that the replacement of the engine mount on a VAZ 2109 is not carried out in a timely manner, the cost of further repairs will increase significantly.
Factors affecting the resource
The price of VAZ-2109 engine mounts is about 500 rubles. Most experts recommend choosing only products that are recommended by the car manufacturer. But there are several factors that affect the resource of these elements:
- Natural production. All elements, including pillows, have a maximum service life. And hardly anyone can surpass him. They are not able to develop a full resource for reasons that will be discussed below.
- VAZ-2109 cars experience very high mechanical loads when driving on uneven roads, colliding with curbs, etc. And this significantly reduces the service life of the engine mounts.
Replacement
The process of replacing Lada Priora engine mounts is described below, as well as the tools that will be needed to carry out this work. By following these step-by-step instructions, work on replacing the Priora engine mounts can be carried out without much effort in the shortest possible time.
Required tool:
- Ratchet with 13, 15, 17mm heads. Head Torx E10;
- Open-end or socket wrenches 13, 15, 17 mm;
- Jack;
- Part of a wooden board;
Replacing the right support
If the car has a crankcase protection installed, it must be removed.
We jack the engine into the crankcase, placing the support through a wooden board.
Unscrew the central nut securing the support to the engine bracket.
Unscrew the fastenings of the support to the body.
Lower the engine slightly with a jack. This is necessary for easier dismantling of the unscrewed support.
Install the new support in reverse order
Replacing the left support
Replacing the left support is done in the same way as the right one, only the jack must be installed under the gearbox. The emphasis must be made through a wooden lining.
Replacing guitars
Replacing guitars is quite simple and effortless.
Using a 15 mm wrench, unscrew the bolt securing the guitar to the car body and remove it.
Using a 15 mm wrench, unscrew the bolt securing the guitar to the engine bracket and remove it, and then the support itself.
Install the new support in reverse order.
Replacing the lower guitar follows similar instructions.
Tightening guitars must be done with the engine running.
Replacing the lower support on 8-valve internal combustion engines
Work on replacing the lower support on 8-valve engines must be carried out from the inspection hole.
We unscrew the 2 nuts securing the rubber part of the cushion, which is attached to the car body.
Unscrew the two bolts securing the cushion to the gearbox housing and remove the cushion.
Installation is carried out in reverse order.
We hope our article was useful to you.
Welcome! The engine mounting cushions are located differently on all cars and the number of them is also different, on some there are only two, and on some there are up to 4 pieces (We are talking about VAZ models, on jeeps with large engines, the number of cushions is they mount the engine, much more or the same number, but they are simply larger in size), thanks to these cushions the engine does not vibrate much and, most importantly, the vibration is not transmitted to the car body, as is felt in some old Zhiguli cars in which the rubber of the cushions has already hardened and Instead of dampening vibrations, they rock the car itself and its engine.
Note! To carry out repair work, to replace the cushions, the smallest set of tools from the tool kit will be useful, in which you will need: A jack will be needed, a wrench and sockets for it, as well as an extension cord, we recommend stocking up!
Where are the engine mounts located? There are four of them in 16 valve engines (the largest number, by the way, 8 valves are mainly equipped with three cushions or just two lower ones), the two most basic ones that are present in any engine (These are the same lower cushions on which the engine sits) and more one (Additional) is located on top and one more (Also additional) below, we will not show photos of all the pillows, because you won’t be able to get one photo, you will have to take several at once, so as you read the article, you will get acquainted with all the pillows and find out where which one is located.
When do you need to change engine mounts? They change rarely and only because of their aging (rubber gets old and it begins to hold the engine poorly and therefore it shakes), there are isolated cases when the cushion has to be changed due to deformation, and this happens when you hit the engine hard on the road or when hitting a deep hole, due to which, in addition to the airbags, the windshields also burst.
Additional engine support
- Thank you
- I do not like
VASA March 24, 2008
Hello everyone! I want to share my experience of installing an additional engine mount in order to warn everyone against a bad result. I have a 15. The engine, of course, is a regular 8-valve engine. The car is two and a half years old. Mileage 44,000. I switched to it after 20 years of classics. (It should be noted that my cars were always in excellent condition) And naturally, I immediately didn’t like the fact that when I started, the gearshift knob ran away from me. So I decided to install an additional engine support.
The thing is generally useful. The machine acquired solidity and smartness. The handle doesn't twitch. (by the way, I also redid the rocker. I wrote about this earlier in the topic “Song of the gearshift lever” https://lada-forum.ru. opic=2066&st=40 drawing on page 3)
BUT ! This is what happened. Bracket for support, on the engine, mounted on the studs of the manifolds (suction and exhaust of the 1st cylinder)
So these studs, or rather the threads in the head of the block, are not designed for such a load. I don’t know, maybe I’m just unlucky, but the aluminum alloy from which the heads of modern domestic cars are cast is just some kind of crap! With a regular wrench, the thread breaks off in one go.
So here it is. About six months ago, I was doing the next maintenance and saw that the top pin had been torn off. Well, thank God the hole is deep (43 mm) and the threaded part of the standard stud is 25 mm. I took the longest hairpin, twisted it deeper and calmed down.
And about a month ago, the gasket under the manifold blew. I took it apart and AFIGEL! This is the first time I've seen this.
I don’t know why, but at the exhaust port of the 1st cyl. The gasket has moved almost 12mm. It burned out and tore between the exhaust and suction ports.
I assume that it shifted and broke when the support pulled out the pin. Carbon monoxide began to enter the injector receiver... Hence the loss of power... (Which I also wrote about earlier.)
I had to cut a 10mm thread in the head, and made a 10mm/8mm adapter pin.
The bottom pin was simply replaced with a long one.
I RECOMMEND ! To everyone who will install such a support. IMMEDIATELY change the studs to LONGER ones.
I repeat! The standard stud has a 25mm thread. ! And the metal is very soft! And the load is very heavy.
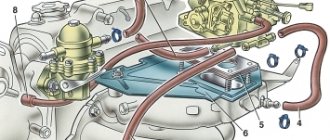
How the engine is mounted in a VAZ2110 car
The engine of a VAZ 2110 car is mounted in the car in the engine compartment. The supports are three elastic elements. The right support is attached to the engine bracket, and the left and rear supports are attached to the gearbox housing brackets. The last two supports are similar in design.
How to replace the right engine mount of a VAZ 2110 car
So:
- The top nut securing the engine mount is unscrewed.
- The two bolts holding the element to the bracket are unscrewed.
- The bolts that connect the bracket to the side member are unscrewed under the wheel arch.
- The bracket for the right engine mount of a VAZ 21103 is pulled out of the car.
- The old cushion is replaced and a new one is installed in the reverse order of disassembly.
How to replace the left engine mount of a VAZ 2110 car:
As in the first case, the upper nut fixing the pillow is unscrewed. But the engine on this side needs to be lowered.
- The engine is lowered onto the prepared support.
- The upper washer of the pillow is pulled out.
- The bolts securing the element are unscrewed.
- The left cushion under the VAZ 2110 engine is removed.
- The lower washer is removed along with the pin.
- The left engine mount of the VAZ 21102 is replaced with a new one, and assembly is performed in the reverse order.
- Using a socket, the nut that secures the rear cushion to the body is unscrewed.
- The mount of the engine mount on the VAZ 2110 to the gearbox is unscrewed.
- The pillow is removable.
How to replace the rear airbag of a VAZ 2110 car
Removing the rear cushion of a VAZ 2110
The rear airbags can be equipped with or without a bracket. The part is a one-piece cast element, which has all the necessary holes for mounting the pillow. To increase reliability and rigidity, ribs are located on the inside of the bracket. The upper motor mount bracket is an intermediate link between the engine support pad and the flexible rod. With its help, you can change the angle of fixation to the body and strengthen the fastener design.
So:
- Installation of the new part is carried out in the reverse order.
- The assembly of the unit is performed in reverse of its disassembly.
To correctly replace VAZ 2110 engine mounts, you can watch the video.
Tuning engine mounts for VAZ 2110
A fairly affordable tuning element with which you can make the engine mount more rigid is to replace the factory standard mount with an element with a more rigid body and a rubber support part. This device allows you to:
- Reduce engine movement as much as possible when braking, abruptly starting the car, or hitting bumps.
- Increase the service life of the exhaust system and drive wheel drives.
- Protect against self-switching gears.
- A bright tuning part will be installed under the hood.
Tuning part for VAZ 2110 engine mount
To increase engine rigidity, you can install a fourth support for the car’s power unit. It connects the cross member of the front suspension of the VAZ 2110 car and the clutch housing. Such a device can be installed both for mounting an 8-valve and 16-valve engine. When installing an additional support, you need to find another place for the ignition module and purchase a new bracket. The general view of the device is shown in the photo.
General view of additional support elements for VAZ 2110
Additional engine support SVS for VAZ 2110 2112,2170 2172
Installation instructions include:
- Removal of spark plug armored wires.
- The wire connectors from the car's ignition module are disconnected.
- The fastening to the cylinder block and clutch housing of the ignition module is turned out.
- The last three nuts securing the module are unscrewed, which is then removed.
- A new fastener is screwed in and the ignition module is installed in a different place.
- The fourth support bracket is screwed onto the front suspension cross member.
- A bolt is inserted into the hole in the terminal clamp, a nut is installed and tightened two turns.
- The lower head of the rod is placed in the support fixation eye.
- A bolt of the appropriate size is inserted into the hole of the eye and the cushion, and the nut is tightened.
- The size of the rod is adjusted until the hole in the clutch housing matches the hole on the upper head.
- Another bolt is inserted.
Installation of the fourth engine mount VAZ 2110
- The clutch housing shield and the rod head are attached through a spacer sleeve on the support.
- All bolts are tightened.
- When installing another mount for the ignition module, bolts are screwed into the threaded hole on the cylinder block.
- The bottom and top of the bracket are attached, all bolts are tightened.
When installing the fourth support, the price of the engine mounts will increase, but the reliability of mounting the engine of the VAZ 2110 will also increase.
Replacement
Now we move on to replacing elements. Doing it yourself or contacting a car service is purely your personal decision.
For the VAZ 2109, the use of three supports is provided:
- Front;
- Rear;
- Left side.
The replacement of each of them should be discussed separately, since the processes differ from each other.
Replacing the rear cushion
- Find a suitable place to carry out repairs. You will need a pit or overpass.
- Place the car there, secure it with stops, and put the car on the handbrake.
- Disconnect the negative terminal from the car battery.
- Using a 17mm spanner, unscrew the nut that holds the cushion to the body.
- Using a 17 socket, remove the mounting nuts of the support bracket to the gearbox. There are 3 of them in total.
- Remove all the bolts and remove the old engine mount.
- Install a new motor element and reassemble the unit.
Dismantling works
Side left pillow
Left element
- Provide yourself with free access to the bottom of your VAZ 2109.
- Secure the vehicle with jack stands and the handbrake.
- Disconnect the minus from the battery.
- Remove the left engine splash guard.
- Using a 17mm spanner, remove the nut that holds the cushion to the body.
- Using a 17 socket, unscrew the 3 mounting nuts of the support bracket, removing them from the gearbox.
- After removing the mounting bolts, replace the worn engine mount with a new one.
- Carry out the reassembly procedure. Stick to strict consistency.
Replacing the front airbag
Here, follow all the same conditions that were relevant for previous works. That is, drive the car into a pit, place supports and turn off the power to the car by removing the negative terminal from the battery.
- Using a 17mm spanner, remove the nut holding the cushion to the body.
- Using a 17mm wrench, remove the 4 fastening nuts securing the airbag to the engine.
- Remove the rubber element from the eyelet.
- Place a new support in place of the old unit.
- Reassemble the unit.
When replacing engine mounts, be sure to make sure that the new mounts meet the quality and size requirements. It is also recommended to thoroughly clean the seats before installing a new element, which will extend the service life of the new motor mounts.
Replacement does not require special skills, special tools or special conditions. Therefore, VAZ 2109 owners often change the pillows with their own hands. But if you are not confident in your abilities, contact a trusted car service center.
Replacement of VAZ 2109 engine mounts
Replacing VAZ engine mounts 2109
done when they wear out. engine vibration occurs.
during throttle changes and sudden starts from a standstill.
In this case, you first need to visually verify their damage and then make a decision on replacing the rubber-metal engine mounts. The VAZ 2109
has three engine
: rear, left and front support. Let's consider their sequential replacement.
Replacing the rear support of the power unit of a VAZ 2109
The work must be done from a pit or overpass. Support the transmission so that it does not fall when removing the support. Using a 17mm socket, unscrew the 2 nuts securing the airbag to the car body.
Lower the stop slightly and, using a 19mm wrench, release and unscrew the two nuts securing the airbag bracket
to the checkpoint
Remove the bolts and remove the cushion.
Installation is in the reverse order.
Replacing the left power unit cushion
Replacement
the support is made due to its wear, as well as when removing the engine or gearbox from the car. You also need to work on a pit or overpass. Before starting work, you need to remove the left engine
.
Using two open-end wrenches, unscrew the nut for 17 bolts securing the airbag
to the car body and remove the bolt.
Now, using a ratchet with a 17 socket head, unscrew the pillow
to the gearbox.
Lada 2108 1.5 carburetor › Logbook › Replacement of all engine mounts on a VAZ 2108 1.5.
There are already a whole bunch of visual aids on the Internet on how to do this with pictures and descriptions of each body movement, and yet I have something to add.
Front engine mount for VAZ 2114 which is better
To begin with, if the supports are old, then it is better to change everything. Why? Because the load on the new support will be higher if the others are already “tired”. On the other hand, if you take care of your car, you can change it as it wears out. For example, in a figure eight, the load on the front support is approximately equal to the total load on the remaining two, it will fail faster in any case. The symptoms of torn engine mounts are quite logical: increased noise, jerking of the entire car, and in some positions in space it may be difficult to engage gears. By the way, it’s not always easy to see a torn pillow; I visited two car repair shops, and two independent mechanics, looking from above, said that it was just old and therefore the engine could easily be swung back and forth with your hands. This explanation seemed strange to me, because over time rubber, on the contrary, LOSES its elasticity and cracks.
I really didn’t want to end up with a broken pin in my hand next to a half-removed engine, so I bought all the accessories. Looking ahead, I will say that the extra bolt of the rear support was immediately useful to me when installing the protection - I broke the thread on the lower arm, and the bolts turned out to be the same. Nuts and washers, of course, need new ones. Another important question is where to do this if you have nothing? I used the self-service service, for starters, it’s an excellent safety net in case something goes wrong. Usually there is all the tools there, there is someone to ask for advice, and a second pair of hands is sometimes necessary (and in my case, a strong pair of hands =)).
I did everything according to the instructions, links and shopping list below.
As you can see in the photo (top left), the front support had long lived its own separate life, the rest were outwardly intact, but immediately became covered with small cracks when bending. Everything seemed simple and clear, but a special surprise awaited me: the bolt attaching the left support to the body was missing . At all. Let me remind you that two services did not notice this (well, I have no luck with car services). The situation was complicated by the fact that I noticed this after dismantling the front support; as a result, the entire unit was hanging on the stop and rear cushion, and its position shifted both in the vertical and horizontal planes. The seats did not fit together, and a second stop was needed for the box (luckily it was there). I had to tinker, without a second stop it is simply unrealistic. In general, I recommend that everyone have a separate support for the engine and a separate one for the gearbox, for example, two jacks, since the supports are still elastic, and the unit can move in any direction. This is felt most strongly on the left, but if the position is level, then there are no problems with replacing it (they wrote somewhere that this is the most difficult).
I didn’t unscrew the studs, they were all intact, I changed everything else. I washed the seats with wd-40 before installation, I wanted to use something else to prevent corrosion, but it was blocked.
Source
Engine Mount Replacement Guide
How the engine is mounted in a VAZ2110 car
The engine of a VAZ 2110 car is mounted in the car in the engine compartment. The supports are three elastic elements. The right support is attached to the engine bracket, and the left and rear supports are attached to the gearbox housing brackets. The last two supports are similar in design.
How to replace the right engine mount of a VAZ 2110 car
So:
- The top nut securing the engine mount is unscrewed.
- The two bolts holding the element to the bracket are unscrewed.
- The bolts that connect the bracket to the side member are unscrewed under the wheel arch.
- The bracket for the right engine mount of a VAZ 21103 is pulled out of the car.
- The old cushion is replaced and a new one is installed in the reverse order of disassembly.
How to replace the left engine mount of a VAZ 2110 car:
As in the first case, the upper nut fixing the pillow is unscrewed. But the engine on this side needs to be lowered.
- The engine is lowered onto the prepared support.
- The upper washer of the pillow is pulled out.
- The bolts securing the element are unscrewed.
- The left cushion under the VAZ 2110 engine is removed.
- The lower washer is removed along with the pin.
- The left engine mount of the VAZ 21102 is replaced with a new one, and assembly is performed in the reverse order.
- Using a socket, the nut that secures the rear cushion to the body is unscrewed.
- The mount of the engine mount on the VAZ 2110 to the gearbox is unscrewed.
- The pillow is removable.
How to replace the rear airbag of a VAZ 2110 car
Removing the rear cushion of a VAZ 2110
The rear airbags can be equipped with or without a bracket. The part is a one-piece cast element, which has all the necessary holes for mounting the pillow. To increase reliability and rigidity, ribs are located on the inside of the bracket. The upper motor mount bracket is an intermediate link between the engine support pad and the flexible rod. With its help, you can change the angle of fixation to the body and strengthen the fastener design.
So:
- Installation of the new part is carried out in the reverse order.
- The assembly of the unit is performed in reverse of its disassembly.
To correctly replace VAZ 2110 engine mounts, you can watch the video.
Tuning engine mounts for VAZ 2110
A fairly affordable tuning element with which you can make the engine mount more rigid is to replace the factory standard mount with an element with a more rigid body and a rubber support part. This device allows you to:
- Reduce engine movement as much as possible when braking, abruptly starting the car, or hitting bumps.
- Increase the service life of the exhaust system and drive wheel drives.
- Protect against self-switching gears.
- A bright tuning part will be installed under the hood.
Tuning part for VAZ 2110 engine mount
To increase engine rigidity, you can install a fourth support for the car’s power unit. It connects the cross member of the front suspension of the VAZ 2110 car and the clutch housing. Such a device can be installed both for mounting an 8-valve and 16-valve engine. When installing an additional support, you need to find another place for the ignition module and purchase a new bracket. The general view of the device is shown in the photo.
General view of additional support elements for VAZ 2110
Installation instructions include:
- Removal of spark plug armored wires.
- The wire connectors from the car's ignition module are disconnected.
- The fastening to the cylinder block and clutch housing of the ignition module is turned out.
- The last three nuts securing the module are unscrewed, which is then removed.
- A new fastener is screwed in and the ignition module is installed in a different place.
- The fourth support bracket is screwed onto the front suspension cross member.
- A bolt is inserted into the hole in the terminal clamp, a nut is installed and tightened two turns.
- The lower head of the rod is placed in the support fixation eye.
- A bolt of the appropriate size is inserted into the hole of the eye and the cushion, and the nut is tightened.
- The size of the rod is adjusted until the hole in the clutch housing matches the hole on the upper head.
- Another bolt is inserted.
Installation of the fourth engine mount VAZ 2110
- The clutch housing shield and the rod head are attached through a spacer sleeve on the support.
- All bolts are tightened.
- When installing another mount for the ignition module, bolts are screwed into the threaded hole on the cylinder block.
- The bottom and top of the bracket are attached, all bolts are tightened.
When installing the fourth support, the price of the engine mounts will increase, but the reliability of mounting the engine of the VAZ 2110 will also increase.
Self-replacement
Before replacing the pillows, it is necessary to diagnose their condition. The condition of any silent blocks is checked with a mount: with its help you need to influence the support, simulating the movements of the engine during operation. If:
- rubber ruptures are visible,
- the bushing of the silent block touches the joints,
- the motor moves easily when pressed and hits the protection,
- the support bracket is broken,
the part needs to be replaced. Even if the signs of wear are not so noticeable (for example, the rubber is cracked but not torn), it is better to replace them as a set. Silent blocks lose their elasticity over time and begin to perform their functions poorly.
There are regular and reinforced supports for the VAZ 2114 on sale. The second type uses a harder rubber compound, but they are more durable only in quiet driving mode. Fans of sharp starts and braking will have to change any of them every 15-20 thousand; for other drivers they can last 50 thousand kilometers. This is the answer to the question of how long the supports last.
Front engine support VAZ 2114
On a VAZ 2114, the supports can be replaced independently, without contacting a car service center. It is more convenient to use a pit or overpass, but you can do without them. To do this, the car is jacked up and placed on supports (bricks or tree stumps). If crankcase protection is installed, it must be removed.
Replacing the front support. You need to jack up the oil pan. First, use a 17mm head to unscrew the 4 bolts securing the bracket to the crankcase, then the silent block bolt. To remove the bolt, you need to use a jack to get it into a position where the engine will not put all its weight on it.
When installing a spare part, it is important to lubricate the silent block bolt well: not only the threaded part, but also the body. It is in contact with the metal sleeve, so it may stick
This is interesting: We independently solve the problem with floating speed
Side engine support VAZ 2114
Replacing the right support is similar, with the difference that it is better to jack the gearbox housing rather than the engine. Another option is to install a jack in the area of the oil filter housing. It is attached to the crankcase with three bolts. Another trick is that the right pillow needs to be changed by two people. Without a side stop, the motor moves up, not down. The jack will not help here, so an assistant must press on it so that the silent block bolt can be secured.
Replacement of the rear support is the most difficult task if done without a pit or lift, requiring some skill in performing auto mechanic work and perseverance. It is located at the connection between the engine and gearbox, so you will have to work in a confined space. In addition, when unscrewing the bolts from the body, the key may rest against the gearbox housing.
Characteristic
What is this item? An engine mount is a gasket between body elements and the power unit. This is installed on all cars without exception. On Soviet Zhiguli cars, the cushion was a durable piece of rubber with fasteners on both sides. On more modern “nines” and “eights” (and subsequently all VAZs with a front-wheel drive layout) full-fledged rubber-metal supports were installed.
So, the power unit was mounted on four pillows. Two of them are on the gearbox, and the rest are on the engine. To avoid unnecessary loads, the box and motor are rigidly fixed. Any distortion leads to a change in the geometry of the input shaft. As a result, all the vibration is strongly transmitted to the gearbox lever and the transmission itself.
Where are the pillows? This element is installed on the engine from several sides:
- Front cushion. Attached to the front beam of the power unit.
- Back cushion. Installed to the front subframe. Located in the bottom area.
- Right support. It is located on top, near the front side member of the body.
Features of pillows
On Lada-2109 cars, airbags are used, the functioning of which has the following features:
There are many designs of supports, they are able to reduce the level of vibrations, therefore, during production, all values of the loads that act on them are taken into account. These components are constantly under load, and their direction and magnitude changes many times.
The only constant load is the mass of the engine itself. But during the start of movement, several other forces arise, acting in different directions. When reversing, the same forces act on the airbags as when starting, but they are directed in the opposite direction.
During sudden acceleration, braking, or driving over uneven surfaces, a lot of forces are necessarily exerted on the engine mounts. In the manufacture of cushions for Lada-2109 cars, only natural rubber is used, as well as high-grade rubber. In addition to rubber elements, the supports consist of steel frames and heavy-duty adhesive. They operate at temperatures of -40…+70 degrees.
Replacing the Rear Engine Mount of a VAZ 2109
replacing engine support VAS 2109
replacing VAS engine cushion 2109
made with wear and tear. Wearing causes excessive vibration to the engine
with gas relays and sudden starting from a place.
In this case, you first need to visually check them for damage and then decide to replace the rubber engine mounts. The VAZ 2109
has three engine
: rear, left and front support. Consider replacing them sequentially.
Replacing the rear support of the power unit of a VAZ 2109
The work must be done from a pit or a flight. Support the transmission so that it does not fall when the support is removed. Chapter 17, unscrew the 2 mounting nuts of the airbag to the car body.
Lower the latch slightly and, using wrench 19, loosen and unscrew the two nuts that secure the bracket. pillows
to the checkpoint.
Remove the bolts and remove the cushion.
Installation is in the reverse order.
Replacing the left power unit cushion
replacement
support occurs due to wear and tear and when it is removed from the vehicle's engine or transmission. You also need to work on ditches or overpasses. Before starting work, remove the left engine
.
Loosen the nut on the 17 bolts with two open keys of the airbag
to the car body and remove the bolt.
Now use the 17 head ratchet to loosen the pad
to the gearbox.
replacing engine cushions for VAZ 2108, 2109, 21099, 2113, 2114, 2115
Replacing the VAZ engine mount
2108,2109
, 21099, 2113, 2114, 2115.
Only three nuts. Please remove the old support and install the new one in reverse order.
Auto repair school – DIY car repair
This article will describe the process of replacing the rear engine mount on a VAZ-2109 car. On VAZ 2108, 2109, 2109 and VAZ 2113-2115 cars, replacing the rear airbag is similar. But first, I will list the reasons why you should think about replacing the pillows or engine mount. Wear, breakage and destruction of the rubber or metal component of any engine mount leads to vibration and itching while driving, and shocks when starting and stopping the car
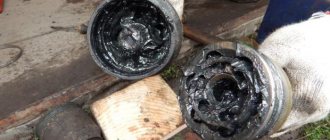
Therefore, if the above symptoms appear in your car, then pay attention to the condition of the airbags or, as they are also called, engine mounts. If large cracks, breaks or peelings of the rubber part of the cushion are detected (photo 1), replace the part
If the metal part of the pillow bursts or breaks, replace the part as soon as possible. I think there will be problems in this part. But questions regarding work related to replacement may arise! Right? Therefore, we continue to read further and at the end of this material the answers to the questions will be found)))
Spare parts. The rear engine mount for VAZ 2108, 2109, 2109 and VAZ 2113-2115 cars can be found on the Internet and purchased using the catalog number - 2108-1001033-10. According to the manufacturer, everything is simple - we buy a pillow from BRT or SEVI. Other options are not options...
Tools required for replacing the rear engine mount: 17 socket wrench, a pair of 19 socket wrenches, trapezoidal jack for fixing the engine. We carry out the replacement work in an inspection pit.
The procedure for replacing the rear engine mount (support) on a VAZ-2109 car:
We drive the car into the inspection hole. Remove the engine protection, if any.
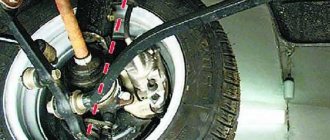
Place a jack under the gearbox and slightly lift the gearbox up (photo 2)
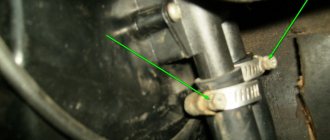
Unscrew the nuts securing the mounting bolts to the gearbox (photo 3)
Using a 17 mm socket wrench, unscrew the nuts of the body studs (photo 4)
We take out the bolts and remove the pillow. And we put a new one in its place (photo 5)
Tighten all the nuts and remove the jack
All! Replacement of the rear engine mount on the VAZ-2109 is complete! Thank you all for your attention;). When using an article or photographs, an active direct hyperlink to the website www.avtorem.info is required!
When using an article or photographs, an active direct hyperlink to the website www.avtorem.info is required!