You need to connect a longer piece to the input, and a shorter piece to the output. Longfies are divided into powers - 1.5 kW, 2 kW and 3 kW. In general, this is one of the most optimal options - the battery does not run out, the power of the heating element is high, and after using it, the driver also receives hot air from the stove. For such a connection, a tee fitting is included with the device. This device is mounted in the engine cooling system. Engine HEATING 220V easy starting in any frost, principle of operation, installation on VAZ 2108,2109,21
If you install it yourself, follow the detailed instructions. The pipe leading to the radiator is simply cut and a heater is inserted there at both ends. This is where the idea arose that it was time to change the car to a foreign car. In order to use them, you just need to press a button. When inserting into the cooling system, keep in mind that it is advisable to place the heater below the interior space heater radiator. The air filter device with the blower is reinstalled, and high-voltage cables are connected to the spark plugs.
In addition to standard functions, heaters quickly warm up the interior of the car. Do not turn on the engine heater if there is no coolant in the cooling system.
This power is not enough to warm up the engine in severe frost. Most drivers consider this nuance to be a disadvantage, since it is difficult to find a parking space where it is possible to connect to the electrical network. Overview of bumper connector for engine heaters. Installation Guide.
Heaters without pump
These are heating units Start-M, Severs, Alliance and others. They do not have a pump and work on the basis of convection. That is, the cold liquid goes down into the heating, while the already heated liquid rises up, as a rule, into the head.
Well, let's begin. Errors when installing a heater without a pump
1.
The engine heater housing is level or higher than the block drain plug. The whole point is that liquid flows into it almost by gravity, or is displaced by heated liquid from above. If it is above the plug level, there will be no circulation, the heating will turn off after the pipe warms up, because the temperature in it will quickly reach 80 degrees.
2.
The thermostat cuts off the upper radiator hose. In this case, the same thing will happen as in the first option. The maximum that is possible is to warm up the upper radiator tank, but the cylinder block will remain cold. This is a common problem with Grant and Kalina cars.
In this case, it is necessary to draw liquid from the drain plug, and push the heated liquid into the stove supply pipe. The heater will not flow through the radiator, because the liquid frees up space in the block.
Models, their features
The “Start” line of preheaters includes the following series:
"Start"
Classic horizontal tank-type heaters with high power (2.5 and 3.0 kW). The movement of liquid in them is gravity. Designed for installation on trucks;
"Start-Turbo"
The only series of tank heaters equipped with a centrifugal pump providing forced circulation. They are mounted on the car in a vertical position, the terminals for connecting to the system are located perpendicularly. The series includes three sets - “Universal No. 1” (with a power of 1.0 kW, 1.5 kW and 2.5 kW.
The set contains components for a sequential installation method), “Universal No. 2” (heaters of the same power, but the set contains a variety of elements for installation, which allows you to make an insert in different ways) and “Universal No. 3” (the kit contains the same components, same as set No. 1, but the device itself is different - its power is 3 kW). These devices are suitable for use on both cars and trucks;
Flow-through heater with pump - installation
In principle, with a pump, everything is simpler, because you don’t need to go into the laws of physics - the pump does its job, and very well, most often the pump costs about 700 liters per hour.
Errors when installing a flow-through heater
1.
Parallel with the stove. Not a single flow-through heater has a check valve, so it is absolutely impossible to install it in parallel with the stove, because the liquid will circulate not through the radiator, but through the heater. If there are no other options, you need to install at least one tap either at the inlet or outlet of the heating.
2.
The outlet pipe must be strictly at the top. That is, it must be unfolded so that the pipes are aligned along the vertical axis. This is necessary so that the pump can expel air, otherwise the heating element will burn out.
3.
This point is rather advisory in nature. Do not turn the heater pump against the fluid circulation in the engine. This means that the heater installed in the return of the stove should push water into the pump, and not into the radiator. This is necessary so as not to accidentally start the engine with the heating running.
Can you imagine what will happen to the stove radiator or just the pipe if two pumps start pumping into it at the same time?
That's right, both of them will most likely be torn apart.
These are the simplest things that every car enthusiast should know. Subscribe to the channel to know. Well, give me a thumbs up, I will be pleased.
Diagram of the heater, preheater/reheater for the GAZelle Next heating system.
Diagram of the heater, preheater/reheater for the GAZelle Next heating system.
A feature of the diesel engine is its inability to maintain a high operating temperature when operating at idle speed, as well as at low load. This is especially pronounced in the winter season. As a result, engine parameters deteriorate (increased fuel consumption and wear of friction units) and the efficiency of the interior heating system decreases. To eliminate these shortcomings, as well as to make it easier to start the engine in cold weather, a pre-heater/reheater for the heating system will be used.
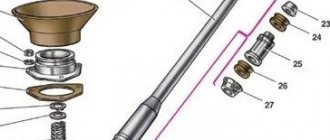
Heater/reheater device.
1 – air intake; 2 – air blower; 3 – liquid outlet pipe; 4 – glow pin/flame sensor; 5 – evaporative gasket; 6 – connectors; 7 – control unit with temperature sensors; 10 – heat exchanger; 11 – combustion chamber; 12 – Exhaust gas outlet; 13 – fuel intake; 14 – Circulation pump; 15 – liquid intake pipe; 16 – fuel metering pump.
RECOMMENDATIONS FOR HEATER INSTALLATION
Operation
INSTRUCTIONS FOR IMPLEMENTATION
Prepare: tools – wrenches; screwdriver (for tightening clamps); knife (for cutting hose); coolant (coolant) in the amount of 1 liter; container for draining coolant.
Preparing the heater for installation
Cut the rubber sleeve into lengths: output sleeve L2 = 880 mm; inlet hose L1 = 450 mm. Secure the bracket to the heater with studs through the bushings using washers and nuts (see Appendix PRM-0030, Fig. 1). Place the sleeves on the corresponding heater pipes and secure the connections with clamps.
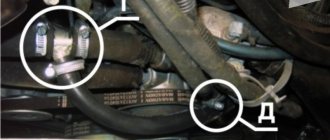
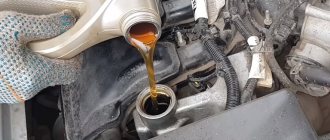
Drain the coolant. Unscrew the nut on the frame, supporting the bolt from below (on the left side along the direction of the car, Fig. 2, arrow A).
Attach the bracket with the heater to the frame, as shown in Fig. 2; in this case, it is necessary to ensure a slight (5-10 degrees) downward slope of the heater inlet pipe. The heater should not touch any parts (frame, brackets, etc.) of the vehicle in order to avoid damage to the housing during vehicle operation.
Installation of the heater inlet tee
What kind of battery is on the gazelle next:
- And the Gazelle Next battery
has a relatively high capacity by the standards of its class. The indicator is 75 A/h. This is quite enough to start the power unit many times during a trip and power all connected devices. - What battery for gazelle next?
The car battery has dimensions of 278/175/190mm. This is the standard size for this class of vehicle. Therefore, it will be easy to find a replacement. The polarity of the connection is traditionally reversed. - What battery for Gazelle Next Diesel?
The minibus uses a rechargeable battery that has a starting current of 670 A. This indicator is quite enough to start the power unit even in severe frosts.
Electric heating of the UMZ 4216 Business engine
Start-M is designed for pre-heating of the coolant of internal combustion engines of vehicles and units during the cold season.
Contents of delivery:
Operation manual Mounting bracket Sleeve Installation manual Electric heater Installation kit
Operating principle of the electric heater:
The coolant (antifreeze, antifreeze) is heated in the heater housing. Due to the lower density, the heated liquid begins to circulate directionally and enter the engine cooling jacket. The place of the heated liquid is taken by a colder one. This establishes natural thermosyphon circulation of the coolant. The thermostat automatically maintains the coolant temperature within specified limits, and the emergency thermal switch prevents failure of the heater if there is no coolant in it (double degree of protection). The engine warm-up time depends on climatic conditions (temperature, wind), as well as on the parking conditions of the car (open parking, garage).
Installation and Maintenance:
The electric heater is built into the engine cooling system of domestic and foreign cars (external installation method), the power supply is from a 220 V electrical network. It is recommended that the electric heater be installed at a car service station. Due to their simple design, electric heaters do not require frequent maintenance (see Operating Manual).
Technical data of the electric heater:
Rated voltage - 220 V Power consumption - 1; 1.5; 2 kW Degree of protection - IP 34
1) The horizontal design eliminates the possibility of coolant entering the electrical part of the heater 2) The ball valve ensures the direction of coolant circulation, protects the electric heater from overheating and makes heating more efficient with various installation schemes 3) The temperature regulator ensures that the electric heater is turned on and off within the specified temperature limits, which protects the device from overheating and saves energy 4) Thermal switch (emergency) ensures that the electric heater is turned off in emergency situations (insufficient amount of coolant or lack thereof), if the thermostat fails 5) The thermal switch reset button ensures that the thermal switch is turned on in case of an emergency, which makes the operation of the electric heater more efficient safe, durable and comfortable
How the stove works in Gazelle Business
For correct diagnostics and repairs, it is necessary to know the structure and operating principle of the heater in order to diagnose a breakdown or carry out repairs at the first sign of a malfunction, preventing failure of the entire unit as a whole. Most faults can be predicted by indirect signs and their progression can be prevented. To do this, you need to know and understand what each element is responsible for and what the principle of its operation is.
Car cooling system
In Gazelle Business the stove is an integral part of the engine cooling system. When the engine operates, a large amount of heat is generated that must be removed. Heat is released due to fuel combustion and from rubbing surfaces. If the heat is not removed, the engine will heat up very quickly and fail. The cooling system has two circuits (small and large circle), they are separated by a thermostat. When the liquid is cold, it circulates in a small circle, and when it warms up, it circulates in a large circle. This allows you to quickly reach operating temperature and not overheat. During the warm season, heat is released into the atmosphere, and when cold weather sets in, part of the heat is spent on heating the cabin.
Heating
After we have figured out how the cooling system works, we can move on to heating the interior. The heater circuit on a Gazelle car is identical to the heaters of other cars that have a liquid-cooled engine. Fluid can circulate through the heater core whether the thermostat is open or not. For better heating, the heater fluid comes from the hottest part of the engine (the cylinder head). Therefore, on an engine that has not yet reached operating temperature, warm air still comes out of the deflectors. The heater has a valve in its design that either allows liquid to flow into the radiator or dumps it back. And the temperature of the air leaving the deflectors depends on how much it is open. The valve position is adjusted from the heater control panel. The faucet is equipped with an electric drive that changes the position of the valve. It is also possible to change the blowing intensity and direction from the control panel. The intensity is controlled by a motor with an impeller, the rotation speed of which changes the intensity of the airflow.
Changing the position of the dampers changes the direction of the airflow (to the face, to the legs, to the chest, to the glass). The heated coolant from the engine enters the heater radiator through the highways, causing it to heat up. At this time, air blown by a fan passes through it. Then it passes through air ducts, the dampers of which are open. The hot air then enters the car interior and heats it. To repair or diagnose a malfunction of this equipment, there is an electrical diagram that shows all the components of the electrical devices. And in case of breakdowns or incorrect operation of devices, it is necessary to read it in detail in order to understand where it is powered from and how the failed device is regulated.
When you know the principle of operation and the device, it is much easier to navigate in case of breakdowns. After all, to successfully carry out repairs, it is important to understand the cause of the malfunction, otherwise the repair will not be completed successfully. For correct diagnosis, it is also important to understand the algorithm of operation of the entire mechanism as a whole. Currently, a driver does not have to know how to repair a car; there are service stations that can handle repairs of any complexity. But it happens that a breakdown catches you on the road, and there is no opportunity to use the services of specialists. This is when knowledge of the structure of a car and its mechanisms comes in handy. When you know how the Gazelle stove works, then if a malfunction occurs on another car, it will be easier to navigate when repairing or diagnosing, since in all cars they are almost the same, with the exception of small nuances. And you can easily diagnose the problem.
Heaters without pump
These are heating units Start-M, Severs, Alliance and others. They do not have a pump and work on the basis of convection. That is, the cold liquid goes down into the heating, while the already heated liquid rises up, as a rule, into the head.
Well, let's begin. Errors when installing a heater without a pump
1.
The engine heater housing is level or higher than the block drain plug. The whole point is that liquid flows into it almost by gravity, or is displaced by heated liquid from above. If it is above the plug level, there will be no circulation, the heating will turn off after the pipe warms up, because the temperature in it will quickly reach 80 degrees.
2.
The thermostat cuts off the upper radiator hose. In this case, the same thing will happen as in the first option. The maximum that is possible is to warm up the upper radiator tank, but the cylinder block will remain cold. This is a common problem with Grant and Kalina cars.
In this case, it is necessary to draw liquid from the drain plug, and push the heated liquid into the stove supply pipe. The heater will not flow through the radiator, because the liquid frees up space in the block.