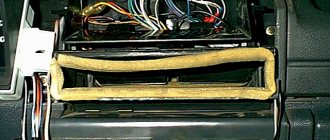
The ignition system of any modern car consists of many different components designed to ensure normal starting of the internal combustion engine. One of such devices is the ignition coil of the VAZ 2109. You can learn more about the features of this device on the “nines”, as well as its malfunctions and diagnostics from this material.
Checking the ignition coil on VAZ 2108, 2109, 21099 cars:
photoshop these testers have numbers on the right side
P...... where have you seen a Chinese device show 0. .... Ohm, if it has a minimum reading of 1 Ohm. How can it show 0.15 Ohm?
You can put a Japanese reel on a Russian car youtube.com/watch?v=micwr-NC7p4
Probably the coils were Chinese or the tester was defective.
And the fact that after measuring my old ignition coil, I received a reading of the primary winding of 0.15., and when I came to the store and ran around the car market with a tester, I discovered that all the coils show approximately 0.15-0.17. In my opinion, the article is nonsense. And the manual is also nonsense. or now coils are specially stamped in factories this way. And then, after replacing the old coil with a new one, people start panicking to change switches, hall sensors and other crap on their cars, because the problem does not go away.
Nikolay, photoshop for clarity, no problem
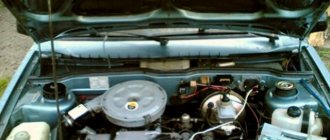
Regardless of the type of engine installed (carburetor or injector), on the VAZ 2109 we are dealing with a distributor-type ignition system. On the one hand, this is good, since replacement and repair of the unit is cheap. But the resource of parts leaves much to be desired.
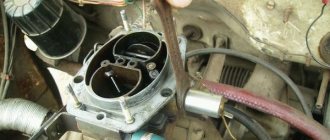
Appearance of the device
SemarglUA › Blog › Modernization of the ignition system of carburetor VAZ 2108 - 21099
Since I wanted to slightly modernize my ignition system, namely, replace the old coil with something else because, according to all the signs and the verdict of the STOshnik, the time has come to change it. Having scoured the entire forum and the Internet, I saw how they use four coils, two relays, a bunch of wiring and a complete dismantling of the distributor)) in order to cram in something that couldn’t be shoved in, I even went as far as the “God’s spark” method, I realized that this is very troublesome and due to incorrect installation you can get into trouble for a larger amount. In short, I found, in my opinion, the easiest way to replace the annoying 027.3705 coil that needs “care” and now I very much doubt the quality of the new “Russian-Chinese” coils of this type:
to a more modern type of injection coil 2111-3705010-03 with a slight modification to the wiring itself
It turns out that practically nothing needs to be changed in the circuit, the ignition coil itself is simply replaced. All parts remain in the circuit of the contactless ignition system of the VAZ 2108 - the electronic switch 0529.3734, the VAZ distributor in all its glory with one contactless hall sensor.
Installation :
When connecting the coil, you can choose the left or right side; in this case, the other side will be a backup one, so one wire from the coil is connected to the ground housing, the other goes to the distributor as from a standard ignition coil.
The central high-voltage wire itself that goes to the distributor will need to be redone, because the terminal on the coil is an injection one, which means that the end of the wire that goes to the coil needs to be installed with an injection tip. On spark plugs, the recommended gap is 1.0 - 1.13 mm. Connection diagram for the injection coil:
For comparison, this is the connection diagram for the old-style coil:
To make it clearer, I’ll tell you how to connect in my own words:
1. disconnect the original ignition coil, two wires go to it (remember which goes where) and the end of the high-voltage wire which then goes to the distributor
2. Install an injection tip at the end of the wire that will go to the injection coil, additionally install one wire also with an injection tip that will go to the body “ground”
3. Next, screw the coil in a convenient place but so that the wires reach both the coil and ground.
4. The wiring is connected through a plug previously purchased for this coil: - the wire that was on the old coil to the terminal with the letter “B” is connected to the center of the outlet from the injection coil; - connect the wire that came from the old coil to the terminal with the letter “K” on the left or right, depending on which side of the coil you will use
At the end, check the gap on the spark plugs; I recommend high-voltage wires with a copper core with minimal “zero” resistance. This change will improve driving characteristics.
You can, of course, install two hall sensors in parallel in the distributor to avoid connecting explosive wires to the distributor cover and have a connection similar to the injection system, but I considered this unnecessary.
This method of replacing old-style ignition coils with more powerful modern versions can be used on other carburetor engines, for example, on our forum we already have an example of this type of application on a Lada Oka car
And at the end of the video work from the author of this modernization idea:
Features of the operation of different ignition systems
Ignition on the VAZ 2109 is necessary to ignite the air-fuel mixture when starting the engine. If the ignition does not work correctly, the engine will start and run intermittently, and its power during start-up and acceleration will noticeably decrease. In addition, fuel consumption will be noticeably increased. The conclusion from this is that the correct operation of the ignition system should be constantly monitored.
It’s worth mentioning right away the differences in the ignition design of “nines” with different types of fuel supply. Their SZ is similar, but they differ in the elements of electric charge distribution.
- In “nines” equipped with a carburetor, there is a coil and a distributor.
- For systems with an injector, an ignition distribution module consisting of several coils and an electronic controller is installed.
The second difference is how the system works. In cars with an injector it is not required, but in VAZs with a carburetor you have to do it manually.
In nines, two types of ignition systems are used:
- contact;
- contactless with transistors.
The first is installed in carburetor “nines”, and the second in injection ones. Thanks to the use of contactless ignition, the system has the following advantages:
- Working with a Hall sensor, which makes the system more stable and increases its overall efficiency.
- The absence of contact with the working parts and elements of the system increases the service life of the elements and makes maintenance of the circuit components easier.
- Excellent spark distribution between spark plugs.
- Generating a powerful spark, which prevents system failures.
- Fuel economy.
- Works even with low battery charge.
Over time, the contact type SZ has practically ceased to be used, so from now on we will focus on the contactless analogue.
Contactless - transistor ignition system (BTIS)
Now we have come close to the ignition system of the VAZ 2109. This VAZ car model is equipped with a non-contact ignition system, which has been used since the mid-80s.
In this system, the chopper mechanism has been replaced by a more modern non-contact sensor, which instantly and accurately determines the engine speed and angle of rotation.
Unlike earlier ignition systems, where their operation was based on the mechanical action of parts with each other, the principle of operation of the new ignition system is based on an electrical impulse, which is generated using a non-contact sensor. But first things first.
Verification procedure
If you detect one or more signs of “dying” of the coil or if it is impossible to start the engine, you should definitely check its performance. This is necessary in order to find out what nature of the breakdown occurred, and, therefore, begin to eliminate it. Can this be done without instruments? Unfortunately no. Unless you immediately replace the coil with a known good one. At the very least, a regular multimeter will suffice. Such a tester must be kept in the car - its cost is almost symbolic.
In general, verification is relatively easy. It is enough to follow the steps described below, and even a completely inexperienced car enthusiast can handle it.
There is no spark from the ignition coil
It is clear that the engine does not start. But the reason may not be in the short circuit, but in the contact connectors associated with the supply of an impulse to it. They should be inspected and cleaned. But, if there is still no spark, then you can check whether the short circuit is working properly only by testing the ignition system with an oscilloscope. Using a multimeter, you can only determine whether the coil windings are intact by ringing them. If they are in order, then the fault must be sought in the spark supply control system. If the coil is broken, it will need to be replaced.
To learn how to check the serviceability of ignition coils without using special equipment, watch the video below.
How to check the ignition coil of a VAZ
If the ignition coil is faulty, the engine will not start. A characteristic sign of a faulty coil is its increased temperature when the ignition is turned off. This is easy to determine by touch.
Signs of a faulty ignition module may include the following:
- hesitant engine starting or failure to start;
- failures during sudden changes in speed;
- high fuel consumption;
- two cylinders do not work, the engine is feverish;
- lack of dynamics;
- a sharp drop in power;
- drop in power and thrust after warming up.
These symptoms may not only be caused by the ignition module. To determine the malfunction, it is enough to spend a few minutes diagnosing spark plugs, high-voltage wires and caps. This will eliminate the remaining elements of the ignition system and make sure that it is the ignition module that is faulty.
Checking the ignition coil is performed in one of 2 ways. The simplest one is to remove the central wire from the breaker-distributor, bring it to the motor housing and turn it with the starter, and a running spark should appear. After this, we check the energy supply to a separate spark plug, for which we unscrew the working spark plug, bring its contact to ground and attempt to start the engine. In this case, the spark should come from the wire to ground. If it is absent, the reason will be a malfunction of a system element such as the ignition coil.
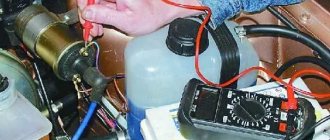
To check the module in the second way, we only need a multimeter, then follow the step-by-step instructions:
- We check the power supply and the presence of pulses supplied from the ECU. We check the power between the central terminal (15) of the wire block connected to the module and the engine ground. When the ignition is on, the voltage should not be less than 12 V. Otherwise, either the battery is dead or the ECU does not work.
- We check the pulses from the ECU on the wiring block. We install one tester probe on connector 15, the second on the far right, then on the far left. The assistant cranks the engine with the starter, and at this time we record short-term voltage surges with a tester. If there are no impulses from the ECU, it is he who is to blame.
- We check the resistance on the secondary windings of the coils. We put the tester in resistance measurement mode and measure it at the high-voltage terminals of the module cover. Between pins 1 and 4 and pins 2-3, the resistance should be 5.4 kOhm. Otherwise, the module must be replaced.
- We check the resistance of the primary windings between contacts 15 and the rightmost, then the leftmost terminals. Nominal - 0.5 Ohm. Deviation is not allowed.
- Check the module for a short circuit. In ohmmeter mode, install one multimeter probe on the central terminal, the second on the metal body. There shouldn't be any resistance. If the device detects at least some resistance (other than unity or infinity), the module must be replaced.
Useful: All computer connectors: pinout and pinout of cables, sockets and PC plugs
Ignition coil does not work, signs of malfunction
Failure of the ignition coil leads to problems in the operation of the car engine.
Using the example of ignition coil 25.3705 of the ignition system of the carburetor engine 21083 of VAZ 21083, 21093, 21099 cars, we will look at what signs can be used to determine that the coil has come to an end.
Signs of a malfunction “ignition coil does not work”
— The car engine does not start
The reason is that the coil has stopped producing high voltage current (possibly a “break” in its windings). No current - no spark on the spark plugs. There is no ignition of the fuel mixture. The starter will spin the crankshaft, but the engine will not start.
— The engine “troubles” and tries to stall at idle
The problem is especially common in damp, rainy weather. The reason is a “breakdown” of the insulation of the coil windings to ground. The current does not go to the spark plug electrodes, but directly to ground. The strength of the spark decreases, it either disappears or appears. The normal combustion of the fuel mixture in the combustion chambers is disrupted, there is not enough energy to turn the crankshaft, the engine “troubles” and tries to stall as quickly as possible. Very often such a “breakdown” occurs in the coil cover (for example, at the base of the central terminal).
— Dips and jerks after sharply pressing the gas pedal
Missed sparks and weakened sparks will prevent the fuel mixture from being fully burned. The engine will “choke” when you press the gas pedal sharply.
As a bonus to the listed symptoms of a malfunction of the ignition coil of VAZ 2108, 2109, 21099, the driver will receive a decrease in the power and throttle response of the car’s engine and an ever-increasing fuel appetite.
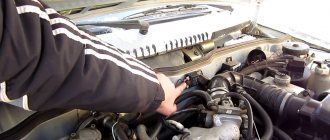
How to identify a faulty ignition coil and deal with the problem yourself?
To make sure that the coil is faulty, you need to check for the presence of a spark on the central high-voltage wire. To do this, turn on the ignition, remove the tip of the central high-voltage wire from the distributor cover and bring it to ground. For example, to the engine. The gap to ground is 0.5-0.7 mm. It is best to install the wire tip in some kind of clamp or holder and do not touch it with your hands to avoid high voltage electric shock. The assistant cranks the engine with the starter, and from the side we observe a spark in the gap.
If there is a spark, the coil is working properly and the cause of the malfunction must be looked for further in the high-voltage circuit of the ignition system (distributor cover, slider, high-voltage wires, spark plugs).
If there is no spark, you need to check whether current is flowing to terminal “B” of the coil. If there is no current, we look for a malfunction (“open”) in the low-voltage circuit of the ignition system according to the diagram, but do not touch the coil. In the case when there is current, but the coil does not work, we sentence it to replacement.
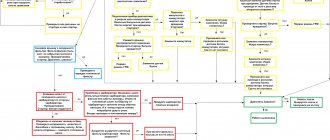
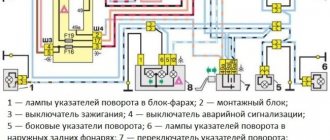
Diagram of the ignition system for VAZ 2108, 2109, 21099 cars
Before replacing, you can try to check the coil using an ohmmeter (multimeter with ohmmeter mode) for an open or short circuit in the windings in order to finally give a verdict on it. See “Checking the ignition coil of VAZ 2108, 2109, 21099”.
Checking the primary winding of the ignition coil - measuring its resistance value
Notes and additions
The listed signs may be symptoms of a malfunction in other vehicle engine systems, not just the ignition coil. For example, a Hall sensor in a distributor. Therefore, in order to narrow down the search for the problem, we immediately check for the presence of a spark on the central armored wire, described above. There is a spark - everything is fine with the coil, no, we replace it with a new one or a known good one.
Possible causes of failure
The weak point of the ignition coils and modules is the secondary winding, which generates a high voltage pulse. A coil break or breakdown may occur in it. The following factors lead to this phenomenon:
- use of low-quality or unsuitable candles;
- operation with non-functioning high voltage wires;
- frequent attempts to check the spark.
Often, a module malfunction occurs when the integrity of poor-quality factory soldering of wires going to the switch elements is violated. This happens from vibration. Also, the cause of non-working coils can be a banal contact failure in the incoming connector. Another factor leading to a malfunction of the ignition unit is often moisture that gets on the device during washing or driving in unusual conditions.
Ignition circuit for VAZ 2109
Every owner of the VAZ 2109 should know the ignition circuit. Without knowing this circuit, you will not be able to start the car in case of ignition problems. Moreover, this scheme is elementary simple. The VAZ 2109 is equipped with a contactless ignition system. It consists of the following components: switch, ignition coil, distributor, Hall sensor, high-voltage wires and spark plugs. The task of the ignition system is to provide a timely, cyclic spark to the engine cylinders. Let's take a closer look at how the clamping circuit works.
Ignition circuit for VAZ 2109
ignition of the VAZ 2109: power is supplied to the ignition system through a relay. Until the key is in the ignition position, the relay will not turn on and supply power to the circuit. As soon as the key is turned, the ignition system is energized. +12V power from the battery is supplied to contact B of the ignition coil, the 4th contact of the switch. The Hall sensor powers the switch itself
Please note that the ignition relay is powered through the mounting block, and if there is poor contact in connectors Ш1, Ш8 or for some reason the track oxidizes or burns out, the ignition system will not be powered and the VAZ 2109 will not start. In order for a spark to begin to form, you must crank the engine crankshaft.
Together with it, the camshaft will turn and the Hall sensor will send an impulse to the switch. The commutator, in turn, will connect contact K of the ignition coil to ground, resulting in a spark appearing on the central wire. When the distributor slider connects the central wire and the wire leading to a specific engine cylinder, a spark will jump on the spark plug, igniting the combustible mixture. The engine will start. When it is necessary to turn off the engine, the driver, by turning the key in the ignition switch, turns off the relay, which in turn disassembles the power supply to the system. The switch and ignition coil become de-energized and stop working. The most common malfunctions of the VAZ 2109 ignition system: 1) Failure of the switch. 2) Failure of the Hall sensor. 3) Poor contact of the slider in the distributor. 4) Lack of power supply to the ignition system of the VAZ 2109. Go to Home.
Ignition settings
When setting up the ignition, you will need to do the most important thing - install the shafts according to the marks so that the gas distribution functions synchronously with the operation of the piston group. This is the first thing you should do before you start adjusting the ignition. It is worth noting that there should not be any particular difficulties during setup, especially on VAZ 2108-21099 cars. The thing is that the ignition distributor on the engines of these machines can only be installed in one position. Moreover, the ignition switch does not undergo any settings during this procedure, since it does not have any. The distributor body rotates around its axis to make more precise adjustments. And this turns out to be enough. To accurately set the torque, you can use a simple circuit that uses a simple LED as an indicator. The Hall sensor is disconnected from the system, and positive power is supplied to its negative terminal. An LED is switched on between “+” and the signal LED, and a 2 kOhm resistance is connected in series with it to reduce the voltage. But the plus of the Hall sensor is connected to ground. Now all that remains is to slowly rotate the distributor housing. The moment when the diode lights up will be the desired one.
Setting up SZ
If you have a VAZ 2109 carburetor, you will have to adjust the ignition system from time to time. This procedure is not the simplest; it requires following clear instructions. The operating procedure is as follows:
- We take the manual for our “nine” in our hands, set the contact gaps in accordance with the recommended values. Typically this is 0.45 mm.
- The ignition timing is set using special equipment, we miss this point.
- We connect the high-voltage wires and begin adjusting the torque in the middle of the stroke.
- Install the spark plug in the first cylinder and turn on the ignition.
- Turn the pulley counterclockwise 45°.
- We connect the ground to the spark plug, turn the pulley gradually in a clockwise direction until a spark appears between the electrodes.
- We look at the marks of the cover and pulley. They must be on the same level.
- To ensure that the marks coincide, we turn the distributor in the desired direction.
- If the marks do not match, the ignition will either be late or turn on prematurely, which is unacceptable.
- We rotate the pulley and distributor until we get the desired result, after which the distributor will need to be tightened, and then turn the crankshaft two turns.
- Check the result: if everything works fine, we finish the adjustment.
- You need to warm up the engine, then drive at a speed of 40-50 km/h, switch to fourth gear and accelerate sharply. If there is a knock, the ignition worked prematurely, we adjust it again.
At the service station, technicians can also carry out the adjustment, so if you can’t do it yourself, go there.
Ignition module for injection engine of VAZ 2108, 2109, 21099 cars
The ignition module on the injection engine of VAZ 2108, 2109, 21099 cars is part of the ignition system.
Purpose of the ignition module
The ignition module on VAZ 2108, 2109, 21099 cars is designed to create high-voltage voltage on the spark plugs at a certain moment.
Location by car
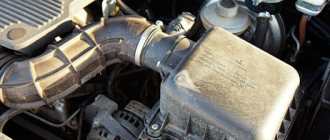
On the 2111 engine of VAZ 2108, 2109, 21099 cars, the ignition module is installed on a special bracket mounted on the front of the cylinder block on the gearbox side.
Ignition module design
The ignition module consists of a housing, inside of which there are two two-terminal ignition coils and a two-channel switch (two electronic units). The housing has four ignition coil terminals, which are connected to the spark plugs in a certain order. The wires for the first and fourth cylinders are connected to the two terminals of one winding, and the wires for the second and third cylinders are connected to the two terminals of the other winding. Therefore, a spark jumps in two cylinders at once (on the compression stroke - working and on the exhaust stroke - idle).
The current supply and control wires from the control unit are connected to the module through a connecting block.
Operating principle of the ignition module
The control unit of the ECM system receives a signal from the crankshaft position sensor about the position of the engine crankshaft and its rotation speed, from temperature sensors and mass air flow sensors information about the condition of the engine and the load on it. After processing the signals, it calculates the ignition timing and sends a command to the ignition module to fire the first or second pair of coils. The ignition module generates high-voltage pulses and supplies them through high-voltage wires to the spark plugs of either 1-4 or 2-3 engine cylinders.
Ignition module malfunctions
A faulty ignition module leads to difficulty starting a cold engine, jerking and failures during acceleration, especially on a cold engine (jerks may disappear after warming up the engine, and with it the ignition module), unstable engine idling (especially when warmed up), increased consumption fuel. Missing sparks lead to the release of a rich mixture into the converter, which leads to its failure.
If you suspect a malfunction of the ignition module, you should check it, as well as check the high-voltage wires, spark plugs, and electrical circuit of the module.
Applicability of the ignition module
The following ignition modules are used on VAZ 21083, 21093, 21099 vehicles: 2112-3705010-01 – ECM with GM ISFI-2S control units (2111-1411020-10 (20, 21)) and 2112-3705010-02 (04, 05) – ECM with control units January 4.1 (2111-1411020-22), January 5.1 (2111-1411020-71), VS 5.1 (2111-1411020-62), VS 5.1 (2111-1411020-72), BOSH M1.5.4 ( 2111-1411020), BOSH M1.5.4 (2111-1411020-70), BOSH MP7.0N (2111-1411020-40), BOSH M1.5.4N (2111-1411020-60), BOSH MP7.0N (2111-1411020 -50).
Notes and additions
— The ignition module is not dismountable. If it fails, it is replaced with a serviceable one.
— Most often, two coils of the ignition module fail, and the engine begins to “doubly” - only two cylinders work.
TWOKARBURATORS VK -More information on the topic in our VKontakte group
- No spark. injector
— Diagram of the ignition system for injection VAZ 21083, 21093, 21099
— Applicability of spark plugs on VAZ cars
— Types of injection on injection engines of VAZ 21083, 21093, 21099 cars
— Checking high-voltage wires of VAZ 21083, 21093, 21099 cars
— Oxygen sensor (Lambda probe) of injection engines of VAZ 21083, 21093, 21099 cars
Design features
It is possible to understand how the ignition module works only using the example of the entire system. So, it includes the following components:
- Ignition coil in a VAZ 2109 car injector. There are always two coils and this is the very mechanism that generates the current.
- High-voltage key switches, there are also two of them, through them the current goes to the spark plugs, in addition, the controller regulates how long the current will be turned on, it calculates the required time based on the data received from the crankshaft sensor.
- Electronic control unit.
- The body of the device itself is made of durable plastic.
Device Features
The ignition coil serves to produce a spark coming from the spark plug electrodes. To put it briefly and simply, this is a small transformer that operates in pulse mode and converts 12 volts from the car into 20-30 thousand volts at the output. High-voltage wires are used to transmit the impulse, which also sometimes cause coil malfunctions.
The distributor-type ignition system works simply - the distributor (distributor) receives a low-voltage pulse from the car's network, transmits it to the coil, and it, in turn, transforms the pulse into a high-voltage pulse. Next, the distributor distributes sparks among the cylinders depending on the order of their operation.
Structurally, the VAZ 2109 coil consists of a pair of windings - secondary and primary.
- The primary winding has fewer turns, but wires with a larger cross-section;
- The secondary winding of a coil with a large number of turns, but a smaller wire cross-section.
Signs of breakdown
Often the spark at the carburetor disappears unexpectedly when the driver is not prepared for such a turn of events. But if you have enough experience and pay close attention to the behavior of your car, you can detect signs of a malfunction before the spark disappears and the engine does not start.
So, why does the spark disappear, what are the reasons and what signs may indicate a failure of the ignition coil?
Approximately 500 kilometers before the coil’s life is over, on a cold engine the device normally starts working only after a couple of minutes of warming up. The engine starts with difficulty, but some people think that the problem is in the idle system. At the same time, the engine begins to behave unstably at low speeds.
This phenomenon occurs within 10-30 seconds, so you don’t always have time to pay attention to it. Another short-term symptom is the engine actively shaking when starting a cold engine and holding down the gas pedal. This will happen literally for 3-5 seconds, and after pressing the pedal again, everything will return to normal. When accelerating or changing gears at the gearbox, the engine may produce jerks, vibrations, and the dynamics deteriorate for a short time. The downside is that such a symptom may appear for a few moments, but disappears just as quickly. The most obvious sign is the complete failure of the engine to try to start.
The spark disappears, and therefore the chances of starting are zero.
The downside is that such a symptom may appear for a few moments, but disappears just as quickly. The most obvious sign is the complete failure of the engine to try to start. The spark disappears, and therefore the chances of starting are zero.
Device
The ignition coil itself is designed to supply electricity to the spark plugs. Their cores produce a spark that ignites a mixture of air and fuel. In other words, it is actually an ordinary transformer operating in pulse mode. It converts the supplied 12 volts into 20 thousand. The transmission of the discharge is ensured by wires; their breakage also occasionally causes failure.
The coil itself consists of two windings:
- primary;
- secondary.
Examination
If you notice signs of a problem with the ignition coil, or have to deal with a situation where the engine “died,” be sure to check the condition of this element.
As you test, you will be able to determine what caused the coil to fail and how the problems can be corrected.
How to check the device? The instructions are not complicated, even a beginner can handle it.
First, let's check the condition of the unit, and then check for correctness of the resistance of the coil itself.
- If the engine cannot be started, make sure that the coil itself is producing a spark at all. To do this, the central wire is removed from the distributor and a spare spark plug is connected to it.
- Now take the spark plug with pliers and place the metal casing on the breaker or motor.
- If a spark does not appear when the engine starter is turned, there is a malfunction in the ignition system.
- So check the power to the coil, or rather its presence. For this you will need a multimeter. One terminal is connected to contact B on the coil, and the second goes to ground. Turn on the ignition. If there is no voltage, the culprit is the ignition switch.
- You can start the engine in emergency mode. To do this, the plus from the battery is thrown onto contact B of the coil.
If there is voltage but there is no spark, check whether the primary winding is intact. To do this, the side low-voltage wires are disconnected from the coil and resistance measurements are taken with a multimeter. Then the secondary winding is checked.
We will tell you about this procedure in more detail.
Multimeter for testing
Checking coil resistance
- Unplug your car. To do this, simply disconnect the negative terminal from the battery.
- Disconnect all wires and leads going to and from the coil.
- Be sure to arm yourself with the necessary tools and a tester. A universal multimeter or ohmmeter will work fine.
- Take measurements on the primary winding. To do this, the tester probes must be connected to the low-voltage terminals located at the edges of the coil. Before doing this, do not forget to clean the terminals from accumulated dirt and traces of oxidation. Surely they formed during the operation of the car.
- Record the data.
- Now the resistance of the secondary winding is checked. To do this, you need to transfer one ohmmeter probe to terminal B of the coil, and the second to the high voltage.
- Note your results.
- The last stage of the test involves measuring the insulation resistance to ground. To do this, you need to connect one terminal of your tester to ground (this is the ignition coil housing), and connect the second one in turn to all three terminals - a pair of low-voltage terminals and one high-voltage one located in the middle of the device. If the coil is working properly, then in all three measurement cases you will get a resistance of at least 50 ohms.
- Check the table against the previously recorded data.
| Coil type | Winding | Resistance indicators |
| 3122.3705 | Primary winding | 0.43 ohms +/- 0.04 ohms |
| 8352.12 | 0.42 ohm +/- 0.05 ohm | |
| 3122.3705 | Secondary winding | 4.08 ohms +/- 0.40 ohms |
| 8352.12 | 5.00 ohms +/- 1.00 ohms |
Repair
In fact, the only way to repair a faulty ignition coil on a carburetor or injection VAZ 2109 is to replace the device.
Here you just need to choose which element will replace your old coil.
- MZATE-2. This is a standard coil, which all VAZ 2109s were equipped with from the factory. It costs about 600 rubles and serves well;
- An excellent alternative option, characterized by reliability, durability and operational efficiency. But it costs about 1800-2000 rubles;
- Valeo. Something between the factory and Bosch version, which has good characteristics and positive reviews. Today such a reel costs an average of 1,500 rubles.
The coil is the most important element of the ignition system; if it fails, you can forget about traveling about your business.
Have you ever had to check or repair an ignition coil?
- Yes, I have carried out similar operations several times already.
- No, the reel has never failed yet.
- I’m going to do this kind of work myself for the first time, and I’m collecting the necessary information.
View Results
Loading …
Examination
If you notice signs of a problem with the ignition coil, or have to deal with a situation where the engine “died,” be sure to check the condition of this element.
As you test, you will be able to determine what caused the coil to fail and how the problems can be corrected.
https://youtube.com/watch?v=Z5cUQhKBZm0
Ignition coil
How to check the device? The instructions are not complicated, even a beginner can handle it.
First, let's check the condition of the unit, and then check for correctness of the resistance of the coil itself.
- If the engine cannot be started, make sure that the coil itself is producing a spark at all. To do this, the central wire is removed from the distributor and a spare spark plug is connected to it.
- Now take the spark plug with pliers and place the metal casing on the breaker or motor.
- If a spark does not appear when the engine starter is turned, there is a malfunction in the ignition system.
- So check the power to the coil, or rather its presence. For this you will need a multimeter. One terminal is connected to contact B on the coil, and the second goes to ground. Turn on the ignition. If there is no voltage, the culprit is the ignition switch.
- You can start the engine in emergency mode. To do this, the plus from the battery is thrown onto contact B of the coil.
If there is voltage but there is no spark, check whether the primary winding is intact. To do this, the side low-voltage wires are disconnected from the coil and resistance measurements are taken with a multimeter. Then the secondary winding is checked.
ignition coil
We will tell you about this procedure in more detail.
Multimeter for testing
Checking coil resistance
- Unplug your car. To do this, simply disconnect the negative terminal from the battery.
- Disconnect all wires and leads going to and from the coil.
- Be sure to arm yourself with the necessary tools and a tester. A universal multimeter or ohmmeter will work fine.
- Take measurements on the primary winding. To do this, the tester probes must be connected to the low-voltage terminals located at the edges of the coil. Before doing this, do not forget to clean the terminals from accumulated dirt and traces of oxidation. Surely they formed during the operation of the car.
- Record the data.
- Now the resistance of the secondary winding is checked. To do this, you need to transfer one ohmmeter probe to terminal B of the coil, and the second to the high voltage.
- Note your results.
- The last stage of the test involves measuring the insulation resistance to ground. To do this, you need to connect one terminal of your tester to ground (this is the ignition coil housing), and connect the second one in turn to all three terminals - a pair of low-voltage terminals and one high-voltage one located in the middle of the device. If the coil is working properly, then in all three measurement cases you will get a resistance of at least 50 ohms.
- Check the table against the previously recorded data.
[media= https://www.youtube.com/watch?v=2F4BDExybgs]
| Coil type | Winding | Resistance indicators |
| 3122.3705 | Primary winding | 0.43 ohms +/- 0.04 ohms |
| 8352.12 | 0.42 ohm +/- 0.05 ohm | |
| 3122.3705 | Secondary winding | 4.08 ohms +/- 0.40 ohms |
| 8352.12 | 5.00 ohms +/- 1.00 ohms |
We measure the resistance of the ignition coil
Repair
In fact, the only way to repair a faulty ignition coil on a carburetor or injection VAZ 2109 is to replace the device.
Here you just need to choose which element will replace your old coil.
- MZATE-2. This is a standard coil, which all VAZ 2109s were equipped with from the factory. It costs about 600 rubles and serves well;
- An excellent alternative option, characterized by reliability, durability and operational efficiency. But it costs about 1800-2000 rubles;
- Valeo. Something between the factory and Bosch version, which has good characteristics and positive reviews. Today such a reel costs an average of 1,500 rubles.
The coil is the most important element of the ignition system; if it fails, you can forget about traveling about your business.
How to check an ignition coil: 3 proven methods
Loading …
Coil resistance measurement
It is important to note that this procedure cannot be performed without an ohmmeter or tester. The procedure is as follows:
- the car is de-energized (by disconnecting the negative cable from the battery);
- completely remove all wires from the coil;
- measurements are taken on the primary winding (the probes are applied to two low-voltage terminals, installed as we remember - along the edges);
- to avoid distortion of readings, it is necessary to thoroughly clean the outputs from dirt and oxides;
- It is better to write down the results.
Next, measure the resistance on the secondary winding with a tester. Here one probe is combined with the “B” contact, and the second with a high-voltage cable.
And finally, all that remains is to find out what the ground resistance is. To do this, one wire of the multimeter is applied to it, and with the second you need to touch three contacts in turn:
- two low-voltage;
- one high-voltage one (it is in the center of the coil).
If nothing happened to it, then in all three cases the tested resistance level will be within 50 Ohms.
Depending on the type of coil, the normal readings in Ohms will be as follows:
- at primary – 0.43 +/- 0.04;
- on the secondary – 4.08 +/- 0.40.
If nothing happened to the distributor, you will need to inspect the switch module - this can be done using a light bulb.
It will not be possible to check it qualitatively, since a special stand is used for this in car repair shops. But a light bulb (12-volt) will confirm that the impulse controlling the spark is being received.
labavto.com
One of the reasons for problems with a spark in the internal combustion engine on a VAZ 2109 is a malfunction of the ignition coil (IC). To accurately diagnose a malfunction, you need to know the design of the unit, be able to check it and, if necessary, install a new product.
Coil design features
This unit is designed to convert low on-board voltage (12 V) into high voltage (15-30 thousand V), which is supplied to the spark plugs to ignite the fuel assemblies in the engine cylinders. The impulse is transmitted through high voltage wires.
Both engines with injector and carburetor engines have an ignition system with a distributor (distributor). The scheme of work is not complicated. The distributor receives low-voltage current, which is then transmitted to the short circuit. The received pulse is converted into high-voltage current. Then the distributor distributes it in a certain order to the candles.
The main elements of the coil are the primary and secondary windings, wound on an external magnetic circuit. The first one has a small number of turns of copper wire - from 100 to 150, but it has a large cross-section. The second has a much larger number of turns - from 15,000 to 30,000, the wires are also made of copper, but with a smaller cross-section. There is a primary winding on top, and a secondary winding inside it.
In the secondary winding, a high-voltage current arises due to the action of electromagnetic induction and the accumulation of charge in the primary winding, which arise after cutting off the current in the primary. The high-voltage current is supplied to the central terminal of the short circuit, and then the distributor distributes it to the spark plugs.
Signs and causes of malfunctions
Most often, the spark disappears unexpectedly, but attentive drivers with experience can predict the disappearance of the spark by the following signs:
- 500 km before the end of the short circuit service life, the car can sometimes be difficult to start, only after a few minutes of warming up. Some drivers associate this with idling.
- When starting a cold engine and pressing the accelerator pedal, the engine begins to actively rev. This lasts a few seconds and after further pressing the accelerator, the engine runs normally.
- Dips or jerks at start.
- Unstable idling, unstable engine operation at low speeds.
- When you press the accelerator hard, instead of increasing speed, dips appear.
- Weak spark or its complete disappearance.
Typical short circuit faults:
- there are oil stains on the cover;
- short circuit between the turns of any of the windings;
- breakdown of insulation of the secondary winding to the housing (ground) short circuit;
- break in the electrical circuit of the windings;
- mechanical damage or defects on the body or cover of the short circuit;
- The readings on the measuring tester do not meet the requirements.
Symptoms of malfunction
As practice shows, the spark in a carburetor power plant very often disappears suddenly. However, having the necessary experience and knowledge, it is possible to identify the problem in advance.
Approximately half a thousand kilometers before the coil finally breaks down, problems arise with starting the engine when cold. It is usually possible to move off only after several minutes of warming up. The engine starts reluctantly. Moreover, most car enthusiasts are sure that the fault lies in the idle system.
This nuisance is often combined with unstable operation of the unit at low speeds. However, this lasts very little time - no more than half a minute, and therefore many simply do not notice the problem.
Another fairly clear signal is that the engine starts running when cold with the gas pedal pressed. The syndrome is eliminated in 5 seconds or even faster. If you press the pedal again, everything will work as it should.
Examination
If you notice signs of a problem with the ignition coil, or have to deal with a situation where the engine “died,” be sure to check the condition of this element.
As you test, you will be able to determine what caused the coil to fail and how the problems can be corrected.
How to check the device? The instructions are not complicated, even a beginner can handle it.
First, let's check the condition of the unit, and then check for correctness of the resistance of the coil itself.
- If the engine cannot be started, make sure that the coil itself is producing a spark at all. To do this, the central wire is removed from the distributor and a spare spark plug is connected to it.
- Now take the spark plug with pliers and place the metal casing on the breaker or motor.
- If a spark does not appear when the engine starter is turned, there is a malfunction in the ignition system.
- So check the power to the coil, or rather its presence. For this you will need a multimeter. One terminal is connected to contact B on the coil, and the second goes to ground. Turn on the ignition. If there is no voltage, the culprit is the ignition switch.
- You can start the engine in emergency mode. To do this, the plus from the battery is thrown onto contact B of the coil.
If there is voltage but there is no spark, check whether the primary winding is intact. To do this, the side low-voltage wires are disconnected from the coil and resistance measurements are taken with a multimeter. Then the secondary winding is checked.
We will tell you about this procedure in more detail.
Multimeter for testing
Checking the ignition coil B 117 from VAZ
Ignition coil
from
VAZ
, called B117, can be successfully installed on an IZH motorcycle with 12 volts.
The first thing to check in this case is. this is the power supply to the coil
.
This is checked using a multimeter by touching one terminal to point "B" to the coil and the other. to the ground. Measurements must be carried out with the ignition on
. If there is no voltage, then the problem is in the ignition switch.
To jump start the engine, you can pull the wire from the positive terminal of the battery to the "B" terminal on the coil.
If voltage is present and there is no spark, check the integrity of the primary winding. For this purpose, the double-sided, low-voltage wires from the coil must be disconnected. To check, the multimeter is placed in resistance measurement mode, and its terminals are connected to the contacts on the coil. At a temperature of 25 ° C, the resistance of the coil winding on a VAZ 2109 should be about 0.43 Ohm.
To check the secondary winding, a multimeter is connected to the center terminal and to the side marked “B”.
How to check the ignition coil
The main parameter by which the performance of the reel is determined is the resistance of the windings. There are average indicators that indicate its serviceability. Although deviations from the norm are not always an indicator of a malfunction.
Using a multimeter
Using a multimeter, you can check the ignition coil according to 3 parameters:
- primary winding resistance;
- secondary winding resistance;
- presence of a short circuit (insulation breakdown).
We check the primary winding by attaching probes to contacts B and K.
| Coil type | Resistance, Ohm |
| VAZ 2106 (contact system) | 3,07-3,5 |
| 27.3705 (contactless, M, P) | 0,45± 0,05 |
| 3122.3705 (N, W) | 0,43± 0,04 |
| 8352.12 (M, R) | 0,42± 0,05 |
| 027.3705 (M, R) | 0,43± 0,04 |
| 27.3707-01 (M, R) | 0,42± 0,05 |
| ATE1721 (M, R) | 0,43± 0,05 |
| M – oil-filled | |
| C – dry | |
| P – open magnetic circuit | |
| Z – closed magnetic circuit |
When measuring the “secondary” we connect one probe to contact B, and the second to the high-voltage terminal.
| Coil type | Resistance, KOhm |
| VAZ 2106 (contact system) | 5,4-9,2 |
| 27.3705 (contactless, M, P) | 5±1 |
| 3122.3705 (N, W) | 4,08±0,4 |
| 8352.12 (M, R) | 5±1 |
| 027.3705 (M, R) | 5±1 |
| 27.3707-01 (M, R) | 5±1 |
| ATE1721 (M, R) | 5±1 |
The insulation is measured through terminal B and the coil body. The device readings should be at least 50 MΩ.
It’s not always common for a car enthusiast to have a multimeter at hand and experience in using it; on a long journey, checking the ignition coil using this method is also not available.
other methods
Another method, especially relevant for old cars, including VAZs, is to check the spark. To do this, the central high-voltage wire is placed at a distance of 5-7 mm from the motor housing. If a blue or bright purple spark flashes when you try to start the car, the reel is working normally. If the color of the spark is lighter, yellow, or absent altogether, this may confirm that it is broken or the wire is faulty.
» alt=»»>
There is an easy way to test a system with individual coils. If the engine stalls, you just need to disconnect the power to the coils one by one while the engine is running. We disconnected the connector and the operating sound changed (the machine stalled) - the coil is fine. The sound remains the same - there is no spark to the spark plug in this cylinder.
Diagnostics and repair of ignition coil 2109
“Repair” is a strong word. Hardly anyone is going to disassemble the coil to look for a breakdown in it, and in principle they cannot be repaired. They simply take them out of the trunk and replace them with new ones. How they get into the trunk, see above. But, of course, it is possible to diagnose the coil if desired. Especially if you have a couple of hours of free time and an oscilloscope in the garage. If not, then you can do it much easier. The people work using traditional methods, but we, as a part of the people who are more technically savvy, would not recommend doing so. Usually the coil is checked simply - unscrew the spark plug, put it on the central wire, put it to ground and crank the engine with the starter. Or even without a candle at all. There was a spark - a good coil. No spark or weak spark - into the trunk.
True, this can damage a completely healthy coil and half of the ignition system, including the semiconductor switch. The fact is that every extra millimeter and every extra ohm in the discharge resistance is an unpredictable load on the ignition system. It is more rational to check the condition of the coil using an ohmmeter and using the connection diagram to check the resistance between terminals K and B. The working coil will show about 0.4 Ohm. The secondary winding is checked by measuring the resistance at terminal B and the output of the high-voltage wire. The value for a normal coil is 5 kOhm.
Possible causes of ignition module malfunction
Despite the high reliability and durability of the ignition module, during operation it can fail, like any other mechanism. Among all possible causes of breakdowns, in 9 out of 10 cases the following occur and are diagnosed:
- Use of inappropriate components in the ignition system. High-voltage wires are selected based on the parameters of the module, since excessively high or low voltage creates malfunctions or burns out contacts.
- Defective or damaged parts, poor quality assembly. Defective components break down faster and damage other components or elements of the system. Practice shows that the selection of high-quality components and their periodic diagnostics allow the module to remain operational for a long time.