To replace the rear light bulbs, follow these steps:
1. Fold back the trunk trim behind the taillight in two places.
2. Holding the flashlight with one hand, unscrew the three wing nuts of the flashlight mounting studs.
3. Pull the light towards the rear of the vehicle.
4. Turn the lamp socket you want to replace counterclockwise and remove it from the lamp.
5. While pressing lightly on the lamp, rotate it counterclockwise in the socket and remove it.
6. Install the new lamp in the reverse order of removal.
The lamps used in the rear light can be viewed here.
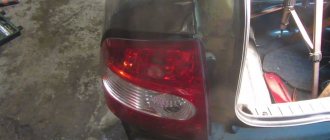
The work is shown on the left lantern.
To replace the lamps in the rear light, simply unscrew the nuts that secure it without disconnecting the light's wiring block from the rear wiring harness block. Inside the trunk...
...we bend the upholstery flap...
...and by hand unscrew the three fastenings of the flashlight (two nuts are located under the upholstery and are not visible in the photo).
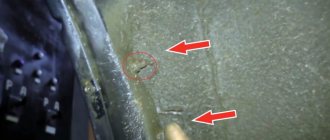
Location of the rear light fastening nuts (shown with the light removed for clarity)
By turning the side light and brake light bulb socket counterclockwise...
...remove the lamp socket from the flashlight body.
Pressing the lamp, turn it all the way counterclockwise...
...and remove the lamp from the socket.
The combination parking light and brake light have two protrusions located at different levels.
When installing a new P21/4W parking light and brake light bulb, its protrusions must fit into the corresponding grooves in the socket.
We carry out the operations for replacing the remaining lamps in the same way.
Each lamp socket, in addition to the black “mass” wire, is connected to other wires of different colors.
In order not to confuse the lamp sockets when installing them, the corresponding wire colors are indicated on the lamp body.
For example, on the light housing next to the fog light lamp socket there is the inscription “red”, which corresponds to the red wire of the lamp socket.
Next to the turn signal lamp socket there is the inscription “blue”, and next to the reversing light lamp socket it is written “green”. The exception is the socket for the side light and brake signal lamps, next to which there is no inscription.
To remove the rear light...
...squeeze the clamps of the rear wiring harness block...
...and disconnect it from the flashlight wiring block.
Using your hand, push the rubber sealing cover of the wires out from the hole in the body.
Unscrew the three plastic nuts securing the rear light (see above).
We remove the lamp by pulling the wires with the block through the hole in the body.
There are sealing gaskets installed on the three mounting threaded rods and two plastic mounting pins of the lantern.
If the gaskets are torn, replace them with new ones.
Install the rear light in the reverse order.
Replacing lamps in a Lada-Priora headlight
Depending on the manufacturer, two types of headlights are used on the Lada Priora. In order to change the lamp in the left headlight, you must first remove the battery.
Procedure for replacing low or high beam lamps:
- remove cover 2;
- disconnect the wire block 7 from the failed lamp;
- remove the antennae 6 of the spring clamp from the grooves;
- remove the lamp;
- Replace the lamp and install it in reverse order. In this case, you should hold a working lamp only by the base and under no circumstances touch its glass part.
The procedure for replacing the side light lamp in the headlight:
- remove cover 1;
- remove the side light lamp socket from the seat in the reflector 5 by the wires;
- remove the lamp from the socket;
- replace the lamp and install it in the reverse order, fix the lamp socket in the reflector socket, applying force to the socket body.
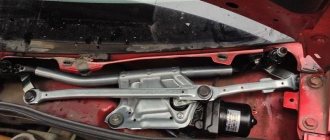
The procedure for replacing the turn signal lamp in the headlight:
- remove the headlight housing by unscrewing the three fastening screws;
- turn the socket with lamp 3 counterclockwise and remove it from the seat of the headlamp housing;
- remove the lamp from the socket by turning it counterclockwise;
- Replace the lamp and install it in reverse order.
Replacing lamps in the rear light of a Lada Priora
The procedure for replacing the lamp in the rear light:
- bend back the trunk trim, providing access to wing nuts 1 for securing the rear light;
- unscrew the 3 wing nuts and slide the rear light out of its seat;
- turn the lamp socket to be replaced counterclockwise and remove it from the seat;
- remove the lamp from the socket by turning it counterclockwise;
- Replace the lamp and install it in reverse order.
What standard lamps are used in Priora headlights?
The Priora headlight unit is equipped with:
- low beam lamp;
- high beam/running light lamp;
- turn signal lamp;
- side light lamp.
Designations
- Low beam, for example, is marked 55H7, where 55 is the power in Watts, and H7 is the designation of the base;
- The main beam is designated 55N15;
- turn signal – 21PY21W;
- side light – 5W5W.
The lamps are in the headlights in a single unit, and the headlight unit is not always replaced - only the bulbs are changed. And not in vain - the factory headlight produces a cloudy light. Prior owners try to install the best lamps so that the headlights shine longer.
Layout of the restyled version
In the Priora, little has changed after restyling - small details invisible to the eye, the center console, the dashboard. The headlights have also changed - they have become quite a bit larger. The principle of their design has remained virtually unchanged, except that there is now one plug at the back to isolate the contacts.
The design of the headlamp unit has become more complex: now in place of the usual high beam lamp there is a light consumable, combined with daytime running lights, which switches between operating modes. PTF fog light bulb, everything is also mounted depending on the configuration.
Types of lamps used in Priora
- H7 – long-distance;
- H15 – long-distance + daytime running gear;
- PY 21W – rotary;
- P21 W – reverse;
- P21 and 5W – brake lights and side lights;
- H11 – fog lights;
- C10 W and C5 W – interior and luggage lamps;
- W5W – front dimensions;
- H1 – long-range without daytime running lights (installed on cars until 2013).
How to change the low beam light bulb on a Priora
First of all, it is necessary to remove the battery, otherwise access to the headlight will be limited. And even if you stick your hand inside, working under the hood will be uncomfortable. The process of replacing a light bulb is described in several steps:
- Remove the rubber cover, the outermost one (it is located closest to the front fender of the car). At the same time, try to be careful with fastening the headlight housing;
- Disconnect the block with contacts from the lamp itself;
- We press the latch and remove it from engagement with the hooks carefully and without sudden movements;
- We take out a 55H7 light bulb;
- We do everything in reverse order with the new lamp.
It is recommended to do the entire mechanism according to the clockwise principle - first remove the old light bulbs from both sides, and then install new ones. Lamps used at the factory do not perform very well, even in terms of durability, and may require repairs a couple of months after purchase.
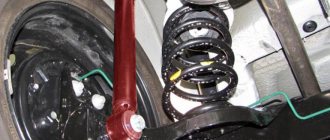
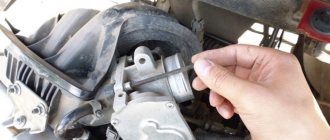
Where is the reversing light switch (sensor) installed on the Priora?
Following the logic, you need to look for the reverse sensor on the gearbox. After all, it is when the reverse speed is turned on that it is triggered when the fork rests on the rod. Accordingly, the reverse light switch is located at the gearbox. It is located on the right side (if you are facing the car) on the gearbox housing closer to the radiator. The photo below shows where the reverse sensor is located on a Priora.
You can get to it in different ways:
- from the engine compartment - you need to remove the air filter housing, but access to the sensor will not be very convenient;
- on the left wheel side - to do this you need to remove the mudguard of the engine compartment (it is advisable to remove the wheel if you need to replace it);
- from below is the most convenient option (if there is an inspection hole), especially if the product is being replaced. To access the device, you need to remove the protection, if any.
When the location of the reverse speed sensor on the Priora is known, all that remains is to replace the product. The next section describes this procedure in detail.
Replacing Priora high beam lamps
It all starts again with removing the battery - you can’t do without it now. The high beam lamp is located a little deeper and is not easy to get to. The sequence of actions when replacing a high beam lamp is as follows:
- We disconnect the rubber cover (it is larger than the one designed to protect the low beam lamp);
- Disconnect the block with wires;
- Unclench the spring clamp and disengage it from the reflector hooks. We release the light bulb.
- We remove the lamp socket from the headlight unit.
DS4 45565557
For example, on the body of the light, next to the lamp socket socket, there is an inscription “orange”, corresponding to the orange wire of the lamp socket.
For example, on the body of the light, next to the lamp socket socket, there is an inscription “orange”, corresponding to the orange wire of the lamp socket.
For example, on the body of the light, next to the lamp socket socket, there is an inscription “orange”, corresponding to the orange wire of the lamp socket.
After replacing the lamp, install the rear light in the reverse order.
Changing the lamps in the rear light of Lada Priora
Replacing lamps in Priora taillights
Replacing the rear light bulbs is complicated by the fact that the combination unit inside supports the operation of the parking lights and brake signal. But it all starts just as simply, when replacing the bulbs in the rear headlights of the Priors, as well as the front ones:
- Remove part of the upholstery opposite the headlights;
- Unscrew the screws that support the protective housing of the rear light. In Kalina, there were nuts in place of the screws, and unscrewing them was even more fun - they fell into a huge gap and were lost in the car body forever;
- Turn the brake light and clearance holders counterclockwise. Do not remove the socket, take it out together with the light bulb;
- It is easy to press down the lamp, turn it clockwise and remove it from the socket with a slight movement (it will almost fall out on its own);
- Carry out the operation in reverse order.
All you have to do is remember about the combination headlight - remember where each lamp was located, so that you don’t confuse anything during installation. With the rest of the light bulbs, everything is different - in addition to the ground (black wire), wires from the ECU are connected to them. Thus, the “foglights” correspond to the red wire color, the turn signal indicator – blue, the green light is assigned to the reverse lamp.
Replacing brake light bulbs and parking lights
With the release of the restyling of Priora 2, a large number of details have changed in it. The rear lights are especially noticeable; they have become LED. Now the dimensions have become lower, which gives the car a wider appearance in the dark. To achieve this effect, it is not at all necessary to buy and install LED lights.
To do this, just swap the backlight from the top position to the bottom. We don’t touch reverse and turns!
After such a replacement, when you press the brake pedal, the brakes will light up where the side lights and fog lights were previously illuminated. And the dimensions and rear PTFs will glow from the bottom of the lamp.
Dorestyling
The life of the owners of pre-restyling cars was darkened by the fact that, in addition to the reduced service life, even then it was darkened by the fact that when replacing some light bulbs it was necessary to remove the socket along with the bulb - this, for example, happened when the owner wanted to replace a side light bulb. Owning a Priora became increasingly expensive; rarely did anyone think about buying another headlight - developed by other companies. Installing light bulbs from foreign manufacturers solved the problem of poor lighting well and for a long time.
Turn
The turn signal signal is located the highest (in relation to the hood), and to remove it you don’t even have to wrap your hand under the hood.
- Remove three screws and a self-tapping screw from the plastic cover, pry it up with a flat-head screwdriver and remove it;
- Turn the cartridge strictly counterclockwise;
- Remove the cartridge;
- It is easy to press down on the lamp and rotate it counterclockwise until it begins to fall out of the socket.
When choosing a turn signal PY21W (Voltage 21 W), you should be careful - a lamp with a similar marking - P21W - will not have orange, but colorless glass, and will not be suitable as a turn signal.
Difficulties with replacement
The most convenient thing is to replace the turn indicators. In other cases, you have to twist very tightly and stand in this uncomfortable position for a couple of minutes until the job is done. This is not very convenient, because the light bulb is a consumable, but the engineers could make sure that replacing it was as easy as the plastic steering wheel insert on the “ten”.
Another inconvenience is that you have to remove the battery. Nobody argues that it is better to turn off everything before starting work. But the battery is removed for reasons of rationality - the battery takes up a lot of space and interferes with working with your hands while you stand in an awkward position.
Design and principle of operation of the reverse sensor (headlight switch) on Priora
Knowing the purpose of the element in question, it is important to regularly monitor its serviceability. If the device fails, it must be replaced. It cannot be repaired, and to make sure of this, let’s look at the design and operating principle of the reverse sensor on the Priora.
The product has a simple design and consists of the following components:
- Contact pins.
- Spring.
- Contact plate.
- Frame.
- A pusher in the form of a rod.
The photo below shows a diagram of the reverse sensor.
The sensor design on the Priora is almost identical, with only a slight difference in the design of the pusher. If in the diagram above the pusher consists of a ball, then the Priora uses a cylindrical rod. The photo below shows the product disassembled.
The operating principle of such a sensor is simple, but to understand it, we will use the diagram presented below.
Reverse switch operation diagram
Based on this, we’ll figure out how the rear lights come on when reverse gear is engaged. The operating principle of the sensor is as follows:
- The sensor is a limit switch, when the contacts of which are closed, power is supplied to the rear lights.
- The sensor contact receives power, which is supplied only when the ignition is turned on. Please note that the sensor is connected through a fuse, which protects the circuit from short circuits or overheating, thereby preventing the insulation from melting and the vehicle wiring from catching fire. Attention should be paid to the presence of a fuse because this element may also be the reason why the reversing lights on a Priora do not light up
. - The second contact on the sensor is the circuit that powers the tail lights (positive wire). Knowing this information, it will not be difficult to check the serviceability of the circuit.
- Having understood the diagram of the reverse sensor on the Priora and its pinout, you can begin to consider the functioning process.
- The switch works as follows: when the driver engages reverse gear, the gear shift fork rests against the protruding sensor rod. The rod pushes the contact plate, which, overcoming the force of the spring, closes the contacts inside.
- As a result, the circuit closes and the reverse lights come on. As soon as the transmission is disengaged, the contact plate returns to its original position due to the action of the spring, and the lights go out.
The operating principle of such a device is very simple and understandable, so there are no difficulties in determining the reason why the reverse lights do not work on a Priora. Most often, the cause is a sensor or switch in which the contacts wear out or the spring fails. If the DZH is faulty, it must be replaced.
Why the headlights don't light up - reasons
The most common reason for headlights not working is a burnt out light bulb. Its service life is indicated in hours on the packaging. For a low beam bulb, this limit can be 400 hours of operation. The second extremely possible reason could be a wiring malfunction due to water leakage, or the wire simply frayed. This problem is already more serious, because you will have to fuss with it much longer than with a regular replacement of consumables.
Often, car enthusiasts are too lazy to change light bulbs, driving out onto the road in “one-eyed” cars. This is very unsafe - it is recommended that immediately after a malfunction is noticed, you go for a spare part to replace a new lamp.
Why the reverse lights don’t light up on a Priora: checking the 3D sensor yourself
This is often associated with the reverse sensor (light switches), but there is no need to rush to change it right away. First you need to make sure that this element is indeed faulty. There are several reasons why the reverse lights do not light up on a Priora. These include:
- Burnout of light bulbs in lanterns.
It is important to make a note here, since two light bulbs cannot burn out at once. You can, of course, check the bulbs for serviceability, but in most cases, they will be suitable. - Fuse tripping
. The power supply circuit for the rear lights is connected via a fuse. It is used in the circuit because a large current flows in the circuit, and in the event of a short circuit, the wiring may catch fire.
Which fuse is responsible for the reverse circuit on a Priora? This is a fuse F12 in the car at 10A.
Below is the photo of its location. We check the serviceability of the fuse using a tester. If it is not working, then before installing a new fuse, you should determine the reason for the failure of the old one. After all, the fuse-link melted due to increased current in the circuit, which means it is possible that the supply wire is damaged, which breaks through to ground. - The power cable is faulty.
Before you begin removing and replacing the switch, you should make sure that the wiring is in good condition. The easiest way to check it is to use a jumper.
Connect the contacts in the chip to each other and turn on the ignition. If the headlights do not light up, then the sensor has nothing to do with it, and the cause is a faulty circuit
. Another way is to measure the voltage in the chip that connects to the sensor. One of the contacts should have 12V voltage when the ignition is on. Connect the multimeter as follows: one probe to one of the contacts of the chip, and the second to the ground of the car. Turn on the ignition. If there is no voltage, then touch the probe to another contact in the chip. If in this case there is no voltage, then it is necessary to look for the cause in the wire, since its core is damaged. Most often, the wire frays at the junction with the terminal. Inspect the wire and replace the chip if necessary. - Faulty reverse sensor or switch.
A multimeter will help you verify this. We turn on the device in the continuity or resistance measurement mode, after which we turn on the reverse gear (there is no need to turn on the ignition). If the tester produces a characteristic sound signal, it means the switch is working. We need to look for the reason elsewhere. The absence of a signal is a clear sign that the sensor needs to be replaced. If you check by measuring the resistance, then its zero value when the reverse speed is engaged indicates a sensor malfunction.
Having figured out the reasons why the reverse lights do not work on the Priora, you can resort to troubleshooting. However, first, let’s look at where the reversing light switch is located on the Priora.