Buy - Side light lamp socket
Includes 2 RGB lamps. The operating principle is simple. They are inserted quite easily, 1 set is for the dimensions. They operate from a small remote control and have multi-colored lighting. There is a strobe mode, smooth on and off. They look very stylish and original. You can set it to blink even with music. This video shows how to replace the side lights on a Lada Priora 2. Published: February 3. 2022 replacement of side light bulb on Lada Priora. About daytime running lights on the Main Road on NTV - Duration: 3:20 FRANCHISE TV 503,754 views. Replacing side light bulbs on Prior 2. The headlights themselves are slightly changed when compared with the initial headlights. I made a video because I couldn’t find any information. Simple and quick replacement of the side light bulb in a Priora headlight. Report a video? Sign in to report inappropriate content. Video review of replacing light bulbs in a headlight unit on a Lada Priora car - a visual aid. Video. Replacing the low and high beam lamps on the Lada Priora. 05:18. Diary of Lada Priora 2. Entry 29. Replacing the headlight on a Priora. 06:11. Lada Granta: replacement of daytime running lights (DRLs)/parking lights (Lada Granta). Video of replacing headlight bulbs, low beam and high beam in Lada Priora: Backup video of replacing bulbs in Lada Priora. Related videos. Lada Priora: Replacing the side light bulb Lada Priora 2, replacing the side light bulb, how the lights are correct, simple and ingenious Lada Priora - replacing license plate light bulbs replacing the cabin filter on a Lada Priora Lamp test. side light lamp. Also, the process of replacing low and high beam lamps is shown in the video: Have you ever had to change the bulbs in the Priora headlights yourself? Self-replacement of lamps in the headlights of a Lada Priora. We turn the high beam lamp with the daytime running light function against. To replace the side light lamp in the headlight, remove the socket with the lamp. This video shows how to replace the side light lamp on a Lada Priora 2. Replacing the rear brake light and turn signal lamp on a Priora Hatchback and Sedan. Video review of replacing light bulbs in the rear lights on a Lada car. This video shows how to replace the side light bulb on a Lada Priora 2. Simple and quick replacement of the side light bulb in a Priora headlight. Replacing a side light bulb on a Lada Kalina. Replacing Priora lamps in 5 minutes. Dimensions during the day, instead of the neighbor. Replacement of side light bulbs for Skoda Octavia. Replacing low beam lamps on a Lada Granta. This video shows how to replace the side light bulb on a Lada Priora 2. Lada Priora 2, replacing a side light bulb, how to replace a side light bulb on a Priora? Glow test of H7 diode lamps on a Priora. Replacing the side light lamp Additional video: On the new second-generation Priors, the light bulbs are replaced a little differently, that is, instead of rubber covers there is one large plastic cover, folded back.. I installed it myself, there is nothing complicated about it. The lamps themselves have a remote control. All colors are beautiful, but my favorite is blue. What surprised me was that the lamps shine well during the day too, the colors are visible. Well, of course, it looks even cooler in the evening. When we get together with friends, they ask me to turn on the strobe mode. If all this is accompanied by music, then the result is a real disco.
How can you improve the performance and appearance of flashlights?
Taillights and headlights on Priora are the devices that are most frequently subject to changes. The goal is to give the car individuality and expand the functionality of standard optical devices. Tuning options:
- Eyelashes are linings that visually change the shape of the front optics and the appearance of the car. Automotive eyelashes are made of plastic, tint film or seclomat (fiberglass) with epoxy resin.
- Angel eyes are luminous rings, placed in reflectors, installed in car optics, and emit light that is pleasant to the eye. Clearly visible during the day, they can be used as DRLs or as markers. Available in LED, neon or cluster versions.
- Rear diode lights with a plastic lens duplicate all the functions of factory products - LED dimensions, brake light, turn signal, PTF. Changing them is not difficult - a standard connection connector and 4 fastening nuts.
- Xenon on Priora. Its advantages are best demonstrated when there are bi-xenon lenses on the car. Lensed glass will help avoid dazzling oncoming cars and ensures the formation of the correct beam of light. Bi-xenon lenses with angel eyes look impressive and modern. They are suitable for all types of car lamp sockets. Installation in a standard base without changing the design of the reflector is acceptable. To install, remove the outer glass of the headlight and replace the lens.
- Tinting. This is done using a tint film or varnish. Using the first one, you can carry out partial tinting of individual elements.
A large assortment of lights for Priora allows each car owner to choose what best suits his taste. Modern external vehicle lighting perfectly illuminates the road day and night in any weather, demonstrating a truly high level of quality and reliability. In the event of a malfunction, most of the work can be done on your own if you have the knowledge, but to maintain the warranty, you should contact a service station.
We recommend reading:
- Replacing a ball joint using the example of a Priora
- Replacement of rear struts: done on Priora
- Engine protection on Priora
- Troubleshooting the Priora mass air flow sensor
- Which is best: Grant or Priora?
- How to properly install fog lights on a Priora
Removing and installing lamps in the rear headlights of Priora
To replace the lamps in the rear light, you need to unscrew the nuts securing it; you do not need to disconnect the block with wires.
- Unfold the flap of the upholstery inside the trunk.
- Unscrew the 3 plastic nuts securing the taillight.
- Turn the side light and brake light bulb socket counterclockwise.
- Remove the socket together with the lamp from the headlight housing.
- Press the lamp, then turn it counterclockwise all the way, remove the lamp from the socket.
- Side light and brake signal lamp (P21/4W) Priors - combined, has 2 protrusions, which are located at different levels. When installing the lamp, its protrusions must fit into the corresponding grooves of the socket.
Replacement of the remaining taillight lamps is carried out in the same way. There are some peculiarities when installing cartridges. Each lamp socket, in addition to the wire with a black mass, is connected to other wires of different colors. In order not to confuse the lamp sockets when installing them, the corresponding wire colors are indicated on the headlight housing (except for the side light lamp socket and brake signal). For example, on the body of the lantern
- Next to the fog light bulb socket there is a "red" inscription that corresponds to the red wire of the bulb socket.
- next to the turn signal lamp socket there is the inscription “blue”,
- next to the reversing light socket - “green”.
By the way, do you know that you can install angel eyes in the headlights of the Lada Priora.
H4 car lamp tests
1. Which lamps are the brightest were determined by the Test Lab channel (June 2020). The rating is as follows:
- OSRAM Night Breaker
- Philips X-Treme Vision
- Philips Vision
- Philips Vision Plus
- Philips Longlife Ecovision
- OSRAM U37R
- Narva
- OSRAM Cool Blue
- GE 50440U
Out of the standings:
- MTF Argentum
- OSRAM Super Bright
2. Test of H4 automobile lamps “Behind the Wheel” in the laboratory and on the roads (March 2022):
| Zone III (measuring direction: 0°-0°), OK | Counter. point B50L (measurement direction: 34′ up, 3°26′ left), lx | Counter. point 75R (measurement direction: 34′ down, 1°09' to the right), lux | Counter. point 50R (measurement direction: 52′ down, 1043′ to the right), lux | Notes | |
| Standardized values, lux | 1,00 | <0,60 | >9,60 | >9,60 | |
| Standard Philips H4 lamps | 1,00 | 0,60 | 9,60 | 9,60 | the light is visually white |
| ClearLight X-Treme Vision H4 | 1,00 | 0,34 | 15,30 | 26,50 | the light is visually white |
| Narva Xenon White H4 | 0,64 | 0,22 | 8,00 | 12,40 | light visually blue |
| MTF Light Aurum H4 | 2,04 | 1,00 | 12,88 | 28,40 | the light is visually yellow |
| LED MAS H4 | 1,20 | 1,20 | 1,40 | 1,40 | no cut-off line |
| DLED H4, 270 lm | 0,40 | 0,40 | 0,40 | 0,40 | no cut-off line |
| DLED H4, 900 lm | 7,60 | 4,24 | 7,20 | 5,70 | no cut-off line |
Turn
The turn signal signal is located the highest (in relation to the hood), and to remove it you don’t even have to wrap your hand under the hood.
- Remove three screws and a self-tapping screw from the plastic cover, pry it up with a flat-head screwdriver and remove it;
- Turn the cartridge strictly counterclockwise;
- Remove the cartridge;
- It is easy to press down on the lamp and rotate it counterclockwise until it begins to fall out of the socket.
When choosing a turn signal PY21W (Voltage 21 W), you should be careful - a lamp with a similar marking - P21W - will not have orange, but colorless glass, and will not be suitable as a turn signal.
Replacing the brake light bulb, tail lights and turn signals on Priora Hatchback and Sedan
Comments
Alexei:
Which lamp should I insert into the brake
light of Lada Priora 21/4 or 21/5?
Teddy Bear E:
Sandro, thank you for the video! Helped!
Maga Aliev:
handsome guy helped
Meirkhan Mihon:
thanks to the author
stason73rus:
But my brake lights on the Priora do not light up, but
the brake light on the rear window is on, the fuse is fine.
what could be the reason? Thanks in advance. marina korshikova:
Sandro, handsome, I watch your videos regularly, they help a lot. I’m just sorry for your viburnum, you did so many experiments on it.
Andrey M:
Thank you, this video was very useful today!
rc models:
sell me the speakers
Denis Denis:
Remove the headlight to change the light bulb!
Gray matter:
Is it possible to touch the light bulbs with your hands? or am I confusing something
Makarov Alexander:
on Kalina1 sedan also
Removing and installing a rear light on a Priora
So, first of all, we open the trunk lid, and on the inside we find a special technological window with Velcro that needs to be opened. It is through this that you can get to the flashlight mounts.
How to change light bulbs and remove the headlight of a VAZ-2123 car
It is worth noting that from the inside it is not mounted with bolts, but with special plastic screws that secure the lamp to the car body. There are three of them in total, of course, each of them must be unscrewed. After this, we move the lantern to the side from the outside, as is clearly shown in the photo below.
If it is necessary to replace the rear light, then each of the lamps should be pulled out of the light housing from its rear part. More on this below.
Video on this topic
how to remove the rear light on a Lada Priora
Lada Priora station wagon: replacing the tabs in the headlights
I'll show you how to change the light bulbs in the headlights of a Priora station wagon
.
Removing the Priora station wagon lamp
Removing the rear light of a Priora station wagon
VAZ 2171.
how to remove the rear light on a Lada Priora , Everything is done quite simply. We bend the upholstery on the side to be removed.
LED in Priora, replacing stock lamps in reversing headlight
LED reverse lamps P21W on led.
Lada Priora station wagon : replacing the tabs in the headlights
I'll show you how to change the light bulbs in the headlights of a Priora station wagon.
Installing LED rear lights on Priora
Online store EXELET.RU Tolyatti, st. Ofitserskaya 12V, office 206 Tel https://exelet.ru PRIORA on Drive2.
Which low beam lamp is suitable for Priora?
Suitable vehicle years: 2007, 2008, 2009, 2010, 2011, 2012, 2013, 2014, 2015, 2016, 2022, 2022.
The H7 55W bulb is installed at the factory:
- 55 is the power in watts,
- H7 - base type.
Quick comparison: the best low beam lamps for Lada Priora
| Model | Peculiarities | Rating | Link |
| Philips X-treme Vision | very bright | ★★★★★ | |
| Philips LongLife EcoVision | inexpensive and durable | ★★★★✩ | |
| Bosch Pure light | inexpensive, universal replacement for standard lamps | ★★★★✩ |
Philips X-treme Vision - the brightest low beam bulbs
Features declared by the manufacturer:
- up to 130% brighter white light,
- increase the lighting area in front of the car by 45 m,
- high quality quartz glass,
- Patented technology provides more powerful light output.
Country of origin: Poland.
What we like best: White and very bright light.
Test results
Good ADAC score, results:
Replacing light bulbs on Lada Kalina
- very good road lighting,
- short service life,
- relatively expensive (but each lamp is tested at the factory).
Auto Express test winner. According to the measurement results, the border of the bright light spot is 75 meters from the car.
.
Philips LongLife EcoVision - durable lamps for Priora
Features declared by the manufacturer:
- high strength quartz glass,
- resistant to temperature changes and vibration,
- high internal pressure provides more powerful light,
- protect headlights from harmful ultraviolet radiation.
Country of origin: Poland, Germany.
What we like most: They should last much longer than regular lamps.
.
Bosch Pure light
Features declared by the manufacturer:
- a universal series of high-quality products for passenger cars,
- indicators as close as possible to standard lamps,
- certified by ECE (Economic Commission for Europe),
- do not transmit the ultraviolet spectrum to protect the headlights.
The package contains one lamp.
Country of origin: Poland, Germany.
- Replacing a low beam lamp on a viburnum
What we like best: well-known manufacturer, characteristics - the same as standard lamps.
Adjusting the lights
Properly adjusted headlights are the key to safe driving at night. Good road lighting helps you avoid an obstacle, a pothole, or an open hatch in time, notice a pedestrian in a timely manner, and avoid a collision with a vehicle parked incorrectly on the side of the road. Factory adjustment minimizes the harm caused by bright lights to oncoming drivers. After replacing lighting fixtures or body repairs, situations arise when they need to be adjusted. If you have the tools and a suitable place, it is not difficult to do it yourself. For adjustment you will need:
- flat surface (opposite a wall, garage or gate);
- five-meter tape measure;
- a sheet of thick paper that does not allow light to pass through;
- hex wrench.
A diagram is drawn on a vertical surface that acts as a screen. At the level of the center of the headlights, draw a horizontal line. We lay the parallel line 65 mm lower. We apply vertical marks opposite the centers of the right and left lamps, as well as in the middle, at an equal distance from them. We bring the car into equipped condition (there is no excess cargo, the tank is filled). We bring the tire pressure level to the nominal value. Further:
- We place the car 5 meters from the screen, the centers of the headlights are located opposite the corresponding vertical marks.
- We set the electric corrector drive for the lights to “0”, which corresponds to the minimum vehicle load.
- We load the driver's seat with a load of 75 kg and rock the car to install the suspension.
- Open the hood, turn on the low beam, and use paper to block the light from the right light fixture.
- Using the left headlight adjustment screw, using a hex wrench, adjust the horizontal border of the light to the bottom mark.
- We bring the bend of the light border to a vertical mark corresponding to the center of the lantern.
- We set the right headlight in the same way.
This completes the adjustment process.
Priora station wagon replacing tail light bulbs
Tail for Lada Prioru Hatchback
The headlights of my monastery have the eyes of an angel. Fine. But when you're on the road, what do you see? car headlights? YES. 5 seconds each, but how long do you look at you in front of you driving a car?? it happens that for 30 or 60 minutes. This is why (and more) I wanted to change the staff lights on my car. All painting options. IMHO. the cleanest collective farm. Proport gives you a few customization options, but it's not for me. The only option is “Infiniti-style”, which made me unhappy IMHO. Well, here we go. I wanted to do a “Skyline style”.
But it is impossible to organize circles horizontally; they will be small. means only the vertical layout option. bought broken lights and started drawing circles on them #128578; Choose your option. We even managed to cut out the lights and “photoshop” the module mugs.
It was summer. Then there was a lot of work, the birth of a second child. In general, I didn't touch the lights at all for 4 months, but in October I bought new lights. transparent. they are cheaper. And yesterday I carved a lantern. that's what happened.
White color. duct tape
White color. duct tape
How to install angel eyes
Angel eyes Lada Priora with DRL controller.
Angel eyes on the Priora are LEDs that are installed inside the front unit, along the perimeter of the lenses and in the rear light. To do this you need to purchase:
- Electric wire of moon-white color. Type SH; diameter 2.6 mm;
- Receiver (Operating voltage – 12 Volts).
After everything is ready, you can begin active actions:
- Raise the hood, remove the battery (this will make it easier to work).
- Dismantle the block, remove the substrates.
- First secure the wires in place with tape (lightly) or clothespins - this is done to fix their position. Then fix them with epoxy resin.
- Wait for the resin to dry, secure the substrates and seal all the gaps with sealant so that the glass does not fog up. We carry out the installation.
Lighting repair
In some cases, owners need to disassemble and repair the headlight due to a malfunction of its components, to replace glass, with regular formation of condensation, or for tuning:
- We dismantle the lantern.
- The headlight unit consists of two parts connected with glue or sealant. Use a hairdryer to heat the joint around the circumference until the glue becomes softer.
- Separate the glued parts from each other with a screwdriver, cutting the glue with a mounting knife and continuing heating. On BOSCH headlights, remove the four latches.
- We clean the disassembled parts from glue with a mounting knife and sandpaper.
- Upon completion of the repair, glue the separated parts together with sealant.
Then you need to wrap the headlight with plastic film and tape and leave until the sealant polymerizes.
Lada Priora lamp base
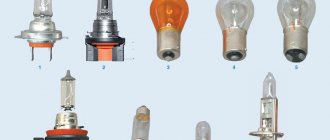
Regardless of the year of manufacture of the Lada Priora, three types of lamps are traditionally used in the head optical system:
- Low beam.
- Long-distance lighting.
- Side lights.
However, regarding the category under consideration (high beam), copies released before 2022 and after were equipped with different types of lamps:
- Pre-styling - H1 55W.
- Restyled - H15 55W.
LED lamps on Priora TEST
With the same power of 55 watts and a single-filament structure, the type of base has changed from H1 to H15 (the DRL function has been added). At the same time, the modification of the light generator remained the same - halogen. In addition, the changes affected the design of the headlamp itself, which is clearly shown in the following images:
Note! Halogen lamps that are part of the Lada Priora lighting system should not be touched with unprotected, clean cotton gloves. Traces of grease and dirt left behind will lead to their rapid failure.
To remove existing deposits from the surface of the glass, you can use a cotton swab soaked in alcohol.
Manufacturers of lamps for VAZ 2114
Since lamps with an H4 socket are used in headlights of many models from different manufacturers, all manufacturers of car lamps produce such lamps. Among them are the following companies:
- A world-famous Dutch company, known for its low prices and good quality products;
- A German company with a long history and rich technological experience;
- Narva. This is another manufacturer from Germany, known for the quality and durability of its products;
- Bosh. Another German company that does not need any special introduction;
- Company based in Hong Kong and Germany. Produces a wide range of reliable lighting equipment.
The above list can be continued for a long time. Today, a big name of a manufacturer is not a guarantee of high quality and reliability. There are a lot of fakes on the market, which are not only cheap, but also completely inconsistent with the original. Therefore, it is better to make a choice based not on the name, but on the characteristics of the light bulbs.
Criterias of choice
The low beam of VAZ-2107 (Lada Priora) cars is implemented using halogen lamps. They have an H7 base and a power of 55 W. Similar lighting devices are produced by all car lamp manufacturers, both European and those from Southeast Asia. The most reliable companies producing H7 light bulbs include:
- A Dutch company whose history goes back 120 years. The range includes a large number of different technical devices. Lighting devices make up only a small part of the total production volume. Famous for quality and reliability. Today the company has factories in many countries around the world;
- Large manufacturer of automobile lamps from Germany. Initially, the company was a division of the Siemens concern. The production of lighting devices is the main specialization of the company, which has achieved great success in this direction. The company's subsidiary, Neolux, which also produces lamps and lighting equipment, is actively operating;
- Another German company whose age exceeded 100 years. It produces a wide range of products; in addition to light bulbs, power tools and automobile accessories are widely known;
- The company was founded in Germany in 1948. The production of electric lamps is the main direction of the company. All products undergo multi-stage quality control and have appropriate certificates;
- Sho-Me. A large Chinese manufacturer of car lamps, accessories and other goods. Most xenon lamps are produced by this company;
- MTF-Light. A Russian company that produces automobile lamps for the domestic market. Production facilities are located in South Korea. The products meet all international standards and are highly valued by users.
The above list is not exhaustive. It is difficult to list all the companies, and there is no point in doing so. New companies are constantly appearing on the market, offering their products to customers.
Problems when paying with bank cards
Sometimes difficulties may arise when paying with Visa/MasterCard bank cards. The most common of them:
- There is a restriction on the card for paying for online purchases
- A plastic card is not intended for making payments online.
- The plastic card is not activated for making payments online.
- There are not enough funds on the plastic card.
In order to solve these problems, you need to call or write to the technical support of the bank where you are served. Bank specialists will help you resolve them and make payments.
That's basically it. The entire process of paying for a book in PDF format on car repair on our website takes 1-2 minutes.
If you still have any questions, you can ask them using the feedback form, or write us an email at [email protected]
How to replace a burnt out lamp
Let's start with replacing the lamps in the foglight of the Lada Priora. This is a simple matter, and there is absolutely no need to go to a service station because of such a trifle - everything can be done on your own. First of all, what lamps are installed in the PTF of this car? The manufacturer installs H11 type halogen lamps with a power of 55 W on both regular Priora and Priora Restyling (production since 2013).
Light bulbs in PTF Lada Priora of any modifications
In addition to, in fact, new lamps, we will need:
- Torx key T-30;
- socket wrench (head) 10;
- cotton gloves;
- inspection pit or overpass.
Removing the power unit mudguard
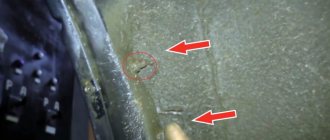
We drive the car into a pit or overpass. To get to the PTF of the Priora, you need to remove the engine mudguard or, as it is also called, the engine protection. To do this, use a T-30 wrench to unscrew the four screws that secure the mudguards to the engine mudguard. The photo shows two, the remaining two are on the other side of the mudguard.
Screws securing the mudguard to the mudguard
Now we arm ourselves with a 10mm wrench and unscrew first the two rear mounting bolts (the second on the opposite side), and then the five front mounting bolts.
Power unit mudguard mounting bolts
The mudguard can now be removed to gain access to the fog lights.
Removed Priora engine splash guard
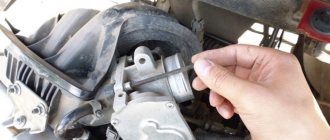
Replacing lamps
We look under the bumper and get to the back of the PTF. In front of us is a lamp base with a power supply inserted into it. Press the latch and pull out the block.
Disconnecting the power wires of the Priora fog lamps
Turn the light bulb counterclockwise until it stops and remove it from the flashlight housing.
We put on cotton gloves, remove the new lamp from the box and install it in place of the burnt one, not forgetting to lock it by turning it clockwise until it stops. We connect the power supply (the latch should snap into place). Similarly, we change the light bulb on the second PTF and install the engine mudguard in place.
Why the headlights don't light up - reasons
The most common reason for headlights not working is a burnt out light bulb. Its service life is indicated in hours on the packaging. For a low beam bulb, this limit can be 400 hours of operation. The second extremely possible reason could be a wiring malfunction due to water leakage, or the wire simply frayed. This problem is already more serious, because you will have to fuss with it much longer than with a regular replacement of consumables.
Often, car enthusiasts are too lazy to change light bulbs, driving out onto the road in “one-eyed” cars. This is very unsafe - it is recommended that immediately after a malfunction is noticed, you go for a spare part to replace a new lamp.
What kind of lamps are in the headlights of the Lada Priora?
| Lampatip | Lamp type |
| low beam lamp | H7 |
| high beam lamp | AKG12–55–2 (H1) |
| high beam lamp and DRL | H15 |
| turn signal lamp | А12–21–4 (PY21W) |
| side light lamp | А12–5–2 (W5W) |
Also, the process of replacing low and high beam lamps is shown in the video:
How to change light bulbs in a Lada PRIORA headlight
Have you ever had to change the bulbs in the headlights of a Priora yourself? What were the challenges during this process? Let us remind you that it is possible to install DRLs yourself.
Found an error? Select it and press Ctrl+Enter..
Replacing lamps in a Lada-Priora headlight
Depending on the manufacturer, two types of headlights are used on the Lada Priora. In order to change the lamp in the left headlight, you must first remove the battery.
Procedure for replacing low or high beam lamps:
- remove cover 2;
- disconnect the wire block 7 from the failed lamp;
- remove the antennae 6 of the spring clamp from the grooves;
- remove the lamp;
- Replace the lamp and install it in reverse order. In this case, you should hold a working lamp only by the base and under no circumstances touch its glass part.
The procedure for replacing the side light lamp in the headlight:
- remove cover 1;
- remove the side light lamp socket from the seat in the reflector 5 by the wires;
- remove the lamp from the socket;
- replace the lamp and install it in the reverse order, fix the lamp socket in the reflector socket, applying force to the socket body.
The procedure for replacing the turn signal lamp in the headlight:
- remove the headlight housing by unscrewing the three fastening screws;
- turn the socket with lamp 3 counterclockwise and remove it from the seat of the headlamp housing;
- remove the lamp from the socket by turning it counterclockwise;
- Replace the lamp and install it in reverse order.
Replacing lamps in the rear light of a Lada Priora
The procedure for replacing the lamp in the rear light:
- bend back the trunk trim, providing access to wing nuts 1 for securing the rear light;
- unscrew the 3 wing nuts and slide the rear light out of its seat;
- turn the lamp socket to be replaced counterclockwise and remove it from the seat;
- remove the lamp from the socket by turning it counterclockwise;
- Replace the lamp and install it in reverse order.
Replacing the lamp in the side turn signal of Lada Priora
In order to replace a failed side turn signal lamp, it must first be removed. The side turn signal lamp 1 is held in its socket by a spring latch and a latch. It is necessary to move the lamp in the direction of vehicle movement and disengage the latch. Turning socket 3 counterclockwise, remove it together with the lamp from the flashlight body and pull lamp 2 towards you. Replace the lamp and reinstall the lamp in the reverse order.
Replacing the license plate lamp of Lada-Priora
To gain access to the license plate light lamp socket, you need to open the trunk lid and turn the socket with lamp 3 clockwise through the holes in the inner panel of the trunk lid, without disconnecting the wiring harness block, and remove the socket from the lamp housing and pull out lamp 2 to myself.
To replace the lamp in light 1 in a Lada Priora in a hatchback body, you need to remove the tailgate trim, which is attached with buttons. After this, you should do the same steps as described above.
Replacing a lamp in the interior lighting of a Lada-Priora
To replace the lamp in the dome light, it must be removed from the roof trim container body. The lampshade is held by a metal spring latch 4 in the socket of the container body. To remove the lampshade, you need to insert a flat-tip screwdriver into the groove on the right side of the lampshade (passenger's side) and carefully turn the lampshade towards you, after which you should press contact 3 and remove lamp 2, replace the lamp and install the hooks 1 of the lampshade into the socket on the left, after Then press the right side of the lampshade until it locks.
Replacing the lamp in the trunk and glove compartment lighting of a Lada Priora
To replace lamp 2 in trunk light 1, remove the light from the bracket. To do this, install a flat-head screwdriver in groove 3 on the right side of the lampshade and carefully press the lampshade down. The lampshade is held in the bracket by a spring latch. Replace the lamp, install the lampshade hook on the left in the bracket, then press the right side of the lampshade until it locks.
To replace lamp 3 in the glove box lamp 1, remove the lamp from the socket by inserting a flat screwdriver into groove 2 on the right side of the lamp and gently press the lamp down. The lamp is held by a spring latch 7 in the socket of the glove compartment housing. Replace the lamp, install the lampshade hook on the left into the socket, and then press the right side of the lampshade until it locks.
Top of page
Step-by-step replacement instructions
Having scoured the Internet, I found a bunch of “useful” recommendations for replacing the Priora license plate light bulbs. Some people rip the lights out of the rear trim, which almost always results in broken latches. Others pull out the lights, but before that they also remove the upholstery and this very rear trim (“saber”).
The result of such a replacement is a lot of work and again broken latches. There is no need to unscrew or tear out anything except the upholstery!
Everything can be done:
If you have purchased the license plate light bulbs and have a screwdriver at hand, then you can probably start. First of all, you need to remove the trim from the trunk lid (door), which is attached to regular clips. Open the lid, insert a screwdriver between it and the upholstery in any of the corners. Lightly press the upholstery, snapping off the corner piston.
Replacing brake light bulbs and parking lights
With the release of the restyling of Priora 2, a large number of details have changed in it. The rear lights are especially noticeable; they have become LED. Now the dimensions have become lower, which gives the car a wider appearance in the dark. To achieve this effect, it is not at all necessary to buy and install LED lights.
To do this, just swap the backlight from the top position to the bottom. We don’t touch reverse and turns!
After such a replacement, when you press the brake pedal, the brakes will light up where the side lights and fog lights were previously illuminated. And the dimensions and rear PTFs will glow from the bottom of the lamp.
Layout of the restyled version
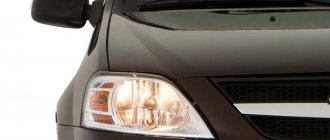
In the Priora, little has changed after restyling - small details invisible to the eye, the center console, the dashboard. The headlights have also changed - they have become quite a bit larger. The principle of their design has remained virtually unchanged, except that there is now one plug at the back to isolate the contacts.
The design of the headlamp unit has become more complex: now in place of the usual high beam lamp there is a light consumable, combined with daytime running lights, which switches between operating modes. PTF fog light bulb, everything is also mounted depending on the configuration.
Types of headlights
The headlight unit on a VAZ can have two design options:
Outwardly they are very similar. Experts distinguish them by small details - the shape of the blender arches or the rotation diffuser. Kirzhach has a long, narrow reflector with a partition and no top wall. Bosch has walls on all sides, and the reflector is short. For an inexperienced person, it is easier to distinguish these designs by the shape of the plug on the back of the headlamp - Bosch products have one and are made in the form of an oval. These subtleties are not accessible to everyone, but only to experienced car enthusiasts.
Important! They have no fundamental difference in design, but installing one instead of the other will not work. Therefore, you should know which headlights will fit the body of a given car, so as not to find yourself in a difficult situation when purchasing
In addition, Kirzhach headlights are more difficult to disassemble than Bosch.
There are also Chinese analogues of headlight units for the VAZ 2114. They can have any shape, since they are not subject to general standards. Purchasing such products is a big risk. You can, with equal probability, get suitable headlights, or have lighting fixtures that do not match the shape of the sockets.
What kind of base is in the Priora fogs ~ AUTOINTERLINE.RU
Societies › Lada Priora Club › Blog › Who installed xenon in fog lights
I'm thinking about installing xenon foglights on my Priorka. In this regard, several questions arose:
1. Who did it, tell me how (links to blog posts are welcome)
2. How much does this business cost?
3. What you need to buy
4. What tasks may arise during operation
5. How difficult is it to do all this and can a new person do it?
Thanks in advance for your help!
Comments 25
you buy h21 xenon in the store. costs about 2 thousand, not bad. take off the bumper. look for a place for the blocks, attach it. insert xenon into the fog lights. connect the wires and enjoy
Is it possible to install it so that the bumper does not need to be removed?
4. What obstacles may arise during operation?
Only one so far, the light bulb is burned out, I can’t buy a new one, I drive like one-eyed)
Replacing the light bulb in the fog light of LADA PRIORA Replacing the light bulb in the fog light of LADA PRIORA
Replacing the light bulb in the fog light of LADA PRIORA
Hi all! This video will talk about replacing the light bulb in the fog light on a LADA PRIORA
How to film...
Test of H11 LED lamps in PTF. Choose which is brighter LED or Halogen
Test of LED lamps h21 in PTF. Choose which is brighter LED or Halogen
Buy Led lamps CL6 H8,H9,h21...
There are no problems. You buy fog lights, auto lights are better, Bosch often sweat, they cost me 1700. You buy a set of xenon lights with an H11 base, our set costs 1700-2000. You buy wiring for connecting fog lights for 500 rubles, if you don’t know anything about electrics, then go to an electrician so that he can connect the wiring and remove the button. Install the fog lights yourself, remove the bumper, unscrew the plugs and screw the fog lights in their place. The ignition units can be screwed to the lower headlight mounting brackets. When connecting fogs, do not forget to connect the ground and do not confuse the polarity.
I think the base would be h21, maybe I don’t understand it naturally, but I had one on the Boche.
I think the base would be h21, maybe I don’t understand it naturally, but I had one on the Boche.
listen exactly, confused, N 11, N7 - in my head
There are no problems. You buy fog lights, auto lights are better, Bosch often sweat, they cost me 1700. You buy a set of xenon lights with an H11 base, our set costs 1700-2000. You buy wiring for connecting fog lights for 500 rubles, if you don’t know anything about electrics, then go to an electrician so that he can connect the wiring and remove the button. Install the fog lights yourself, remove the bumper, unscrew the plugs and screw the fog lights in their place. The ignition units can be screwed to the lower headlight mounting brackets. When connecting fogs, do not forget to connect the ground and do not confuse the polarity.
Thanks for the instructions)
I had a problem, the lamps did not fit into the socket, but Ratfil solved the problem. Now on bumps one lamp turns off, my fault is that the block is not fixed, otherwise everything is trivial there))))
There is nothing complicated, the main thing is that the arms grow from a suitable place))
Comments
Alexei:
Which lamp should I insert into the brake
light of Lada Priora 21/4 or 21/5?
Teddy Bear E:
Sandro, thank you for the video! Helped!
Maga Aliev:
handsome guy helped
Meirkhan Mihon:
thanks to the author
stason73rus:
But my brake lights on the Priora do not light up, but
the brake light on the rear window is on, the fuse is fine.
what could be the reason? Thanks in advance. marina korshikova:
Sandro, handsome, I watch your videos regularly, they help a lot. I’m just sorry for your viburnum, you did so many experiments on it.
Andrey M:
Thank you, this video was very useful today!
rc models:
sell me the speakers
Denis Denis:
Remove the headlight to change the light bulb!
Gray matter:
Is it possible to touch the light bulbs with your hands? or am I confusing something
Makarov Alexander:
on Kalina1 sedan also