Perhaps this is exactly the case when one should not interfere with a properly working mechanism, because... There were no indications for surgical intervention in the Granta throttle assembly.
The engine is running. Idle speed does not float. The throttle response to the electronic accelerator occurs as normal. Occasionally I noticed, standing at a traffic light, that the tachometer needle was trying to unobtrusively change its position, but the electronics quickly eliminated this incident. In early spring, one could refer to some amount of condensation that sometimes appears in the fuel system. Now, May. Warm. But sometimes the arrow still tries to “twitch”.
The situation is not annoying, but the mileage is under 17,000 km. indicates that behind the throttle it is not at all the same as it was in the first hundreds of kilometers.
I did not contact the “dealer” service station, where Grant was under warranty, to clean the throttle. After we “adjusted” the thermal clearances of the valves during maintenance-1, there was no desire to communicate with such “specialists”.
It’s high time for AVTOVAZ to check its dealers and subdealers for high-quality performance of work when undergoing scheduled maintenance of warranty vehicles. There are enough statistics. And those who are negligent will be punished with a ruble so that the desire to run an official car service will no longer exist once and for all.
If adjusting the “valves,” for me, still requires consolidating the experience gained, then with cleaning the throttle valve, everything is much simpler.
What you needed: *A 5mm hex wrench. *Star key T-20. *Brush flute. *Lubricant. *Thread lock. *New bolts with washers, made of stainless steel. *Phillips and slotted screwdriver. *Cheap degreaser. *Spray for cleaning carburetors and chokes. *Cotton rags. lint-free. *Disposable rag on a roll. *Rechargeable cylinders and a hand pump for them. *Garbage bag.
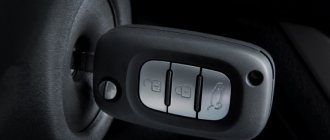
Using the “Open Diag” program, we take screenshots of the throttle position before starting cleaning.
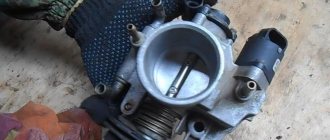
Throttle Lada Granta 8 valve
Perhaps this is exactly the case when one should not interfere with a properly working mechanism, because...
There were no indications for surgical intervention in the Granta throttle assembly. The engine is running. Idle speed does not float. The throttle response to the electronic accelerator occurs as normal. Occasionally I noticed, standing at a traffic light, that the tachometer needle was trying to unobtrusively change its position, but the electronics quickly eliminated this incident. In early spring, one could refer to some amount of condensation that sometimes appears in the fuel system. Now, May. Warm. But sometimes the arrow still tries to “twitch”.
The situation is not annoying, but the mileage is under 17,000 km. indicates that behind the throttle it is not at all the same as it was in the first hundreds of kilometers.
I did not contact the “dealer” service station, where Grant was under warranty, to clean the throttle. After we “adjusted” the thermal clearances of the valves during maintenance-1, there was no desire to communicate with such “specialists”.
It’s high time for AVTOVAZ to check its dealers and subdealers for high-quality performance of work when undergoing scheduled maintenance of warranty vehicles. There are enough statistics. And those who are negligent will be punished with a ruble so that the desire to run an official car service will no longer exist once and for all.
If adjusting the “valves,” for me, still requires consolidating the experience gained, then with cleaning the throttle valve, everything is much simpler.
What you needed: *A 5mm hex wrench. *Star key T-20. *Brush flute. *Lubricant. *Thread lock. *New bolts with washers, made of stainless steel. *Phillips and slotted screwdriver. *Cheap degreaser. *Spray for cleaning carburetors and chokes. *Cotton rags. lint-free. *Disposable rag on a roll. *Rechargeable cylinders and a hand pump for them. *Garbage bag.
Using the “Open Diag” program, we take screenshots of the throttle position before starting cleaning.
Reviews
| № | Positive |
| 1. | Vasily: I’ve been driving a car for a year and a half, I haven’t made any capital investments, except for the purchase of consumables. I regularly maintain it, buy good oils, and fill it with high-octane fuel. |
| 2. | Gennady: at 30,000 km I cleaned the idle air regulator once, and since then I forgot about the malfunctions. In winter, the car starts with a half turn. |
| 3. | Ivan: I recently went to a service station, the car started to be difficult to start. After diagnostics, the technician discovered poor contact between the block and the wires on the throttle position sensor. Now the Lada Granta works like a watch. |
| 4. | Vladlen: I have no complaints about the quality of the machine, because it is a budget option. Yes, breakdowns do occur, but they are minor and can be repaired independently. |
| 5. | Gennady: a year has passed since the purchase of the equipment, there are no comments. I tighten the fastenings in small ways, check the wiring, otherwise no comments. |
| 6. | Dmitry: for two years of operation of the car there were no major breakdowns, minor ones were fixed independently, and I did not contact the service center. |
| 7. | Valery: I am satisfied with the quality of workmanship and assembly of the machine. After the purchase, I immediately tightened all the fasteners, the interior is quiet, the plastic does not make noise. |
| Negative | |
| 8. | Victor: the first time the regulator flew 40,000 km, I contacted the service center and had it replaced. At 65,000 km the TPS began to act up. I decided to sell the car and will buy a Renault Logan. |
| 9. | Georgy: after a year of operation, the car began to crumble, I visited the service station twice unscheduled. I am dissatisfied with the quality of workmanship and assembly and plan to sell the car. |
| 10. | Vladislav: I used the car actively for six months, it started to fall apart, I had it repaired twice under warranty. I do not recommend Lada Granta for purchase. |
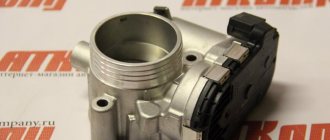
Features of the Lada Granta throttle assembly
The throttle valve is turned by an electric motor through a gearbox. Both are built into the throttle body.
When starting and warming up the engine, as well as during idling, the flow of air into the cylinders is regulated by opening the throttle valve.
The throttle position is controlled by two sensors built into the throttle body.
The throttle valve opening angle is set by the electronic control unit (ECU) depending on the estimated amount of air that should enter the engine cylinders. This takes into account the operating mode of the engine (starting, warming up, idling, and so on), the temperature of the ambient air and the engine, and the position of the gas pedal.
Control commands are sent to the throttle assembly to the electric motor. At the same time, the ECU monitors the opening angle of the damper and, if necessary, sends appropriate commands to adjust its position. As a result of the fact that the ECU simultaneously regulates the amount of injected fuel and incoming air, the optimal composition of the combustible mixture is maintained in any engine operating mode.
The electric throttle body is sensitive to deposits that may accumulate on its inner surface. The resulting layer of deposits can interfere with the smooth movement of the throttle valve, jamming it (especially at low opening angles). As a result, the engine will operate unstably and even stall at idle, start poorly, and failures may also appear during transient conditions. To avoid this, as a preventive measure, deposits should be removed with special detergent compounds during regular vehicle maintenance. A large layer of deposits can completely block the movement of the damper. If flushing fails to restore the throttle assembly to operability, it must be replaced.
A malfunction or incorrect operation of the throttle assembly may be caused by a broken contact in its electrical circuit (oxidized terminals in the wiring harness connection block). In this case, it will be possible to restore operation by treating the terminals with a special compound for cleaning and protecting electrical contacts. There are other possible causes of the malfunction:
— no supply voltage is supplied to the throttle assembly;
— signals are not received from both throttle position sensors;
— The computer cannot recognize signals from the throttle position sensors.
In these cases, the engine control system goes into emergency mode. At the same time, the car retains the ability to independently move a short distance at a slow speed, which, in extreme cases, will allow it to be moved to a safe place (pull to the side of the road, leave an intersection, etc.).
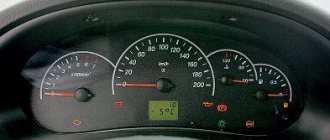
The fact that the throttle assembly is operating in emergency mode may be indicated by a burning warning lamp for a malfunction of the engine management system and an increased speed of the crankshaft at idle (about 1500 rpm, despite the fact that the engine is warmed up to operating temperature). it will not respond to pressing the gas pedal.
Each of the throttle position sensors is a potentiometer. During operation, gradual wear of conductive paths and moving contacts occurs. Over time, wear can reach such an extent that the sensor cannot function correctly. The presence of two sensors increases the reliability of the entire unit.
If only one sensor fails, the warning lamp will light up, but the engine management system will switch to backup mode. In this case, the engine will respond adequately to pressing the gas pedal, but with worse performance parameters
The reserve mode allows you to drive your car to the repair site under your own power.
Conclusion
The performance of idle speed sensors is influenced by many factors, including:
- fuel quality;
- level of dust and gas contamination of the territory;
- filter replacement frequency;
- car driving style.
In most cases, breakdowns are caused by violation of the operating conditions of the technical equipment by the driver. Purchasing cheap, non-original spare parts and unprofessional installation are the main factors that create the preconditions for premature wear of parts.
Throttle assembly - removal, inspection, cleaning and installation of Lada Granta
The throttle assembly is non-separable, cannot be repaired and in case of malfunction it is replaced as an assembly. The need to perform work is determined by checking the technical condition of the engine control system.
To flush the throttle assembly, you need a means to clean the engine intake pipe. As a last resort, you can use a carburetor cleaner. If the problem cannot be eliminated using a cleaner, the throttle assembly must be replaced. After removing the throttle assembly, the gasket (O-ring) must be replaced. A product to clean and protect electrical contacts may be required.
To avoid damage to the electric drive, do not attempt to forcefully turn the throttle valve by applying force to it. When installing a new throttle assembly on a vehicle, special diagnostic equipment will be required in order to check the “calibration” of the throttle valve position in its extreme positions.
1. Prepare the car for work and disconnect the wire terminal from the negative terminal of the battery.
8. Using a multimeter in ohmmeter mode, measure the resistance of the throttle position sensors between terminals 1 and 4. A working throttle assembly should have a resistance in the range of 750–1250 Ohms.
When performing the following operation, hold the throttle assembly with the electric drive upward so that the cleaning agent cannot flow down the throttle valve axis towards the gearmotor and get inside the mechanism.
9. Using a cleaning agent, we wash away deposits from the inner walls of the throttle assembly and from the throttle valve.
10. Wipe the throttle assembly with a clean rag and blow it with compressed air from a compressor or foot pump.
11. Install the throttle assembly in the reverse order, replacing the O-ring with a new one.
Increased idle speed, dips and jerks when accelerating the car, loss of power - all this indicates problems with the throttle valve, which needs to be removed and cleaned, or replaced, if cleaning does not give the desired result, the unpleasant phenomena persist.
The procedure for removing the throttle assembly on a LADA Granta car
To remove the damper you need to perform the following operations:
- The wire is disconnected from the negative terminal of the car battery.
- The tightening that secures the ventilation hose going to the engine crankcase is loosened.
- The hose attached to the fitting of the air supply pipe is disconnected.
- The clamp connecting the pipe and the throttle becomes loose.
- The pipe is disconnected.
- The connector connecting the wires to the throttle assembly is disconnected.
- The bolts securing the throttle valve are unscrewed.
- The gasket located on the flange of the intake module is dismantled.
It should be noted that the gasket is disposable; when dismantling it, it is necessary to subsequently install a new element.
Source
Need for maintenance
The prophylaxis procedure should not be carried out in the absence of obvious reasons. Before starting, you need to carefully evaluate the condition of the throttle valve. If there are no obvious signs of tar deposits and areas of coking, then the reason for unstable operation may lie elsewhere.
Also consider the mileage of the car. Experts recommend resorting to flushing no earlier than after 100 thousand km. But on some cars, for example, a Ford Focus, it may be necessary to flush it after 30 thousand kilometers.
You should know how to clean your throttle body to achieve the desired result. This requires a special carburetor cleaning solution, for example, Abro Carb & Choke Cleaner or similar products. The assembly must be dismantled; only in this case can the maximum effect be achieved, otherwise carbon deposits will remain inside the tubes. Disconnect all pipes from the throttle valve to gain good access to the inlet part of the assembly.
Remove carbon deposits delicately using a clean rag or soft brush. Do not use excessive force; you may damage the valve. The internal elements are coated with a thin layer of molybdenum, which novice car enthusiasts mistake for harmful deposits.
The consequences of zealous cleaning can be different: the moving part of the damper will begin to bite, or vice versa, in the closed position it will begin to let air through. In this case, it will not be possible to do without repairing the throttle valve.
Instructions for cleaning the throttle body on LADA cars
In some cases, problems in engine operation may be associated with the formation of all kinds of deposits on the walls of the throttle valve. In this case, cleaning the throttle assembly (DU) can help. We'll tell you how to perform this procedure yourself. The remote control cleaning process is carried out similarly on all modern LADA cars (XRAY, Vesta, Largus, Priora, Granta, Kalina, Lada 4×4). You will find examples of work on specific LADA models in the comments.
It is not necessary to remove it to clean the throttle assembly. However, with the part removed, this can be done easier and better (see how to remove the remote control).
The book on repair and operation of the LADA Vesta car (and other LADA models) indicates that to flush the throttle assembly, you need a means to clean the engine inlet pipeline. As a last resort, you can use a carburetor cleaner.
We spray the cleaning agent not only on the throttle valve itself and the cavity around it, but also on all channels and hidden cavities. The use of soft rags is allowed. When cleaning the remote control with E-gas, make sure that the cleaning agent does not get into the electrical part of the unit. The process is shown in the video:
- Do not remove the throttle valve mounting screws. If they are then poorly tightened and tightened, the loosened screw can get into the engine cylinder and damage it.
- Use a coarse lint cloth or wire brush for cleaning.
- Do not touch the throttle on cars with an electronic gas pedal, so as not to reset the factory setting.
If it was not possible to eliminate the engine malfunction by cleaning the throttle assembly, then the throttle assembly must be replaced (if you are sure that it is the cause of the malfunction). When installing a new throttle body, special diagnostic equipment may be required to check the "calibration" of the throttle position at the extreme positions. This operation can be performed at a specialized service station. See also: Procedure for adapting throttle valve zero on Lada Vesta and XRAY.
Have you ever had to clean the throttle body yourself? What were the difficulties?
Causes of pollution and how to deal with them
Repair and replacement of the ignition coil for a VAZ (Lada) 2123: manual with photos and videos
In order not to confuse the symptoms indicating excessive carbon deposits on the valve, it is better to first visually inspect it, and if there are no visible oil or coked deposits on the walls of the throttle assembly, then, with a high degree of probability, cleaning the throttle valve will not eliminate the problem.
The signs themselves look like this:
- problematic engine starting;
- uneven engine operation;
- floating speed at idle;
- freezing engine speed;
- drops in speed until a complete stop.
There are several reasons why the throttle body becomes dirty over time. By avoiding their appearance, you will automatically extend the time between cleaning it. Reasons mentioned include:
- Using low-quality gasoline. If there is sediment in it, it will definitely get into the throttle assembly, where it will turn into carbon deposits. Therefore, try to fill in high-quality gasoline and refuel at proven gas stations.
- Clogged fuel filter. If you do not change the fuel filter in time, then there is a possibility that pieces of dirt from it will get into the fuel system, including the throttle assembly.
- Dust and dirt getting into the intake system. This can be caused by various reasons - clogged air filter, damage to the integrity of the air duct, various mechanical stress.
- Crankcase gases with oil dust. They are the main cause of oil deposits on the valve. They can enter the combustion chamber through the valve cover from the crankcase ventilation system. The situation is aggravated by the fact that they carry oil dust. It is this that burns and remains as sediment on the surface of the throttle valve.
Change the air and fuel filters on time, fill with high-quality gasoline, and prevent dust from getting into the car's fresh air ventilation system. All this will save you from the need to clean the throttle valve ahead of schedule.
Adaptation using the example of some cars
Another method, which we will consider using the example of one well-known German brand, also involves adaptation without a computer. Here you should warm up the engine to a temperature of approximately 70-99°C. The battery voltage must be at least 12.9 Volts when the engine is not running. The action plan for how to adapt the throttle valve on a Volkswagen will be something like this:
- After warming up and turning off the engine, you should wait a short period (5-10 seconds).
- With the gas pedal released, turn on the ignition and wait 3 seconds.
- After 3 seconds, you need to press the accelerator pedal all the way 5 times and release it back. Act quickly, as you only have 5 seconds to do this.
- After the 5th exercise, you should wait a pause.
- After 7 seconds, press the pedal all the way again and hold it in this position until the “CHEK” indicator starts flashing (≈ 10 sec.), then it should remain on continuously (≈ 20 sec.).
- When the indicator lights up constantly, count to three and only then release the pedal.
- Start the engine (repeat if necessary), wait 20 seconds, then lightly accelerate (2000-3500). If the tachometer shows 700 rpm at XX (+- 50), it means that the adaptation was successful.
In this case, it is necessary to strictly adhere to the time intervals of each setting step. This is the only way the ECU training will go smoothly. But before that, it’s worth studying the adaptation features and the possibility of a manual procedure for your car. Perhaps only service station specialists can help.
Addresses of companies providing installation/replacement services (Moscow, St. Petersburg, Kyiv region)
| № | Name | Address |
| 1. | "Oiler" | https://oiler.ua/ Kyiv, V. Lobanovsky Ave., 119D, Goloseevsky district |
| 2. | "AUTOKLONDAYK" | https://auto-vaz.com.ua/ TO AUTOKLONDAYK, Kyrylivska street, 60P, of. 1, Kyiv, 04080 |
| 3. | "Star - D" | https://star-d.ru/ st. Savushkina, 89, not far from the Staraya Derevnya metro station, 200 meters from the St. Petersburg - Finland highway (from Primorsky Prospekt). |
| 4. | "OSA" - Society for Assistance to Motorists" | Address: 190013, St. Petersburg, st. Vvedensky Canal, 7, BC “Farvater”, office 210 |
| 5. | "Auto Mechanic" | Address: Rostokinsky pr-d, 3с61 |
| 6. | "PaAlex" | Address: st. Ozernaya, 46k2s2 |
How to clean the throttle body on a VAZ 2110. how often should you clean the throttle body
Cleaning the throttle valve on the grant
Hi all! Guys, how can I clean the throttle on a Grant 8 valve? The revs have been fluctuating lately, they say that the idle speed sensor is clogged, they decided to clean it, and with it the throttle valve, but for some reason I’m afraid to clean it with kerosene, they seem to write that there is some kind of Teflon coating on it.. If you erase it, the speed will fluctuate. Who thinks what?
Carburetor/throttle cleaner aerosol, remove the terminal from the battery, remove the throttle and spray and do not touch the throttle with your hands
Before cleaning, it’s better to look at what % it is open on a warm engine at xx. And then the speed can jump for various reasons, and even a faulty adsorber will also give incorrect readings.
You unscrew it and see how dirty it is after cleaning, do an adaptation of the throttle
I cleaned it carefully with a cloth and warm soapy water, only then it needs to be adapted.
And how much is the mileage, if it’s not a secret? Why are you planning to do such a procedure, and even on your own...
Carb cleaner, soft cloth. Just don’t try to touch the valve with your hands. You'll mess up the calibration.
How do you know if you mess up the calibration?
The electronic damper is calibrated and cannot be moved. If you move it with your hands (open - close), you can throw it away; it will not work normally. Carefully pour in carb cleaner and wipe with a soft cloth. The whole hat will dissolve anyway.
A very effective product - aerosol, carbon deposits, all the blackness flows off in the same second. No rags are needed. I cleaned it on an old grant with 40 thousand of crap in it on a Brobeg...
You probably got it wrong on e-gas, there is no rxx, there at idle the throttle itself is slightly open, and the adaptation is - after assembly, turn on the ignition, wait 40-50 seconds and start it, somewhere it says that after waiting you need to turn off the ignition and start it back up, but on my Kalina car the car stalled, there was no traction, then I reset the ECU with initialization and after waiting 40-50 seconds, I didn’t turn off the ignition, but started it right away, everything worked fine, that’s all the throttle adaptation
Throttle learning idle
After flushing the unit or reflashing the ECU, the throttle valve should be trained to idle. To do this, fulfill the following conditions:
- check the voltage on the battery with the engine off, it should be at least 12.9 V;
- the coolant temperature should be in the range from 70 to 100 degrees;
- the steering wheel must be in a neutral position;
- The gearbox oil must be warmed up;
- all electrical consumers are turned off;
- automatic transmission handle in position P.
Failure to comply with the above requirements will lead to incorrect operation of the engine, so they must be followed. After warming up the engine, you must:
- turn off the ignition for 10 seconds;
- make sure that the accelerator pedal is in the up position;
- turn the key to the ON position for 3 seconds (do not start the engine);
- Press the gas pedal all the way 5 times within 5 seconds and release it for the last time;
- after 7 seconds, press the gas pedal all the way and wait until the “CHESK ENGINE” display lights up continuously;
- After pausing for 3 seconds, release the gas pedal.
Try to start the car, the attempt can be repeated several times. During stable operation, rev the throttle several times and the idle speed should return to the acceptable range.
The procedure for learning the throttle using a PC and car programs has its own specifics, depending on the brand of car, etc. Therefore, it makes no sense to describe the entire process in detail. But first you need to install special software on your PC, for example, VAG-COM for a VAG car group (or other) and drivers. The following is the standard connection order for all:
- turning on the ignition;
- connecting the PC to the car diagnostic connector with an information wire;
- launching software on a PC;
- conducting a test;
- receiving information about readiness for further work - the inscription: “The adapter is ready for work.”
Following a special algorithm, you will be able to coordinate the remote control and the ECU in the “throttle fully open/fully closed” modes for cars with both an electronic and mechanical gas pedal. In this case, the throttle valve training is carried out when the car is warm and the above requirements are met.
Equipment diagnostics
- We switch the tester to resistance testing mode (ohmmeter), measure the resistance at the regulator terminals according to the diagram: A - B, C - D. Data in the range from 0.040 to 0.080 Ohm.
- Using a caliper, measure the distance between the end of the needle and the flange; it should not exceed 23 mm.
- We inspect the mounting socket for each of the sensors, clean it with a rag from dirt and dust.
- Before installation, lubricate the O-ring with engine oil.
- We tighten the screws of the regulators with a torque of 3 - 4 Nm.
Throttle assembly - removal, inspection, cleaning and installation of Lada Granta
The throttle assembly is non-separable, cannot be repaired and in case of malfunction it is replaced as an assembly.
The need to perform work is determined by checking the technical condition of the engine control system.
To flush the throttle assembly, you need a means to clean the engine intake pipe.
As a last resort, you can use a carburetor cleaner.
If the problem cannot be eliminated using a cleaner, the throttle assembly must be replaced.
After removing the throttle assembly, the gasket (O-ring) must be replaced.
A product to clean and protect electrical contacts may be required.
To avoid damage to the electric drive, do not attempt to forcefully turn the throttle valve by applying force to it.
When installing a new throttle assembly on a vehicle, special diagnostic equipment will be required in order to check the “calibration” of the throttle valve position in its extreme positions.
We prepare the car for work and disconnect the wire terminal from the negative terminal of the battery.
Using a Phillips screwdriver, loosen the clamp and disconnect the air supply hose from the throttle body pipe and pull the hose down.
By pressing the clamps, disconnect the wiring harness block from the throttle assembly.
Visually check the condition of the throttle assembly terminals and the wiring harness block.
To remove oxides, spray the terminals with a product for cleaning and protecting electrical contacts.
Using a 5 mm hex wrench, unscrew the four bolts securing the throttle assembly (one of the bolts is not visible in the photo)
Remove the O-ring from the intake manifold flange
Using a multimeter in ohmmeter mode, measure the resistance of the throttle position sensors between terminals 1 and 4.
A working throttle assembly should have a resistance in the range of 750-1250 Ohms.
When performing the following operation, hold the throttle assembly with the electric drive upward so that the cleaning agent cannot flow down the throttle valve axis towards the gearmotor and get inside the mechanism.
Using a cleaning agent, we wash away deposits from the inner walls of the throttle assembly and from the throttle valve.
We wipe the throttle assembly with a clean rag and blow it with compressed air from a compressor or foot pump.
We install the throttle assembly in the reverse order, replacing the O-ring with a new one.
Sequence of actions when independently replacing IAC and TPS sensors
- We place the machine on a level platform and ensure priority safety measures during repairs.
- We open the hood, an air duct with a receiver is laid above the engine. The Lada Granta with 8 and 16 valves has plastic, while in previous Lada models it is aluminum.
- We press out the plastic clamp of the block with wires.
- Disconnect the contacts of the electronic gas pedal.
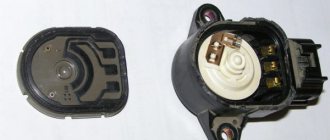
- Using a Phillips screwdriver, unscrew the two screws securing the IAC to the throttle body.
- We remove the IAC from the cavity of the throttle assembly.
- Next, we proceed to unscrew the TPS, it is installed a few centimeters lower.
- We unscrew the two screws, remove the TPS, and disconnect the block with the wires.
Note to the driver! When removing the valve, be extremely careful not to lose the rubber bushing.
- We carry out troubleshooting of the seat of the IAC and TPS. We clean the rust deposits with a rag and use WD-40 aerosol as needed.
- Screw in each of the sensors one by one and connect the connectors with wires.
- We start the engine and check the idle speed.
Replacement of the idle speed sensor is complete.
Replacing the idle speed sensor
see also
Throttle error
Throttle valve malfunctions
DIY throttle valve repair
Cleaning the electronic throttle valve
The task of the throttle valve (hereinafter referred to as DZ) is to regulate the amount of air supplied to the intake manifold. Its position is adjusted in accordance with the position of the accelerator pedal. The damper drive can be mechanical (using a cable) or electronic (using an electric motor). The position of the remote control is recorded by a special sensor. It transmits the relevant information to the ECU, which in turn makes a decision on the amount of fuel supplied and changing the engine operating mode. You can read more about its structure and functions in additional material on our website.
Cleaning + lubrication of the throttle valve - logbook Lada Granta Perseus 1.6l. 8kl. 2015 on DRIVE2
At the beginning of this entry, I thank everyone who writes about their experience, especially with detailed photo reports. I’ve seen enough and decided to follow in the well-trodden footsteps of throttle valve cleaners. I have already driven 41,000 km. Up to 25,000 I filled in 95 TNK (2 times 92 - there was no way out) .After this mileage, it’s only 95 Lukoil. My consumption on 95 Lukoil is 8.2-9.5 liters with air conditioning. The city and a big traffic jam in the morning to work/in the evening from work.…
I bought a throttle valve cleaner at BB (on the way to my parents in the village) and got into the engine jungle.
*I wanted to buy Liqui Moly for 319 rubles in METRO, but a toad appeared and took me out of the hypermarket*1. Remove the pipes from the throttle body and mass flow sensor and move them to the side2. We take a hexagon (I don’t know which one exactly. My father has a whole set
3. We briefly remember all the relatives of the founder of the AvtoVAZ company and... voila, it’s in your hands!
puff-puff-puff - half of the bottle is missing (520 ml full). You can wash 100 ml economically. Next, use a rag to wipe the contact area of the throttle at the engine inlet. I unscrewed the cap and read from the guys that there is no lubricant on the gears. And so it was. Guys don't lie)
A little CV joint and we mount this nonsense in place (I didn’t take a photo, sorry)
Why is this and what does it give?1. Let's assume 3500 rpm and 3rd gear. release the gas pedal and your car seems to be rushing back. This procedure gives an almost imperceptible reduction in speed. In general, as it was from the factory.2. Work on xx without flaws
3. Smoother response to the gas pedal *by the way, I didn’t dare open it - the bolts are sealed*
Price: 142 ₽ Mileage: 41,000 km
Do-it-yourself throttle valve cleaning. — logbook Lada Granta Ice 2014 on DRIVE2
When I removed the air duct when replacing the speed sensor, I paid attention to the throttle valve. On it, 97,700 thousand kilometers away, deposits have accumulated, apparently from crankcase ventilation. According to the BC, the throttle position on a warm engine showed 4 (which is not good, it should be 1-2). For work you will need: hexagon number 5, a Phillips screwdriver (loosen the clamps), carburetor/throttle valve cleaner, rags and
Next, remove the air duct and the large crankcase ventilation pipe
Disconnect the terminal from the remote control (I also removed the terminal from the battery) Unscrew the 4 hex bolts. Two of which were searched for and unscrewed by touch. Unfortunately I didn't take a photo.
also from the air duct side
I did not change the rubber o-ring, it looks and feels like new.
Cleaned with carburetor and throttle valve cleaner. I bought the cheapest one that was in the store. I didn’t take any photos of the cleaning process either, I was distracted. Here is the end result:
Clean valve on all sides, remove all deposits
After installing it in place, I turned on the ignition for 60 seconds so that the damper determined the zero position. Acceleration from 1.5 thousand to 4 thousand rpm. per minute didn't.
Result: This may be self-deception, but the engine feels softer/quieter. According to the BC, the damper position at XX shows 1, very rarely 2.
Price: 150 ₽ Mileage: 97,700 km
Downloading a book
Replacing the handbrake of a lada granta (VAZ Granta)
After successful payment (by any method) and return to the KrutilVertel store from the payment system website, you will be taken to the successful payment page:
The book you purchased will be in your personal account, from where you can always download it.
Please note that after making the payment, you need to return back from the payment system website to the KrutilVertel website. If for some reason you did not return back to the site and closed the payment system tab with a message about the successful completion of the payment, please let us know - we will send you a letter indicating access to download the book
If for some reason you did not return back to the site and closed the payment system tab with a message about the successful completion of the payment, please let us know - we will send you a letter indicating access to download the book.
Costly mistakes when repairing a car
Unfortunately, valuable experience in quality repairs is always built on a mass of expensive mistakes. Although no one has canceled banal laziness and sloppiness.
Even ordinary machine repair operations can result in significant costs. And here the matter is not only in the attitude of the master or the owner himself to his car, but also in the mass of pitfalls of technical stones. Moreover, not all of them are mentioned even in the factory service manual.
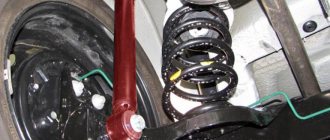
Replacement of suspension and chassis elements
There are common cases when a client comes to the service center to replace suspension elements, and as a result, when returning the car, for some reason the ABS system malfunction lamp lights up on the instrument panel. Computer diagnostics will most likely indicate a malfunction of the wheel speed sensor, from which repair work was carried out. It’s strange, but the mechanic didn’t touch this electronic meter at all, but it has to be replaced. Where is the connection?
The most common cause of failure of the active wheel speed sensor of the ABS system is careless use of a hammer when replacing suspension elements.
The most common cause of failure of the active wheel speed sensor of the ABS system is careless use of a hammer when replacing suspension elements.
Recommendations for choosing components
Insufficient driver experience and a wide range of spare parts are the main factors that make it difficult to select and purchase components for the Lada Granta.
Cheapness is the first sign of low quality workmanship.
When purchasing, carefully check the catalog items and search indexes with the actual data specified in the operating instructions. If you do not have experience in servicing equipment, use the services of certified service stations and demand a quality guarantee for the work performed.