Review of work features
First, let's look at the simplest case and figure out how to replace a low-beam lamp on a Grant, then we'll tell you how to troubleshoot some problems, and we'll describe how to adjust the light yourself; the instructions are so simple that anyone can handle it.
Replacing light bulbs
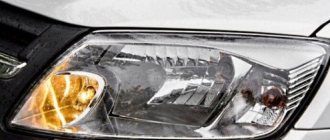
The low beam lamp of the Lada on Granta is universal, that is, it serves both high and low beam. The 60/55 Watt option is used (that is, the power of the high beam spiral is 60, and the low beam is 55), the lamp type is H4. This is the option you need to purchase before starting work.
The process itself is quite simple, and replacing the low beam bulb on a Lada Granta is done very quickly:
- First, remove the terminal from the battery and fix the hood in the open position.
- Next, press the latch of the plastic plug on the headlight and open it.
The lid latch is located at the top and is clearly visible
Under the cover you will see a block with wires; it must be carefully disconnected and moved to the side.
- Next, remove the rubber plug, which protects the case from moisture and dust. The rubber plug is very easy to remove
- The low beam lamp on the Grant is held in the reflector by a spring lock; to release it, you need to press the antennae and disengage them from the hooks of the housing.
- After this, you can remove the used unit, but we recommend that before changing the low beam lamp on Grant, you carefully examine it; it is possible that it is working, and the reason for the lack of light is not at all in it.
- When installing a new unit, do not touch the glass part under any circumstances, as this can cause it to fail very quickly; do everything carefully. Assembly is carried out in reverse order. (See also the article Installing fog lights on Kalina: features.)
Replacing the low beam lamp on a Lada Granta is done very carefully so as not to touch the glass bulb
Shutdown problems
Very often you can come across this question: the low beam headlights on the Lada Granta do not turn off, what should I do?
In fact, there may be several reasons, we will look at them:
The low beam relay on the Grant is located in a common block, the diagram below shows its location, you can try to hit it lightly, this often solves the problem, but you still need to change this unit, especially since its price is low. This is the most common option, but far from the only one.
The main reason why the low beam on the Lada Granta does not turn off is interruptions in the operation of the relay indicated in Figure K4
- The second option is a malfunction of the steering column switch; you can check it very simply: remove the trim from the steering column and disconnect the block of wires that go to the switch unit. If after this the light does not go out, then everything is fine with it; if it goes out, this unit needs to be changed.
- Finally, the third option is a short circuit, which can occur due to wear and tear of the elements or the use of too powerful light bulbs. To check, move the chip on the headlight. If the light blinks, then this is the reason, you need to unscrew two screws to disassemble the housing, most often the low and high beam contacts are closed, just disconnect them and put them back as they should be.
Adjustment
Let's look at how to adjust the low beam headlights on a Grant yourself:
First, you need to carry out preparatory measures - refuel to a full tank, check that there is a spare tire in the trunk, and put a load weighing 75 kilograms on the driver’s seat. Also, check the tire pressure, it should be correct.
Tire pressure is an important parameter; if it is different, the car will not be level and it will not be possible to make the correct adjustment.
- You will also need a 6 mm hexagon with which the adjustment will be made.
- You need to find a flat area in front of which there is a wall or a flat high fence and place the car at a distance of three meters from the surface.
- Apply markings on the wall - two vertical stripes should go along the width of the light bulbs in the headlights, a horizontal line should be located along the height of the installation of the lighting elements, and also draw an axial vertical line in the middle.
- When adjusting one of the headlights, cover the other with opaque material, then set the corrector to position “0”. Next, use a hexagon to direct the light flux so that its center is at the intersection of the vertical and horizontal lines opposite the headlight. Work is also carried out on the second side.
The hexagon is inserted into the hole above the headlight and the screw is carefully rotated to the desired position
Changing the lamps in the Lada Granta headlight
How to correctly change a low beam light bulb on a grant
December 14, 2015
We show the replacement of lamps on the left headlight unit (for clarity, we removed it from the car). We change the lamps in the right headlight in the same way.
Disconnect the wire terminal from the negative terminal of the battery.
To replace the headlight lamp, press the lock...To replace the headlight lamp, press the lock...To replace the headlight lamp, press the lock... ...and remove the cover from the headlight housing...and remove the cover from the headlight housing...and remove cover from the headlamp housing. Disconnect the wiring harness block from the lamp terminals. Disconnect the wiring harness block from the lamp terminals. Disconnect the wiring harness block from the lamp terminals. Remove the rubber cover. By pressing on the ends of the spring clamp, we disengage them from the hooks of the reflector... By pressing on the ends of the spring clamp, we disengage them from the hooks of the reflector... By pressing on the ends of the spring clamp, we disengage them from the hooks of the reflector... ... and remove the clamp from the lamp.... and remove the retainer from the lamp... and remove the retainer from the lamp. We remove the lamp from the headlight housing. We remove the lamp from the headlight housing. We remove the lamp from the headlight housing.
Attention! The headlight lamp is halogen. You should not touch its glass bulb with your fingers, as traces from them will lead to darkening of the lamp when heated
You can remove dirt from the flask with a clean rag soaked in alcohol.
We install the new H4 lamp in the reverse order.
To replace the turn signal lamp, press the socket and turn it counterclockwise (clockwise in the right headlight), remove the socket with the lamp from the headlight housing. To replace the turn signal lamp, press the socket and turn it counterclockwise clockwise (clockwise in the right headlight), remove the lamp socket from the headlight housing. To replace the turn signal lamp, press the socket and turn it counterclockwise (clockwise in the right headlight) , remove the socket with the lamp from the headlight housing.
Pressing the lamp, turn it all the way counterclockwise and remove the lamp from the socket.
We install the new PY21W lamp in the reverse order.
To replace the daytime running light lamp and side light in the left headlight, move the air filter housing to the side, releasing its rubber clamps. To replace the lamp in the right headlight unit, this is not necessary.
By turning the lamp socket counterclockwise, we remove the lamp socket from the headlight housing. By turning the lamp socket counterclockwise, we remove the lamp socket from the headlamp housing. By turning the lamp socket counterclockwise, we remove the lamp socket from the headlamp housing . Pulling the lamp, we take it out of the socket. Pulling the lamp, we take it out of the socket. Pulling the lamp, we take it out of the socket.
We install the new W21/5W lamp in the reverse order.
[Maintenance of Lada Granta for 45 thousand.
km run]
Changing the lamps in the Lada Granta headlight Changing the lamps in the Lada Granta headlight Is there an error in the text? Select it with your mouse! And press: Ctrl + Enter
We replace standard lighting with LED lamps.
How to correctly change the low beam bulb on a viburnum
To complete the work we will need the following materials and tools:
In order to tune the interior lighting grants, you need to stock up on high-quality LED strip. The choice of LEDs is one of the most important stages in interior modernization. Therefore, it is recommended to purchase quality products from trusted manufacturers. When choosing lamps, make sure that they are suitable for connection to the vehicle's standard 12-volt power supply.
Stages of work execution.
First of all, it is necessary to dismantle the standard interior lamp. After we have dismantled the diffuser, we can gain free access to the conductors.
Next, you need to prepare the LED strip by cutting it into several parts. Using double-sided tape, install the light bulbs on the Lada lampshade.
The final step is to connect the conductors of the LED strip according to the polarity and install the lampshade in its original position. We check the functionality of the light bulbs.
Elements of tuning optical devices
Recently, installation of LEDs has become popular. There are many advantages with analogues: long service life, direction of the light beam, brightness, resistance to high plus and minus temperatures.
And the main trump card is cost, availability, and a wide range of color shades.
The installation process is somewhat different from the usual, as it is necessary:
- dismantle the standard illuminator (lamp);
- depressurize the lantern, remove the rubber seal;
- cover the seat with LED strip of the required length;
- connect the contact board;
- Reassemble the structure in reverse order.
Recently, it has become popular to install fog lights on the rear bumper. This improves visibility when passing backwards and prevents accidents. Replacing the rear fog light of a Lada Granta liftback is carried out by analogy.
Adviсe
How to change the low beam light bulb on a Priora? list of required actions
If you notice that your running light bulbs burn out too often, the reason may be due to errors during replacement. The fact is that you cannot touch the bulbs of halogen lamps with bare hands. It is best to work in new cotton gloves that are free from dirt and other defects. The fact is that greasy marks that will remain on the lamp bulb can reduce the overall service life by up to several times. And to remove dirt, you just need to wipe the flask with a cloth previously moistened in an alcohol solution.
And, of course, do not forget that after replacing the lamps you may need to adjust the headlights.
Main reasons
Consider in detail the most basic reasons for such a breakdown.
Fuses blown
The fuses in the mounting block have burned out (F12 - right side, F13 - left side). Their rating is 7.5A.
F12 - left headlight, F13 - right headlight
The fuses in the photo are marked with an arrow. (top - left headlight, bottom - right headlight)
In this case, the voltage regulator may be faulty. As a result, a power surge occurred and both fuses were blown. It is necessary to check the voltage of the electrical circuit under load.
If you are on the road at the time of a breakdown, you can install a “bug” instead of fuses.
Carefully insert a piece of wire into the fuse connectors, preferably one, the left fuse. In this case, do not put the cover of the mounting block back on, as you will have to conduct a visual inspection; the wire may begin to heat up.
Low beam bulbs burnt out
“Right low beam” burned out
The low beam bulbs burned out, both of them at once, either a coincidence, or a short one, or the low beams were not turned on at idle. At high speeds, the current is greater, so both can burn out at once. The voltage regulator may also be faulty.
The low beam contact relay is broken
Location of the contact relay in the mounting block
The low beam may not turn on due to a broken contact relay. This breakdown is a very common reason. Due to the design of the relay and its low cost, the contact group may become stuck.
- Open the fuse box (mounting block).
- We take out the relay number K9.
- It is advisable to take a known good relay for a test drive. Or you can lightly tap the old relay with a key or coin.
- Reinsert the contact relay.
- Checking the low beam operation.
Light control module failure
Light control module on Grant
This fault should be checked last. The cost of a new part is about 900 rubles, so the easiest way is to replace the module with a known good one, for example, take it from another car.
If your high beams also do not work, then check whether voltage is coming to the MUS.
The nuances of installing LED DRL lamps
If there are no baseless LED lamps for the Lada Grant, you can install ordinary base lamps. In this case, you will have to remove the base from the diode yourself, and fit the free antennae to the mounting holes.
After replacing the lamps, do not throw away the old halogen devices. The fact is that in order to comply with regulatory and technical requirements for daylight, after installing new lamps, you will need to visit a technical center. Otherwise, the next scheduled technical inspection will prohibit the operation of a car with such modified headlights.
There are many LED light sources available in a variety of colors and shades. But according to standards, the light emitted by daytime running lights should only be white or yellow. All other colors are prohibited.
LED lamps consume significantly less electricity than standard incandescent lamps. Therefore, installing LED lights will significantly reduce the load on the battery. If you forget to turn off your running lights at night, your battery will hardly be discharged by morning.
The design of the Lada Granta car provides a relay that monitors the serviceability of the DRL. In addition, this relay simultaneously monitors the functioning of the injector and brake lights. Given that LED lamps consume less energy, the monitoring relay may give erroneous readings, indicating that the running lights are faulty. That is, the DRL lamp on the dashboard will often turn on, and the on-board diagnostic system will constantly beep.
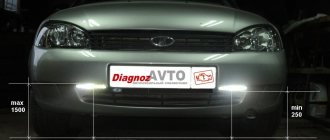
On the Lada Granta, the liftback and sedan dimensions are combined with daytime running lights in one lamp. That’s what the lamp is called: a two-filament side light/daytime running light (it’s the same on the new and old family - W21/5W). When the ignition is turned on, the DRLs (21 W thread) are automatically turned on, and when the headlights are turned on, the DRLs go out and the side lights (5 W thread) turn on. Next, we will tell you about the features of replacing the DRL bulb of a Lada Granta..
To gain access to the left headlight unit, you need to move the engine air filter housing to the side. To do this, we release all the housing fasteners, the wiring harness and the sensor. Then we move the filter housing up, as shown in the photo:
To gain access to the right headlight unit, remove the engine cover. To do this, you will need to unscrew the oil filler cap, and then unclip the cap by pulling it up. Don't forget to screw the lid back on to prevent foreign objects from getting into the neck!
The connector for the headlight bulbs in the Lada Granta is located in place No. 7. To replace the DRL lamp, you need to remove the socket by turning it counterclockwise and then pull out the lamp. Install the new lamp in the reverse order, insert the cartridge into the groove on the headlight unit and turn clockwise.
The entire process of replacing DRL lamps is shown in the video:
Why do DRL bulbs often burn out on Lada Granta? The reason is an error during replacement. Do not touch the bulbs of halogen lamps with your fingers. Work in clean cotton gloves without rubber coating. Greasy fingerprints left on the lamp bulb will shorten its service life several times. To remove contaminants, wipe the flask with a clean cloth moistened with alcohol.
As a reminder, check your headlights periodically and adjust your headlights if necessary.
To replace a burnt out Grant low beam bulb, no additional tools or bumper removal are required. Before starting work, you need to select high-quality lighting elements and prepare the car.
Daytime running lights based on diodes
Replacing incandescent lamps and installing LEDs on a Lada Granta car does not require special skills, but has some nuances. Firstly, the lamps in both headlights must be replaced at the same time: if you change one incandescent lamp to an LED one, then be sure to change the other one too. Secondly, replacing lamps with LED lighting sources requires mandatory compliance with power polarity.
Please note: if you try to install an LED lamp without observing the polarity, it will instantly fail. Moreover, there is a high probability of failure of the power fuse for the DRL lamps. Therefore, if your actions nevertheless lead to the device burning out, be sure to change the fuse before trying again.
The polarity of the contacts is determined using a voltmeter (tester). After the old lamps are removed, you need to turn on the daytime running lights so that voltage is supplied to the contacts. Then connect the red probe of the voltmeter to one contact, the black one to the other. If the device shows a positive voltage, the red probe will correspond to “plus”, and the black probe will correspond to “minus”. If the voltmeter shows a negative DC voltage, it means the wires are connected in reverse: red to negative, black to positive.
In this case, the digital tester will produce a negative voltage with a minus sign, and the readings of the pointer voltmeter will go below zero.
Lamps for increased visual comfort
The DRL lamp of the Lada Granta Deluxe is an ordinary halogen low beam incandescent lamp, shining white. The main disadvantage is reduced visibility in rainy weather due to the fact that white light produces much more glare from wet surfaces and raindrops than yellow light.
The following brands of high-comfort halogen lamps are most often found on sale: OSRAM, General Electric, Mayak, Philips, Narva, IPF, Hella, etc. The manufacturer recommends choosing OSRAM H4 models in Standard and Light Day modifications. The first fully complies with all norms and legal requirements for safety, illumination, geometry and accuracy of the cut-off line. Has the highest luminous intensity value. The second model differs from the first in having a significantly longer service life. In terms of luminous intensity it is slightly inferior to the Standard modification.
Replacement of low beam lamps is carried out as follows. Clear access to the left headlight unit. To do this, release the Lada air filter housing from all fasteners, disconnect the wiring harness and sensor. Then slide the filter housing up and to the left. To gain access to the right headlight, you need to remove the power unit cover. To do this, unscrew the oil filler cap and then the 4 mounting bolts. After this, pull the cover up and unclip it.
To remove the old lamp, first turn the socket counterclockwise and then carefully pull out the light source. Install the new one in the reverse order: first install the base into the groove of the cartridge, then screw the cartridge clockwise.
Please note: when replacing halogen lamps, it is not recommended to touch the bulbs with your fingers. The fact is that fingerprints of sweat and grease on the bulbs of lighting devices reduce their service life many times over.
Therefore, it is necessary to work in clean cotton gloves without rubber coating. Wipe the flasks themselves with alcohol wipes before installation.
The fact is that fingerprints of sweat and grease on the bulbs of lighting devices reduce their service life many times over. Therefore, it is necessary to work in clean cotton gloves without rubber coating. Wipe the flasks themselves with alcohol wipes before installation.
Video on how to ensure bright DRL lighting in Grant without modifications
Good visibility on the road, especially in the dark, is a guarantee of safety. A correctly installed lighting system is extremely important for a car; the issue of uninterrupted operation of high and low beam headlights on a Lada Granta car is always relevant.
In today’s article we will talk about the malfunctions and causes of failure (burnout) of low beam lamps on Lada Granta cars, we will look at what to look for when choosing, and I will also tell you step by step how to replace this undoubtedly important element of the car.
Most often, Granta owners complain about the fairly frequent failure of low beam lamps. Indeed, they most often require changing names, which is understandable: after all, they work almost constantly.
If previously car owners turned on the lights at night and in inclement weather, now, according to the rules, they must always be on while driving. Lamps do not last forever, and if a cheaper analogue is purchased to replace the fairly good standard OSRAM light bulbs, the problem may become a regular one.
LED lamps for Lada Granta SMD 2835
The second common reason for bulbs burning out in front and rear headlights is moisture getting inside. The culprit is usually cracked or poorly fitting rubber seals located between the headlight housing and the glass. The presence of a problem is indicated by periodic fogging of the headlight from the inside.
Halogen lamps may not light due to improper installation. During this procedure, you must avoid touching the glass surface with your fingers.
Traces of grease significantly reduce the life of the light bulb. In addition, although in rare cases, the lamps do not light up due to too high voltage supplied by the car's alternator or poor terminal contact.
LED halogen lamps on Lada Granta H4 (prohibited for use)
In general, as you were able to notice, there may be more than enough reasons why the low beam on the Lada Granta stopped working. Let's now figure out in what cases you will need to replace the lamps, and in which cases you should contact a specialist.
Replacing low beam lamps on a Grant may be necessary if they burn out. But, if such a malfunction occurs very often, or along with the low beam, any other part directly related to the electrical system disappears or stops working, then in this case it is better to contact a specialist.
The process of replacing low beam lamps on a Lada Granta
In most cases, the problem lies in the car's wiring or insufficient voltage supplied by the battery. It will be extremely difficult to find the cause on your own without the proper skills.
Replacing light bulbs in the front headlights of a Lada Granta car is usually carried out due to natural wear of the lamps (clouding of the bulb) or their complete failure.
Every car owner should be able to carry out the procedure for replacing low and high beam bulbs, since the lighting elements may fail along the way and further movement without lighting will become impossible. The Grant headlights use halogen double-filament lamps with an H4 socket (the new family of models uses lamps with an H19 socket).
One lamp, thanks to the presence of two filaments in it, allows the headlamp to operate in two lighting modes - low beam or high beam. No special tools are required to carry out the replacement. You will need a long screwdriver, rags, cloth gloves and alcohol to wipe the lamp bulb. The replacement process should only be carried out with clean gloves.
To gain free access to the left block, move the housing that covers the air filter and protects it from external factors. To do this, you will need to remove all the harnesses and housings from the device, and then simply move the desired housing up.
With the right block the situation is somewhat different. In this case, to replace the running lights on the Lada Granta, you will need to dismantle the power unit cover. To do this, first remove the cover of the oil filler system, after which the desired housing is snapped off. It is worth noting that the cover can be firmly fixed, so you should firmly pull up to remove it.
Rules for replacing light bulbs on a Lada Granta car
To replace a burnt out Grant low beam bulb, no additional tools or bumper removal are required. Before starting work, you need to select high-quality lighting elements and prepare the car.
Which parts to choose
Granta, whose lamps are easy to find in any auto parts store, is equipped with modern optics that illuminate the road surface in accordance with all GOST requirements.
When choosing lamps, it is important to observe the following parameters:
- designation of the base;
- voltage;
- power.
Installation of parts that do not meet the requirements often leads to melting of the base, transparent cover or headlight housing.
Lamps used on Grant:
- low/high beam – H4 55/60W 12V;
- direction indicator block – PY21W 12V/21W;
- running light/marker – P21 5/21W 12V.
A special feature of the H4 format is a combined bulb for near and far illumination. Each type of light has its own thread. If one of them burns out, the second continues to work.
The factory in Grant comes with lighting elements from Philips or Osram, depending on the batch.
The following options are suitable as a replacement:
- Bosch;
- Philips;
- Osram;
- MTF;
- Koito.
Japanese Koito and Korean MTF are expensive, so owners rarely choose them to replace the original ones.
Philips X-treme Vision
According to test results from independent experts, these consumables have one of the best indicators of brightness and illumination in the dark.
The manufacturer indicates the following features:
- light temperature corresponds to 3500K;
- increase in the lighting area of Grants up to 45 meters in comparison with standard lamps;
- service life up to 450 hours.
The packaging with two parts included is produced in Poland. During installation, car enthusiasts note a significant improvement in low beam and sufficient brightness in rainy weather. The disadvantages include a short service life. On average, such parts work in Grant from 1 to 2 years.
Philips LongLife EcoVision
Lamps are supplied from factories in Poland and Germany. A distinctive feature is an increased service life of up to 1500 hours, which equates to 4-5 years of operation or 100,000 km.
Characteristics for low and high beam:
- quartz flask with increased strength indicators;
- thread resistant to shock and vibration;
- powerful luminous flux due to increased gas pressure in the bulb.
The lamps do not differ in lighting quality from the original ones, but they work much longer and are also not afraid of shocks.
Bosch Pure Light
You can purchase such lamps for Granta in a package of one piece. This is convenient for owners who have one lamp burnt out and do not want to pay for both.
Peculiarities:
- the manufacturer promises an increase in light spot of up to 90%;
- The item comes with a silver plated cartridge and a blue bulb to provide white light.
The lamps show themselves in Grants optics on the positive side and last about 2-3 years. Drivers often choose Bosch for its reasonable price and good workmanship. Country of origin: Germany, Poland.
Osram Original Line
The cost of the part is comparable to the prices of lamps from Bosch. The manufacturer promises car owners the following features:
- improving the length of the light beam, increasing visibility on the roadside;
- pressure in the flask provides a power increase of up to 130%.
Lamps are supplied individually. The production plant is located in Germany. The part has a good service life of 500 hours and is inexpensive. These lamps are factory installed on many makes of cars.
When to change lamps
Original light bulbs in Grant can last from 2 to 4 years. Replacement is necessary when signs appear:
- reducing beam power;
- a sharp increase in brightness;
- burnout of one of the threads.
The brightness of the Granta headlight is reduced due to burning of the filaments and smoke on the inner surface of the bulb. In this case, the flow of light is significantly reduced: the reflector cannot collect the required amount of light and direct it onto the road. The malfunction occurs at dusk, rain and on unlit sections of the road.
When falling into a hole, drivers notice a sharp increase in the light power in one of the headlights. This indicates a partial break of the filament and an excess of temperature at the filament point. Such a lamp needs to be replaced, as it is not capable of working for more than one day or even a few minutes.
If the thread breaks, the Grant optics go out and show no signs of operation until the burnt-out part is replaced.
When operating a Grant with a non-working lighting source, traffic police officers may issue a fine of 500 rubles.
How to change lamps
To replace a burnt-out part in a headlight yourself, you don’t need complex tools. Before starting work, you should thoroughly wipe the headlights, disconnect the battery and prepare new spare parts.
What does the market offer?
Below are some options for halogen lamps of different price categories that can be installed on the Grant:
- PHILIPS H4 COLORVISION . A set from a German manufacturer, characterized by bright light and the ability to choose the color of the glow (blue, green, yellow). Price – about $35.
- OSRAM COLOR BLUE HYPER. Halogen lighting elements made in Germany, with a declared color temperature of 5000K. The flask is painted blue. Price – about 17$.
- MTF LIGHT STANDARD. Korean light bulbs with a transparent bulb, the color temperature of which is 2900K, which allows them to be used in headlights with plastic housings. They will cost only $6.
- KOITO DENSO VWHITE. Products made in Japan, with transparent bulbs and a color temperature of 3700K. Features high light intensity. Price – about 28$;
- EVO VISTAS. Halogen lamps from China have a completely transparent body, their light color temperature is 3200K. Will cost $25.
- LIGHTHOUSE ULTRA. Budget option made in China. The base is transparent, the characteristics of the products are fully suitable for installation on Granta. Cost – $4.
Installing new lighting
The necessary increase in brightness or service life of light bulbs can only be achieved by replacing existing lights. Car enthusiasts often replace the halogen lighting sources installed in Lada with LED ones. As a rule, even a person without experience in replacing lamps can cope with this task. However, you should know a few nuances. Simply placing a new diode in the right place is not enough - the process has its own characteristics. They are:
- it is often necessary to tear off the previous base from the diode in order to move its parts to the required holes;
- the driver will have to check the polarity of the light sources on the Grant to ensure the safety of the fuse. If this is not done, the fuse that controls the voltage in the network will simply blow out. The fuse that is installed in this car model is capable of de-energizing the safe operation of the electrical circuit.
You should also remember to undergo routine inspection. It will help determine whether the changeover procedure is dangerous. Once you take out your old light source, you don’t need to throw it away immediately. If you do not pass inspection with new lamps, it would be logical to return the old ones in their place. Also remember that the legislation of the Russian Federation allows only white and yellow lighting on cars - other colors are illegal.
Changing the lighting on the Lada Grant to the recently popular LEDs provides many advantages:
- consumption of less electricity and, therefore, fuel;
- longer service life (some are designed for the entire life of the Lada Granta);
- excellent visual effects, bright road lighting;
- These models do not put a large load on the generator and do not overload the fuse.
To replace the right headlight, follow the algorithm:
- Remove the cartridge by rotating it counterclockwise.
- Remove the broken product by pulling it towards you.
- Check that the bulb's antennae match the same mounts in the car and insert it into place at a 45-degree angle.
Correct placement of diode antennae
Installing lighting in the left headlight has its own characteristics, since it is more difficult to reach. Before the replacement process, remove the air filter unit by first unscrewing the antifreeze hose. After this, remove the 3 rubber fasteners that secure the block. Further actions are similar to replacing the lighting in the right headlight.
- January 11, 2016 11:30:17
- Reviews:
The daytime running light lamp on the Lada Granta is combined with the dimensions. Standard socket 4 pin w21/5w. 21 W – running lights, 5 W – dimensions. It seems like install an LED lamp of this size and that’s it. But no...
AvtoVAZ loves to come up with the best schemes and non-standard solutions. It's the same this time. The pinout on a standard base is completely non-standard. Therefore, if you install an ordinary LED lamp, the following options are possible: either the running light (or dimensions) will not work, or it will start to smoke..
There are several options for solving this problem.
Option 3. The most barbaric. Drill out the entire base from the standard Granta connector. Glue the light bulb there tightly and either solder the wires as needed, or buy an additional connector and solder it on it.
The most correct option is to use special non-polar LED lamps. This means that no matter how “+” and “-” are supplied, the electronics inside the lamp will determine how to supply power to the chips.
Rate it! Luminous flux - 720 Lm (halogen low beam lamp gives a flux of 1200 Lm) Chips - American made CREE, 6 pcs Multi voltage from 12 to 24 V Non-polar Claimed service life of more than 30,000 hours.
The photo shows the fuse for daytime running lights on a Lada Granta. When experimenting and selecting LED lamps, it often burns out.
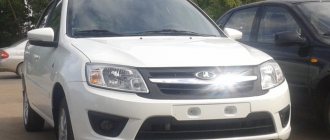
For comparison. One headlight of the Lada Granta car has an LED DRL, the other has a standard lamp.
And now how it looks in the dark. The difference is obvious!
LED running lights and low beams on. Well, in general, the low and high beams also need to be changed to LED lamps. For example, for these – LED CARS H4 HI/LO 3600 LM
What can you supply?
Standard for this car are halogen lamps. But it is quite possible to install other types of lighting elements. The following types of lamps can be installed on Granta:
- XENON The light of such paws is provided by the creation of an electric arc in an environment of inert gases. They are distinguished by high brightness, relatively small dimensions and a significant service life;
- LED . They are becoming increasingly popular among car enthusiasts. Their advantages include significant light brightness, low power consumption, and long service life.
But it’s still better not to experiment with light, but to use the Granta lamps that are indicated in those. documentation for the car, namely halogen.
With their quite good performance indicators, such lighting devices are the most inexpensive, and there is a large selection of them, which allows you to choose the best option for use.
DRL connection diagrams
Since DRL can be mounted at your discretion, there are many connection schemes that allow you to configure the optics in the most convenient way for the driver. Let's look at the most popular of them.
Option 1 (to speed sensors)
This connection of running lights through a relay, the diagram of which is shown below, is considered one of the simplest. In this case, the DRLs will turn on depending on the operation of the speed sensor. In order to implement this scheme, it is necessary to connect contacts K1.1 to the circuit section (into the wiring break) from the low beam switch button to contact 85. In this case, you can use any relay with an opening pair, but experts recommend using a product with a TC code.
If you want the dipped lights to work while the engine is on, rather than the side lights, then the contacts must be “paralleled.”
Option 2 (to the oil sensor)
Another scheme for connecting daytime running lights via a relay uses an oil sensor. You should immediately check that it is in good working order, since if the regulator provides incorrect information about the fluid pressure, then the operation of the entire system will be disrupted.
With this installation of DRLs, the lights will turn on when the engine starts, and will be turned off by the dimensions. As optics, you can also use low beam or fog lights.
Option 3
It will be a little more difficult to connect the DRLs so that they turn on when the engine starts and turn off when it stops. In this case, the running lights will turn on together with the low beam headlights. This will require two low-power diodes (for example, 1A + KD10), which must be connected in series. After this, wires about 400 mm long are soldered to the light bulbs and connected. Don't forget that they are polar.
At the next stage:
- Dismantle and disassemble the dashboard of the car and connect the “blank” to X1 (most often the yellow wire).
- Remove the button through which the optics will be turned on.
- Plug the other end of the wire into the connector.
- Reinstall the button and check its functionality.
Option 4 (connecting running lights from the generator)
To implement such a project, you can use one of three schemes.
The first one is suitable if only the handbrake and the engine are used.
The second scheme for connecting running lights from the generator will require the use of an additional resistor, which is responsible for turning off the daylight when the side lights or headlights are activated.
The third scheme will allow you to deactivate the running lights:
- When you raise the handbrake, during the start of the internal combustion engine or during the automatic start of the engine along with the alarm.
- When the lights are turned on (in this case, it is necessary that the headlights or fog lights operate normally).
Roughly speaking, this type of connection “cancels” the automatic start of the DRL simultaneously with the ignition of the generator.
Healthy! It is this scheme that is “working” when passing the GTO.
Before connecting the running lights from the generator, it is recommended to watch the video at the end of the article. The fact is that there is more than one or two ways to activate the DRL. However, the connection will be much easier if you purchased a ready-made set of running lights.
Option 5 (connection of a ready-made kit)
In order not to rack your brains over how to install running lights on a car yourself, the easiest way is to buy a ready-made control unit to automatically turn off and turn on the DRLs. To install this module you need:
- Connect the black wire to the negative of the battery, and the red wire to the positive.
- The orange wire (if included) must be connected to the headlights or low beam. If the wire is not connected, the lights will not deactivate when the low beam or side lights are turned on.