Replacing the rear door handle of a Lada Granta is indicated when it breaks or wears out. In other situations, the driver's desire to change this item may cause scratches or microcracks on parts that spoil the appearance of the interior. If in the case of passenger structures only the handle needs to be changed, then in the driver’s door the lock that unlocks the door will also need to be changed. Sometimes replacing the opening mechanism is necessary because the lock cylinder has been damaged by an intruder.
The door structures of the Lada Granta and Kalina modifications are identical, so dismantling the handles is carried out in the same way.
Causes of malfunction
If we compare the frequency of breakdowns, the Lada Granta rear door handle fails half as often as a similar part on the front doors. Main causes of failure:
- Lever wear. After 3–4 years of operation, the spare part wears out, the paintwork cracks, scratches, and the appearance of the car deteriorates.
- Mechanical defect of the internal or external lining. This may be due to careless handling or careless driving.
- Poor quality material. The problem occurs in cases where the car owner, in order to save money, purchases a non-certified product from an unknown manufacturer to replace the original part. As a result, the lever breaks or becomes deformed after a few months.
- Breakage of the opening lock cylinder.
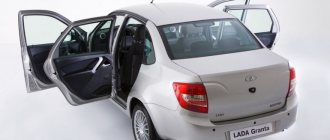
Owners of the 2022 Lada Granta sedan model prefer to tune the car and replace standard spare parts with replicas immediately after purchasing the vehicle. A factory defect leads to the fact that the standard part begins to hang loose and opens poorly after a few weeks.
What tends to break down in a mechanism?
Sometimes disassembly occurs only to tighten the fasteners. It is also necessary to dismantle the opening mechanism if it does not work correctly. Main causes and options for breakdowns:
- A defect appeared after an accident.
- The part does not close or open the door well. There is insufficient adhesion to the body part.
- Microcracks, scratches, and abrasions appeared on the product.
- Damage to internal components has been detected. If no defects are found during a visual inspection, you will have to unscrew the handle to make sure that the whole problem is in the fastenings.
- In the case of the driver's door, where there is a lock in the handle, the reason for dismantling is an attempt to break into it.
An equally compelling reason: failure of the external door opening manipulator. It is important to understand that the plastic from which the products are made is not as durable as other elements. It may simply crack due to strong pressure on the handle.
Replacing the hood cable on a VAZ 2110
Most often, the mechanism jams after a collision with the front part of a personal vehicle. In worst cases, you have to completely dismantle the front end.
Replacing the hood proceeds as follows:
- Two supporting telescopic tripods located on both sides of the hood are removed;
- The hinged fasteners are unscrewed;
- Move the metal blade in any convenient direction and remove the hood with slow, light movements;
- After replacing the new metal sheet, all parts should be returned in the reverse order.
The cable fragments are removed using the most convenient and accessible method. You should start with the handle in the cabin and end with the engine compartment; Having asked a handy person to hold the fixation spring located near the lock, remove the rubber plugs from the spring
Important! Along with this step, feel this place, as there may still be fragments of the cable; Pull the cable from the engine side and secure it in the passenger compartment. The correct state of the spring is slightly bent.
The instruction manual for the VAZ 2110 describes in detail how to properly secure and check the mechanism so that there are no unexpected breakdowns in the future.
Rear door interior handle illumination
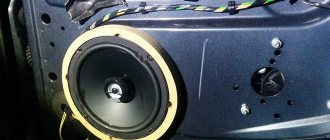
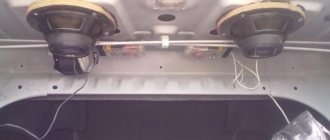
After the handle is removed, it would be nice to supplement it with lighting. To do this, drill a hole for the LED on the removed handle with the cover:
We install an LED in the hole and connect it to the power supply for the side lights. We get lighting for the inside rear door handle on the Grant. The photo was taken from below, so the LED is visible. It does not interfere with the passenger and allows you to easily open the handle, without searching for it in the dark.
How can you align the door of a VAZ 2110 car?
You can level the door using a bolt. For this:
- Take a bolt of the same size as the finger.
- The element is placed with its head up on the lower door hinge from the inside so that the bolt hangs on the edge of the hinge.
- The door is carefully closed, and the bolt is clamped inside the hinge.
- The door is slowly closing and the result is visible.
- If necessary, the operation is repeated.
There are repair instructions for sagging doors after increasing the gap between the doors and their poor closing. For this:
- You need to remove the door and disassemble its trim.
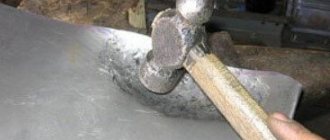
- Make a longitudinal cut in the bottom loop using a small grinder.
- The remains of the finger are knocked out with a core.
Repair kit
Repair kits for the Lada Granta car have the following articles and prices:
External:
- rear right DAAZ – 1118-6205150, price – 450 rubles.
- rear left DAAZ - 1118-6205151, price - 450 rubles.
- front left DAAZ – 1118-6105151, price – 505 rub.
- front right DAAZ - 1118-6105150, price - 505 rub.
Internal:
- rear left LADA – 2190-6205181, price – 145 rubles.
- rear right LADA – 2190-6205180, price – 145 rubles.
In addition to original repair kits, you can use spare parts from similar models of the VAZ line, caps, levers, fasteners, clamps, rods, lock cylinders.
Let's proceed to the second stage: dismantling the side view mirror
- Using a screwdriver, unscrew the three screws that secure the mirror frame to the body.
- Using pliers, remove the locking bracket.
We remove the mirror and remove the hinges through the diagnostic hole.
- Using an “8” socket, unscrew the bolt that secures the outer handle to the end of the door.
- In the inner tunnel, unscrew the second bolt holding the handle.
- Using a screwdriver, carefully pry up and remove the rods from the lock.
- We remove the handle from its seat, turning it slightly from side to side.
Refinement of the base and mechanisms
The best way out is to purchase a silent lock, in which the parts in contact with each other are made of plastic. You can modify the mechanism yourself, as a result the door will close even quieter and softer.
- Dismantle the outer part of the old lock without removing the casing.
- Remove the small retainer latch spring. Insert the large spring into place.
- Cut or remove the shaped rubber seal. The part often comes out of its seat because the block is skewed against its base, which prevents the door from closing normally.
- Slightly grind and adjust the nose of the locking ratchet, which, when closed, engages with the latch on the stand.
- Glue a rubber gasket or any vibration-absorbing material to the base of the door where the lock will be attached.
- Lubricate and install the new modified mechanism in the place where the old one stood.
Replacing the outer handle
To understand how to remove the door handle on a Grant, just study our instructions. From the inventory you will need: a Phillips screwdriver, a socket wrench and a knife. Step-by-step work:
- Decorative trims are dismantled. The plastic latches are removed, then the edge of the casing is picked up using a knife.
- The handle is secured with a nut and bolt on the inside and outside. First, the fastening element is unscrewed in front, then in the back.
- The thrust rods and seals are removed from the closing mechanism.
- The product is removed. To do this you will have to pull the handle a little.
- Before installation, the mounting location is inspected and dirt and dust are removed.
Procedure for removing the driver's door handle
Answering the question of how to remove the Lada Granta door handles on the driver's side is a little more difficult. It is important to consider that this plastic item has a lock installed, so the cause of the mechanism malfunction may be due to a broken cylinder. You will need a Phillips screwdriver, an 8mm wrench and a knife. Basic steps for dismantling:
- The fastening fragments are unscrewed from the top and inside.
- Traction is turned off. The handle is removed. If the cylinder needs to be replaced, the lock cylinder latch is released. It can be easily removed with a simple screwdriver.
- A new core is installed after first removing the larva. To do this, the plastic tip of the rod with the lock switch lever is disengaged with a screwdriver.
- The part is fixed with bolts on both sides and tightened.
Tools and Supplies
Reinstallation and repair of the part can be done in the garage; for the work you will need the following tools and consumables:
- Set of car keys.
- Set of heads, ratchets and cranks.
- Set of special plastic tools.
- Ruler for opening the door of a Lada Granta car.
- Phillips and flat head screwdrivers.
- Anti-corrosion lubricant WD-40.
- Litol lubricant.
- Rags.
The work does not require special skills; the driver only needs to carefully dismantle and install new parts according to our instructions.
External handle replacement process
The outer door handle of a Lada Granta car is removed not only for replacement, but also if it is necessary to repair the lock cylinder, lubricate or correct the operation of the locking mechanism. Work order step by step:
- Open the front door.
- Remove the casing.
When working on reinstalling trim elements, it is recommended to purchase additional clips; the cost of one clip is up to 3 rubles. During the repair process, fasteners may
break, the parts are consumer goods, have a bad fixing clip or a hard skirt.
- Using a screwdriver, unscrew the three screws that secure the mirror frame to the car body.
- Remove the retaining clip using pliers.
- Remove the mirror and remove the hinges through the diagnostic hole.
- Remove the bolt that secures the outside handle to the end of the door. To do this, you need to use a 8-mm head. If the screw is tight or acidified from rust, it is recommended to spray the fasteners with anti-corrosion lubricant.
- Remove the bolt holding the lever. It is located in the inner tunnel.
- Disconnect the rods from the lock using a screwdriver.
- Moving forward as you move, slightly rocking, remove the outer handle.
All work with lock mechanisms, dismantling handles outside and inside, and reinstalling casings is carried out only with the battery disconnected.
General principles of lock operation and reasons for blocking doors
Since the handles are located at a great distance from the lock, they are connected to it using rigid wire rods or cables. The parts to which these pull rods or cables fit are often made of plastic, so they break or wear out easily. Accordingly, if the handle itself breaks, to open the door in an emergency, you need to use a cable or rod to operate the lock. If the tongue on the side of the lock breaks off, you need to move what is left of it.
Design of a standard car door lock
The second reason why the door is locked is that the lock is faulty. It could be:
Most often, drivers become hostages of the door locking function to prevent children from accidentally opening them. When the latch is moved, it slams shut and to open it, you need a working outer handle, which is what broke.
Opening a door with a broken lock is much more difficult than when the inside and outside door handles are broken at the same time. However, this does not happen often and in any of these cases it is necessary to remove the door card for further work with the mechanism. Therefore, first we will look at how you can open the door or how to remove the trim when the door is closed, and then how to unlock the lock.
Initially, I didn’t really like the way the doors on my Grant closed. The sound when closing was somewhat sharp and unpleasant. Having been spoiled in recent years by driving foreign cars, I acutely felt this contrast when slamming the doors. Of course, this most likely relates to comfort and does not affect the reliability of the car, but still, when working in a taxi, you would not want to constantly listen to this clanging sound.
Often I heard from the clients themselves: “Oh, I didn’t want it that much. Sorry. " Imagine, even clients get scared when the doors are closed! And I had to feel awkward about it every time.
The solution to the problem turned out to be simple. It turns out that in order for the doors on the Grant to close more softly, you need to install a vertical rubber seal RKI-19. Well, let's install it.
Having stopped at one of the LADA spare parts stores, I purchased the desired “noise damper” and scheduled a time when I would do the installation. At the same time, I also purchased another seal - to protect the thresholds (RGI-135), which, in addition to its main function of protecting the inside of the thresholds from dirt, slightly muffles the sharp sound when closing the doors. But more on that a little later. First, let's figure out how to install the RKI-19 vertical seal. The photo shows the RKI-19 seal, which was available in the store.
Sequence of actions when replacing the front door handle on a Lada Grant
- We place the car within the perimeter of the repair area and provide priority safety measures.
- Open the front driver's door and raise the window to the top position.
- Unscrew the three screws that secure the upholstery at the bottom.
- We carry out dismantling on the right side by analogy.
- We unscrew the little soldier - the door lock lever.
- Use a screwdriver to pry off the plastic plug.
- Additionally, we unscrew the screw that secures the upholstery in the middle part of the door panel
- We unscrew the screws at the bottom of the armrest.
- Unscrew the handle fastening (two self-tapping screws).
- We insert a flat-head screwdriver between the metal body and the plastic upholstery.
- Squeeze out the plastic.
- We remove the card from the seat.
- Disconnect the block with wires from the locking lever.
- By analogy, we disconnect the contacts from the electric window drive.
- We remove the upholstery.
- Use a screwdriver to pry up the power window control unit and remove the switches.
Review of spare parts prices
| Name/article | Price, rub.) |
| 00001003833121 Bolt M5x10 with serrated shoulder | From 100 |
| 00001003831801 M5 nut with serrated shoulder | From 100 |
| 00001002624101 Washer 5 mm | From 50 |
| 00001003275901 Screw M6x10 | From 50 |
| 00001002605371 Lock washer 6 mm | From 50 |
| 21230610542000 Lock cylinder | From 550 |
| 11180610515000 External front right handle | From 650 |
| 11180610515100 External front left handle | From 650 |
| 21900610518000 Inner front right handle assembly | From 950 |
| 21900610518100 Inner front left handle assembly | From 950 |
*prices are current as of November 27, 2018.
Recommendations for choosing and replacing door handles
When choosing spare parts, always give preference to original ones. Good, high-quality parts are always 10 - 15% more expensive than analogues. At the same time, by purchasing a factory part, you can count on a long service life of the mechanism. A cheap counterfeit does not provide even a third of the required resource. The final choice is up to the owner of the technical device. The deciding factor is the budget.
The process of replacing the inner door lever
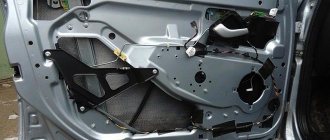
The inner handle will have to be removed not only if the part breaks. Dismantling is necessary when replacing the casing, installing additional sound insulation, or repairing a window regulator. To completely replace the outer handle trim and internal operating mechanism, you will need to remove the trim from the door. Step by step procedure for replacing parts:
- Disconnect the negative terminals from the battery.
- Unscrew the 3 trim screws located at the bottom.
- Remove the plastic plug by prying it off with a screwdriver.
- Unscrew the screw located in the middle part of the door trim.
- Remove the screws located in the armrest niche and the two that hold the handle fasteners.
- Insert a flat-head screwdriver wrapped in a rag or a plastic wedge from a special tool kit between the trim and metal door frame.
- Carefully pulling back the screwdriver or wedge, unfasten all the clips securing the casing.
- Move the panel slightly away from the frame and disconnect the block with wires from the locking lever. Disconnect the power window wires.
- Remove the door trim.
- Using a Phillips screwdriver, unscrew the screw securing the base to the inner door panel and pull the bent end of the rod out of the hole in the inner handle lever.
- Remove the inner handle.
You can install the new handle in the reverse order, taking into account that the front tab of the base of the part should go beyond the edge of the technological hole in the inner panel.
Remove sagging doors using washers
You will need to prepare several washers with an outer diameter of 20mm and a hole diameter of 10mm. The washers should be of different thicknesses; the thicker the washer, the more sagging of the door it will eliminate. For a heavily sagging door, a washer with a thickness of 1.5 mm may be suitable, and for a slightly sagging door, about 1 mm.
To place the washer you will need to place a block under the door, and then:
- Unscrew the lower door mounting bolt. Please note that to unscrew this bolt you will need to use an impact screwdriver or a large lever.
- Pull the door towards you a little, and then slide the washer under the hinge.
- Install the bolt and tighten it back.
Reviews
| № | Positive |
| 1. | Vitaly: for two years of operation of the car, there are no comments on the body or locks. From time to time I lubricate the components myself; for this I bought a special grease gun. To prevent the core from freezing in winter, I spray it with an aerosol. |
| 2. | Gennady: I used the aerosol several times to lubricate the core in winter. The door slams easily, the plastic does not rattle, the sound insulation is standard. |
| 3. | Vasily: after using the car for a year and a half, I only replaced the factory vibration and noise insulation and re-lubricated the door mechanism. Everything works as usual, there are no complaints. |
| 4. | Kirill: I’m happy with the car, the build quality is good, I fix minor breakdowns on my own. |
| 5. | Gennady: During the year, I made one unscheduled visit to the workshop to lubricate the door components. The central locking works properly and stably. Poor sound insulation, but this is easily fixable. |
| 6. | Alexander: my positive review of the Lada Granta, the car is good, it fully meets the “price-quality” criterion. Minor flaws are present, as the model is in the budget segment. |
| 7. | Ivan: I drove 75,000 km on Grant, I didn’t make any capital investments, I just bought consumables for maintenance. I treat my equipment with care, fill it with high-quality fuel, and periodically lubricate it. |
| Negative | |
| 1. | Victor: The standard locks are very weak, they wear out quickly, after which the door rattles and knocks. A year and a half has passed since the purchase, and the mechanisms already need to be changed. |
| 2. | Dmitry: after another winter, the castle on the left side flew away. There is no point in repairing it, since repairs will cost more than buying a new one. |
| 3. | Vyacheslav: the factory hinge on the left side lasted only 80,000 km, after which it was replaced with a new one. The service life is short, the quality is very poor. |
Conclusion If the need arises, you can replace the door handle on the Lada Grant yourself. The process is not complicated, and the principle of operation is intuitive.
When selecting and purchasing consumables, give preference to parts with factory catalog numbers. When contacting a service station, request a quality guarantee for the work performed.
The outer door handle on the Lada Granta is made to Euro standards, to suit the natural grip of the hand. If it breaks, you can replace it yourself. The connection diagram of components and parts directly related to the door opening mechanism is presented below.
Designations adopted in the diagram: 1 - front door panel; 2 — lock switch rod; 3 - the outer handle itself; 4 — door glass; 5 — door lock switch button; b - door trim; 7 — rod of the lock switch button; 8 — door lock; 9 — internal handle of the lock drive; 10 — rod of the internal drive of the lock; 11 — guide of the lock switch button; 12 — rod of the external handle of the lock drive; 13 — nut securing the outer handle to the door panel; 14 — screw securing the lock.
To carry out work on removing and installing the external handle, you will need an “8” wrench and two screwdrivers (flat and Phillips). Sequence of work
How to tighten the handbrake on a grant in 5 steps
Does the handbrake engage after 3-4 clicks? Stopped holding? On slopes do you have to double it with the gear engaged or turn the wheels towards the curb? It's time to find out how to tighten the handbrake on a Grant yourself.
Adjusting the Grant's handbrake
Adjusting the parking brake of a VAZ 2190 is no more difficult than on a classic or “chisels”. Let's look at the step-by-step principle , starting with inventory.
Necessary tool for tightening the handbrake
What you will need for work :
- Inspection pit, overpass, lift;
- Keys: open-end and ratchet with long head 13;
- Socket wrench or ratchet with a 10mm head;
- Possibly WD-40.
The lift will make it much easier to adjust the parking brake.
Parking brake adjustment principle
So, the car is on a pit/lift, the tool is in your hands - the handbrake is loose. What to do?
Step 1 : find a resonator under the bottom. We remove its mount, located closer to the front of the car. Then, using a socket wrench or a ratchet with a 10mm socket, unscrew the 4 bolts securing the heat shield.
This way we get the opportunity to move the screen forward without removing it. Underneath there is access to the parking brake adjustment mechanism.
Step 2 : slide the screen forward to access cable adjustment.
Remove the cushion mount 1, unscrew the bolts 2. Move the screen 3.
Step 3 : holding the adjusting nut (open-end wrench size 13), loosen the lock nut (head size 13).
Step 4 : Rotating the adjusting nut clockwise, tighten the cables. Periodically check from the inside how the handbrake is holding.
As soon as the parking brake lever reaches 3-4 clicks, tighten the locknut.
1-lock nut. 2-adjusting nut. For convenience, you can loosen the locknut and rotate them both clockwise with a long head of 13.
Step 5 : return the heat shield to its place, fix the fastening screws and the rubber suspension of the resonator.
Checking work:
- the rear axle is suspended, the parking brake is removed - the rear wheels rotate freely;
- the rear axle is suspended, the brake lever is raised (to maximum tension - 3-4 clicks) - the rear wheels do not rotate even with force.
General questions about the parking brake on Grant
Let's look at a few basic questions about VAZ 2190 brakes.
Operating principle of the Granta handbrake
When raising the handbrake lever in the passenger compartment:
- the drive brake cable is tensioned;
- through the equalizer he pulls the cables going to the rear brake pads;
- The pads are pressed against the brake drums through expansion bars, stopping the wheel from moving;
- When the tension is loosened (removed from the handbrake), the tension of the cables also weakens, and the wheels move freely.
Why is it necessary to tighten the parking brake?
When the cable tension is loosened, there is a danger of the vehicle rolling away .
This means that as the rear pads wear out, the original parking brake setting will lose effectiveness.
Replacing an internal part
Replacing the internal handles on the rear door of a Granta is slightly different from dismantling the external part. The internal element has more fastenings and is partially hidden by decorative trim. Algorithm of actions:
- The cladding is dismantled. To pull it out, you need to pry up the edge. To do this, use the thin edge of a screwdriver or a sharp knife.
- The rear door card unwinds. There is a rod inside that is important to disconnect.
- To remove the remains of the broken opening device, the fasteners are unscrewed. The handle is removed and a new part is mounted.
Before installation, the internal niche is cleaned. This can be done with alcohol infusion or detergent.
Sources
- https://remont-avtovaz.ru/zamena-ruchki-perednej-dveri-na-lade-grante/
- https://neauto.ru/class-single__title-itemprop-headline-osobennosti-zameny-vnutrenney-i-naruzhnoy-ruchki-dveri-v-lada-granta/
- https://InfoKuzov.ru/remont/zadnyaya-ruchka-granta
- https://vgrante.ru/?cat=60&pcat=29
- https://o-ladagranta.ru/kak-pomenjat-ruchku-na-dveri-lada-granta/