March 03, 2015 Lada.Online 95 767 3
Some owners, after purchasing a LADA car, notice malfunctions in the operation of the doors. For example, the back door doesn't open well. You can cope with the problem yourself by adjusting the locks and door geometry. The defect can also be corrected under warranty from an authorized dealer.
Malfunctions that owners of LADA cars (and other car brands) encounter when the door locks are not adjusted:
- the door does not open or close;
- the door closes/opens poorly (tight);
- large gaps between the door and the body (water gets into the cabin, rattling and whistling appear at speed).
Door adjustment on all LADA cars (XRAY, Vesta, Largus, Granta, Priora, Kalina Niva 4x4) is performed in the same way. There are no fundamental differences.
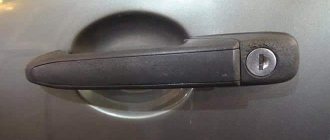
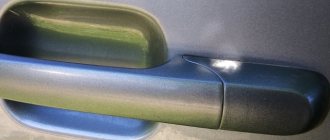
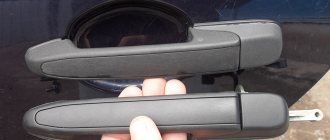
Replacing the front passenger door handle
Photo of replacing the door handle hook, I numbered the photos just in case, in case someone changes the thread, it might come in handy:
Step-by-step instructions for replacing the outer and inner door handles on a VAZ 2115
The elements that open and close the door structures on your car wear out over time. Replacing the VAZ 2115 door handle from the inside or outside may be required due to abrasions, scratches, and deformation. The procedure for removing and installing a new part is different for the rear and front doors, so separate instructions are provided for each situation.
Causes of lock failures on VAZ 2109
- There may be several such reasons. Here is a “rating” of the most common reasons for replacing a lock.
- “Downfall” of the latch connecting the door lock to the rod that connects it to the central lock.
- Lost key.
- Damage to the locking mechanism itself - the cylinder in the car. On the VAZ 21093, the front door lock is designed in such a way that it is almost impossible to repair them. That is, if a lock cylinder breaks, it is better to immediately replace it with a new one. Thus, you will save time and your nerves. Moreover, its price is quite reasonable.
- Wire refraction.
Causes of malfunction
Before replacing a part, you should find out the cause of the failure. The main ones:
- damage after an accident;
- mechanical damage to internal elements;
- Hacking attempt;
- failure of the external door opening manipulator;
- pressing hard on the handle.
Most often, the plastic part breaks or breaks as a result of constant opening.
Main types of breakdowns
The first warning for the driver is an extraneous sound when turning the key. Jamming, difficult movement or blocking of the key inside the cylinder will indicate that something is wrong with the device. Variations of breakdowns:
- the pin broke;
- the groove or internal parts are rusty;
- mechanical damage to the door;
- water appeared and froze inside the castle;
- the retaining ring has failed;
- the latch broke;
- the thrust cap collapsed;
- the opening element broke, leaving part of the key inside the device;
- temporary wear of parts.
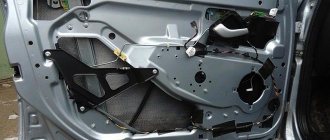
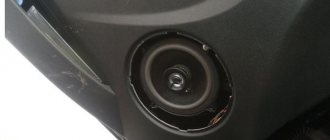
Replacing the inner handle
If the internal door handle of a VAZ 2115 is broken, then cosmetic repairs are impossible. To repair, you will need a standard set of tools: several types of screwdrivers, a sharp knife and a 8mm wrench. It is better to change the part while in the salon. Algorithm for replacing a part:
- The lining is removed. It is pryed off with the thin end of a screwdriver. It is important to remove all fragments of decor.
- The door card is being dismantled.
- The rod is disconnected.
- To remove the remains of the broken opening device, the fasteners are unscrewed.
- A new element is installed. It should be attached to the rod, and then the facing elements should be reassembled.
The trim on the VAZ is fixed with special clips. To remove them, you can pry up the edge with a screwdriver. Proceed with caution as they are plastic and may break. This is affected by rough handling, material wear or cold.
Door lock adjustment
Another reason for poor door opening is unadjusted locks.
Required
: Phillips screwdriver (if the screws do not come off, you will need an impact screwdriver) or Torx T40 wrench
Procedure
:
- Mark the position of the lock shackle for possible return to its original state.
- Loosen the two/three bolts securing the lock bracket.
- We move the bracket (forward/backward, up/down), achieving easy and tight closure of the door.
- Upon completion of the adjustment, tighten the screws securing the lock retainer with a torque of 22 Nm.
Everything said in the article is shown in the video:
Have you ever had to adjust the door locks yourself? Let us remind you that in order to extend the life of locks and seals, they should be lubricated regularly. Do you want to improve the design? Install additional door seals (instructions for XRAY, Vesta, Granta/Kalina/Priora, Largus and Lada 4x4).
Keywords: Lada Granta doors | Lada Kalina doors | Lada Vesta doors | doors lada xray | Lada Priora doors | Lada Largus doors | doors 4x4
0 0 0 0 1 0
Share on social networks:
Replacing the outside door handle
Replacing the inner door handle of a VAZ 2115 is not as difficult as dismantling the outer element. First you need to determine the fastening method, which is specified in the technical document for the car. It will not be possible to get to the fasteners without removing the casing. Armed with screwdrivers and a 8mm wrench, it is important to follow the step-by-step instructions:
- Remove trim.
- Remove the thrust rods from the closing mechanism.
- Unscrew the external fastening screw.
- Remove the rubber seals and remove the handle.
- Inspect and clean the installation site of the new structure.
Assembly is carried out in reverse order.
The design and principle of operation of the VAZ 2107 clutch
The VAZ 2107 is equipped with a single-plate dry clutch with a hydraulic drive. The drive design includes:
- tank with a stopper and built-in liquid stabilizer;
- suspended pedal with pusher;
- master and slave cylinders;
- metal pipeline;
- hose connecting the pipeline and the working cylinder.
When the pedal is pressed, the force is transmitted through the pusher to the piston of the clutch master cylinder (MCC). The main fluid circulation pump is filled with brake fluid coming from the hydraulic drive reservoir. The piston pushes out the working fluid, and it flows under pressure through a pipeline and a rubber hose into the clutch slave cylinder (CSC). In the RCS, the pressure increases and the fluid pushes the rod out of the device, which, in turn, actuates the clutch fork. The fork, in turn, moves the release bearing, disengaging the pressure and driven discs.
The VAZ 2107 clutch has a single-plate dry design with a hydraulic drive
Handle selection
Repair will require a new part. The mechanism is sold for the driver's or passenger's door. When purchasing, you should pay attention to:
- Appearance of the product. Experts recommend taking a closer look at Euro pens.
- Manufacturer.
- Material of manufacture. The standard version is made of plastic, but there may be products with additional elements. Some manufacturers add chrome strips.
It is better to purchase AvtoVAZ products. Factory articles: 2109-6105180 – for internal, 2108-6105177 – for external product.
Door sills ArtForm (dark gray embossing) Lada Largus | LADA Largus since 2012
RUB 2,499 /set
- 8 show number 88001009907 (calls within Russia are free)
- 88001007637 Wholesale (calls within Russia are free)
n
n
n", "n
n
n”]>, “hash”: “E654CC27338DF2808D6299EF353A1D02B16FC6AF5B395FF561″>” >Find out partner prices (u0437u0432u043eu043du043eu043a u043fu043e u0420u043eu0441u0441u 0438u0438 u0431u0435u0441u043fu043bu0430u0442u043du044bu0439) n
n
n", "n
n
n”]>, “hash”: “E654CC27338DF2808D6299EF353A1D02B16FC6AF5B3C3DBF8005″>” >Find out partner prices
- 8 show number 88001009907 (calls within Russia are free)
- 88001007637 Wholesale (calls within Russia are free)
- Terms of payment and delivery
- Schedule
- Contacts
Functional:
Designed to protect body sills from environmental influences during vehicle operation. The design is also unique in that the door sill covers cover the upper part, preventing chafing when entering and exiting the vehicle.
Reliability:
The organizer is made of high-strength ABS plastic. The special composition allows the product not to deform after exposure to chemical reagents: acids, alkalis and fats. Heat-resistant plastic retains its shape from -45 °C to +60 °C. The surface of the product is scratch-resistant and retains its attractive appearance for a long time.
Installation:
The product does not interfere with the installation of the jack.
The product is installed in standard places, without drilling the body:
Requirements for high-quality installation of the product:
- Installation should be carried out in a dry, warm room with an ambient temperature of at least 20 C
- It is prohibited to wash the car during the first 24 hours after installation.
- The surface of the car on which the product is installed must first be dry and clean.
Recommendations for using the product:
- Use touchless car wash with caution.
- Do not wipe with alkaline or acidic solutions or abrasives.
- Do not use the product as a load support.
Required consumables for installation (not supplied):
- Torx screwdriver T15
- Torx screwdriver T25
- Technical degreaser.
- Small cotton fabric.
- A napkin soaked in ethyl alcohol.
Recommended Supplies:
- Primer for double-sided tape type 3M 94F, or analogues.
- Brush.
- Self-adhesive bookmarks (stickers) for marking the product on the car.
Product contents:
- Door sills “ArtForm” (dark gray embossing) Lada Largus from 2012. – set left and right side.
Installation sequence:
- Remove the front mudguards using a T15 Torx screwdriver
- Unscrew the bottom screw securing the arch trim. To do this, it is recommended to place the car on a lift or jack by lifting the rear of the car and removing the rear wheel.
- Remove the lower part of the front and rear door seals. Install the door sill covers and pre-mark where the double-sided tape will fit on the car.
- Treat the contact areas of the double-sided tape with a primer or a cloth with ethyl alcohol.
- On the part, remove the protective layer from a short length of double-sided tape and bend it perpendicular to the part.
- Install the part on the car so that the protective layer of double-sided tape is on the outside of the part.
- Install the front mudguard through the door sill trim and screw the rear wheel arch trim mounting screw through the part.
- Remove the protective layer of double-sided tape completely and secure the part by pressing firmly against the car.
- Reinstall the front and rear door seals.
- Install the sill trim on the other side in the same order.