Car : VAZ-2112. Asks : Kalashnikov Vladimir. The essence of the question : Where is the signal relay on the VAZ-2112?
Greetings to all motorists! The sound signal on my two-wheeler stopped working . I drove for about two weeks, the button was wrong, I had to press it hard for it to work. And today the car in front at the traffic light went backwards, or rather began to roll. I had to scream through the window. It's not safe.
In general, the signal now does not work at all. The fuses are normal, I checked the signal directly - it’s working. They advised me to check the signal relay, but I can’t figure out where it is.
Please tell me where the relay is installed and how to correctly determine the cause of the breakdown?
There is no separate horn relay on the VAZ-2112!
There is no sound signal relay as such on the VAZ-2112. The minus of the signal is taken from the ground, and the plus from the positive contact of the cooling fan.
The horn fuse is marked with a red arrow.
From this we can conclude that if the sound signal does not work, then:
- faulty wiring (need to call);
- the contact group on the steering wheel is faulty (often happens);
- The cooling fan does not work (the signal seems to hint);
- the moving contacts of the signal button do not reach the contact on the steering wheel;
- The sound signal itself is faulty.
- The fuse is faulty.
F7 (20 A) - horn fuse
Every car must have a working horn. Thanks to the horn, the driver can prevent an emergency situation on the road and avoid a possible collision. But it often happens that the horn refuses to work. For what reasons does the sound signal on the VAZ 2110 not work and how to fix this problem - read below.
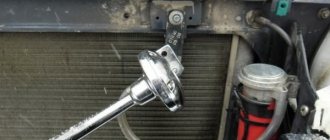
How to remove a faulty signal (horn)
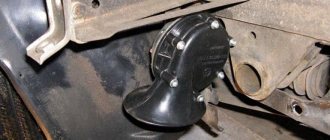
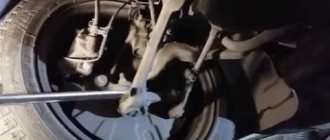
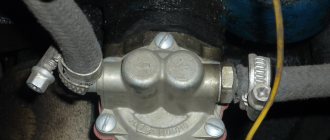
There is a single module mounted under the radiator grille. To remove it, unscrew one nut (key “13”). First disconnect the connector.
Dismantling, adjustment before installation
It will be necessary to remove the grille. This action is difficult to perform on both the “Ten” and even on the VAZ-2112, and the signal may not work due to faulty wiring. First achieve what was discussed in “step 3”. And only then, if necessary, proceed with replacement.
One adjusting screw is fixed to the horn body. Set it to the middle position and check.
Removing the radiator grille
- Taking the “10” key, unscrew the two screws on top (as in the photo). You can't remove the grill right away.
Self-tapping screw for radiator grille fastening
An important fastening element is the clamp.
The article number of the new radiator grille is 2110-8401014 (or 8401614, or 8401714).
I just bought a moped... Now I’m repairing it... Why doesn’t the horn work? The relay clicks when pressed.
I checked: - the fuse (switched places with another, I didn’t have a tester at hand) - I connected it directly to the battery - it works - I cleaned the contacts on the steering wheel
Thanks for any tips! I'll attach photos just in case.
Possible malfunctions: signs and causes
There are several signs of a malfunctioning sound signal on a VAZ 2110 or 2112:
- The sound signal has disappeared. The driver presses the steering wheel or the corresponding button located on it, but there is no beep.
- The beep appears and disappears. When the driver presses the steering wheel, the signal may start to work, but then immediately disappears.
There may be several reasons why the horn refuses to function:
- One of the most common reasons is the failure of a safety device. In this case, the integrity of the horn itself will not be compromised, which greatly simplifies the repair procedure.
- Failure of the horn itself. If after replacing the safety device the sound does not appear, you can try to check the functionality of the horn by dismantling it and directly connecting it to the battery. If the device is working, then when connected to the battery it will begin to emit a corresponding signal.
- The reason may also be a short circuit in the vehicle's on-board network.
- Another cause of the problem may be worn out clamping contacts located on the steering column. This problem often occurs in the cars of our compatriots. In any case, the clamping contacts wear out over time due to use; this cannot be prevented. As an option, you can try to increase the service life of the contacts; to do this, they need to be treated with graphite lubricant from time to time.
- Worn slip ring on the steering wheel. As stated above, there is no escape from wear and tear, so sooner or later every car owner will face such a problem. As in the previous case, you can try to increase the service life of the slip ring by applying graphite lubricant to it.
- Oxidation of contacts on the steering wheel. With prolonged use, deposits will begin to accumulate on the internal contacts, which makes it impossible to transmit the impulse to activate the horn.
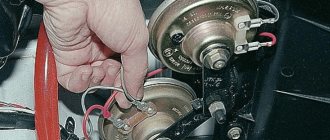
Removing the steering wheel
If “step 2” is not successful, you need to remove the steering wheel. The two copper strips should “close” when pressed - everything is clear here. The test is carried out with an ohmmeter, and if necessary, the switch is replaced.
Steering wheel after dismantling
When the steering wheel is removed, you can clean the contact tracks. The wire contacts in the column must also be clean.
Dismantling from start to finish
First you need to unscrew the two screws under the trim. Having removed the plastic, you can see the contact plate - perhaps that was the problem.
First step in dismantling
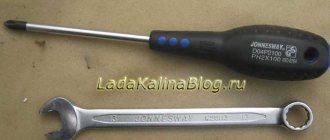
Try cleaning the contacts and performing “step 2” again. If there is no result, take a 24mm wrench and unscrew one nut (not all the way).
The steering wheel needs to be knocked off its splines
The steering wheel is pushed towards itself. And then the nut can be unscrewed completely.
When installing, follow one rule. The protrusion on the bracket should fit into the slot made in the plastic ring (see photo).
Steering wheel installation (first step)
Methods for troubleshooting
If the horn circuit is broken and the horn stops working, then there are several options for solving the problem:
- First you need to diagnose the safety device. If this part is burnt out, then you just need to replace it with a new one; the device is located in the mounting block. The replacement process will not take much time; any car enthusiast can cope with this task. If replacing the fuse gave results, but after some time the horn stopped working again, then most likely the reason lies in voltage surges in the on-board network. Overload contributes to accelerated burnout of the fuse element, so you will have to look for the source of the load and solve the problem. To do this, use a multimeter or seek help from an electrician.
- If the horn itself malfunctions, the device must be replaced. If diagnostics by direct connection to the battery do not produce results, then most likely the reason lies in the device itself, which needs to be changed.
- Short circuit. To diagnose, you will need a multimeter and a little experience. Using a tester, you can find a short circuit, but if you have never encountered such a problem before, it is better to seek help from specialists.
- If the clamping contacts or slip ring are worn out, then the failed elements must be replaced. It is not a fact that you will be able to buy new contacts or a ring, so most likely you will have to change the horn assembly.
- Another reason why the horn does not work is oxidation of the internal contacts. Over time, as mentioned above, dirt and deposits accumulate on them, which leads to the obstruction of sound. You can try to disassemble the steering wheel of the car, then clean the internal contacts and assemble the steering wheel (the author of the video is the channel Alexander Amochkin Kolomna AAK).
If you are faced with the problem of a non-working horn, then you will probably be wondering how to replace it:
- First of all, you need to remove the steering wheel. To do this, remove the trim and unscrew the bolts that secure the steering wheel.
- After the steering wheel is removed, you can clean the contact tracks, perhaps this will help solve the problem. Make sure that the wire contacts in the column are as clean as possible .
- Unscrew the two screws located under the plastic cover. After dismantling the cover, you will be able to see the contact plate; there is a possibility that the problem lies there. Clean the contacts and check the signal functionality. If the horn does not work, then using a 24mm wrench you will need to unscrew the nut, but you do not need to unscrew it all the way.
- Next, the steering wheel itself must be pulled towards you; this will require some effort. You can try to move the wheel by tapping it from different sides. When you feel that the steering wheel has given way, the nut is unscrewed completely.
- After dismantling the steering wheel, we proceed to removing the horn. There is a module located under the grille of the radiator unit; it must be removed; to do this, unscrew the nut to 13 and disconnect the connector.
- Install a new one, replace the steering wheel and check the operation of the horn.
Photo gallery “Removing the steering wheel and replacing the horn”
Removing the steering wheel
If “step 2” is not successful, you need to remove the steering wheel. The two copper strips should “close” when pressed - everything is clear here. The test is carried out with an ohmmeter, and if necessary, the switch is replaced.
Steering wheel after dismantling
When the steering wheel is removed, you can clean the contact tracks. The wire contacts in the column must also be clean.
Dismantling from start to finish
First you need to unscrew the two screws under the trim. Having removed the plastic, you can see the contact plate - perhaps that was the problem.
First step in dismantling
Try cleaning the contacts and performing “step 2” again. If there is no result, take a 24mm wrench and unscrew one nut (not all the way).
The steering wheel needs to be knocked off its splines
The steering wheel is pushed towards itself. And then the nut can be unscrewed completely.
When installing, follow one rule. The protrusion on the bracket should fit into the slot made in the plastic ring (see photo).
Steering wheel installation (first step)
Is a Volga horn good?
Is it possible to use a signal from the Volga in the “ten”, how to install it and how to connect it yourself? In the VAZ 2110 it is allowed to install a Volga horn, and the latter can be either old or new model. There is no particular difference between these details, except that the tonality will be slightly different. And, of course, the cost. But keep in mind that installation by simply replacing the device will not work.
The bottom line is that two cables are connected to the standard device - one with a negative output, which comes from the button on the steering wheel, and the other with a positive one. The latter is permanently connected; it also powers the ventilation device of the radiator unit. But in Volga devices, only one cable is used - positive, since the mass in this case is supplied through the body, that is, from the attachment to the vehicle body. In addition, you must also take into account that both systems use different current consumers - the standard options require no more than 5 amperes, while the Volga ones require 8 amperes each. The result is 16 amperes (video author - Master Bruce).
Accordingly, to correctly connect a product from Volga to a VAZ 2110, you will need a four-pin relay; you have several options for installing it:
- in the vehicle interior, in the mounting block with fuses;
- in the engine compartment, but in this case, please note that the relay should be securely insulated to prevent moisture from entering.
Block in the engine compartment
The power fuse box is located in the engine compartment under the hood, near the left strut support. To get to it, you need to open the lid by prying the latch.
1 (30 A) - engine control system circuit. If there are problems with the electronic control unit, short circuits or other malfunctions, this fuse may blow out.
2 (30 A) - vehicle on-board circuit. 3 (40 A) - vehicle on-board circuit.
4 (60 A) - generator circuit.
5 (50 A) - electric power steering circuit.
6 (60 A) - generator circuit.
In case of any problems, it is important not to panic, to think soberly and logically. The most important thing is to diagnose and establish the cause of the breakdown.
If you don’t have enough experience or nerves, it’s easier to sign up at the nearest car service center if it has a competent electrician.
I hope this article will help you deal with electrical problems and quickly fix any Priora malfunctions. If you have any experience or information, please leave a comment below, useful information will be added to the article.
The feasibility of self-repair
So does it make sense to repair the horn yourself? If we take into account the recommendations described above, then the repair is advisable only if the car owner is as careful as possible when performing it. After all, during the repair work, there is a high probability that an inexperienced car enthusiast will damage the wiring in the unit or connect the contacts incorrectly. Therefore, if you have never encountered a repair procedure before, it is better to entrust this matter to specialists or simply replace the horn assembly.
Symptoms of problems
How can you even determine that the horn is not working or has some kind of malfunction? It's actually extremely simple.
There are 2 main signs of problems with a car horn:
- The signal doesn't work at all. When you press the button, the driver, like other road users, hear absolutely nothing. This is a clear indication that the system has failed;
- The signal appears periodically. There is also a slightly different situation when the horn does not go off with every press. That is, they pressed it once, everything works, but when you try to honk again, the horn goes silent, there is no reaction to the press. Then the situation repeats itself.
There is nothing complicated or unusual in determining the nature of the malfunctions. But now we need to understand why this happens and where to look for the reasons.
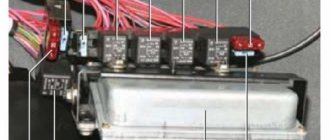
Location
The relay and fuse mounting block is located on the left side of the steering column in the instrument panel.
Types of mounting blocks
Block 2110-3722010
Block 2110-3722010-01
Block 2110-3722010-08
Circuit breakers
F1 (5A)
- License plate lights
- Indicator lamp for turning on side lighting
- Trunk light
- Instrument lighting lamps
- Left side marker lamps
F2 (7.5A)
F3 (10A)
F4 (10A)
- Right fog lamp
F5 (30A)
- Door window motors
F6 (15A)
- Socket for portable lamp
F7 (20A)
- Engine Cooling Fan Motor / Horn
F8 (20A)
- Rear window heating element and heating switch contacts)
F9 (20A)
- Recirculation valve
- Window washer motor
- Rear window wiper motor
- Windshield wiper motor
- Headlight cleaner motor
F10 (20A)
F11 (5A)
- Starboard side marker lamps
F12 (7.5A)
- Right headlight (low beam)
F13 (10A)
- Right headlight (high beam)
- Indicator lamp for high beam headlights
F14 (10A)
- Left fog lamp
F15 (20A)
- Electric seat heating
- Trunk lock lock
F16 (10A)
- Relay-breaker for direction indicators and hazard warning lights (in hazard warning mode)
- Hazard warning lamp
F17 (7.5A)
- Tail lights (brake lights)
- Body interior light
- Individual backlight lamp
- Ignition switch illumination lamp
- Clock (trip computer)
F18 (25A)
- Glove compartment lamp
- Heater controller
- Cigarette lighter
F19 (10A)
- Door locking
- Rear lights (reversing lights)
- Relay for monitoring the health of brake light and side light lamps
- Direction indicators with warning lamps
- Generator field winding
- On-board control system display unit
- Instrument cluster
- Clock (trip computer)
F20 (7.5A)
- Rear fog lamps
F21
F22
F23
K1
- Lamp integrity monitoring relay (4412.3747 / 2110-3747410)
K2
- Windshield wiper relay breaker (524.3747 / 2110-3747710)
K3
- Relay-breaker for direction indicators and hazard warning lights (492.3747 / 2108-3747010-02)
K4
- Relay for low beam headlights (113.3747 / 2105-3747210-10)
K5
- Headlight high beam relay (113.3747 / 2105-3747210-10)
K6
- Additional relay (71.3747-01 / 2110-3747310-01)
K7
- Relay for turning on the heated rear window (113.3747 / 2105-3747210-10)
K8
- Rear fog lamp relay (113.3747 / 2105-3747210-10)
Additional fuses and relays
Location
Additional fuses and relays are installed behind the side trim of the console, secured with two screws, on the right side of the instrument panel.
Circuit breakers
1 (15A)
2 (15A)
- Canister purge valve
- Vehicle speed sensor
- Oxygen sensor (heating)
- Air flow sensor
3 (15A)
- Fuel pump relay
- Fuel pump
- Injectors.
K4
K5
K6
- Main relay (ignition relay)
Stories from our readers
“Fucking basin. "
Hi all! My name is Mikhail, now I’ll tell you a story about how I managed to exchange my two-wheeler for a 2010 Camry. It all started with the fact that I began to be wildly irritated by the breakdowns of the two-wheeler, it seemed like nothing serious was broken, but damn it, there were so many little things that really started to irritate me. This is where the idea arose that it was time to change the car to a foreign car. The choice fell on the melting Camry of the tenth years.
Yes, I had matured morally, but financially I just couldn’t handle it. I’ll say right away that I am against loans and taking a car, especially not a new one, on credit is unreasonable. My salary is 24k a month, so collecting 600-700 thousand is almost impossible for me. I started looking for different ways to make money on the Internet. You can’t imagine how many scams there are, what I haven’t tried: sports betting, network marketing, and even the volcano casino, where I successfully lost about 10 thousand ((The only direction in which it seemed to me that I could make money was currency trading on the stock exchange, they call it Forex. But when I started delving into it, I realized that it was very difficult for me. I continued to dig further and came across binary options. The essence is the same as in Forex, but it’s much easier to understand. I started reading forums, studying trading strategies. I tried it on a demo account, then opened a real account. To be honest, I didn’t manage to start earning money right away, until I understood all the mechanics of options, I lost about 3,000 rubles, but as it turned out, it was a precious experience. Now I earn 5-7 thousand rubles a day. I managed to get the car buy after half a year, but in my opinion this is a good result, and it’s not about the car, my life has changed, I naturally quit my job, I have more free time for myself and my family. You’ll laugh, but I work directly on the phone)) If If you want to change your life like me, then here’s what I advise you to do right now: 1. Register on the site 2. Practice on a Demo account (it’s free). 3. As soon as you get something on the Demo account, top up your REAL ACCOUNT and go to REAL MONEY! I also advise you to download the application to your phone, it’s much more convenient to work from your phone. Download here.
3 - mounting block
A - wiring block to the electric motor of the engine cooling system fan B - to power supplies
Preset for everyone
When the sound does not work on the phone, it creates a huge problem because the user cannot use the device as desired.
Here are some general steps to fix a sound problem:
- Check the phone volume, press the increase/decrease buttons.
- Reboot the mobile phone, remove the headphones and clean the jack.
- Check the position of the vibration sound switch; to do this, go to settings > click on sound > volume. By setting this option, you can adjust the volume of music, ringtones, and notifications.
- If the setup was successful, they use the device; if not, they continue the recovery and look for the reason why the sound on the phone does not work.
- Update the device firmware and proceed to configuration. Click on the “about phone” section, find “system update/software update” and click on it, download the latest version for the phone.
- Check the music app and clear the cache, go to settings, and then click on the clear data tab.
- If these actions also do not bring results, then install the SoundAbout application from Google Play for free.