Print this article Font size 16
Already on new cars of the VAZ 2110 series, buyers noted the insufficient effectiveness of noise insulation and wind protection by rubber on the doors. Therefore, there is no need to talk about used cars.
Over time, creaking and rustling noises appear, and the driver and passengers experience discomfort from the cold seeping through worn-out seals. Plus, loose fitting of the doors leads to the appearance of moisture inside the cabin during snow or rain.
It would seem that such an insignificant element as a seal, but how many problems it can cause in case of wear or mechanical damage.
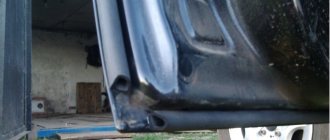
The seals at the bottom of the doors, near the thresholds, are subject to the greatest wear. Therefore, every buyer of a used VAZ 2110 or the owner of a rather old car must first replace these same rubber bands.
Appearance of the gum
Door seals VAZ 2110
When developing domestic cars, due attention was not paid to their comfort; extraneous sounds are often heard in the cabin and moisture leaks are possible during precipitation. By replacing the door seals of the VAZ 2110 and slightly modifying them, you can achieve better sound insulation performance. Serial rubber products intended for sealing the interior, as a rule, are not of high quality. Often the problem arises not only with the double-circuit seals of the doors themselves, but also of the lowered side windows. This is due to the low quality of polymer materials and rubber from which these elements are made. Errors during their installation on the conveyor, as well as deformation during prolonged and intensive use, are also possible. The work of restoring the tightness of the interior is simple and will not require much time even for an untrained worker.
Some information about the design of the body as a whole and the doors of the VAZ 2110
Unlike previous models of the Volzhsky car, there is no drain protruding above the doors. This makes the car more attractive and modern, but raises a number of problems associated with the need for better insulation of the interior volume from external adverse influences.
Implementation of a set of measures to restore the tightness of doors
As experience in operating machines of the “tenth” series shows, the rubber elements used are not very reliable and require additional refinement. The official repair instructions provide for the replacement of these parts when deformations and damage occur. Most often, such phenomena are observed in the lower part at the threshold. To perform the operations you will need the following spare parts, tools and accessories:
- three-chamber seal with a fixing insert made of steel strip,
- disposable pistons for fixing elements,
- silicone or polyurethane tube with a diameter of 8 mm,
- screwdriver with flat and figured slots,
- shaped self-adhesive profile gasket.
You can purchase everything you need at any automotive spare parts store; nowadays you can choose between products from different companies. Seals are mainly sold by the meter or in ready-made kits. Before going to the store, you should measure the length of the openings of the front and rear doors of the car, and buy the required quantity.
Replacing the sealing element on a VAZ 2110
Preparation for interior sealing work
The front and rear doors of the VAZ 2110 have a similar design of the points of contact with the openings and, for the purpose of unification, they use the same sealing rubber profiles. Before starting repair work, you should prepare all the necessary materials and accessories . The order of preparatory operations is as follows:
- We clean the doorway from dirt, especially in its lower part; this can be done using water and detergent or dry using a stiff polymer brush.
- Using a flat-head screwdriver, remove the plastic facing panel from the threshold; perform this action carefully so as not to accidentally break the fastening caps.
- We dismantle the old seal, simply removing it from its expired place using improvised means.
- We repeat the operation to remove dirt and debris, which invariably accumulates in hidden cavities during intensive use of the machine.
- The shaped side sealing element is glued, and it should be removed as carefully as possible without damaging the paint layer.
- Degreasing of expired areas is carried out using special solvents that do not harm coatings.
The working surfaces are prepared, and you can begin to perform the basic operations of installing the seal. These are fairly simple actions, but they also require a certain skill. If you are not confident in your abilities, then you can entrust their implementation to professional craftsmen. You can watch the video and try to do the work shown on your own.
Installation of sealing elements
First of all, you need to perform a few simple steps to modify the standard seal. As already mentioned, factory parts have a short lifespan and quickly deform. Introduction of an additional shock-absorbing part into the cavity. The sequence of work is as follows:
- Using a tape measure, measure the length of the seat and cut off the required amount of seal with a small margin.
- We insert a polymer tube inside along the entire length without tension and also cut off the excess. This element will give greater elasticity to the structure.
- We begin to put the seal on the edge from the starting point, which should be located 25-35 cm from the bottom of the threshold. Installation can be carried out either clockwise or in the opposite direction.
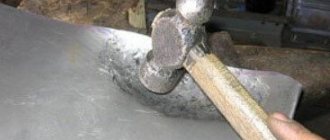
- We push the figured profile down using a wooden or rubber hammer until it stops. Having walked around the entire circle, we will see that part of the seal turns out to be redundant.
- We cut off the unnecessary remainder so that the joint is without a gap and at the same time causes deformation of the adjacent areas.
- We install the piston in place and mount the plastic lining in place.
- The second contour is glued along the edge of the door. We carry out this action with all possible care so as not to have any peeling or irregularities in shape.
The installation is completed and if it is done correctly, then when the doors are closed, a change in the nature of the sound is noted, it becomes more dull. In addition, metallic knocking in locks and aerodynamic noise when driving at high speeds disappear.
Advice: As practice shows, VAZ spare parts with such an improvement provide reliable sealing of the interior.
What to choose?
Sometimes you are amazed at the imagination and thoughts of those who are trying to save money on car repairs. If we talk about rubber seals, some advise using drip tubes instead, others go the other way, inserting window seals.
Do not follow such advice under any circumstances. They won't lead to anything good.
There are several truly correct and effective options, which we will introduce you to using the table.
| Option | Peculiarities |
| Ready-made kits from the manufacturer | They are designed specifically for the VAZ 2110 model. These are mass-produced rubber bands that fit perfectly on the dozen doors. Their design is double-circuit, which allows you to install additional seals if necessary. |
| Measuring rubber bands for VAZ | In stores you can purchase ready-made or soldered seals for each door. Or a solid tape, from which they will cut you a piece of the required length |
| Seals from Priora | Experts believe that these are the most effective and reliable seals. This is due to the three-chamber design with a steel fixing strip and high quality. These elastic bands do not wrinkle and keep their shape perfectly. |
| Rubber bands from GAZelle | A frequently encountered option that has similar characteristics to the standard elements for the dozen. The price is about the same |
When choosing the length of the required piece of seal, measure the internal length of the installed rubber bands on both doors separately. Take it with a reserve, because you can always cut off the excess.
The fixing elements should be caps and high-quality, effective glue. When purchasing the rubber itself, they will tell you which glue is best to use.
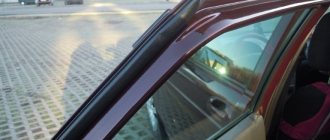
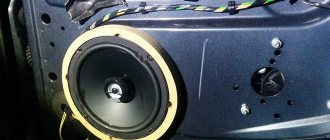
Replacing glass frame seal elements
External polymer elements are gradually destroyed under the influence of moisture, solar radiation and dust and need to be replaced. The step-by-step guide for replacing seals is as follows:
- dismantling old elements using a screwdriver, being careful not to damage the coating,
- removing dirt under the old linings and wiping the seats with a rag,
- We install new seals in place, while trying not to hit or apply much force.
Having completed all the work on one door, we move on to the next one, considering that their design is similar, then there are no special features in them. This is how we consistently eliminate natural ventilation of the car interior. Photos with step-by-step operations allow you to perform all actions quickly and get good results.
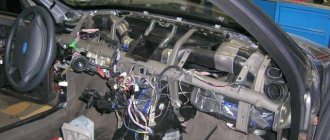
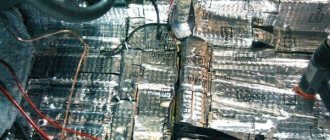
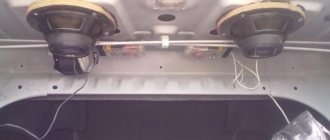
Additional operations to eliminate noise in the VAZ 2110 interior
Statistics show that the majority of drivers of Russian cars are not satisfied with the increased noise in the car. This is caused by the use of low-quality rigid polymer materials and insufficiently reliable fasteners. Therefore, reassembling the interior of even a new car is the most frequently requested service at many service stations. All work can be done with your own hands if you carefully study the instructions for carrying out the entire necessary cycle. The body can be properly isolated from extraneous noise only through complete disassembly . The panels are removed, and polymer or sponge inserts are glued in the places where they meet, which will prevent knocking or other sounds from occurring. The price of materials and work is relatively low, so the total cost of work will be acceptable.
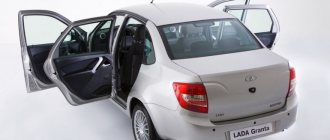
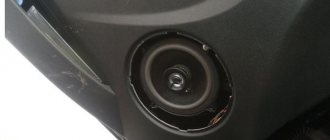
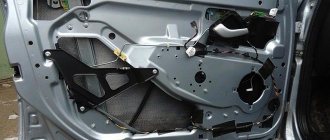
View of the improved doorway of the VAZ 2110
A car improved in this way becomes more comfortable and convenient to use, both in the city and on the highway. A high-quality replacement of the VAZ 2110 door seal eliminates aerodynamic noise and moisture leakage during precipitation into the car interior.
Removal
When you have purchased the required number of seals, you can begin to work.
The first step is to remove the old rubber elements, after which the installation of new parts begins.
Let's tell you more about the dismantling procedure.
Upcoming work
Installation
This process cannot be called complicated. You are not required to have any special training or extensive experience. Although you should at least be able to handle glue.
Working with the back door
Each stage is performed consistently and carefully to achieve the desired result and create comfort inside the cabin.
Almost immediately you will feel the difference between the old and new seal. This is a useful exercise that allows you to get rid of unpleasant sounds, knocking, whistling and cold air flowing directly onto your feet.
Additional measures
Some car owners believe that the efforts of standard seals are not enough to provide the necessary comfort and silence in the cabin. Therefore, they decide to install additional rubber bands.
An additional seal is installed only if the old ones are worn out, but you do not want or cannot replace them completely. If you replace rubber bands, there is no need to install additional elements.
Thermal insulating tubes, which are used in refrigerator designs, often act as additional seals. The material is somewhat similar to black foam rubber, only its density is higher.
Sometimes an additional element is the seal used for the windshield. Although from a practicality point of view this is not the best option. This is explained by the difficulty of finding material and the inconvenience of installation - the material is difficult to adhere to, and it is difficult to achieve a high joint density.
Regardless of the material chosen, the installation procedure always looks approximately the same:
The presence of seals makes driving your car more comfortable and enjoyable. These rubber bands have a positive effect on the level of sound insulation. This is important, given the effectiveness of the standard Shumka provided for the VAZ 2110.
Source
Tools and materials
In order for the replacement of the VAZ 2110 windshield to be as high-quality as possible, you should prepare a set of necessary tools, as well as some chemicals.
To work, you will definitely need a new glass to replace the damaged one, and a mounting string with two handles. You should also prepare a repair kit - it is necessary for gluing the windshield. This kit must contain a special glue - “Sicaflex”, “Dinitrol” or “Terasol”. You will also need a primer, without which special glue cannot be used - this is a primer. An activator is also needed. It is used to glue glass. Additionally, for degreasing you will need white spirit, a plastic spatula and plumbing tools. It should be noted that replacing the windshield of a VAZ 2110 alone is almost impossible - experts recommend using help.
Necessary tool
To ensure that the replacement of the VAZ 2110 windshield goes smoothly, you should get a gluing kit. When purchased through an online store, the TEROSON PU kit will cost approximately 1,150 rubles, but it will quickly pay for itself. Its composition:
- adhesive-sealant 8596;
- cartridge nozzle;
- primer;
- applicator;
- surface cleaning cloth;
- cutting string;
- instructions for use.
In addition, you need to have other devices on hand:
- a set of flat screwdrivers and spatulas;
- several stationery knives;
- solvent for nitro paint;
- new consumable.
With an assistant, changing a part is easier and faster.
Price is not a guarantee of quality! But you shouldn’t take the cheapest materials either: fakes are not uncommon.
How to install
The installation procedure should not cause problems, since it is quite simple and even a beginner can perform it. Although you still need to know how to use glue. It is also necessary to install the seal carefully and carefully, this will allow you to achieve comfort in the cabin for a long time.
To correctly install VAZ 2110 door seals , the following steps should be taken:
This procedure will significantly improve the noise and sound insulation of the car interior.
After installing the new seal, passengers and the driver will immediately feel changes for the better. Extra noise, whistling, knocking will disappear. It will also become warmer, since cold air will no longer penetrate inside and blow through your feet.
Installation
This work, in principle, is not too difficult; it can be done even without special training. Just take into account that the installation of the seal and the simultaneous modification of wind and noise insulation must be carried out carefully and meticulously, then you will ensure greater interior comfort for several years to come.
The installation is carried out according to the following algorithm:
Almost immediately when closing the door you will hear a softer dull sound. And while driving you will not hear annoying noises and whistling of the cold wind penetrating inside. After a while, you see, you will forget about the pain in your previously cold left knee.
Types of damage
The structure of the windshield is triplex - an impact-resistant material in which there are two layers of glass and a thin film in the middle. This allows the spare part not to crumble upon impact.
Masters divide damage into two types:
- Chips. Only the top layer was damaged. No immediate replacement is needed.
- Cracks. In this case, supply new material as quickly as possible. The film holds the fragments, but not as firmly as before, and in case of potholes, which are not uncommon on our roads, they will fly apart. This will lead to an accident.
If you can’t change it soon, you can resort to several tricks:
- Make perpendicular cuts along the edges of the “web”.
- Drill holes with a diameter of 5 mm along the edges of the crack.
- “Brew” the damage.
All measures will give a temporary effect, and the spare part will still need to be replaced.
The role of product quality
Rubber bands are expensive, so drivers are looking for a homemade method that will tell them how to seal a car door with their own hands. The durability of rubber inserts directly depends on the quality of the material. Automotive manufacturers created them from durable raw materials. Only the highest grade rubber with good density and wear resistance is used. The diameter and cross-section of the inner metal tube is at least 8 mm. Over time, the internal element collapses, so they try to replace it with another material that will provide elasticity.
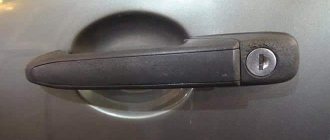
A little about moldings
Spectacular car body decoration
Moldings are plastic or rubber linings, also called stickers, that give the car an aesthetic appearance. In addition, the moldings also have a protective quality: when installed on doors or bumpers, they protect these areas from impact and abrasions. You remember this with special gratitude when you unsuccessfully emerge from a crowded parking lot. Usually, after such trips, very unpleasant scratches remain on the doors and sides, which have to be painted over at a car service center, paying an N amount for painting.
Recently, Kalina moldings have become popular, as drivers want to give their car a more charismatic look, removing that domestic laconicism of the image, which has never been a winning solution. First you need to get good, high-quality moldings for Kalina, which can be bought in car dealerships, on the market, from dealers or even on the Internet. The main thing is to check the quality: there should be no microscopic cracks or abrasions on the stickers.
It is safer to buy from dealers: you have confidence that they will not sell low-quality goods. However, there is one “but” here - dealers only sell unpainted moldings, and it’s better not to paint it yourself, since if done inappropriately, you can ruin the whole look. To paint parts at a car service center will cost approximately 1,000 rubles. By purchasing painted moldings, you will eliminate running around to car services and unnecessary expenses.
Tuning Kalina station wagon
Tuning starts with the wheels. The station wagon comes complete with stamping, which is reliable, durable, but heavy and unsightly. If you are not going to drive Kalina through the impassable wilds of the Siberian taiga, then it would be good to install alloy wheels. True, they are not as reliable and practical as stamped ones, but they are much more beautiful, and it’s up to you to choose. Alloy wheels give Kalina a sporty look.
Some extreme drivers who love the impossible sometimes try to lift the Lada and put wheels of a different size on it. But this maneuver is good for an SUV and disgusting for the modest, fragile Kalina. It is not designed to be fitted with fifteen-inch rims instead of standard wheels. In this case, it will lose some of its controllability, the car will skid when cornering, and a whole bunch of problems will arise that you don’t need. Therefore, it is better to settle for small things, but without sacrificing quality.
It’s hard to imagine a good station wagon without moldings and other bells and whistles. The appearance of the car improves noticeably if you install some original spoilers, replace bumpers, and install moldings with a fantastic color. In general, the field for imagination is huge.