Hello! Let there be light
, I decided a long time ago, but somehow I didn’t get around to it... I connected the DRL-30 and got to the tidy... well, let’s relight it, since I got in)) off we go...
I took it off, took it apart, took a photo to remember the position of the arrows... what's the point in this, it doesn't help, then I set it up all day (((
I took off the arrows, turning them counterclockwise, everything came off as normal, only the fuel level was fluctuating and didn’t want to be removed, I pry it off with two screwdrivers... it flew to the ceiling and came off))
I carefully peeled off the backing, it came off easily and without damage, I have no complaints about it))
I started cleaning off the green filter... I cleaned it off with a knife and a utility knife blade
I thought this would be the most difficult and dangerous stage, I screwed up the backing on the climate panel at this point - how wrong I was... the backing on the dashboard is fine, everything is cleaned well, slowly but surely... and the green light filter turns into dust.
further along the arrow... I cleaned the paint with a utility knife, everything came off neatly, and they didn’t put much effort on it either...
initially I wanted them in red, but I discovered a non-separable display, I didn’t want to solder it, so it was impossible to remove the light filter ((( I decided that the blue LED would break through the green light filter, so the arrows would also be blue... I bought blue SMD 5050 kolkhoznik diodes, damn... there were red ones take it as I wanted... I regret it now... so I painted the hands blue... it turned out to be some sad crap, not very good (no photo, I vomited at the sight of them)... cleaned it again and repainted it white... it’s even more interesting, they are white during the day and blue at night ))
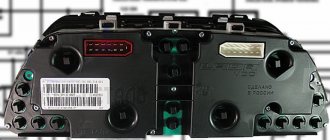
The display turned out to be not removable, bitch, in the photo you can see how many contacts are holding it... desoldering it is not an option ((but I wanted to overexpose it, ideally do an inversion... oh, life is a pain...
Sadness aside, I took a knife, cut off one wall (then I completely unsoldered it to insert a piece of diode strip for illumination) and took out the green diffuser, this is where I regretted buying blue diodes...
A new diffuser was made from a translucent plastic matte canister and inserted under the screen. I illuminated it with three SMD 3528 4300K diodes from the tape, glued it to the board under the screen, it’s enough, it lights up more or less equally.
And then I got kind of depressed, my phone died and in general the tidy really stressed me out, I thought everything would be easier ((
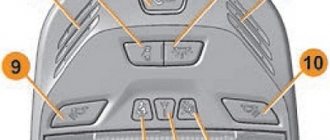
Central deflectors of the heating and ventilation system
1 — handwheel for adjusting the flow intensity through the deflectors (when rotating up, the damper opens, down, it closes); 2 — lever for adjusting the direction of air flow left and right. The direction of air flow through the deflector is adjusted up and down by pressing on the top or bottom of the deflector.
Tuning the Priora instrument panel mainly consists of connecting additional lighting and installing several color inserts inside the device. No specific replacement of parts is required, nor is the installation of expensive new items required. How to implement a budget tuning option?
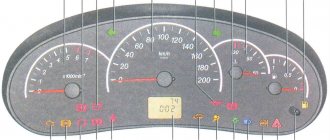
Lada Priora became the first VAZ model to use a new type of material for the dashboard. “Soft look” plastic has a visual similarity to leather, so the console looks quite solid. The dashboard includes all the most necessary devices to inform the driver:
- tachometer;
- speedometer;
- fuel sensor;
- oil quantity sensor;
- There are many small indicators on the instrument panel: turn, lighting, reserve fuel, etc.
In fact, the dashboard is fully equipped and does not require any technical modifications or installation of additional sensors. Then the next question arises: is it worth redoing the instrument panel at all? If you are quite satisfied with its appearance, leave everything without modifications. But if you are going to remodel the interior, then changes will be required for the instrument panel. You can change its color, strengthen it a little, change the lighting of the devices. In addition, you can add a few details for yourself. For example, highlight the most important indicators in a certain color - the amount of gasoline, the speed of the car, so as not to search for them throughout the entire panel.
Glass tinting
Glass tinting is an elementary type of tuning the panel of a Lada Priora. The film is attached to the outside of the glass. You can use film No. 15 or any other depending on the driver’s preference. The main thing is to choose the right shade to make the glass look good. American film, which often has a reddish tint, is not suitable for every interior.
The film is applied as usual - we degrease the glass using any dishwashing detergent, Fairy and others will do. We apply the film and cut it, paying special attention to the edges. It is better to cut off the edges so that the film does not start to bubble after installing the glass in place.
Tuning the Priora dashboard using LEDs
Dashboard supervision in Hyundai Solaris
806
Lada Priora, in comparison with other models of the AvtoVAZ concern, is distinguished by a more attractive and high-quality dashboard, finished with good “Soft Look” plastic and a good instrument cluster. However, the owners of these cars are seeking to change some elements of the dashboard and make the interior brighter and more stylish.
1 Tuning the instrument panel on the Lada
Upgrading your dashboard usually starts with installing new lighting. To do this, you will need a set of tools, namely screwdrivers and keys, as well as reflective foil and LED strips. At the first stage, the dashboard is dismantled. This is done by hand using a Phillips screwdriver. To do this, you do not need to remove the steering wheel; you just need to move the steering column to the lowest position.
Then, following the instructions, disassemble the device. At the second stage, it is necessary to carefully separate the cover from the main glass and disassemble the dials and hands. The easiest way to improve the dashboard lighting is to remove the standard coating from the numbers on the trim. Thus, with normal backlighting, the numbers on the instrument panel will have a bright white glow.
Another simple and inexpensive option for tuning the dashboard is to stick multi-colored inserts made of loose cellophane, which must be glued to the back side of the panel removed from the glass. This will change the color on the speedometer and temperature scale. However, more serious tuning involves installing additional lighting or completely changing the standard lighting.
2 10 LEDs to change the backlight
To improve or change the lighting on the dashboard, after removing it, you need to stick on pieces of LED strip. They must be glued along the entire perimeter of the tidy, at the same distance. In this case, the most important condition is to maintain polarity when connecting the diode strip and standard power wiring. Next, you need to carefully disassemble the display and remove the green light filter from it.
This will make the display backlight bright white. However, if you want to get some other color on the display, you can purchase a filter of any color - as a rule, they are sold in specialized stores. Some Priora owners, when completely changing the backlight, also change the backlight of the main speedometer needle. To do this, use LEDs of the color to which you want to change the arrow illumination. Ten CMD LEDs will be enough. 3 LEDs for the speedometer and tachometer, three more for the engine temperature scale and fuel consumption indicator.
It is best to fix the LEDs with a blowtorch, soldering them into the main glass on the instrument panel. At the same time, do not forget about the need to connect the standard wires on the reverse side, observing the polarity. If you follow all the rules of the instructions and have the necessary tools, making such changes yourself will not be difficult, but the result will certainly please the car owner.
3 Protect the console - paint and polyurethane
After a certain period of operation of the VAZ Priora model, unpleasant sounds may appear in the cabin - a creaking or knocking somewhere inside the console. To avoid this, experts recommend dismantling the console's facing panel and applying an additional layer of polyurethane or modelin coating to the main body. This will get rid of unpleasant creaking and extraneous noise in the cabin.
In addition, a popular area of interior tuning for a Priora is painting the center console in a different color.
To do this you will need a can of spray paint and plastic primer. Remove the center console, following the instructions and remembering to turn off electronic devices, radio, power to the stove, clock, etc. Next, apply a thin layer of primer to the plastic console, let it dry for several hours, then apply spray paint over the entire surface of the console. The color is up to you and only you, but after changing the instrument panel lighting and improving the appearance of the center console, the car's interior will become more attractive and sporty.
https://youtube.com/watch?v=CSgh75RlPdc
806
When is pinout required (device chips) and how to do it
All car parts fail sooner or later. There are times when they need to not only be repaired, but replaced. The instrument panel may also break, causing it to be removed and a new one installed in its place. This work is easy to do with your own hands if you have at least the slightest knowledge of mechanics. If you are well versed in your Priora (sedan), then you need to perform the pinout in this way:
- First, the dial hands are removed using a regular knife.
- Next, the gasket in the speedometer is scraped out to replace the backlight.
- If there is no need to change the sensors, you can simply remove them and clean them.
Very often, motorists cover the panel with a special LED strip to achieve even lighting. You can also use CMD diodes, which can be easily fused into glass with a soldering iron. To do this, you need to disassemble the dial and solder diodes directly under the base of the hands. If you understand the purpose of all the contacts, and also know the purpose of a particular connector on the panel, then you can easily do the pinout yourself. The main thing is to carry out everything strictly according to the instructions so that the connection is successful and the panel continues to function efficiently. If you know which is better to install a tidy: with a canbus or a regular one, then it’s better to ask professionals who understand this. If you have no experience in such work, and you do not understand the purpose of certain wires, then the technical service will help you improve the operation of the instrument panel. Of course, you will have to pay for this, but you will not waste your time, and the work will be done efficiently.
Read with this
- VAZ Priora (Lada 2170)
- Troubleshooting low beam lamps on the Lada Kalina
- Types of car lamp bases and their markings
- Which car LED lamps to choose in 2022
- Selecting low beam bulbs
- VAZ 2110 removing the torpedo
- The principle of operation of xenon headlights in a car
- Xenon lamps for cars: d2s, d1s, h4, h7, hb4
- Owner reviews of the “robot” (AMT) on Lada cars, overall rating
- How to replace a side light bulb: step-by-step instructions, features and recommendations
Removal and replacement
Pinout of Lada Priora comfort block
So, if you are firmly convinced that the Priora instrument panel is faulty, it must be removed for replacement
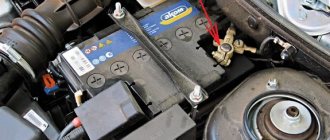
This operation must be carried out very carefully so as not to damage the trim housing and the wires running under the instrument cluster. First of all, according to the rules, it is necessary to disconnect the battery when performing any work on electrical equipment.
In this
In this case, this action also makes sense, since the instrument panel ECU is under constant load to save the parameters. Therefore, you should first disconnect the battery terminal. After this, in the cabin, begin dismantling the device. First, remove the panel under the steering column covering the fuse box. It is held in place by three decorative plastic locks. By turning them half a turn, you can remove it. After this, remove the four screws holding the instrument panel trim panel. Now the combination is completely open.
Now you need to unscrew two more screws holding it and remove the panel. Carefully turn over. Move the connector latch to the side. With this action, it will partially come out of the groove. Now completely disconnect the part and put it aside. If the panel only needs to replace the lamps, then this is quite simple. They come immediately in special plastic nests when sold. On the device they are located in small wells, with the plastic end facing up. Just grab it and turn it a quarter turn counterclockwise. The lamp will immediately fall out. At the end, you need to insert a new one in its place, and turning it clockwise, fix it.
Replacing the panel
Before you put the new panel in place, you should make sure that power is supplied to it correctly. To do this, you will need a test lamp, with the ability to check both the “+” and “-” contacts. You need to know that on the 19th contact of the block there is a common “minus” of the device. Or as they say - “mass”. On pin 20 there is a constant plus from the battery, and on pin 21, a “plus” appears when the ignition is turned on. These connector sockets should definitely be checked before installing a new combination. And after the contacts have been checked, you can connect a new panel to the connector and check it by turning on the ignition. If everything is fine, you can install it in place. Hers or the old one, if it was only necessary to change the light bulbs. You can install the instrument cluster on the “Priors” panel by doing everything in reverse order.
Features of the Gamma instrument panel
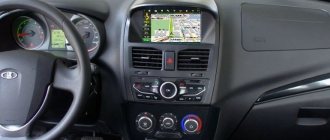
The latest models of Priora cars are equipped with a factory navigation system. And in this case, a model called “Gamma” is installed. But do not assume that this is a well-made toy, suitable only for a car with
navigation. No, it installs perfectly on earlier versions of Priora. Since there is practically no need to change anything in the wiring. The only modification: run one wire to the car's diagnostic connector! But this will allow the driver, in addition to the stunning design, to have before his eyes the car’s on-board computer with many functions, including reading error codes from the main Priora ECU. In general, although it is an expensive thing, it is worth the money. In the video, removing the Priora instrument panel:
- DIY muffler resonator
- Lambda probe "Priors"
- Features of the knock sensor on the Priora
- What is a speed sensor on a Priora?
Is it possible to install LED lamps?
Instead of conventional dashboard lamps, some owners install LED ones. The advantage of them is that they provide brighter light and you can choose lamps of different colors. However, some LED lamps are longer than conventional lamps, so when installed in the instrument panel, they fit closer to the light filter and create a bright spot. But at the same time, the panel itself and the indicators become brighter.
Advantages of LEDs in the shield
- brighter light, allowing better illumination of devices
- Possibility of choosing lamps of different colors at will
- longer lifespan of quality LEDs
Minuses
- Too bright LED lamps create glare on the panel, which does not look very good
- sometimes the panel looks too bright and distracts from movement
- The bright light of the panel can cause eye fatigue
When installing LED lamps in the instrument panel, brightness adjustment does not really work due to the fact that the diodes consume very little energy and therefore, unlike conventional lamps, do not lose brightness when the current supply is reduced.
The ignition key can be in one of three positions
Priora front suspension tuning
0 — “off”; I — “ignition”; II — “starter” In the lock position “0” — “off” the power circuits are energized: side light; lighting of the interior, glove compartment and trunk; brake signals; sound signal; central lock; hazard warning lights. The key can only be inserted and removed from the ignition switch in the lock position “0”. When the ignition key is removed, the anti-theft locking mechanism may be activated, blocking the steering shaft. To lock the steering shaft, turn the steering wheel left or right until the locking element clicks. To unlock the shaft, insert the key into the ignition lock and, slightly rocking the steering wheel left and right, turn the key to position “I” - “ignition”. When the key is in position “I”, along with the above consumers, the power circuits are energized: elements of the engine control system; instrument clusters; headlights; direction indicators; fog light and reversing light in the rear lights; windshield wiper and washer; heater; electric door windows, heated rear window elements, electric drives and heated exterior rear-view mirrors. In the lock position “II” - “starter”, the starter is turned on. The key position is not fixed. Immediately after starting the engine, release the ignition key and it automatically returns to position “I”. If the first attempt fails to start the engine, turn off the ignition and, after waiting about 30 seconds, try to start the engine again. Hold the key in position “II” for more than 10 is not recommended, since this can lead to overheating of the starter motor and its failure. The ignition switch is designed to block an attempt to start an already running engine, which does not allow turning the key a second time from position “I” to position “II”, bypassing the “0” position. If the driver’s door is opened when the ignition is turned off and the key is left in the ignition switch, the buzzer emits a continuous sound trill, warning about the key being left in the ignition switch. If the key is removed from the ignition switch, but the side light remains on, then when When the driver's door is opened, the buzzer emits two intermittent beeps, warning that the exterior lighting has been left on.
Electronics LadaPrioraTuning
Electronic components for tuning Lada Priora are presented: instrument panels, on-board computers, parking sensors, angel eyes.
Compatibility - BOSCH M1.5.4/MP7.0/M7.9.7/17.9.7 - January 5.1/VS 5.1/7.2/M7.3 (Euro-3)/M74 Graphic display 128×64 Type: TFT indicator 65535 colors Resolution ( pixel) 480×272 Diagonal: 4 inches More details…
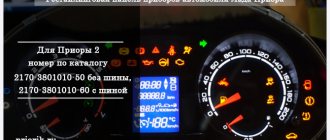
The new instrument cluster for Lada Priora, Lada Kalina, Lada 2110 cars with the new GF 821 panel was developed taking into account the wishes of users of the first generation FERRUM dial instrument cluster More details...
Instrument cluster Gamma 819. Relieves the user of unnecessary body movements. To view parameters and diagnose vehicle systems, the combinations are equipped with a vertically oriented LCD display. More details...
Instrument cluster Gamma 819 Black. Compatibility – BOSCH M1.5.4/MP7.0/M7.9.7/17.9.7 – January 5.1/VS 5.1/7.2/M7.3 (Euro-3)/M74 Indicator type and color Graphic display 128×64: – Black background , white symbols Read more…
Instrument cluster GF619. Upgraded Instrument Cluster GF618. Shows parameters of electrical accessories, power steering, airbags, ABS. Added a motion alert function with low beam headlights turned off or with active More details…
Adapter for installing instrument clusters from any manufacturer on Lada cars with a CAN bus (manufactured after 2013). Read more…
Instrument cluster FLASH X4 for Lada Priora. Pointer and digital indication of speed and engine speed LED RGB backlight (allows you to choose more than 32,000 colors) More details…
On-board computer Gamma 270 for Lada Priora. Compatibility - BOSCH M1.5.4/MP7.0/M7.9.7/17.9.7 - January 5.1/VS 5.1/7.2/M7.3 (Euro-3)/M74 Indicator type and color Graphic display 132×48: - LCD blue background, white backlight Read more…
On-board computer Gamma 777. Compatibility BOSCH M1.5.4/MP7.0/M7.9.7/ January 5.1/VS 5.1/7.2/M7.3 (Euro-3)/ Indicator type and color Graphic display 256×64: OLED, yellow backlight ; OLED, blue backlight Read more…
The best Angel Eyes for Lada Priora. Easy installation, long service life (50,000 hours). They also perform the function of Daytime Running Lights. Excellent visibility in any (even the sunniest) weather. Read more…
Parking radar AME-102 Automatic activation when reverse gear is engaged Color and sound indication of the distance to an obstacle indicating the direction 4-stage audio warning of approaching an obstacle More details...
Lada Priora seats
The front seats are equipped with head restraints and are equipped with mechanisms for moving the seat longitudinally and changing the tilt of the backrest. To adjust the position of the front seat in the longitudinal direction, pull up the lock lever located under the seat.
While holding the lever, move the seat forward or backward, release the lever and make sure that the seat is securely fixed.
To change the tilt of the seat back, rotate the handle.
It is prohibited to adjust the position of the driver's seat while driving, as this may lead to loss of control of the vehicle. The headrests of all seats are height adjustable. To raise or lower the front seat headrest, pull it up or lower it to one of four fixed positions.
To remove the headrest, with a sharp upward movement we remove its posts from the holes in the back of the seat. In order to adjust the position of the rear seat headrest... press the latch on the right headrest post and move the headrest to one of two fixed positions. To remove the headrest, press the post lock and move the headrest up until its posts come out of the holes in the seat back.
Ideas for tuning and modifying the shield
How to tune the shield:
- Instead of a standard shield, install a more advanced one, with a navigator. In such devices, the arrangement of indicators and sensors will be different - the sensors are located on the right and left, and in the middle there is a navigator display. This tuning option is considered one of the most expensive.
- Install ready-made or develop your own scales for sensors. To implement this idea, you will need to completely remove the tidy and disassemble it, as well as disconnect the arrows from the sensors. The scales are installed on existing sensors and are securely fixed.
- Use of LEDs in lighting. The device will also have to be disassembled, but here the method is simpler. You don’t have to remove the arrows, you just need to turn off the light bulbs on the device and dismantle them, and then replace them with new ones. If the base of the light sources does not match, the lamps will have to be soldered. Alternatively, instead of light bulbs, you can solder an LED strip.
- Paint the dials and gauges of the instrument panel with fluorescent paint, but for greater effect, again, you will need to install diode lamps. With this combination, the tidy will glow brightly, but keep in mind that the implementation of this method requires care and painstakingness from the car owner.
Instructions for replacing the tidy yourself
The procedure for removing, disassembling and replacing the control panel can be carried out on your own; there is nothing complicated about it.
How to remove the PP:
- First of all, turn off the ignition, and then disconnect the battery from the power supply.
- For greater convenience, you should remove the steering column cover, and also dismantle the steering wheel itself.
- After this, using a screwdriver, you need to unscrew the two screws that secure the upper part of the tidy.
- Next, two more screws are unscrewed, only now from the bottom.
- There are two more screws on the sides of the control panel; they also need to be unscrewed.
- After this, you can pull the tidy towards you, but do not remove it completely. Since wires are connected to the device, you need to disconnect the connectors on the back side, and then release the latch.
- The PP is removed and replaced with a new one. Assembly steps are carried out in reverse order.
Changing the instrument panel lighting on a Priora is quite simple.
| Removing the instrument panel from the car | |
| Unscrew all the fastening screws and disassemble the instrument panel | |
| We remove the instrument arrows. We place a business card or credit card under the arrow (so as not to scratch the instrument panel), and, using a knife to hook it under the base of the arrow, pry it off the axis | |
| All arrows are removed | |
| Remove the instrument panel trim. But the overlay is on a plexiglass base | |
| Therefore, we separate the overlay from the plexiglass base | |
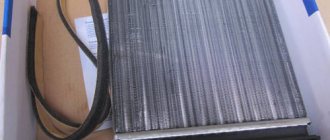
| I decided to change the instrument panel lighting from green to white. Using a knife blade, carefully remove the green coating from the back of the lining | |
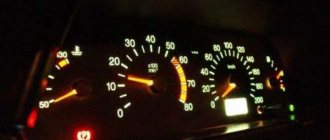
| You can see the difference between the green and white illumination of the instrument panel; some of the symbols have been cleared of green dust | |
| Priora instrument panel completely cleared of green coating | |
| To change the backlighting of individual elements, a plastic bag with colored inscriptions and drawings is useful | |
| Cut out the required colored piece from the plastic bag... | |
| ...which we glue onto the dashboard trim on the back side | |
| In the same way we make yellow on the speedometer and blue on the temperature scale | |
| As for the backlight, standard light bulbs will not provide uniform illumination of the instrument panel. Therefore, it was decided to install LED backlighting of the instrument panel | |
| We glue pieces of LED strip around the perimeter of the instrument panel scales | |
| We connect the glued sections of the LED strip with thin wires and output power. We connect the power to the contacts of the standard backlight lamp, “plus” to “plus”, “minus” to “minus” | |
| Next, we disassemble the display, remove the green filter, and put it back together. Now the display will also glow not green, but white. If you want to backlight the display in a different color, you can install a light filter of any color (they can be purchased at advertising agencies in the city) | |
| Next, it was decided to improve the illumination of the instrument needles. You will need red CMD LEDs, 10 pieces: 3 CMD each for the tachometer and speedometer, and 2 CMD each for the fuel level and engine temperature indicators | |
| You can attach the diodes in any way convenient for you. I simply fused them with a soldering iron into the plexiglass of the instrument panel... | |
| ...and on the reverse side I also fused resistances attached to them | |
| Pilot test, feel the difference! | |
| When using 3 CMD I used resistances with a nominal value of 130 Ohms, when using 2 CMDs I used a resistance with a nominal value of 300 Ohms | |
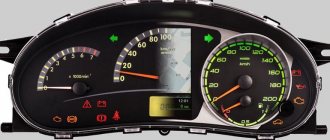
| In the end, I got this result! | |
| Installing instrument arrows | |
| For comparison, this is what the instrument panel looked like without the illuminated arrows. The choice is yours! |
Speedometer adjustment with stop
The procedure for adjusting the speedometer is quite simple; even a novice car enthusiast can do it. To achieve a positive result, you will need a small set of available materials, including a marker, a pencil, thin scissors or, better yet, tweezers, and most importantly, perseverance and desire.
Today, two types of speedometers are known: both with a stop and without, each of which has its own adjustment principle. At the very beginning of work, you should determine the type of speedometer installed in your car; to do this, you need to move the needle beyond the 220 km/h mark; if you can’t move it further, you can conclude that the device has a stop.
Now you can proceed to the procedure for adjusting the speedometer. To do this, holding the instrument arrow in position all the way, you need to make a mark on the glass of the dashboard with a marker (we do not recommend putting marks on the scale, since then it will be impossible to wipe them off).
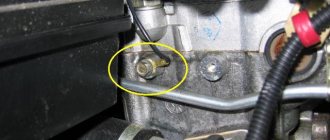
After this, remove the arrow and snap the dashboard glass into place. Rotate the shaft by first removing the nail on the latch.
After this procedure, you should return the speedometer needle to its place, but do not install it tightly. Remember: everything should be done easily, without effort. The arrow should rotate freely, as soon as it reaches the mark made with a marker, try to fix it as tightly as possible. Make sure that it matches the mark; if it does not, the procedure should be repeated again. Having achieved the result, you can snap the nail, lowering the arrow.
Panel malfunctions signs and causes
What malfunctions can occur in the operation of the control panel:
- The backlight does not light up. There may be several reasons - damage to the device’s power supply circuit, a short circuit in the system, failure of the control panel. But one of the most common reasons in this case is the burnout of the safety device. The marking fuse F10 is located in the mounting block; it must be checked first.
- The sensors do not work - the arrows on the speedometer and tachometer do not rise. The reason may be a bad signal coming from the dashboard. It is necessary to check the electrical circuit for breaks. Much less often the problem lies in a failed sensor.
- The controller for the volume of gasoline in the tank and the engine temperature do not work. As in the previous case, the cause of the malfunction may lie directly in the sensors themselves. The fuel volume controller is located in the tank with the fuel pump, and the coolant sensor is located in the cylinder head. Before replacing, we recommend checking the quality of the connection and contacts - perhaps they are simply damaged or oxidized, as a result of which the sensors do not work. The reason may also be a damaged electrical circuit; in this case, you will need to check the wiring.
- It happens that the dashboard as a whole works correctly, but the controllers transmit incorrect information. The reason may lie in the performance of the processor or a short circuit in the wiring. Sometimes the problem lies in bad mass.
- The backlight is partially not working. Most likely, the reason lies in the burnout of the lighting sources; they will need to be replaced (the author of the video is the channel In Sandro’s Garage).
Purpose of the temperature sensor on the pointer
The engine temperature gauge on the Priora is connected to a sensor that is built into the cooling system. It is this element that transmits information about the coolant temperature, which is displayed in a format understandable to the driver. Many people underestimate the purpose of such a device, and if it malfunctions, they are in no hurry to repair it.
And although the temperature gauge sensor does not affect the operation of the engine, it is a very important element that must always be in good working order and display correct information on the dashboard. Using this device, engine warming is controlled, which is necessary for the following purposes:
- Prevent the possibility of engine overheating, which can happen for various reasons: a malfunction of the cooling fan and insufficient amount of antifreeze in the system.
- For controlled warming of the engine to operating temperature, which is especially important in winter. It is strictly contraindicated to drive at high speeds when the engine is not warmed up to operating temperature.
When the engine heating meter on a Priora is faulty, this will not affect the operation of the engine in any way. Such a malfunction can only lead to the fact that if the engine temperature rises, the driver will not be able to react in a timely manner, which can cause serious consequences.