VAZ 1117–2194 (Kalina), equipped with injection engines with electronic control units. The balanced operation of the engine is adjusted by a system that receives impulses from several sensors and controllers. If there is a violation in the circuit, the car loses its performance characteristics, and an alarm signal lights up on the dashboard - Check Engine (check engine). The owner dutifully goes to the service workshop for diagnostics, where he is told: “Your Kalina has a knock sensor failure.” Next, we’ll tell you how to check the sensor yourself and look at the instructions for replacing it.
Signs of a malfunctioning knock sensor
If the DD fails completely or partially, a malfunction of the knock sensor manifests itself according to one of the symptoms:
- Engine shaking. If the sensor and control system in the engine are working properly, this phenomenon should not occur. By ear, the appearance of detonation can be indirectly determined by the metallic sound emanating from a running engine (knock of fingers). And excessive shaking and jerking during engine operation is the first way to determine a malfunction of the knock sensor.
- Reduced power or “dullness” of the engine, which is manifested by deterioration of acceleration or excessive increase in speed at low speeds. This happens when, with an incorrect DD signal, the ignition angle is spontaneously adjusted.
- Difficulty starting the engine, especially “cold”, that is, at low temperatures after a long period of inactivity (for example, in the morning). Although it is quite possible for the car to behave this way even at warm ambient temperatures.
- Increased fuel consumption. Since the ignition angle is disturbed, the air-fuel mixture does not meet optimal parameters. Accordingly, a situation arises when the engine consumes more gasoline than it needs.
- Fixing knock sensor errors. Usually the reasons for their appearance are the signal from the sensor going beyond the permissible limits, a break in its wiring, or a complete failure of the sensor. The occurrence of errors will be indicated by the Check Engine light on the dashboard.
However, it is worth considering that such symptoms may indicate other engine failures, including other sensors. It is recommended to additionally read the ECU memory for errors that could arise due to incorrect operation of individual sensors.
Knock Sensor Circuit Malfunctions
In order to identify DD faults more accurately, it is advisable to use electronic error scanners for the electronic control unit. Especially if the check indicator light on the dashboard lights up.
Often, error p0325 “Open in the knock sensor circuit” indicates problems in the wiring. This could be a broken wire or, more often, oxidized contacts. It is necessary to perform preventative maintenance on the connectors on the sensor. Sometimes error p0325 occurs because the timing belt slips by 1-2 teeth.
Error P0328 “Knock Sensor High” often indicates a problem with high-voltage wires. In particular, if the insulation on them or the piezoelectric element breaks through. Similarly, this error can also occur due to the fact that the timing belt has jumped a couple of teeth. To diagnose, you need to check the marks on it and the condition of the washers.
How to check the knock sensor yourself
Errors p0327 or p0326 are usually formed in the ECU memory due to a low signal from the knock sensor. The reason may be poor contact from it, or weak mechanical contact of the sensor with the cylinder block. To eliminate the error, you can try treating both the mentioned contacts and the sensor itself with WD-40
It is also important to check the tightening torque of the sensor, since this parameter is critical to its operation
In general, it can be noted that the symptoms of a malfunction of the knock sensor are very similar to the symptoms characteristic of late ignition because the ECU, for the sake of safety for the engine, tries to automatically do it as late as possible, since this prevents destruction of the engine (if the angle is too early, then in addition detonation occurs, not only does the power drop, but there is also a risk of valve burnout). So, in general, we can conclude that the main symptoms are exactly the same as with incorrect setting of the ignition timing.
How else can you check DD?
There is another, fairly simple, method for checking the knock sensor. It consists in the fact that with the engine idling at a speed of approximately 2000 rpm or slightly higher, using a wrench or a small hammer, a blow is struck somewhere in the immediate vicinity of the sensor (however, you should not hit directly on the cylinder block, so as not to damage it). The sensor perceives this impact as detonation and transmits the corresponding information to the ECU. The control unit, in turn, reduces engine speed, which can be easily heard by ear. However, remember that this verification method does not always work! Accordingly, if in such a situation the speed decreases, it means that the sensor is in order and no further testing can be carried out. But if the speed remains at the same level, you need to carry out additional diagnostics using one of the above methods.
On some vehicles, the knock sensor operation algorithm is coupled with information about the position of the crankshaft. That is, the motor does not work constantly, but only when the crankshaft is in a certain position. Sometimes this principle of operation leads to problems in diagnosing the condition of the sensor. This is one of the reasons that the rpm will not drop at idle simply because a blow has been taken to or near the sensor. In addition, the ECU makes a decision about the occurrence of detonation not only based on information from the sensor, but also taking into account additional external factors, such as engine temperature, engine speed, vehicle speed and some others. All this is built into the programs by which the ECU operates.
In such cases, you can check the knock sensor as follows... To do this, you need a strobe light, so that with its help, with the engine running, you can achieve the “standing” position of the timing belt. It is in this position that the sensor is triggered. Next, use a wrench or a hammer (for convenience and to avoid damaging the sensor, you can use a wooden stick) to strike the sensor lightly. If the DD is working properly, the belt will jerk a little. If this does not happen, the sensor is most likely faulty; it is necessary to perform additional diagnostics (measuring voltage and resistance, presence of a short circuit).
Also, some modern cars have a so-called “rough road sensor”, which works in tandem with a knock sensor and, provided that the car is shaking strongly, helps eliminate false activation of the DD. That is, with certain signals from the rough road sensor, the engine control unit ignores responses from the knock sensor according to a certain algorithm.
In addition to the piezoelectric element, the knock sensor housing contains a resistor. In some cases, it may fail (burn out, for example, due to high temperature or poor soldering at the manufacturer). The electronic control unit will perceive this as a broken wire or short circuit in the circuit. Theoretically, this situation can be corrected by soldering a resistor with similar technical characteristics near the ECU. One contact must be soldered to the signal core, and the second to ground. However, the problem in this case is that the resistance values of the resistor are not always known, and soldering is not very convenient, if not impossible. Therefore, the easiest way is to buy a new sensor and install it in place of a failed device. Also, by soldering additional resistance, you can change the sensor readings and install an analogue from another machine instead of the device recommended by the manufacturer. However, as practice shows, it is better not to engage in such amateur activities!
Final result
Finally, a few words about installing the sensor after checking it. Remember that the metal surface of the sensor must be clean and free of debris and/or rust. Clean this surface before installation. Similarly with the surface on the sensor seat on the engine housing. You also need to perform preventative cleaning. The sensor contacts can also be lubricated with WD-40 or its equivalent for preventive purposes. And instead of the traditional bolt with which the sensor is attached to the engine block, it is better to use a more reliable pin. It secures the sensor more tightly, does not loosen the fastening and does not unwind over time under the influence of vibration.
Source
Knock sensor in Priora and Kalina
The knock sensor (DS) is designed to detect the occurrence of detonation in the cylinders of gasoline piston engines.
The piezoceramic element of the knock sensor, reacting to vibrations of the cylinder block, sends a signal to the controller.
The controller (ECM), in turn, processes this signal and, in the event of detonation, reduces the ignition timing. In this case, the ignition timing changes for each cylinder separately. This is due to the fact that the temperature of the cylinders, when arranged in a row, is different. The coldest is the first, the hotter is the fourth or last, then the second and the hottest is the third.
From the driver’s point of view, the presence of a detonation elimination system makes it possible, if necessary, to use low-octane gasoline (keep in mind, the controller will assume that you have A-95). Another advantage is maximum efficiency and excellent dynamic properties when using gas-cylinder equipment. Indeed, in this case, you can safely set the maximum acceptable ignition timing for starting, without the risk of running into “knock of fingers” (the popular name for the sound that occurs during detonation).
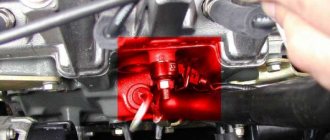
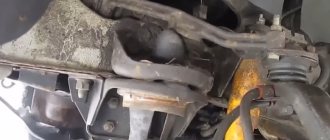
The sensor is mounted on the cylinder block (see photo).
1 — knock sensor on engines 21126, 11194
Knock sensor on engine 21214.
Replacing the knock sensor on a VAZ 2114 - step-by-step instructions
So, after receiving a large block of theoretical information, we will proceed to practical exercises and thoroughly analyze the entire process of replacing (removing) the sensor.
Instructions for 8 valve engine
To perform the work you will need a 13mm wrench or socket.
- We gain free access and unscrew the fastening nut.
- Then disconnect the contact wires from the device connector.
- We extract the part.
Reinstallation is carried out in the opposite sequence. Everything is quite simple.
Instructions for engine 16 valves VAZ 2114
We use the same tools as in the first case. The only addition is the need to remove the internal combustion engine protection and ensure a convenient position and access under the bottom of the car. To do this, you can place the car on an overpass or repair pit. The removal and installation process is similar to the first example.
Mass air flow sensor specifications
The mass air flow sensor is also attached to the top of the cylinder block and covers the air filter inlet. The mass air flow sensor continuously sends signals to the on-board controller, their frequency depends on the amount of air passing through the filter. Failure of this device rarely occurs, but then the behavior of the car can become unpredictable.
The engine may stall and fuel consumption will increase. This is due to the fact that the ECU, without the participation of a sensor, determines the volume of air required for ignition of the air-fuel mixture, based on the crankshaft speed and throttle position. The air flow sensor has a built-in temperature sensor that measures the temperature of the air flow passing through the filter. Signs that the mass air flow sensor is broken are low engine thrust and increased fuel consumption.
If this happens, the mass air flow sensor should be disconnected and replaced with a new one. To do this, you first need to disconnect its connector and start the engine so that the ECU goes into emergency mode. The degree of damage to the sensor can sometimes be assessed by eye
Even in case of symptoms of a malfunction of the mass air flow sensor, you should pay attention to the condition of the inner surface of the pipe on which the sensor is installed. It should be dry and there should be no oil deposits in the pipe
The mass air flow sensor can fail as a result of contamination getting on it, and this happens due to late replacement of the air filter, which draws in many different pollutants from the surrounding air
This is why it is so important to change the air filter on time. The cause of a malfunction of the air flow sensor may also be damage to its sealing ring.
Nevertheless, with all its vulnerability, the mass air flow sensor can serve for a very long time and, if the rules of car care are followed, does not cause problems. By the way, when starting the Kalina engine, you can detect damage to the mass air flow sensor: if the sensor is faulty, the tachometer needle will sway strongly from side to side, and the on-board computer (if installed) will record an increase in fuel consumption.
Jumps in speed, drop in dynamics - this is what threatens a car with a faulty mass air flow sensor. This device cannot be repaired; it must be replaced at the first opportunity. Starting a hot engine with a faulty mass air flow sensor will be difficult, or Kalina will not want to start at all with such a breakdown.
Replacing the knock sensor
If it requires replacement, then it is necessary to purchase a new device and install it as soon as possible. All car enthusiasts are primarily interested in the price of a new device. It is low and depends on the make of the car and on the country in which the part was manufactured.
You can carry out the replacement yourself when the engine has cooled down by disconnecting the negative terminal of the battery. It is necessary to achieve the most convenient access to the sensor so that it can be removed. The fact is that it also depends on the car model.
Thus, the knock sensor is a simple device, yet very useful for an electronic control system. It is not difficult to determine its malfunction; you can check it yourself, even in rural areas.
It will also be inexpensive to replace the sensor.
It doesn’t matter whether this is done by a specialist or independently
Which to choose
Experts recommend buying an original knock sensor; it is suitable for Kalina of the first (8-valve) and second (16-valve) generations. Serial number 21120-3855020-01 or 02. The difference is that the first is produced at AvtoVAZ, and the second at related enterprises. But they are both original.
How to check
Even a new sensor must be checked, as defects may occur. To do this, take a tester and ring the circuit. Turn on the ohmmeter mode. It should be at least 5 ohms. If we switch to voltage mode, we get an operating alternating voltage: U= 0.5−3 V. These parameters indicate the health of the device.
Examination
The sensor can be checked using diagnostics at a service station and using a multimeter. We will consider the second option in detail because of its low cost and independence.
Sensor tester
To check, the sensor must be removed.
- We take a regular multimeter and switch its switch to measure a constant voltage of 200 mV.
- We connect the probes of the device to the sensor and hit the metal part of the sensor with a metal object. The readings on the device should change; if this does not happen, we can conclude that the part is faulty.
DD check
Priora knock sensor 16 valves signs of malfunction
The knock sensor transmits a signal to the on-board computer indicating the frequency and intensity of detonation that occurs during engine operation.
The operation of all vehicle systems is constantly monitored by an on-board computer that receives information from sensors. A malfunction of one of them can become a serious problem that interferes with the normal operation of the vehicle.
During normal engine operation, the knock sensor does not transmit any data to the control unit. But when detonation occurs during engine operation, the sensor transmits a certain signal to the computer, indicating its frequency and intensity. Next, the control unit goes into an operating mode that helps get rid of engine detonation - it sends a signal to change the composition of the fuel mixture and adjusts the ignition timing. After bringing the engine operation back to normal, the sensor “falls asleep” again until the next time.
It is on the basis of the values received from the sensor that the on-board computer adjusts the engine operating parameters, and if the knock sensor turns out to be faulty, then it is often not possible to normalize the operation of the engine.
Operating principle of the sensor
Its design is simple - the sensor is based on a plate with a piezoelectric effect. When there is a mechanical impact on it (impact, as happens when a motor detonates), the plate begins to generate electricity. And the stronger the impact, the more current the sensor will transmit to the engine control system. The magnitude of the current corresponds to a certain level of detonation, and based on these readings, the computer executes an embedded algorithm aimed at eliminating its causes.
A knock sensor error is a consequence of the computer receiving incorrect data, resulting in instability in engine operation.
As statistics show, such a malfunction most often occurs with domestically produced cars - quite often the problem with DD is observed on a VAZ 2112 with a 16-valve engine - for this reason, car owners are recommended to always have a spare VAZ knock sensor on hand, since its cost is within 200- 300 rubles. Foreign cars, in most cases, are equipped with sensors whose service life exceeds the service life of the car itself.
Principle of operation
p, blockquote 19,0,0,0,0 —>
The operating principle of almost all knock sensors is based on the use of the piezoelectric effect. The piezoelectric effect is the ability of certain materials to form a potential difference when exposed to mechanical stress.
p, blockquote 20,0,0,0,0 —>
Most men have used piezo lighters and know that they produce a serious electric spark. Such high voltages do not occur in the knock sensors, but the signal received is sufficient for the engine control unit.
p, blockquote 21,0,0,0,0 —>
p, blockquote 22,0,0,0,0 —>
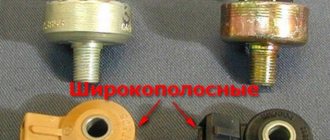
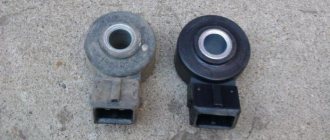
Two types of knock sensors are used: resonant and broadband.
p, blockquote 23,0,0,0,0 —>
p, blockquote 24,0,0,0,0 —>
Design of broadband DD used in VAZ cars and other foreign-made cars:
p, blockquote 25,0,0,0,0 —>
p, blockquote 26,0,0,0,0 —>
Broadband sensors are mounted on the cylinder block in close proximity to the combustion zone. The mount is rigid so as not to damp shock impulses in the event of internal combustion engine malfunctions.
p, blockquote 27,0,0,0,0 —>
The piezoceramic sensing element generates an electrical pulse with an amplitude sufficient for processing by the engine control unit in a wide frequency range.
p, blockquote 28,0,0,0,0 —>
Wideband sensors generate a signal both when the ignition is turned off when the engine is stopped at low speed, and at high speeds while driving.
p, blockquote 29,1,0,0,0 —>
Some cars, for example Toyota, use resonant sensors:
p, blockquote 30,0,0,0,0 —>
p, blockquote 31,0,0,0,0 —>
Such DDs operate at low engine speeds, at which, due to the resonance phenomenon, the greatest mechanical effect on the piezoelectric plate is achieved, and accordingly, a large signal is formed. It is no coincidence that a protective shunt resistor is installed in these sensors.
p, blockquote 32,0,0,0,0 —>
The main causes of detonation knock
Having figured out what this phenomenon is, it’s worth talking about the reasons that cause detonation. Gasoline, its quality and brand (octane number) are of great importance. The lower the last parameter, the less resistance gasoline has to detonation. There is no need to talk about quality; refuel at proven gas stations so that there are no problems. Please note that the knocking noise appears quite often after refueling at suspicious gas stations. True, the VAZ knock sensor, the signs of malfunction of which are discussed in the article, allows you to get rid of knocking in a timely manner.
In addition, one of the reasons for knocking is an incorrectly set advance angle. It is quite possible that the timing belt has moved a few teeth, hence the malfunction. Often the cause of detonation is a poor air-fuel mixture. As a result, the fuel evaporates less and absorbs much more heat. Hence the sharp rise in temperature and the appearance of knocking noises. Such a breakdown can be detected by looking at the spark plug electrodes.
Is it possible to avoid detonation?
- When going uphill at a high incline, select a lower gear or one that will allow the engine to operate between 2500 and 3500 rpm.
- Do not use fuel with an octane rating lower than that recommended by the car manufacturer.
- Check the condition of the spark plugs in a timely manner. During scheduled maintenance, monitor the condition of the spark plug wells and check the compression in the piston.
If there is an on-board computer, an error code will be displayed on it:
- 0327 - excessively low signal level from the knock sensor. Most likely, there is a break in the circuits connecting the sensor to the control unit.
- 0328 - signal level too high. The cause of this error may be a malfunction of the device itself.
The Chevrolet Niva is a very specific car, as it is designed for driving in conditions where there is practically no road. Therefore, any problems with it can simply be fatal. The risk of stopping in the middle of the forest increases several times.
Pay attention to where the knock sensor is located on the Chevrolet Niva. It is located in the center of the engine block
The distance from the sensor installation location to the 1st and 4th cylinders is the same, thanks to this it allows you to capture all detonation knocks that appear in the internal combustion engine.
And in order to eliminate the possibility of detonation, it is enough to follow a few simple rules:
- When you drive your car uphill or off-road, you need to downshift. It is desirable that the engine operates at a frequency of 2500..3500 rpm.
- Monitor the condition of the spark plugs - the quality of ignition of the mixture depends on them. It is better to occasionally check the compression in each cylinder.
- It is not recommended to use gasoline with a low octane number. It is advisable to fill the tank only with fuel recommended by the car manufacturer.
Search
The main symptoms of a malfunction of the knock sensor on the VAZ-2112 valve 16
The knock sensor on the 16-valve VAZ-2112 has the same malfunction conditions as some GAZ, Toyota, Gazelle, Priora and Kalina cars. Replace the knock sensor yourself. Detailed article about replacing the temperature sensor, which replaces the valves of the VAZ-2112 16. 2. Replacing the knock sensor. 16:23. New. Naturally, not every motorist will be able to discover that this is the same sensor, but you can see the direct and indirect causes of the malfunction.
The video provides an overview of the main malfunctions and diagnostics of the wideband knock sensor on the VAZ-2112:
Symptoms of knock sensor failure
Resistance that the sensor must have in good working order
Before looking at the causes, you need to look at the symptoms of the problem. So, let's look at what else can cause the bell to ring when the knock sensor fails:
- The engine is losing power.
- The acceleration potential drops.
- Increased fuel consumption.
- CHECK Dashboard light is on.
- Smoke exhaust.
- Presence of detonation.
- The engine began to flicker.
Of course, an important reason for failure is the knock sensor. this is the fuel mixture, namely the quality of the gasoline itself. The lower the octane number, the lower the resistance to detonation. phase sensor 2110, 2111, 2112 16cl. Where is the phase sensor located? Error p0340. Replacing the camshaft position sensor on a 16 valve engine. If the fuel explodes, it will not burn completely in the engine and you will hear the muffler burning.
Replacing the knock sensor
by car Lada priority
.
Replacing the detonation sensor. Error P0325.
Happy everyday life of an AvtoVAZ owner: trip-repair, trip-repair. Replacing the knock sensor on the valves of a VAZ-2112 16: photo a. Symptoms of detonation of 16-valve VAZ-2112 valves. Change Knock Sensor
Knock sensor diagnostics
The sensor was checked with a multimeter. Replacing valves with the previous 16 valves. In this case, “knock out” the sensor using a screwdriver
To diagnose the knock sensor, it is removed from the engine and a voltmeter with a measurement limit of up to 200 mV is connected to it.
The sensor then “knocks” on a hard surface and looks at the voltmeter. When pressed, the reading should change. If they do not change, the sensor does not work. If they change, then the sensor readings change, but whether they are correct is in question!
ECU fault signal
If the sensor fails, a characteristic knocking sound will immediately be detected. Many motorists simply reset the "negative terminal" to reset the ECU to zero, but it is worth understanding the reasons for this effect and eliminating them. Replacing the timing belt. Previous 16 valves. Let's look at the ECU error codes that signal the output of the knock sensor:
code-0325 hints at problems with the network. Replacing the 16-phase phase sensor VAZ 2112 Replacing the timing belt: previous 16 valves. For example, a break in the wiring or acidification of the plug contacts. In this case, we call the electrical connection of the sensor, clean the electrical contacts;
Error 0325 on the BK STAT screen (knock sensor circuit open)
Knock sensor type
conclusions
It is quite simple to determine the failure of the VAZ-2112 16 valve. The first sign will be electronic errors in the engine control unit and a light in the Check Engine dashboard. Additionally, a simple multimeter test will tell you if the product has truly failed. If the sensor is faulty, it must be replaced.
Source
Post Views: 4
Examination
The sensor can be checked using diagnostics at a service station and using a multimeter. We will consider the second option in detail because of its low cost and independence.
Sensor tester
To check, the sensor must be removed.
- We take a regular multimeter and switch its switch to measure a constant voltage of 200 mV.
- We connect the probes of the device to the sensor and hit the metal part of the sensor with a metal object. The readings on the device should change; if this does not happen, we can conclude that the part is faulty.
DD check
Resistance measurement
Knock sensors, both resonant and broadband, can be checked by measuring changes in internal resistance in dynamic mode, that is, during their operation. The measurement procedure and conditions are completely similar to the voltage measurement described above.
The only difference is that the multimeter is turned on not in the voltage measurement mode, but in the mode for measuring the electrical resistance value. Measuring range: up to approximately 1000 ohms (1 kohm). In a quiet (non-detonation) state, the electrical resistance value will be approximately 400...500 Ohms (the exact value will differ for all sensors, even those of the same model). Measuring broadband sensors should be done by connecting the multimeter probes to the sensor terminals. Next, knock either on the sensor itself or in close proximity to it (at the place where it is mounted in the engine, or, if it is dismantled, then place it on a metal surface and hit it). At the same time, carefully monitor the tester readings. At the moment of knocking, the resistance value will briefly increase and return back. Typically the resistance increases to 1...2 kOhm.
As in the case of measuring voltage, it is necessary to ensure that the resistance value returns to its original value and does not freeze. If this does not happen and the resistance remains high, then the knock sensor is faulty and should be replaced.
As for old resonant knock sensors, their resistance is measured in a similar way. One probe must be connected to the output terminal, and the other to the input mount. It is imperative to ensure quality contact! Next, using a wrench or a small hammer, you need to lightly hit the sensor body (its “barrel”) and at the same time look at the tester readings. They should increase and return to their original values.
It is worth noting that some auto mechanics consider measuring the resistance value to be a higher priority than measuring the voltage value when diagnosing a knock sensor. As mentioned above, the voltage change during sensor operation is very small and amounts to literally a few millivolts, while the change in resistance value is measured in whole Ohms. Accordingly, not every multimeter is able to detect such a small voltage drop, but almost every one can detect a change in resistance. But, by and large, this does not matter and you can run the two tests sequentially.
Where is the knock and fuel level sensor on Lada Priora: signs of malfunction and replacement
The Lada Priora engine is controlled by an electronic engine control system (ECM), which includes a controller and a large number of reading and monitoring devices. The article discusses the Priora fuel sensor and knock sensor, their purpose, location, diagnostics and replacement.
Purpose and location of the knock sensor
During explosive self-ignition in the combustion chamber of the fuel assembly, engine detonation appears. To monitor the occurrence of engine vibrations, a knock sensor (DS) is designed (video author – StarsAutoCom).
The DD is a plastic case, inside of which there is a sensitive piezoceramic disk element that generates an electrical impulse under mechanical influence from the resulting vibrations, and transmits information to the ECU controller. The detonation device is located on the front side of the cylinder block under the intake module.
Location of the device on Priora
Typical faults
If the Lada Priora DD is faulty, the computer will display an error code - 0327. This error is the main reason why the device is changed.
- broken wires;
- damage to the connector with wires;
- failure of the device itself.
The reasons why the power unit detonates may be different. Therefore, to make sure that the cause of detonation is the DD, it must be removed and checked.
How to check and change?
To provide access to the knock sensor, the car should be placed on a lift.
To remove the device, you need to do the following:
- Turn off the power to the car by disconnecting the negative terminal from the battery.
- Next you need to remove the engine protection.
- Having found the DD, you need to press the metal clamp, thanks to which the connector with wires from the controller is held, and disconnect the connector.
- Using a key set to “13”, you need to loosen the bolt securing the device and you can remove the DD.
Photo gallery “Replacing the knock regulator on a Lada Priora”
The knock sensor is checked using a multimeter, setting it to voltage measurement mode. Accurate diagnostics can only be carried out on a special stand.
If the device is faulty, it cannot be repaired; it must be replaced. Installation of a new device is carried out in the reverse order of dismantling.
Purpose and location of FLS
The FLS is located in the fuel module, which also includes a fuel pump and fuel filter.
FLS location
Its main purpose is to monitor the fuel level in the gas tank.
The design of the device includes:
- float;
- dielectric plate with a located rheostat;
- the rod on which the contact slider is located.
FLS appearance
Typical faults
If the instrument panel displays incorrect information about the amount of fuel remaining, the reason may be:
- mechanical damage to the gas tank housing;
- float failure;
- electrical faults;
- disruption in the power supply chain;
- FLS malfunction.
To determine the cause, you need to conduct a diagnosis.
Error p0328
Error code p0328 by definition means that “ the output voltage of the knock sensor is above the threshold value ” (usually the threshold value is 4.5 V). In English it is called Knock Sensor 1 Circuit High. This error is similar to the previous one, but the difference is that in this case it may be caused by a break in the signal/power wires between the knock sensor and the electronic control unit or a short circuit of the wiring section to the ECU to “+”. Determining the cause is made difficult by the fact that such an error occurs much more often not because of problems with the chain, but because of poor fuel flow into the combustion chamber (lean mixture), which occurs due to clogged injectors, poor operation of the fuel pump, low-quality gasoline or phase shift and installation early ignition.
External signs
Indirect signs by which it can be judged that error p0328 is occurring are similar to those described above. In particular, the Check Engine light on the dashboard is activated, the car loses its dynamics and accelerates poorly. In some cases, increased fuel consumption is observed. However, the listed signs may indicate other malfunctions, so mandatory computer diagnostics are needed.
The cause must be looked for by studying the symptoms, and the search itself must be done by removing the connector for connecting the knock sensor with the engine running. It is necessary to measure the reading parameters and observe the behavior of the motor.
Causes of error p0328
The causes of error p0328 may be the following malfunctions:
- Damage to the knock sensor connector or significant contamination (ingress of debris, engine oil);
- the circuit of the mentioned sensor has a short circuit or open circuit;
- the knock sensor itself is faulty;
- there is electrical noise in the sensor circuit (interference);
- low pressure in the vehicle fuel line (below the threshold value);
- use of fuel that is unsuitable for the vehicle (low octane number) or its low quality;
- error in the operation of the electronic engine control system (failure).
Another interesting reason noted by car enthusiasts is that a similar error can appear if the valves are incorrectly adjusted, in particular, they have too much clearance.
Possible troubleshooting options
Depending on what caused the p0328 error, the ways to eliminate it will be different. However, the repair procedures are completely similar to those described above, so we’ll simply list them:
- check the knock sensor, its internal resistance, as well as the voltage it outputs to the computer;
- make an audit of the wires connecting the electronic unit and the DD;
- perform an audit of the chip where the sensor is connected, the quality and reliability of the contacts;
- Check the torque value at the knock sensor seat and, if necessary, set the desired value using a torque wrench.
As you can see, the verification procedures and reasons why errors p0325, p0326, p0327 and p0328 appear are largely similar. Accordingly, the methods for solving them are identical.
Signs of a malfunctioning knock sensor
If the DD fails completely or partially, a malfunction of the knock sensor manifests itself according to one of the symptoms:
- Engine shaking. If the sensor and control system in the engine are working properly, this phenomenon should not occur. By ear, the appearance of detonation can be indirectly determined by the metallic sound emanating from a running engine (knock of fingers). And excessive shaking and jerking during engine operation is the first way to determine a malfunction of the knock sensor.
- Reduced power or “dullness” of the engine, which is manifested by deterioration of acceleration or excessive increase in speed at low speeds. This happens when, with an incorrect DD signal, the ignition angle is spontaneously adjusted.
- Difficulty starting the engine, especially “cold”, that is, at low temperatures after a long period of inactivity (for example, in the morning). Although it is quite possible for the car to behave this way even at warm ambient temperatures.
- Increased fuel consumption. Since the ignition angle is disturbed, the air-fuel mixture does not meet optimal parameters. Accordingly, a situation arises when the engine consumes more gasoline than it needs.
- Fixing knock sensor errors. Usually the reasons for their appearance are the signal from the sensor going beyond the permissible limits, a break in its wiring, or a complete failure of the sensor. The occurrence of errors will be indicated by the Check Engine light on the dashboard.
However, it is worth considering that such symptoms may indicate other engine failures, including other sensors. It is recommended to additionally read the ECU memory for errors that could arise due to incorrect operation of individual sensors.
Knock Sensor Circuit Malfunctions
In order to identify DD faults more accurately, it is advisable to use electronic error scanners for the electronic control unit. Especially if the check indicator light on the dashboard lights up.
The best device for this task will be Scan Tool Pro Black Edition - an inexpensive Korean-made device with great functionality that works with the OBD2 data transfer protocol and is compatible with most modern cars, as well as programs for a smartphone and computer (with a Bluetooth or Wi-Fi module).
It is necessary to consider whether there is one of the 4 errors in the knock sensor and errors in the mass air flow sensor, lambda or coolant temperature sensors, and then view real-time indicators for the advance angle and fuel mixture composition (an error in the DD sensor appears when it is significantly depleted).
Often, error p0325 “Open in the knock sensor circuit” indicates problems in the wiring. This could be a broken wire or, more often, oxidized contacts. It is necessary to perform preventative maintenance on the connectors on the sensor. Sometimes error p0325 occurs because the timing belt slips by 1-2 teeth.
Error P0328 “Knock Sensor High” often indicates a problem with high-voltage wires. In particular, if the insulation on them or the piezoelectric element breaks through. Similarly, this error can also occur due to the fact that the timing belt has jumped a couple of teeth. To diagnose, you need to check the marks on it and the condition of the washers.
Errors p0327 or p0326 are usually formed in the ECU memory due to a low signal from the knock sensor. The reason may be poor contact from it, or weak mechanical contact of the sensor with the cylinder block. To eliminate the error, you can try treating both the mentioned contacts and the sensor itself with WD-40
It is also important to check the tightening torque of the sensor, since this parameter is critical to its operation
In general, it can be noted that the symptoms of a malfunction of the knock sensor are very similar to the symptoms characteristic of late ignition because the ECU, for the sake of safety for the engine, tries to automatically do it as late as possible, since this prevents destruction of the engine (if the angle is too early, then in addition detonation occurs, not only does the power drop, but there is also a risk of valve burnout). So, in general, we can conclude that the main symptoms are exactly the same as with incorrect setting of the ignition timing.
How to determine a malfunction using a diagnostic scanner
In a situation where symptoms of failure of the knock sensor are observed and the engine light is on, it is a little easier to find out what exactly the reason is; just read the error code. If there is a problem in its power supply circuit, error P0325 is recorded, and if the signal wire is damaged, error P0332 is detected. If the sensor wires are shorted or poorly secured, other codes may be set. And to find out this, an ordinary, even Chinese diagnostic scanner with an 8-bit chip and compatibility with the car is enough (which may not always be the case).
When detonation, a decrease in power, and unstable operation during acceleration are observed, then it is possible to determine whether such problems really arose due to a malfunction of the DD only with the help of an OBD-II scanner that is capable of reading the performance indicators of system sensors in real time. A good option for this task is Scan Tool Pro Black Edition .
Diagnostic features
Diagnostics begins with checking that the error is not the result of a false alarm by the system. This happens sometimes, and after this problem occurs there are no real problems with the engine, fuel system or knock sensor.
Carrying out such a diagnosis is quite simple. To do this, the error code is first erased from memory according to the instructions provided for each vehicle. Recommendations can be found in the operating instructions.
Having reset the error, the driver performs a test drive. In this case, you need to create all the conditions described above under which such a code appears in the ECU. Warm up the engine, raise the speed to the desired level.
If the error appears again, it means there is some kind of problem, a provoking factor.
Further diagnostics involves the implementation of such mandatory measures.
Turn off the ignition on the car. Locate the ECU and the wire that goes to the knock sensor. They need to be separated for a while. Take a multimeter. The most common one is suitable for garage use. You don't have to buy an expensive model. Using a test instrument, the wires connecting the control unit and the controller are checked for integrity. This procedure is called dialing. Now check how well and tightly the wires of the sensor and the ECU are connected to each other. If you see traces of corrosion or oxides, you need to clean them. This can be done with fine-grained sandpaper. Just make sure the car's power is turned off
To do this, simply disconnect the negative terminal from the battery. If everything is fine with the wires, there are no signs of damage, the contacts are intact, then the tightening torque on the seat of the detonation controller is also checked. When replacing or installing, it is extremely important to tighten the sensor in accordance with the manufacturer's recommendations. This should not be done with your hands or regular wrenches, but with a torque wrench
It is important to observe a certain regulated tightening torque. It often happens that the sensor is simply not fully tightened. If over-tightened, mechanical damage occurs and the controller must be completely replaced. Each specific vehicle has its own recommendations for the tightening torque used. But on average it is from 20 to 25 Nm in relation to passenger cars.
If the problem is observed on the part of the electronic control unit, it is strongly not recommended to delve into the brains of the car yourself, try to find or fix something there. This is a complex procedure requiring special skills, knowledge, equipment and software.
Having ruled out all possible problems as part of self-diagnosis, and leaving only the ECU as the only suspect, it is recommended to contact specialized specialists. Or better yet, go to an official dealer who has experience working with specific ECUs of certain brands and models of cars.
Similar problems
Other problems may also occur besides those described above. When the 8-valve engine on Kalina fails, the culprit of the problem may also be the ECU, which in this model is placed very poorly. If the owner did not wrap it with film, the contacts could oxidize, and conductivity through them could slow down or disappear altogether. The on-board computer will say the same, producing various errors.
Occasionally, it happens that antifreeze gradually seeps into the electronic control unit through a bunch of wires. Moreover, outwardly the ECU will look dry, although aggressive liquid gradually gets inside it. Therefore, the driver needs to open the block housing and inspect the contacts.
Work progress
The replacement process is the same on different LADA models.
First of all, you need to press the latch, and then disconnect the plug with wires from the sensor itself.
Next, using a 13mm wrench, unscrew the fastening bolt and remove the assembly itself.
The replacement is also demonstrated in the video using the Lada Grant as an example.
The Lada Kalina knock sensor is checked using a multimeter, which for this purpose is switched to the voltmeter operating mode with an upper measurement threshold of 200 mV.
To check you need:
- Connect the multimeter probes to the sensor;
- Lightly tap the metal base of the assembly with another metal tool;
- If the Lada Kalina knock sensor is working correctly, voltage drops will be displayed on the multimeter.
As for a deeper and more complete check, it is possible, but only at a special stand.
Sometimes component failure occurs due to poor contact of the plug. If this is the case, it is necessary to treat them with graphite grease or other composition for cleaning electrical contacts, and then remove oxides from their surface. Don’t forget about contaminants that also need to be removed.
In addition, experts note that detonation is possible if the engine operates under heavy load. In such a situation, the reasons may be as follows:
- The octane number of the fuel does not correspond to that recommended by the factory.
- The heat number of the spark plugs does not correspond to that recommended by the factory.
- The basic ignition timing is incorrectly adjusted.
As you can see, checking and replacing the Lada Kalina knock sensor is not difficult and you can do all the work yourself.
Voltage measurement
The most effective way to check the engine knock sensor is with a multimeter (another name is an electrical tester; it can be either electronic or mechanical). This check can be performed by removing the sensor from its seat or checking it directly on site, but dismantling it will be more convenient to work with. So, to check, you need to set the multimeter to measure direct voltage (DC) in the range of approximately 200 mV (or less). After this, connect the probes of the device to the electrical terminals of the sensor. Try to make good contact, since the quality of the test will depend on this, because some insensitive (cheap) multimeters may not recognize a slight change in voltage!
Next, you need to take a screwdriver (or other strong cylindrical object) and insert it into the central hole of the sensor, and then apply it to the fracture so that force is generated in the inner metal ring (do not overdo it, the sensor body is plastic and can crack! ). In this case, you need to pay attention to the readings of the multimeter. Without mechanical impact on the knock sensor, the voltage value from it will be zero. And as the force applied to it increases, the output voltage will also increase. It may vary for different sensors, but usually the value is from zero to 20 ... 30 mV with low or medium physical effort.
A similar procedure can be performed without removing the sensor from its mounting location. To do this, you need to disconnect its contacts (chip) and similarly connect the multimeter probes to them (also ensuring high-quality contact). Next, use some object to press on it or knock with a metal object not far from the place where it is installed. In this case, the voltage value on the multimeter should increase as the applied force increases. If, during such a test, the value of the output voltage does not change, most likely the sensor has failed and must be replaced (these components cannot be repaired). However, it makes sense to perform additional checks on it.
Also, the value of the output voltage from the knock sensor can be checked by placing it on some metal surface (or another, but so that it conducts sound waves well, that is, detonates) and hitting it with another metal object in close proximity to the sensor (observe when Be careful not to damage the device!). A working sensor should respond to this by changing the output voltage, which will be directly displayed on the multimeter screen.
You can similarly check the resonant (“old”) knock sensor. In general, the procedure is similar; you need to connect one probe to the output contact, and the second to its body (“ground”). After this, you need to hit the sensor body with a wrench or other heavy object. If the device is working properly, the output voltage value on the multimeter screen will change briefly. Otherwise, most likely the sensor has failed. However, it makes sense to additionally check its resistance, since the voltage drop can be very small, and some multimeters may simply not pick it up.
Purpose and location of the knock sensor
A knock sensor (DS) is a device that is installed on the outside of the cylinder block wall to monitor the appearance of abnormal vibrations caused by detonation in the engine, that is, explosive self-ignition in the combustion chamber of the working mixture. The DD produces an alternating current signal, the voltage amplitude and frequency of which depend on the vibration parameters of the cylinder block.
Photo of Priora knock sensor
Each level of intensity and frequency of oscillations of the engine walls corresponds to its own signal. The engine control controller constantly analyzes the data received from the engine. When detonation occurs in the cylinders, the amplitude of vibrations of the corresponding frequency increases, and the DD generates a signal, after processing which the controller adjusts the ignition timing, making it later, which leads to the suppression of detonation of the working mixture.
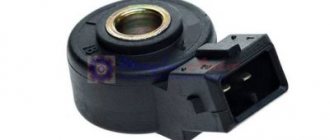
The Priora DD consists of a washer-shaped plastic body, which has a hole in the center for a bolt with a 13-head head, and on the side there is a two-pin connector for connecting wires from the controller. The main part of the DD is located inside the case - a sensitive piezoceramic disk element, which, in fact, generates voltage (signal) when exposed to vibration.
In the photo - DD Priora
The DD Priora is installed on the cylinder block, namely: on its front wall under the intake module, next to and slightly above the dipstick socket for monitoring the oil level in the engine. It is not visible from the top of the hood. It can only be seen from below, for example, from a pit, when the lower engine protection is removed.
in our VKontakte group
DIAGNOSE YOUR CAR YOURSELF!
Code P0327 is entered if the following conditions exist:
engine crankshaft speed is more than 1300 rpm; coolant temperature above 60°C; the amplitude of the knock sensor signal is below the threshold. If a permanent malfunction occurs, the “CHECK ENGINE” lamp lights up after 2 drive cycles.
1. The existence of conditions for the occurrence of code P0327 is checked.
2. The serviceability of wires 2 B and 88 G is checked.
1. Connect the adapter cable to the diagnostic connector. Start the engine and warm up to a coolant temperature of 60°C. Set the engine crankshaft speed to more than 1300 rpm.
Code P0327 is intermittent. If it is currently inactive and there are no other codes, analyze the conditions under which the code occurred. It is necessary to check the knock sensor connector for foreign liquids (motor oil), dirt and dust getting into it. In case of severe contamination, clean with gasoline or any solvent that does not destroy plastic and rubber seals. See “Fault Cards” and “Checking the Knock Dampening System” card.
2. Turn off the ignition. Disconnect the harness connectors from the controller and knock sensor. Check the resistance of wires 2 B and 88 G with a multimeter.
Wire resistance less than 1 ohm indicates a malfunction of the sensor or controller, or poor contact in their terminals.
If the wire resistance is more than 1 ohm, repair the break.
After repair, start the engine, reset the codes and make sure there is no signal from the “CHECK ENGINE” lamp.
Since May 2013, our portal has expanded the thematic sections of the forum for the exchange of experience: subforums Americans, Koreans, Germans, French, Japanese have been added, due to the increase in the fleets of our visitors.
In addition to changing the style, our Chat, Mail, Entertainment and photo/video sections, Literature have become built-in and do not require separate registration. In addition, there are other useful and pleasant innovations that you can all familiarize yourself with when visiting the portal.
You can contact the administration with questions and suggestions in a special section of the forum or through the feedback form.
The Lada Kalina knock sensor is a device that is responsible for detecting signs of detonation in a car engine. The main element of the product is a piezoelectric element (plate) that reacts to vibration in the internal combustion engine.
If signs of detonation are detected, the sensor reads the necessary parameters and transmits them to the computer, after which the control unit adjusts the ignition parameters to level out engine operation. The DD is located on the engine block and converts mechanical vibrations into electrical impulses. The presence of the system prevents excessive vibration processes in the engine, which ultimately ensures maximum efficiency and reveals the excellent dynamic qualities of the engine.
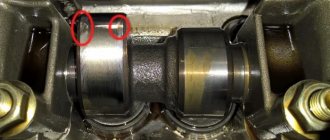
In Lada Kalina 1.6 cars, 8 valves, the knock sensor is located between the second and third cylinders.
Error p0327
The general interpretation of this error is called “ low signal level from the knock sensor ” (usually the signal value is less than 0.5 V). In the English version it sounds like: Knock Sensor 1 Circuit Low Input (Bank 1 or Single Sensor). In this case, the sensor itself may work, and in some cases it is noted that the Check Engine light on the dashboard is not activated since the “check” light lights up only when a permanent malfunction occurs after 2 drive cycles.
Conditions for generating an error
On different machines, the conditions for generating error p0327 may differ, but in most cases they have similar parameters. Let's consider this situation using the example of a popular domestic car, the Lada Priora. So, code P0327 is entered into the ECU memory when:
- the crankshaft speed is more than 1300 rpm;
- coolant temperature more than 60 degrees Celsius (warm engine);
- the signal amplitude value from the knock sensor is below the threshold level;
- the error value is generated on the second drive cycle, and not immediately.
In any case, the engine must be warmed up, since fuel detonation is possible only at high temperatures.
Causes of error p0327
The reasons for this error are similar to those described above. In particular:
- poor DD fastening/contact;
- wiring short circuit to ground or malfunction in the knock sensor control/power circuit;
- incorrect installation of DD;
- failure of the fuel knock sensor;
- software failure of the electronic engine control unit.
Accordingly, it is necessary to check the specified equipment.
How to diagnose
Checking for the presence of an error and searching for its cause must be carried out using the following algorithm:
- Check for false positives by resetting the error. If, after recreating the conditions for its occurrence, the error does not appear, then this can be considered a “glitch” of the engine control electronics.
- Connect a diagnostic tool with the appropriate software to the adapter connector. Start the engine and warm it up to the operating temperature of the internal combustion engine (if the engine is not warmed up). Use the gas pedal to raise the engine speed above 1300 rpm. If the error does not appear, then you can finish here. If it appears, continue checking further.
- Check the sensor connector for dirt, debris, engine oil, etc. If present, use cleaning liquids that are safe for the plastic sensor housing to remove dirt.
- Turn off the ignition and check the integrity of the wires between the sensor and the computer. An electronic multimeter is used for this. However, a broken wire, in addition to error p0327, also usually causes the above errors.
- Check the knock sensor. To do this, you need to dismantle it and measure its internal resistance using the same electronic multimeter, switched to resistance measurement mode (ohmmeter). Its resistance should be approximately 5 MOhm. If it is very low, it means the sensor has failed.
- Continue checking the sensor. To do this, turn on the multimeter to measure direct voltage (DC) within a range of about 200 mV. Connect the multimeter probes to the sensor terminals. After this, use a wrench or screwdriver to knock in the immediate vicinity of the sensor mounting location. In this case, the value of the output voltage from it will change. After a couple of seconds the value will become constant. If this does not happen, the sensor is faulty and requires replacement. However, this testing method has one drawback - sometimes the multimeter is not able to detect the slightest voltage fluctuations and a working sensor can be mistaken for a faulty one.
In addition to the check steps related to the direct operation of the sensor, make sure that the error was not caused by extraneous sounds, such as vibration of the crankcase protection, knocking of hydraulic compensators, or simply that the sensor was poorly screwed to the engine block.
Replacing the VAZ knock sensor
The knock sensor on injection VAZ cars is located on the cylinder block in the front part. Before you begin to unscrew the mounting bolt, disconnect the chip from the sensor by pulling out the locking bracket. To unscrew the DD you will need a 13 key.
After removing the old sensor, do not rush to install a new one immediately. Before replacing, thoroughly wipe the sensor seat from oil, dirt and other debris to ensure a perfect fit of the sensor to the engine block.
The tightening torque DD should be within 10 - 24 N.m. If you don't have a torque wrench, you can lightly tighten it by hand, just don't go too hard.
The basis for any knock sensor without exception, including the VAZ-2114, is the so-called piezoelectric element. And when it is acted upon mechanically, an electrical signal is generated inside its body, after which these impulses are sent to the engine ECU.