Author: Evgeny Zhivoglyadov. Date of publication: June 03, 2015. Category: Articles.
Most owners of the modern Lada Kalina strive to maintain their car themselves. And if not every owner decides to install a zero-resistance air filter, then adjusting the Kalina valves is one of the mandatory operations. In order for the engine to work well, valve adjustment is required, after which the clearances become within the established norm. When the adjustment is carried out correctly, the gas distribution system functions without high wear. The camshaft, pushers, valves do their job superbly. Engine operation becomes less noisy and fuel consumption decreases. The combustion chamber remains clean, there is practically no carbon deposits. The engine starts very easily.
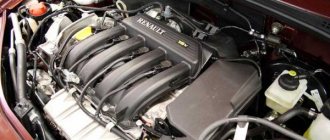
After every 20,000 kilometers, valve adjustment is necessary. Sometimes the interval between repairs can be increased to a mileage of 25,000 kilometers. When such work is delayed and the mileage increases, serious problems with the engine begin. The fact is that the quality of engine operation is directly dependent on the resulting valve clearance. When factory settings are violated, the cylinders do not receive enough fuel, and flammable gases are released prematurely. In fact, the operation of the entire cycle is disrupted. As a result, the engine efficiency decreases. If the thermal gap is greatly reduced, burnout of the valves is possible. This entails a very serious repair of the cylinder head. The cost of rebuilding an engine is quite high.
Adjusting valve clearances
It is carried out only on a cold engine: the optimal ambient temperature is +20 degrees. Prepare in advance:
- narrow nose pliers;
- flat screwdriver;
- heads;
- oil removal syringe;
- tweezers;
- valve desiccant (device);
- probe (0.2 and 0.35 mm);
- adjusting washers.
Remove the bolts securing the valve cover, remove it and remove the spark plugs. At the same time, inspect the camshaft cams to make sure there is no wear. Next, use a syringe to remove the oil from the head. Attach a valve recess tool to the studs. Next steps:
- Rotate the crankshaft and ensure that the marks on the timing cover and the pulley match. Next, rotate the shaft another three pulley teeth.
- Use a 0.2 mm (intake) and 0.35 mm (exhaust) feeler gauge to check the clearances. For reference, to determine which are the intake and exhaust valves, count from left to right: exhaust-intake, intake-exhaust, and so on. The adjusting washers must be replaced when the dipstick passes easily. To do this, lower the valve down using the tool, while simultaneously holding the pusher from turning with a flat-head screwdriver.
- Secure the pusher at the bottom and use tweezers to remove the old washer and install a suitable new one.
- Remove the retainer and check the gap again: the feeler gauge should pass with little effort.
Adjustment order: 1 outlet - 2 inlet, 5 outlet - 2 inlet, 8 outlet - 6 inlet, 4 outlet - 7 inlet.
Adjusting the valves of Kalina, with an 8-valve engine, is necessary when an unpleasant, alarming sound appears under the hood, reminiscent of a metallic clatter. This indicates that the valves “require” immediate adjustment. To perform the mentioned adjustment, you will need to prepare some tools, namely: screwdrivers (flat and Phillips), long-nose pliers (or tweezers), a set of feeler gauges, washers for adjusting the required size, a 10-mm wrench (head) with a knob, as well as a special device for adjustment.
I would immediately like to warn motorists that the adjustment of the Kalina valves is carried out only on a cooled power unit, nothing else, otherwise the set gaps will not meet the required technical standards. Remove the valve covers and install the shafts, crankshaft and camshaft according to the marked marks. In this case, the pistons of cylinders 1 and 4 must be located at TDC of the mechanism. There are different methods for adjusting valves; we will choose a more accelerated one, in which we will have to rotate the crankshaft less, and we will adjust four valves at once.
So, initially we measure the gaps where the camshaft cams are raised above the valves. In this case it is 1,2,3,5 valves. The thermal clearances for the Kalina intake valves correspond to 0.20 (+0.05mm), and for the exhaust valves they correspond to 0.35 (+0.05mm). The valves are calculated from left to right, first exhaust-intake, then inlet-exhaust, and so on. Gaps that do not correspond to the nominal value are adjusted using shims. Now, install the adjustment bar on the valve cover studs and secure it by tightening the nuts.
Then, using the lever of the adjusting mechanism, we recess the adjustable valve until it stops, and using the lever, we fix the position of the valve pusher (in the pressed state). Using tweezers, remove the old washer and install a new one (of the required size) in its place. Having removed the latch, we press it with a lever so that it completely shrinks into place. After this, it is the turn of the following valves 4,6,7,8. You will need to make one rotation of the shaft (the camshaft should turn half a turn) and carry out similar work with the remaining valves. According to experts, when a Kalina car runs up to 50,000 km, you are unlikely to have to adjust the Kalina valves, since when checking their clearances (in the vast majority of cases) meet the required standards.
Valves on Lada Kalina cars play a vital role in the gas distribution system, being responsible for the release of exhaust gases and the intake of the air-fuel mixture. Many motorists do not think that these parts, despite their small size, are very important. And some don’t even know where they are located, and that from time to time (depending on the type of engine) they require routine maintenance.
How to adjust the valves?
The main question is how to adjust the valves. To perform this procedure, the owner will need to acquire the following set of tools, accessories and consumables:
- screwdrivers and pliers with long jaws;
- heads for unscrewing bolts;
- ratchet;
- a set of probes;
- crank;
- a syringe to remove excess oil from the head baths;
- tweezers for removing washers;
- adjusting washers of different sizes (thickness) and a device for recessing the valves.
Before the valve adjustment begins, let the engine cool down (temperature no more than 20 degrees).
- Don't forget about safety and remove the terminals from the battery.
- Remove the valve cover with gasket.
- During the procedure, you will need to rotate the crankshaft of the Lada Kalina. To facilitate this action, it is recommended to unscrew the spark plugs, having first removed the tips of the high-voltage cables from them.
- Remove the timing cover.
- Use a syringe to remove the remaining oil from the baths.
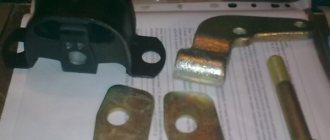
- We install the device for recessing the valves on the mounting studs of the motor cover and secure it with standard nuts.
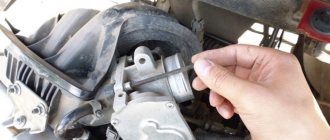
- By rotating the crankshaft (with a key on the pulley bolt or a wheel with 5th gear engaged in the box, after hanging the side of the car), we achieve the TDC position in the 1st cylinder (the rightmost one in the direction of the car).
- From this position, turn the camshaft to an angle of 40-50 degrees (three pulley teeth).
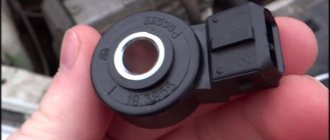
- Using a feeler gauge, we measure the size of the gap between the back surface of the cams and the washers of the 1st (exhaust) and 3rd (intake) valves (we count from the shaft drive gear). The feeler gauge should fit into the gap with a slight “tightness”.
- When the gap size differs from the required value, the pusher should be turned so that its groove is opposite the “adjuster”.
- Using the device, we recess the valve, securing the pusher from turning using a screwdriver (insert it into the groove). Using the latch, we lock the pusher in its lower position.
- We remove the washer using the previously indicated tweezers.
- Read the markings on the washer. It indicates thickness. If the inscription is erased, measure with a micrometer.
- We calculate the required thickness of the washer to be installed using the well-known formula, which, by the way, is different for intake and exhaust valves.
- We select a new washer from the set, with a thickness close to the value obtained in the calculation (deviation - plus 0.05 mm).
- We install the selected washer in the seat (in the pusher). In this case, the surface with the markings should be facing down.
- Having pressed the pusher with the device (drowning it deeper), we remove the latch.
- Now we move on to adjusting the next pair of valves. To do this, we rotate the crankshaft to an angle of 220-230 degrees and carry out the entire list of previously indicated adjustment actions with the valves: 5th (exhaust) and 2nd (intake).
The manipulation algorithm for the two remaining pairs of valves, depending on the angle of rotation of the crankshaft in the Lada Kalina car, is as follows:
- angle of 400-410 degrees: 8th valve (exhaust) and 6th (intake);
- rotation angle of 580-590 degrees: 4th (exhaust) and 7th (intake).
To be sure that the adjustment is correct, you can re-perform the entire shaft rotation cycle with a control measurement of the gap values. Note that their value for the exhaust group of valves is 0.3 mm, and for the intake valves – 0.2 mm.
Adjusting thermal clearances in the engine valve mechanism
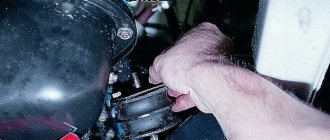
We measure and adjust the gaps on a cold engine. Remove the engine screen. Disconnect the throttle drive cable from the throttle assembly sector (see “Replacing the throttle drive cable”). Having unscrewed the three fastening nuts, remove the throttle valve drive cable bracket and move the bracket with the cable to the side (see “Removing the receiver”).
Use a Phillips screwdriver to loosen the clamp on the lower crankcase ventilation hose. . and remove the hose from the cylinder head cover pipe.
Use a Phillips screwdriver to loosen the clamp on the crankcase ventilation hose (main circuit). . and remove the hose from the cylinder head cover pipe
Using a Phillips screwdriver, loosen the clamp on the crankcase ventilation hose (idle circuit). . and disconnect the hose from the cylinder head cover pipe
Using a 10mm wrench, unscrew the two nuts securing the cylinder head cover. . and remove the washers.
Remove the two rubber bushings.
Remove the cylinder head cover. Remove the front timing belt cover (see “Checking the condition and replacing the timing belt”). The procedure for checking and adjusting clearances in the valve drive mechanism is as follows. We turn the crankshaft by the bolt securing the generator drive pulley clockwise until the installation marks on the camshaft pulley and the rear timing belt cover align (see “Checking the condition and replacing the timing belt”). Then turn the crankshaft clockwise another 40-50° (2.5-3 teeth on the camshaft pulley). In this position of the shafts, we use a set of feeler gauges to check the gaps at the first...
. and third camshaft cams. The clearance between the camshaft cams and shims should be 0.20 mm for the intake valves and 0.35 mm for the exhaust valves. The clearance tolerance for all jaws is ±0.05 mm. If the clearance is different...
. then we install a device for adjusting the valves on the studs of the camshaft bearing housings.
We rotate the pusher so that the slot in its upper part faces forward (along the direction of the car).
We insert the “fang” of the device between the cam and the pusher (1 - device, 2 - pusher)
By pressing down on the lever of the device, we recess the pusher with the “fang”.
. and install a clamp between the edge of the pusher and the camshaft that holds the pusher in the lower position.
Fixing valve tappets when replacing the adjusting washer
: 1 — latch; 2 - adjusting washer Move the device lever to the upper position
Use tweezers to pry the adjusting washer through the slot and remove it. If you do not have a device for adjusting the valves, you can use two screwdrivers. Using a powerful screwdriver, leaning on the cam, press the pusher down. Inserting the edge of another screwdriver (with a blade width of at least 10 mm) between the edge of the pusher and the camshaft, fix the pusher and remove the adjusting washer with tweezers. We adjust the gap by selecting an adjusting washer with the required thickness.
To do this, use a micrometer to measure the thickness of the removed washer. The thickness of the new adjusting washer is determined by the formula: H = B+(A-C), mm
, where “A” is the measured gap; “B” is the thickness of the removed washer; “C” - nominal gap; “H” is the thickness of the new washer. The thickness of the new washer is marked on its surface with an electrograph. We install the new washer in the pusher with the marking down and remove the lock. Check the gap again. When adjusted correctly, a 0.20 or 0.35 mm feeler gauge should fit into the gap with slight pinching. Consistently turning the crankshaft half a turn, we check and, if necessary, adjust the clearances of other valves in the sequence indicated in the table.
| Angle of rotation of the crankshaft from the alignment of the marks, degrees | Cam number (counting from the camshaft pulley) | |
| exhaust (gap 0.35 mm) | inlet(gap 0.20 mm) | |
| 40-50 | 1 | 3 |
| 220-230 | 5 | 2 |
| 400-410 | 8 | 6 |
| 580-590 | 4 | 7 |
We assemble the engine in the reverse order. Before installing the cylinder head cover.
. We replace its sealing gasket with a new one.
How to adjust the 8 valve mechanism in the Lada Kalina model? Most owners of these practical Russian cars sooner or later ask themselves a similar question. Carrying out this procedure yourself will not only be interesting, but also useful in terms of gaining experience.
Now let's move on to a more detailed consideration of the issue outlined here: valve adjustment.
Articles and regulations
When installing the cylinder head cover, it is recommended to replace the rubber gasket. Its article number is 21080-1003270-1 0. The last numbers may differ:
- 11 – BRT manufacturer (Balakovo);
- 12 – ELRING;
- 14 – CJSC VRT (Volzhsk).
All adjustment devices are universal. They don't have articles.
The pressure device can be replaced with a screwdriver. The latch is also a screwdriver, only a thin one. The interval between adjustments is 30 thousand km. Good luck!
Adjustment procedure
The procedure for adjusting the valves on all modifications of the 8-valve vase is the same. There are differences only in injection Grant cars, Kalina 2 with a Grant engine. They have a lightweight piston group and metal-ceramic seats. In this regard, the gaps differ upward by 0.05 mm. Knowing the order and adjustment scheme, you can adjust the valves yourself. The downside is the lack of a set of washers for adjustment. It’s expensive to go to the market to buy them every time, and it’s also expensive to buy the entire range.
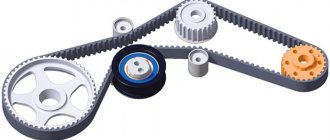
Here is a detailed diagram of valve adjustment for VAZ 2108, 2109, 2114, 2115
- First you need to cool the engine. You can use an additional cooling fan from any VAZ car. Place it on top so that the airflow is towards the internal combustion engine and turn on the 12 V power supply;
- When adjusting 8 valve engines (11186, 11113 oka, 1118, 1111) with a mechanical throttle assembly, unscrew the throttle cable from the intake manifold receiver;
- Disassemble the valve cover, timing belt side casing. Disconnect the large and small breather hose going to the throttle body pipe;
- Pump out the oil near the valve cups using a syringe or bulb. It is most convenient to use a regular medical syringe with a white silicone hose at the end;
- Install a device for adjustment - a rack for pressing the valve, also called a ruler;
- Set the first adjustment position. Turn the camshaft clockwise to the mark and tighten 2-3 teeth. For cars with a lightweight piston group (Granta, Kalina 2, Priora), turn strictly by the crankshaft. If you turn the camshaft, the timing belt may slip, and if this is not noticed and the engine is driven, the valves may bend;
- Adjust in the following sequence: 1 outlet and 3 inlet valves;
- Rotate the camshaft 90 degrees. Adjust 5 outlet and 2 inlet valves;
- Rotate 90 degrees. Adjust 8 exhaust and 6 inlet ports;
- We make the last turn by 90 degrees and adjust the 4th exhaust and 7th inlet valves;
- Reassemble in reverse order. We install a new gasket under the valve cover to prevent oil from leaking out.
- On carburetor engines, everything is done in a similar order. First you need to unscrew the filter housing and the suction cable. The frequency is the same as on the injector 30,000 km.
Checking the gaps is also required after repairing the cylinder head. Especially after replacing the guides. When replacing bushings, the seats are countersunk with a special tool and deliberately recessed into the head. Accordingly, you need to follow the sequence, set the optimal gaps and repeat after 1000 km.
Adjusting the 8kL engine for gas increases the mileage between adjustments. If the engine is not intended to operate on gas equipment, the seats and valves will quickly burn out, and in order to somehow extend the service life, the clearances should be made a little larger than standard. Usually they do +0.05 mm. If the gap is not set, that is, does not expand, then the saddle is sunk a decent distance into the head. In this case, you need to measure how much the gap needs to be increased, disassemble the cylinder head and file the end of the valve. The second option would be to replace the seat or the cylinder head itself.
After how many km do you need to adjust the VAZ-2114 valves: photo, video
Before answering the question of what valve adjustment is, you must first find out what the valves of internal combustion engines are, where they are located, and what functions they are assigned to perform. Structurally, these important parts of modern engines are cylindrical “plates” with fairly long rods. They are installed in the cylinder block, and there are at least two for each of them. When the valves are closed, they are adjacent to seats, which are made of steel and pressed into the cylinder head (cylinder head). Since during operation these parts experience significant mechanical and thermal loads, they are made of special steels that are resistant to such influences.
Valves are components of automobile gas distribution mechanisms (GRM), which are often called valve parts. They are divided into inlet and outlet. The function of the former is, as you might guess from the name itself, the admission of a combustible mixture into the cylinders, and the latter is the release of exhaust gases from them. During engine operation, the valves expand, their rods lengthen, and accordingly, the size of the gaps that should be between their ends and the pusher cams (in engines of older designs - rocker arms) change. During the operation of the internal combustion engine, the size of these deviations increases, and it is when they begin to exceed the maximum permissible values that the valves should be adjusted. It consists of bringing the gaps back to normal.
If the valves are not periodically adjusted, this can lead to very unhappy consequences. In the case where the gap is too small, “burning” will inevitably occur. This means that a fairly dense layer of combustion products of the fuel mixture will form on the surfaces of the valves. Because of it, the normal operation of the gas distribution system, and, consequently, the engine as a whole is disrupted. In addition, this deposit is quite difficult to remove.
In cases where the gap is excessively large, the valves do not open fully, and therefore engine power drops significantly. In addition, they begin to “knock”, and experienced drivers hear this knock even while in the cabin while driving their car. It goes without saying that increased valve clearances affect the operation of an internal combustion engine no less negatively than excessively small ones.
Lada Kalina Hatchback LUX › Logbook › self-adjustment of valves (Part one)
Greetings to everyone! Today I’ll tell you about how to adjust the valves on an 8-valve engine with your own hands using a regular tool. The reason for my intervention in the operation of a working car was banal curiosity and the desire to make the engine run smoother, especially when warming up, when the “diesel effect” is observed.
So let's start: unscrew the filler plug, remove the upper casing, and press out all the clamps going to the valve cover
Using a 10mm wrench, press out the throttle cable mounting brackets
unscrew the valve cover
Using the same 10mm wrench, unscrew the three screws of the timing belt cover
Well, now, without much fanaticism, we open the valve cover, trying to lift it in a horizontal position, without distortions.
the photo shows a rubber gasket carefully glued to the head with sealant