The electrical equipment system has the main power sources, among which the generator is given a worthy place of honor. The voltage regulator of the VAZ 2114 generator is responsible for providing power to the on-board network for the functionality of all operating electrical appliances.
The device contains a rectifier unit that converts three-phase alternating current into direct current. Thanks to this device, surges in the output from the generator are reduced, and the voltage range should be from 13.2 to 14.7 Volts.
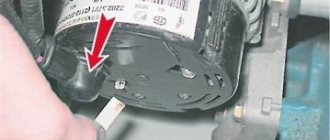
Where is the VAZ 2114 charging relay located? The unit is located at the rear of the generator, below under a plastic cover. The device is black and has two graphic conductive brushes.
Location of the voltage regulator on the VAZ 2114
General design of the generator set
- Covers made of aluminum alloys. They contain special sockets into which bearings are pressed. On the back cover there is a terminal for connecting to the battery and a connector (“male”) for connecting to the excitation winding. There is also a capacitor attached to the back cover. It helps suppress radio interference. The brush assembly is mounted in the same housing with the VAZ 2114 voltage regulator. The generator operates due to the fact that an emf created by the rotating magnetic field of the rotor is induced in the stator winding.
- The stator is made of plates made of special grades of transformer steel. It has special grooves into which the power windings are placed. Each has a terminal for connecting to a rectifier. The covers are bolted to the stator. The field winding is located on the rotor. It is connected to copper rings. They are on the shaft. A drive pulley is installed at the front, and there is a keyway for it on the rotor.
- The diode block is attached to the back cover from the inside. It consists of nine semiconductors - six main and three additional. To ensure high-quality cooling of semiconductors, aluminum alloy plates are used. And on the front part next to the drive pulley there is an impeller.
Specifications
Brief description of the technical characteristics of the generator:
- The rotor winding (excitation) is powered by a voltage whose value is in the range of 13.2 – 14.7 Volts.
- Under a load of 10 kg, the belt sag (over a long section) does not exceed 0.8 cm.
- The generator on the VAZ 2114 (its price in stores is about 4,000 - 4,500 rubles) is capable of delivering a current of up to 80 A to the network.
The unit is located on the left side, the drive is carried out using a poly-V-belt from a pulley on the crankshaft of the car engine.
Mechanical and electrical breakdowns
This malfunction manifests itself in an increase in the noise level emitted by the generator set. The reason is the destruction of one of the bearings. As a rule, the one that is located in the front cover - it is subject to very large loads, especially when the VAZ 2114 generator belt is tensioned too much. For this reason, you should always monitor the tension of the generator drive belt.
As for breakdowns in the electrical part, they can manifest themselves in the form of a lack of battery charging voltage or its low (sometimes too high) value. To check the serviceability, it is not necessary to remove the generator from the car. To do this, use a multimeter. Take voltage measurements at the terminals of the VAZ 2114 battery. The generator should produce about 14 Volts when operating. If it is 12 Volts or lower, then the generator is not producing the required voltage and needs to be repaired. In some cases, the fault lies with the voltage regulator or worn brushes.
How to check the ignition relay?
There are several ways to make sure that the relay has burned out. You can do this on your own. Sometimes it is enough to remove it and see the melted or broken parts. It may crack or develop other visible defects.
After a long drive, the transmission can become very hot. This indicates its malfunction or low power.
The main relay for this model is designed for a current of 70 Amps. But perhaps the part has less power or there are many additionally installed consumers on the car. You can check this by disconnecting several of the devices.
If after this the element stops heating, then its power is too low. It is necessary to buy a part of a similar design, but designed for a higher current.
You can check the functionality of the ignition relay with a multimeter. To do this, set it to voltmeter mode. They need to measure the voltage on the starter winding and the output of this part. If voltage is present, the element is working.
You can test the part with a multimeter in ohmmeter mode. Measurements are carried out in a similar way. The value on the device screen is completely unimportant. The presence of any indications indicates the serviceability of the relay. If there is no indication, it needs to be replaced.
You only need to buy a similar element designed for this car model. Defective products are often found on sale. Therefore, if after installing a new relay the problem does not disappear, you should check this part again. All the previously mentioned methods are suitable for this. In the case discussed above, it is necessary to purchase an electrical component of slightly higher power. Most likely it will be from another car. Therefore, for selection you need to take the old relay with you. If, after replacing the element and if it is known to be in good working order, problems with starting the engine or the heater persist, you should look for another reason. It is a good idea to test all the wiring of the machine. It could rot or fray over time. Other parts of the car may also be to blame for the malfunction. If self-diagnosis of electrical equipment is difficult, you need to contact an electrician at a car service center.
Source
Alternator Removal Tools
A bracket is attached to the engine block (approximately in the middle). The generator housing is secured to the bracket on the block using a special strip. Thanks to it, it becomes possible to adjust the belt tension. To remove the generator, you will need the following tool:
- Wrenches (preferably box and open-end) with sizes “10”, “13”, “17”, “19”.
- Some vehicles may require a "15" socket.
- A small pry bar or short piece of pipe.
Check Features
When checking the generator of a VAZ 2110, 2107 and others for serviceability, the following conditions must be met:
- An accurate multimeter should be used for diagnosis.
- The normal voltage is 12 V.
- If it is necessary to replace the wiring, you must use wires with the same cross-section as the original.
- Before checking, you should check that all fasteners are connected correctly and the belt tension is correct. If necessary, the connections should be adjusted to normal, the belt should be loosened or tightened.
During the verification process it is prohibited:
- short circuit the wires;
- connect terminals that differ in purpose and parameters, connect terminal 30 or B+ to ground;
- diagnose a generator without connected consumers.
Removing the generator from the car
If you need to replace the bearing of a VAZ 2114 generator, you will need to completely remove the unit. First, be sure to disconnect the battery. Without this, repairs cannot be started - a short circuit can lead to ignition of the wiring. Then, using the key at “17”, loosen the tension of the drive belt. To do this, unscrew the nut at the top and move the housing towards the engine block. A little work with electricity - unscrew the nut from the bolt (pin “31”) and disconnect the wire going to the excitation winding.
The generator is secured at the bottom using a long bolt and nut. The latter has a plastic thread lock. At the top, the bar is screwed to the stator with one nut, and to the engine block with two bolts. Unscrew all threaded connections to remove the generator. If the threads are stuck, use a penetrating lubricant - it will get rid of dirt and rust. The generator is pulled out upwards - this turns out to be easier. But you can remove the engine protection and pull it down: on a VAZ 2114 car, the generator can be removed in two ways.
Mounting block 2114-3722010-60
Circuit breakers
- Fuse for fog lights VAZ 2114, 2115 - rear fog light lamps and rear fog light indicator lamp
- Direction indicators
- Relay-breaker for direction indicators and hazard warning lights (in hazard warning mode)
- Hazard warning lamp
- Front interior lamp
- Central interior lamp
- Luggage compartment lamp
- Ignition switch illumination lamp
- Engine control lamp
- Brake lamps
- Trip computer (if installed)
- Portable lamp connection socket
- Rear window heating relay (contacts)
- Rear window heating element
- Sound signal
- Horn relay
- Cooling fan motor
- Fan fuse
- Electric windows
- Power window relay (contacts)
- Heater motor
- Heater fuse
- Windshield washer motor
- Electric motors for headlight cleaners (in operating mode)
- Cigarette lighter
- Glove compartment lamp
- Rear window heating relay (winding)
- Fuse for fog lamps VAZ 2114, 2115 - Right fog lamp
- Fuse for fog lamps VAZ 2114, 2115 - Left fog lamp
- Side light lamps on the left side
- Side light indicator lamp
- License plate lamps
- Engine compartment lamp
- Instrument lighting switch
- Fuse for backlight lamps of switches, instruments, cigarette lighter, ashtray, heater control levers
- Side light lamps on starboard side
- Left headlight (high beam). High beam indicator lamp
- Direction indicators
- Relay-breaker for direction indicators and hazard warning lights (in turn indication mode)
- Reversing lamps
- Lamp health monitoring relay
- On-board control system display unit
- Instrument cluster
- Low oil pressure warning lamp
- Parking brake indicator lamp (brake lights)
- Brake fluid level indicator lamp
- Low battery indicator lamp
- Trip computer (if installed)
- Generator field winding (in engine starting mode)
- Headlight wiper relay
- Relay-breaker for direction indicators and hazard warning lights
- Windshield wiper relay
- Relay for monitoring the health of brake lamps and side lights
- Power window relay
- Horn relay
- Heated rear window relay
- High beam relay
- Low beam relay
Source
Disassembling the generator
- Keys for "10" and "19".
- Crosshead screwdriver.
Before you begin, make sure you have purchased all generator parts. The procedure for disassembling the generator:
- Press the latches and remove the plastic casing from the housing.
- Mark the position of the covers and the stator relative to each other - this will make assembly easier later.
- Using a Phillips screwdriver, remove the two bolts that secure the voltage regulator to the brush assembly.
- Turn off the regulator.
- Unscrew the screws securing the rectifier diode block. Disconnect the leads of the stator windings from it and remove the assembly. Please note that the capacitor is also removed along with it. With its help, the voltage of the VAZ 2114 generator is “cleared” of the variable component.
- Unscrew the four bolts and then remove the back cover.
- Clamp the rotor in a vice and unscrew the nut from the pulley side.
- Remove the front cover.
- Visually assess the condition of the units. If there is severe wear everywhere, major repairs will have to be carried out.
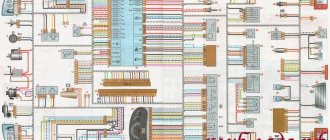
Interpretation of fuses and relays of injection models
The main electrical fuse module 2114-3722010-60 is located under the front engine compartment. This arrangement allows for quick access to all electrical systems of the car.
Block location
Please note that the location of the electrical fuse module may depend on the type of equipment and year of manufacture of the vehicle. As a rule, this is the upper right part of the engine compartment, under the front windshield. The mounting block is made of plastic in the form of a rectangular box. To protect against accidental opening, the box is equipped with special latches.
To quickly remove the fuse, special plastic pliers are located on the plastic protection cover. With their help, you can very easily get any element. You need to grab the top edge of the plastic case with pliers and carefully lift the element.
For the convenience of the user, on the top plastic cover there is a complete diagram, made in the form of a schematic image, which shows all the electrical fuses and relays indicating the current strength (A).
Table 1. Explanation of fuses and relays 2114-3722010-60
Modern fuses vary in color depending on the number of amps.
The color distinction is made for ease of use and identification of the right fuse with the right resistance. There are also fuses available in black, grey, purple, white, orange and other colors. They all differ in the number of amperes that are registered on each product.
In each block, the manufacturer provides additional electrical fuses. They are designed to allow quick replacement of a burnt-out element. They are located at the bottom of the module and are marked with the names F17, F18, F19, F20. Each replacement element differs in color and number of amps.
If one of the electrical appliances in a vehicle breaks down, it is recommended that you first check the mounting block. To determine the burnt element, you need to completely turn off the engine and remove the key from the ignition. Using special pliers, carefully remove the burnt out module.
How to determine the malfunction?
Signs of a breakdown in the generator:
- A light on the dashboard lights up (short-term or constantly) indicating that there is no charging - a red battery.
- The battery is under or overcharged.
- The headlights shine dimly or flicker noticeably, the wipers work unstably and constantly change speed.
- The electrolyte in the battery boils, the headlights shine brightly, and sometimes the lamps come on.
- There is noise from the generator.
This is a brief description of the problems, but you need to consider them in more detail in order to repair the generator on the VAZ 2114. The cost of a complete repair will be no more than 1,200 rubles.
Brush mechanism failures
Faults can be divided into two types: breakdown of brushes or voltage regulator. Replacement of brushes and relay regulator is carried out without dismantling the generator. Diagnostics can also be done using improvised means - a pair of AA batteries, a battery, a light bulb or a tester. The cost of the brush assembly is quite low, so you don’t have to check it, but immediately install a new one and forget about the problems. But if you get excited about the idea, then diagnostics are performed as follows:
- Connect power to the voltage regulator.
- Connect the incandescent lamp to the brushes.
- At a voltage of 12-14 Volts, the lamp lights up.
- When increased to 15-16 Volts, it goes out.
This is normal operation of the regulator. If the lamp behaves differently during diagnostics, we can talk about a breakdown of the relay regulator. It is also worth mentioning the signs of worn brushes:
- There is a decrease in voltage in the on-board network.
- The battery is not charging.
- Voltage surges are observed.
After removing the brushes, visually assess their condition - if the length is less than half a centimeter, then you can safely throw them away. Also pay attention to how the brushes of the VAZ 2114 generator move in the grooves - if there are jams, it is better to install new ones or drop a little clean oil. Be sure to evaluate the condition of the slip rings on the rotor; sometimes they need to be ground. After installing the new brushes, it takes a few minutes for them to start working properly.
Diode rectifier
Two signs of diode bridge failure:
- No battery charging.
- The charge is much higher than expected.
This breakdown can lead to quite negative consequences. If you doubt your abilities, it is better to entrust generator repair to a person who specializes in this. Most often, two diodes fail, but replacing them is problematic, since these spare parts for generators are not sold separately. It will be much easier to buy a new one and install it. Replacement is carried out in the following sequence:
- A contact bolt with bushings and nuts is installed in the block, and clamping is performed.
- Correct and reinstall all leads of the stator windings, tighten the nuts for their connection.
- Reinstall the bolts that secured the rectifier unit. Tighten them.
- Install the relay-regulator and tighten its mounting bolts.
- Install the plastic casing and secure it with the latches.
- Install the generator on the car, tighten the belt and check the operation.
How to replace the VAZ 2114 generator?
VAZ 2114 is a car that very often undergoes modifications (tuning). First of all, of course, they play high-quality and powerful music. Some people care about comfort and install xenon, electric power steering, and air conditioning. This makes the load on the generator higher, and the “native” one is not able to cope with it. Most often, a replacement for the standard one is sought among VAZs of new models - “Kalina”, “Priora”. Replacing a VAZ 2114 generator is quite simple. Any motorist can do it if he knows how to handle wrenches. In addition to the new generator, you will need:
- Open-end and ring wrenches for “10” and “13”.
- Open-end wrenches for “17” and “19”.
- Screwdrivers.
- Small mount.
- In other words, all those tools that are needed to remove the installation.
Procedure for replacing the generator
Regardless of which generator you install on the VAZ 2114 (“Priors” or “Kalinas”), the replacement process will be the same. To make a replacement, follow these steps:
- Disconnect the negative cable from the battery.
- Remove the engine protection.
- Using a “10” wrench, unscrew the nut from the generator bolt (pin “31”).
- Disconnect the wire going to the brushes.
- Unscrew all the nuts and bolts that secure the generator housing to the tension bar and the engine block.
- Take out the generator.
- Install the new one in reverse order.
Be sure to tension the belt correctly, otherwise the bearing will quickly fail. At this point, the work is completed: after a well-done repair, you can not look into the generator for at least three years (or 50 thousand kilometers).
Despite the fact that the VAZ 2114 runs on gasoline, the electrical component in it is very important. Without maintaining the voltage within the required limits, the lighting will not be able to work, and the battery will be discharged. And most importantly, the ignition system will not be able to function without electricity, which means the engine will not work. Therefore, it is important that the electrical circuit of the machine is maintained in good condition.
Charge circuit design and diagram
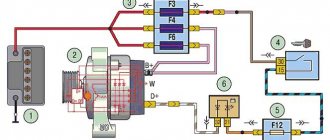
The technical condition of the main components of the car is displayed on the instrument panel. Thus, the performance of the vehicle depends on the reliable operation in any weather of the electrical equipment power system. It consists of a generator, battery, fuse F16, terminals, connecting wires and a control light. A defect in one of these elements is the reason why the VAZ 2114 injector lost charging.
Functional diagram of the VAZ 2114 car charging circuit
At the initial moment after turning on the ignition key, sufficient voltage is supplied through the light bulb and the isolation diode (terminal D) to excite the generator. Further, during rotation, mechanical energy is converted into electrical energy.
GENERATOR
The generator is designed to generate electricity, which is so necessary for the stable operation of the vehicle's electrical equipment. Additionally, it performs the function of recharging the battery - with a discharged battery it will be impossible to start the engine. For the VAZ 2114 model, the nominal voltage of the electrical circuit is considered to be 12 Volts, but taking into account all consumers (lighting, ignition system, instruments, stove motor, windshield wiper motor, etc.) it should always be higher. Therefore, the voltage in the electrical circuit can range from 13.2 to 14.7 Volts. To maintain it at the required value, a regulator is installed in the generator circuit. Moreover, this device is present in any car, and not just on the 2114 model.
It is important for the car owner to know whether the generator produces the required current. Checking the functionality of the generator is primarily determined by the charging indicator located on the instrument panel inside the car. If the lamp lights up while the engine is running, then the generator circuit is faulty; diagnostics and, if necessary, repairs are required.
Other reasons for not charging
If the battery is not charged or is insufficiently charged, in addition to a faulty voltage regulator, there may be other reasons related to the generator:
- The belt is poorly tensioned;
- Poor contact or break in the wires supplying power;
- Faulty rotor or stator winding;
- Poor contact of the brushes with the rotor commutator, the brushes are simply worn out.
The electrical equipment system has the main power sources, among which the generator is given a worthy place of honor. The voltage regulator of the VAZ 2114 generator is responsible for providing power to the on-board network for the functionality of all operating electrical appliances.
The device contains a rectifier unit that converts three-phase alternating current into direct current. Thanks to this device, surges in the output from the generator are reduced, and the voltage range should be from 13.2 to 14.7 Volts.
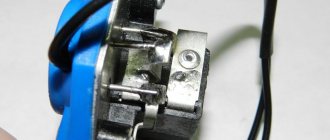
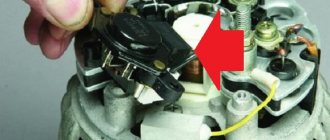
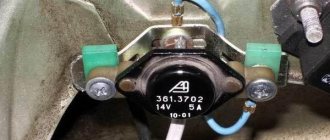
Where is the VAZ 2114 charging relay located? The unit is located at the rear of the generator, below under a plastic cover. The device is black and has two graphic conductive brushes.
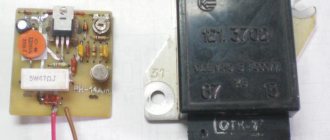
VOLTAGE REGULATOR
It is not difficult to find where the VAZ 2114 generator relay is located. This device is located at the back of the generator itself under a plastic cover. Where is the charging relay located on the VAZ 2114 - a question for backfilling. The fact is that the charging relay, generator relay and voltage regulator on the VAZ 14th are generally one and the same single device. It is also called a relay regulator.
What happens if the voltage in an electrical circuit drops below 13.2 Volts? The battery will stop charging, and after a fairly short period of time the starter will no longer have enough power to crank the engine to start. What if it is over 14.7 Volts? Then elements of the electrical circuit may fail, for example, the radio or one of the engine sensors (mass air flow sensor, phase sensor, etc.) will burn out.
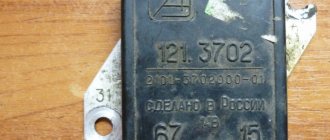
The charging relay on the VAZ 2114 looks like a large black tablet, at the end of which there are two graphite brushes (brush assembly). If there is little or no charging, the voltage regulator is checked.
Voltage regulator location
DIAGNOSTICS OF RELAY REGULATOR
Checking the functionality of the generator on a VAZ 2114 always begins by measuring the voltage of the on-board circuit with the engine running. The most convenient way to measure is with a digital multimeter:
- We set up the multimeter to measure voltage and set the upper limit to 20 Volts;
- We connect the probes of the device to the battery and measure the voltage with the engine turned off. The voltmeter should show somewhere between 12.5 and 13 volts;
- We start the engine, the readings of the device with a good working generator should increase to about 14 Volts (maybe a little more);
- With the engine running, turn on the load (high beam, dimensions, heated rear window, heater motor at maximum speed). We look at the readings of the multimeter - the device should not show less than 13.2 Volts at idle, but it is better if this indicator is in the range of 13.8-13.9.
Checking the generator voltage regulator can also be carried out on a removed device. The device assembled with the brush assembly is checked. For this:
- We connect the mass terminal (minus) of the “tablet” with a wire to the minus of the battery.
- We supply power (12-14 Volts) to terminals “B” and “C” from the battery.
- We connect a 1-3 Watt car lamp to graphite brushes. If the relay-regulator is working properly, the lamp should light up.
There is another way to check the operation of the voltage regulator - when you need to check what the regulator's response threshold is at the upper limit. To do this, we increase the voltage in the circuit, for example, in parallel we add two or three 1.5 V AA batteries to the circuit. We need to increase the voltage to more than 16 volts, we connect everything else according to the same circuit. In this case, if the charging relay is working properly, the lamp should no longer light up.
Summarizing the results of both checks, we draw the following conclusions:
- If the lamp lights up during the first check, but does not light up during the second, then the voltage regulator is working;
- If the lamp lights up during both tests, the regulator has a breakdown;
- If it does not light up in either case, there is a break in the device between the brushes or contacts.
REPLACEMENT
The convenient location of the VAZ 2114 voltage regulator makes it quite easy to change without removing the generator itself.
We proceed as follows:
- Disconnect the battery terminals;
- We unscrew the nut by 10 with a wrench and move aside the positive wires going to the generator (red and black);
- We pull off the chip with a thin wire;
- Remove the rear plastic cover of the generator. It is attached to three clamps, and to remove it, the clamps must be bent;
- The relay regulator is mounted on two screws. Take a Phillips screwdriver and unscrew the screws;
- The “tablet” remains hanging on the wire. Carefully pull out the plug from the device and dismantle the regulator;
- We install the new part in the reverse order.
You can replace the relay regulator by removing the generator; here everyone chooses the method that will be most convenient.
Mounting block 2114-3722010-18
Circuit breakers
- Headlight cleaners (when turned on)
- Headlight wiper relay (contacts)
- Headlight washer activation valve
- Turn Signals and Relays - Hazard Light Interrupter (in Hazard Mode)
- Hazard warning lamp
- Tail lights (brake lights)
- Interior lighting
- Rear window heating element
- Relay (contacts) for turning on the heated rear window
- Socket for portable lamp
- Cigarette lighter
- Engine cooling fan electric motor and its activation relay (contacts)
- Sound signal and relay for its activation
- Power windows for front doors
- Power window relay
- Headlight cleaners (in operating mode)
- Relay for turning on headlight cleaners (coil)
- Heater fan motor - heater fuse
- Window washer motor
- Rear window wiper motor
- Rear window washer timing relay
- Windshield and rear window washer activation valves
- Relay (winding) for turning on the electric fan of the engine cooling system
- Relay (coil) for turning on the rear window heating
- Rear window heating indicator lamp
- Glove compartment lamp
- Left fog lamp
- Right fog lamp
- License plate lights
- Engine compartment lamp
- Instrument lighting lamps
- External lighting indicator lamp
- Heater lever illumination display
- Cigarette lighter lamp
- Left headlight (side light)
- Left rear light (side light)
- Right headlight (side light)
- Right rear light (side light)
- Left headlight (high beam)
- Indicator lamp for high beam headlights
- Turn Signals and Relays - Turn Signal and Hazard Light Interrupter (in Turn Signal Mode)
- Turn signal indicator lamp
- Rear lights (reversing lights)
- Gearmotor and windshield wiper activation relay
- Generator field winding (when starting the engine)
- Brake fluid level warning lamp
- Oil pressure warning lamp
- Carburetor choke warning lamp
- Parking brake warning lamp
- Signal lamp "STOP"
- Coolant temperature gauge
- Fuel level indicator with reserve warning lamp
- Voltmeter
- Headlight wiper relay
- Relay-breaker for direction indicators and hazard warning lights
- Windshield wiper relay
- Lamp health monitoring relay
- Power window relay
- Horn relay
- Heated rear window relay
- High beam relay
- Low beam relay
How does a voltage regulator work?
In terms of its design, the three-level voltage regulator VAZ 2114 is a relay with a transistor circuit and resistances connected to it, which, in turn, are connected to the exciting winding on the generator stator.
The principle of its operation is as follows - during its operation, the generator produces current with an unstable, intermittent voltage, the use of which directly in the on-board network could lead to malfunctions and even breakdowns of electronic equipment. In order to eliminate these surges and maintain the voltage produced by the generator at the same level, a stabilizer regulator is needed.
So, when generating too high a voltage, the device includes additional resistors in the circuit, which lower the voltage to the desired level. Otherwise (when the voltage is too low), the stabilizer turns off all resistance in the circuit, and the voltage produced by the generator increases.
Speaking about the operation of the stabilizer, one should also take into account the fact that all these adjustment voltage fluctuations occur at a high frequency, as a result of which the total voltage in the on-board network remains virtually unchanged.
In simple terms, the voltage regulator of the VAZ 2114 generator is responsible for:
- activation of the electric generator;
- control of the current supplied by the generator;
- maintaining the voltage supplied to the on-board network at a stable level.
For the regulator mounted on the 14th model, the standard operating parameters are a nominal voltage of 14.5 volts and a nominal current of 5 amperes.
Checking the windings
First you need to visually inspect the windings. If there are no visible defects, you should use a multimeter. First you need to do the following:
- Remove the brush holder.
- Disconnect the voltage regulator.
- Clean the slip rings.
- Diagnose the winding for defects.
The resistance measurement function on the multimeter should be activated. The measurement is taken between the slip rings and the stator. In normal mode, the value will be from 5 to 10 ohms.
Signs of regulator malfunction
Sometimes during the operation of a car it happens that the stabilizer fails. Signs of this may include frequent fluctuations and sudden surges in voltage in the vehicle network, problems with electrical appliances and rapid discharge of the battery. If you notice one or more of the above signs, then the relay regulator of the VAZ 2114 generator should be tested using a multimeter.
You can do this as follows:
- Set the tester to measure DC voltage with a limit of 20 volts.
- Measure the voltage readings at the battery terminals with the engine turned off (the result should be from 12.5 to 13 volts).
- Start the engine and measure the voltage at the terminals again (now it should be between 14 and 14.5 volts).
- Without turning off the engine, turn on the high beam, heater and heated glass (other powerful consumers can also be used). Measure the voltage on the battery a third time. The voltage readings should be in the range of 13.2-13.9 volts - this will mean that the stabilizer is fixed. Otherwise, the device will have to be dismantled and replaced.
Traveling in a car with a faulty generator regulator is not profitable and even unsafe, as this can lead to increased fuel consumption, breakdowns in the on-board network, and even a car fire.
You can check the correct operation of the regulator without using a multimeter, with the device removed. To do this, you need to connect its “ground” terminal to the negative of the battery, and connect contacts B and C to the positive. After this, you should take a 3-watt car lamp and connect it to the graphite brushes of the regulator. If the latter is working properly, the lamp will light up.
In some cases, you can go even further and check the trigger threshold. To do this, the regulator should be connected as mentioned above, but between its positive terminals and the plus of the battery, connect a pair of AA batteries in parallel in order to increase the voltage in the network to 16 volts. If the regulator is working correctly, it will interrupt the power supply and the light bulb connected to its brushes will not light up.
Troubleshooting - where to start
The first thing you should check is whether there is an overload in the on-board network. Of course, if your car has nothing installed other than a standard radio, then you don’t need to do this, but if you are a tuning enthusiast, then you should start checking with this option.
Overload of the on-board network of the VAZ 2114
In order to check the load on the network, you will need to at least visually estimate the number of additionally installed light and sound devices, as well as compare their total power with the power of the generator.
If it ultimately turns out that these two values are approximately equal or the power consumption even exceeds the generated power, then you will need to remove some devices (what exactly to “sacrifice” is up to you).
After this procedure, you will need to start the car and check the operation of the generator. If the battery starts to charge, then the reason was precisely the overload.
Battery for VAZ 2114
The second thing you will need to check is the compliance of the generator and battery installed in the car. Thus, some motorists who install additional equipment on their cars also install batteries with increased power, thinking that they will be able to provide energy to all newly installed devices.
In fact, this is far from the case. If the power of the battery exceeds the power of the generator, then the latter simply will not be able to fully charge it, which will only increase energy losses in the on-board network. This should always be kept in mind.
How to replace a voltage regulator
If during the test it turns out that the regulator is faulty, then you should replace it with a new one of a similar model as quickly as possible.
This should be done as follows:
- Disconnect both terminals from the battery.
- Disconnect the block with wires connected to terminal “D” of the generator.
- Remove the rubber cap from the “positive” terminal, using a 13mm wrench, unscrew the nut securing the bundle of wires to the stud.
- Remove the wires from the pin contact.
- Open the 3 plastic clips on the lid.
- Using a flathead screwdriver or narrow blade, remove the cover.
- Using a Phillips screwdriver, unscrew the 2 screws securing the regulator.
- Disconnect the wires leading to the device.
- Remove the regulator housing along with the graphite brushes.
Installing a new voltage regulator should be done in the same order, but in reverse order.
When installing a new regulator, be sure to clean all its contact surfaces and check the tightness of the contacts. Otherwise, failures and incorrect operation of the device may occur.
Finishing the conversation about the voltage regulator, I would like to remind you once again that at the first sign of a malfunction of the device, you should replace it with a new one, since otherwise there is not only a risk of failure of the on-board electronics or increased fuel consumption, but also the likelihood of a short circuit with further fire cars.
Unsustainable breakdown - hurry up with repairs!
It would seem that there is something wrong here - there is not enough tension. The car runs on gasoline, not electricity. However, a lack of current power leads to an increase in fuel consumption, a decrease in engine power, and some electrical appliances stop working altogether and will require replacement in the future. This is especially noticeable in the dark, when many power supply devices are used.
The first sign of lack of voltage is dim high beams - their lamps require a large number of watts. In most cases, it turns out that the battery is poorly charged.
You can deal with this problem easily and quickly by charging it properly. However, sometimes this doesn't help. Look under the hood - the battery terminals may be loose or oxidized. If in a parking lot the current still maintains a constant voltage, then during driving, due to vibration, the terminals may move away, opening the circuit. To fix the problem, you need to thoroughly lubricate the fasteners and tighten the bolts; sometimes only replacing the old terminals with new ones will help.