Quite often there are cases when the ECU (electronic control unit or “brains” of the machine) fills with antifreeze or other coolant. Most happy owners of Lada Kalina, especially the experienced ones who have owned the car for a long time, are well aware of this problem. The reason for its occurrence is very easy to understand - just look at where the ECU is located on the Kalina. The fact is that the “brains” are located next to the radiator of the stove. If it leaks, the controller will be completely flooded with coolant and will definitely fail. One smart person said: “...even if you have never heard of trouble, this does not mean that it cannot happen to you.” Therefore, when I first learned about the problem, I immediately began to think about how to avoid its occurrence. The Internet helped me in studying this issue - it’s easy to find the necessary information on car forums (if only I had time). Transferring the ECU to the Kalina seemed to me to be an absolutely simple and easily doable task; all that remained was to choose a location for installation. The following options were considered: 1. Moving the block under the insulation and installing it above the front passenger seat mat. 2. Installing the unit on the air duct above the glove box shelf. It was also suggested to wrap the ECU with polyethylene or coat it with sealant, but I immediately threw such “good advice” aside. This should not be done under any circumstances - condensation will accumulate inside the controller housing, and the device itself will quickly fail. After thinking about it for a couple of days, I decided to do things a little differently than I was advised. I think that you will also be interested in learning how to transfer brains to Kalina using my method. For greater clarity and visibility of this event, I have attached several photographs depicting the stages of work.
Location
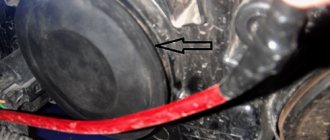
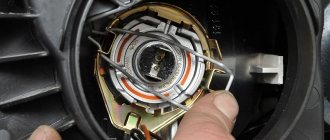
The ECU on the Lada Kalina is located under the center console of the car. You can see it by removing the side cover of the front passenger's footwell air duct. The block is attached to a bolted connection and securely fixed in its place. The connectors of the unit are also tightly inserted into their place and secured with a special lock, which prevents the connector from spontaneously disconnecting from the ECU.
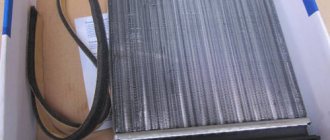
It is quite difficult to call this location of the engine control unit successful, since it is located exactly under the heater radiator and if there are leaks in the heater radiator, the coolant gets directly onto the engine block, which causes irreversible consequences and, of course, a breakdown or short circuit.
In some cases, there is a coolant leak at the ECU, it can be repaired, but most often it is necessary to replace the unit.
Conclusion
As can be seen from the article, the Lada Kalina ECU is located in an accessible place. The only and serious problem remains that an accidental spill of water can lead to tragic consequences, namely the purchase of a new spare part. The cost of the part is about 4000-5000 rubles.
Everything is shown in quite detail. As a newbie in this business, everything is clear and understandable to me. Now I'll try to figure out my technique myself.
Chip tuning to reduce fuel consumption is not really chip tuning. The chip is just a chip, like a USB connection, and everything on the chip has one firmware or another. And there is no chip there, there are controllers and there is no chip there. Rewritable controllers. They chip differently. A chip is something that cannot be faked; it is something that stays with you and is not sold or distributed. The chip necessarily contains data about the owner of the car and other parameters. Give him a fulcrum and let him move this car? The chip is not a support, but it has more meaning than a support. It protects the pupil of the driver's eye.
It’s all described in a hand-cooked way. In Kalina everything is completely different. You explained the cars in the description and write that they are easy. Did the woman rewrite something for you?
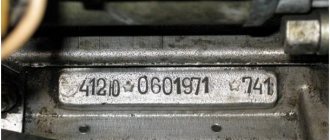
What kind of ECUs are there on Kalina?
Below is a table with engine controllers that were installed on the Lada Kalina.
| Manufacturer | Model | vendor code | Engine | Throttle |
| BOSCH | 7.9.7 | 21114-1411020-40 | 1.6l, 8 cl. | Mechanical |
| BOSCH | 7.9.7 | 1183-1411020-20 | 1.6l, 8 cl. | Mechanical |
| ITELMA | January 7.2 | 11183-1411020-22 | 1.6l, 8 cl. | Mechanical |
| BOSCH | 7.9.7 | 11194-1411020-10 | 1.6l, 16 cl. | Electric |
| Avtel | January 7.2 | 11183-1411020-21 | 1.6l, 8 cl. | Electric |
| Elvar | January | 11183-1411020-52 | 1.6l, 8 cl. | Electric |
| Avtel | January M73 | 21114-1411020-41 | 1.6l, 8 cl. | Mechanical |
| ITELMA | ITELMA | 21126-1411020-08 | 1.6l, 16 cl. | Electric |
Let's sum it up
If symptoms appear, the owner of LADA Kalina should contact service as soon as possible, because the cost of repairs can be significantly reduced. It is advisable to independently carry out the procedures we have indicated if the owner of LADA Kalina has a sufficient level of experience in dealing with automotive electronic devices. To do this, at a minimum, you need to know where the ECU is located, as well as how to remove the ECU. However, a 100% positive outcome of the event should not be expected. In case of failure, we recommend contacting the service specialists.
Why doesn't the ECU work?
ECU chip filled with antifreeze
Quite often problems occur that the engine control unit stops working; to find out the reason for the failure of the ECU, you need to inspect it:
- Check to see if the connector has come loose from the unit; this happens quite often after installing a radio, or replacing a heater radiator, etc.
- Check for ground on the block. Sometimes it happens that after some work, a person forgets to fasten the mass necessary for the operation of the unit.
- Check for signs of coolant leakage on the engine block.
If such problems are not found, it is necessary to dismantle the engine block and troubleshoot, repair or replace it.
Performing device diagnostics
After the block filled with antifreeze has been removed, its initial inspection should be carried out. For these purposes, it is necessary to remove 4 screws using a star screwdriver. Then you should slowly remove the control board for a visual inspection. The most common failure is the burnout of the ignition coil output switch. In this case, repair will not help.
As a result of such a malfunction, the Lada Kalina starts working on only 2 cylinders, and sometimes refuses to start at all. You can cope with a similar problem in a stationary workshop. There they will remove the damaged element, wash and dry it.
The second most common problem is board burnout. It is not difficult to detect such a defect: the characteristic blackening of the board will leave no doubt.
Is it possible to repair the ECU in this case? The answer to this question can only be given by a service center, but experience shows that repairs will not help here. A complete replacement is required. It happens that sometimes the brain circuitry is slightly damaged. If this happens, then the car owner can get off easy. To restore the car to working order, you will need some minor repairs:
- wipe the block with a dry cloth;
- rinse with WD-40 several times and blow it out with a compressor;
- rinse several times in alcohol and blow again with a compressor;
- dry well, otherwise the Lada Kalina will not move;
- drying takes at least 1-2 hours.
Some may think that replacing the brains of a vehicle is more profitable and faster than drying. Experience shows that the exact opposite happens. It all starts with the price factor. Such a breakdown of Kalina 2 will force you to take a considerable amount out of your wallet.
When choosing a new unit, it is not recommended to look for used options. They can be cheaper, but your car's performance may not improve after such repairs.
tweet
back Diagnostics of the fuel pressure regulator Lada Kalina
Forward Why do you need a mass air flow sensor in Kalina?
Tagsrepair, control system, ECU
Replacing the ECU
Replacing the engine controller on Kalina is quite simple according to the instructions presented below.
- Remove the negative terminal from the battery;
- Unscrew the cover of the side air duct of the front passenger's feet;
- Disconnect the connectors from the controller;
- Unscrew the screw securing the ECU on the left;
- We take out the controller by pulling it towards ourselves, as if on a sled;
- Unscrew the controller from the pad;
- Installation is carried out in the reverse order;
Dismantling and installation of the block
Most drivers who searched for a location mainly used the glove compartment as a new location for the part.
There are 2 mounting options: under the glove compartment or inside the bend of this compartment. In the first case, you will need a corner and several screws.
The procedure for obtaining the ECU:
- Armed with a Phillips screwdriver, you need to remove the panel from the front passenger seat.
- Remove the driver's side plastic panel. The block itself should now be visible.
- To remove the part, you will need to unscrew the mounting screws. Using the same screwdriver, unscrew the fasteners.
- After unscrewing the fasteners, you need to pull out the part. Pull it towards you; if it doesn’t give in, you need to move the block a little from side to side and try again. You can push it from the other side.
After the block has been removed, you can begin installing it in a new location.
Now it’s time to move on to the new installation location. The first option is quite simple:
- You will need to make a hole in the left wall of the glove compartment for a self-tapping screw.
- To mount the ECU you will need a self-tapping screw and a corner. The corner is attached to the part and secured with a bolt, screw or self-tapping screw through the glove compartment.
- On the other hand, it does not need to be secured, since it rests against the wall. The option is quite good and can be completed without unnecessary alterations within 40-50 minutes.
The second option is to store it in the glove compartment. Not the most convenient placement, but still usable. There is a small space under the glove compartment, the entire ECU can fit there.
Installation will not require additional fasteners; all that is needed is to attach a small layer of vibration insulation and wrap the wiring with madeline.
After this, the block can be placed in a secluded corner away. You can reach this place only with a strong desire and on purpose, so the block is out of danger.
Primary localization of the problem
If any malfunctions occur in the radiator, then antifreeze dripping directly onto the body of the Lada Kalina ECU becomes the cause of lengthy repairs. It can take a long time from the start of a leak to the first signs of a malfunction. Depending on the intensity of the leak, the Lada Kalina will react differently.
In most cases, the driver sees a constant light on indicating an engine error. After a few weeks, the failure of the brains on Kalina will cause the vehicle to stop. If antifreeze leaks quickly, smoke may come out from under the car's dashboard. Regardless of the reason, the car owner needs to react quickly.
If the ECU is flooded, it is necessary to immediately carry out a visual inspection. It is located at the bottom of the instrument console. If you can’t find it the first time, then you can use the area between the floor and the heating radiator as a guide.
The best way to get to the ECU is from the side where the passenger's feet are located. Before this, it is necessary to remove the plastic cover secured with one self-tapping screw.
After unscrewing, it must be moved in the direction of travel of the vehicle. If everything is done correctly, then it completely disengages. To carry out further work, the unit itself must be dismantled. The procedure here is as follows:
- be sure to remove the terminal from the battery;
- Carefully unscrew 2 screws (one of them is located on the Kalina 2 engine side);
- slowly pull the block towards the passenger door;
- if this does not work, you need to temporarily remove the carpet from the car;
- Removal of the wires is carried out using a slight pulling movement of the connector latches to the side.
How to activate the immobilizer?
Often, a VAZ Kalina car reaches its owner with an inactivated immobilizer. To carry out the independent activation procedure, you need both car keys (with a red mark and a regular one). A prerequisite is that the doors are closed (until the limit switch is activated).
To ensure the correctness of the immo activation procedure on Kalina, it is recommended to refuel the car, since the low fuel level signal is identical to the sound during programming.
Activation on Kalina-1
The training procedure on Kalina-1 is as follows:
- Take the training key with the red mark and insert it into the ignition switch.
- Turn the key to the ignition switch point. Since the immobilizer is not active, after six seconds the control indicator on the instrument cluster should turn on. If this does not happen, the system is in an active state and further steps are not performed.
- Turn off the ignition, and the immobilizer indicator will switch to rapid flash mode. The flashing mode lasts six seconds, which are allocated to the owner to install a regular key in the ignition switch.
- Turn the lock cylinder to the activation position. The correctness of the procedure is confirmed by the alarm buzzer sounding three times. The absence of a sound indication indicates that the time interval allocated for installing the key has been exceeded, or that the immobilizer is faulty. The option of “training” the standard key to work with a device from another car cannot be ruled out.
- Wait 5-6 seconds, the buzzer should sound two more times. Then you need to turn off the ignition and remove the key from the lock.
- After this, the owner has six seconds at his disposal, during which he must turn on the ignition with the key with a red mark. During this time, the immobilizer indicator light flashes on the instrument cluster.
- After turning on the ignition, the buzzer should sound three times. Wait a few seconds until the second series of beeps sounds (two separate beeps).
- Turn off the ignition, leaving the key in the lock. After some time, a single signal will be sent by the buzzer, and the warning lamp on the instrument panel will begin to flash with increased frequency. Up to 15 seconds pass between turning off the ignition circuits and the indicator switching to the accelerated flashing mode. The time interval depends on the model of the immobilizer control unit installed on the car.
- After this, within 10 seconds you need to turn on the ignition briefly (for 3 seconds).
- Turn off the ignition. The alarm should sound three times. This confirms the successful completion of programming.
- Wait until the indicator on the instrument cluster stops blinking. Then you should remove the red key, programming the devices is completed.
Activation on Kalina-2
On Kalina-2 the procedure is different:
- When you turn on the ignition with the key with a red mark, three short beeps will follow from the buzzer. After the third signal passes, the ignition is turned off and the key is removed from the lock. Important - if the car was operated with a red key, the immobilizer will not make sounds. In this case, you need to wait a few seconds and move on to the next step.
- Within 5-6 seconds, insert a regular key and activate the ignition circuits again. Three beeps will sound, followed by a pause followed by two more beeps.
- Change the keys in the lock (within 6 seconds). After turning on the ignition with the red key, three signals will be given, then two more.
- Turn off the ignition, leaving the key in the lock. A buzzer will sound, after which the key will be turned to the ignition switch position. The car's standard horn will sound, indicating that the regular key has been stored in memory.
- Turn off the ignition. The indicator on the instrument cluster will go off. Otherwise, we are talking about device failure or programming error.
The procedure for activating the immobilizer on the VAZ Kalina, as well as Priora and Grant is shown in a video from the channel “avtodopka. ru".
For this we need:
Universal adapter KL-Line BM9213 USB MASTER KIT for tuning a car with an injection engine, you will not chip the carburetor with it,
You can read more about it and how to purchase it here. For the adapter, the driver for the virtual COM port for Win XP, Vista can be downloaded here, you can also use another adapter VAG COM USB KKL v409.1 which can be purchased from our partners, this is the one The KK-Line adapter is exclusively in the case and for funny means.
Next, for flashing the chip firmware, we will need ChipLoader 1.96; you can also use the newest version of ChipLoader 1.97.7, and the previous one works smoothly, so I don’t see the need to use the new one.
in the Help > Help tab you will find the User Guide, also go to options and uncheck all the boxes as shown in the figure above. In order for the block to start sewing, it needs to be modified according to the annotations in the User Manual
, everything is carefully described there.