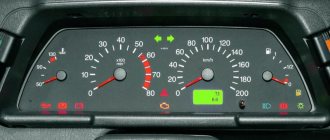
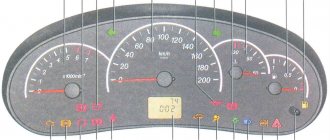
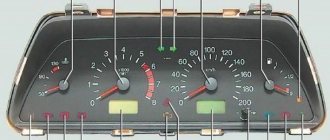
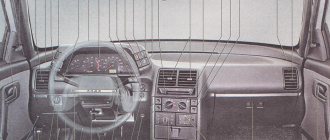
The dashboard in the car allows the driver to know about the speed, engine operating temperature, remaining fuel volume, as well as operating electrical equipment. This unit is the connecting element between the car and the driver, so its performance is extremely important. This material will allow you to find out what the pinout of the VAZ 2110 instrument panel is, what malfunctions it is susceptible to, and how to repair it if necessary.
Replacing the backlight on the dashboard
Dashboard sign for VAZ 2110
To do this, you need to use the following algorithm:
- The panel should be removed.
- The illumination designation is determined by special LED bulbs. To replace the backlight, these bulbs must be removed.
Note: this must be done very carefully, because they are quite small. In addition, there is a possibility of damaging the panel itself.
- But before that you need to disassemble it. This is not a difficult task, as to disassemble it you just need to press the latches, thanks to which you can remove the bulbs.
- Everyone has seen that on top of the dashboard there is a “sticker” and symbols (speed, amount of gasoline). It is held on by glue, so to remove it you will have to dig around a little. Remaining glue must be removed.
- You can start replacing the backlight.
Note: it is advisable to choose colors that are not very bright and strain the eyes. White or blue colors are ideal.
- To remove the light filter located on the back of the “sticker”, you need to take a utility knife. The light filter is located under the protective layer. First you need to remove it. Do not press too hard with the knife, as necessary parts may be damaged.
Description of dashboard tuning
Note: it is easier to remove it if you rub it with a knife in one direction, then in the other.
- To insert LED bulbs, you must remove the board located in the plastic case. There will be special holes for them.
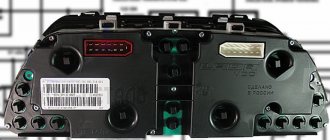
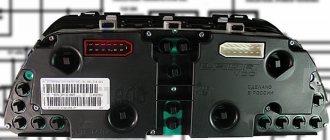
Panel instrument pinout
Note: But that's not all - you will need to solder the wiring of the light bulbs to the board in order for them to work.
- Now we need to put everything back together and install it correctly.
Installing a new trim
Before proceeding with installation, it is necessary to carry out preparatory work:
- First, measure the size of the new overlay and cut out the required part.
- But you shouldn’t cut off much, as after installation, minor gaps may appear near the steering wheel.
- Also, the correct cuts are also made next to the air ducts so that the material can be folded.
- After this, the finished part is tried on.
- Then, to avoid panel squeaks, a special anti-creaking compound should be applied.
- If a new Euro panel overlay is to be glued on, you will need to purchase special brackets.
- Now you can begin installing buttons and other panel elements, and after that the Euro panel is attached using self-tapping screws.
Separately illuminated arrows
LED instrument panel VAZ 2110
If you want the arrows to glow a different color, you can do the following:
- Remove the dashboard.
- Take it apart.
- Install separate LEDs under the arrows.
Note: in this case, the arrows will light up in a different color only when ignited.
When disassembly is required
There are several reasons why car owners want to remove the tidy:
- It is damaged by mechanical shocks, as a result of hitting potholes, etc. In fact, the strength of the standard dashboard leaves much to be desired, so damage is not uncommon for dozens;
- There are scratches and abrasions on the surface of the device, the paint has peeled off somewhere, and there are signs of wear. That is, the appearance of the panel leaves much to be desired, so to correct the situation it needs to be removed;
- The desire to transform the interior of the car. Many VAZ 2110 owners decide to get rid of the old dashboard in order to put something more modern, original in its place, and change the backlight to LED lights.
If you connect something incorrectly and reassemble the panel without checking, you risk not only having to re-disassemble the dashboard, but also encountering non-functioning devices, short circuits and even worse consequences.
How to assemble and disassemble the panel
To reset the speedometer or fix the problem that the turn signal light on the dashboard is not blinking, it must be removed. To this end, you should perform the following actions:
- You can remove the cover, but the board will still be locked.
- You need to take a Phillips screwdriver and use it to remove a few more bolts.
- Now you need to unlatch the latches on the panel. You should start from the bottom. If they were disconnected from the bottom side, then you can push them up. This way the fee will be removed quickly.
- The arrows will have to be removed anyway.
Note: some arrows are easy to remove, but the arrows for the gasoline quantity indicator are much more difficult to remove. To remove the arrows, you need to gently pull them.
- The panel is disassembled, now we need to try to solve the problem.
Note: There are very small LEDs on the board that can also burn out. Because of them, the turn signal light may not blink, so they need to be replaced. This requires working with a soldering iron.
- Find the black daily mileage button on the board.
- Click on it.
Now it is advisable to somehow put the panel back together. This is made even easier:
- Place the board in a plastic case.
Note: It is advisable to have a clean cloth underneath to prevent the surface from being scratched.
- Now you need to screw in the bolts on the panel itself. They do not need to be completely screwed in yet, as the arrows must be put in place first.
- Before putting the hands back in place, they need to be wiped thoroughly, as fingerprints, dirt, etc. will be visible when exposed to light.
Note: the arrows should be set approximately 3-4 mm below zero. It is also important that there is a small gap between the needles and the speedometer, otherwise they will stick. It is much easier to install, as well as remove, long arrows. To install short arrows, you need to act very carefully, as they are more delicate compared to long ones.
- Before installing the glass, it also needs to be wiped. Now snap onto the latches.
- Secure the board with bolts.
- Lastly, screw in the screws on the cover, and then put all the light bulbs in place.
Disassembly procedure
Many people are interested in whether it is possible to remove the dashboard of a VAZ 2110 without “demolishing” the floor of the cabin? It's probably possible, but it would be very inconvenient.
Therefore, we act according to this plan:
- Let's prepare a marker and self-adhesive labels (which are usually glued to the product). They can be bought at points where all sorts of small things are sold such as napkins, bags, etc., as well as in stationery stores;
- We remove the front seats from the interior;
- We unscrew the screws on the sides, remove the tunnel (first its upper part, then the lower);
- We disassemble the steering column casing, remove it and the steering wheel. To do this, you need to unscrew 3 self-tapping screws and 4 screws. Please note that the VAZ 2110 steering wheel sits quite tightly on the splines, so you need to remove it by rocking and tugging, but being careful of a sharp blow to the face, if you suddenly overdo it and it will fly out;
- Next are the steering column switches. They also need to be removed;
- Don’t forget to mark everything and write down on a piece of paper what we are filming;
- We unscrew the glove compartment (in “understandable” language - the glove compartment) and also take it out;
- Next comes the disassembly of the mounting block and its cover. To do this, disconnect all connectors and relays;
- Now we have almost opened the instrument panel on the VAZ 2110. All that remains is to remove the strut covers, unscrew the headlight hydraulic adjustment and push it inward;
- Now the main task is to unscrew the screws securing the instrument panel to the body. To remove it completely, you need to unscrew the two studs located under the covers of the tunnels for supplying air to the side windows.
After all these manipulations, the panel hangs, and is held in place only by the steering shaft and the lower air duct.
Disassembly and replacement of devices
To replace (repair) devices, you must perform the following actions in a strictly established order:
1. The entire instrument cluster must be removed completely.
2. Unscrew the screws (2 pcs.) that secure the tire. After this, the bus itself must be disconnected from the instrument system board.
3. Unscrew the screws (7 pcs.) that secure the frame with glass.
4. It is necessary to remove the frame by disconnecting it from the instrument system.
5. Unscrew the 2 screws that secure the instrument cluster board.
6. Disconnect the left light filter, which has warning lamp symbols.
7. Disconnect the right light filter, which has warning lamp symbols.
9. Unscrew the nuts securing the fuel level sensor, coolant temperature sensor and tachometer. Each device is secured with 3 nuts.
10. Disconnect the board from the instrument system housing.
11. Unscrew the screws securing the instrument scale to the body (5 pcs.).
Improvement and tuning of the dashboard on the VAZ 2110
One of the most popular ways to improve the dashboard on a VAZ 2110 is its sound insulation. In order to do this, you must perform the following steps:
- We remove the tidy, I already told you how to do this earlier
- Next we foam, but under no circumstances should you pile up a huge pile of foam at once, it won’t dry out in a week.
- Don’t forget to try it on so that later it doesn’t turn out that your steering wheel touches it, or it’s just too high.
- In principle, all the work consists of two things, you cut, foam, cut again and so on many times.
- Next, we apply the cheapest putty we could find.
- Next we cover the dashboard with Shumka.
- We install the torpedo back.
You can modify the dashboard of a VAZ 2110 in different ways, someone covers it with leather, someone inserts an LCD monitor into it, in tuning a car it all depends on you and your fantasies and desires.
Replacing warning lamps in the instrument panel
In many cars, including the VAZ 2110, warning lamps A12?1,2 are used in the instrument cluster. When replacing the lamp, do the following:
2. The socket together with the burnt-out lamp should be turned counterclockwise all the way.
3. Remove the lamp socket from the instrument system.
4. A new lamp is installed in place of the burned out one in the reverse order. All other instrument cluster lamps are replaced using the same method.
Hello. We will show you how to remove the instrument panel on a VAZ 2110, as well as replace the suspension bulbs.
Tools:
- Phillips screwdriver (short)
How to remove the dashboard on a VAZ 2110 with your own hands - step-by-step instructions + photo report
In order to remove a torpedo on a VAZ 2110, you must perform the following procedure:
- Unscrew 2 screws on the right and 2 on the left on the central tunnel.
- Next, remove the covers on both sides.
- Remove the plug near the handbrake.
- Unscrew the screws on the left and right of the central tunnel.
- Unscrew the screws at the back of the central tunnel.
- Removing the plastic of the central tunnel.
- Disconnecting the cigarette lighter wires. Mark so as not to get confused when connecting to the assembly.
- Remove the gearshift knob cover.
- Using a wrench, unscrew the interior heating air duct.
- Removing the air duct.
- Unscrew the fastenings of the central panel from the front.
- Unscrew the fastenings of the central panel at the back.
- We finally remove the panel.
- We unscrew the screws of the glove compartment.
- We remove the glove compartment.
- Disconnect the glove box light wires.
- We unscrew the screws inside the space in place of the glove compartment.
- Unscrew the remaining screws on the sides of the torpedo.
- Unscrew the torpedo bolts as follows as in the photo.
- Removing the air duct.
- Unscrew the nut on the dashboard under the air duct.
- We lower the torpedo from the pins.
- We disconnect the wires from the front panel and mark them so as not to get confused during assembly.
As you noticed, if you follow our instructions, the process becomes much easier. You can remove the VAZ 2110, 2111, 2112 torpedo with your own hands, but it is better to do it with an assistant.
Removing and installing the shield
1. From the bottom of the panel, unscrew the two screws using a Phillips screwdriver.
2. On top of the panel, unscrew two screws, also for a Phillips screwdriver.
3. After unscrewing the screws, remove the plastic cover of the instrument panel.
4. Disconnect the connectors on both sides that go to the buttons of the plastic cover and put it aside.
5. Unscrew the two screws securing the shield at the edges.
6. Separate the two latches of the shield and pull it slightly towards you.
7. Disconnect two connectors.
8. After disconnecting the connectors, remove the instrument panel.
Troubleshooting methods
What are the troubleshooting options:
- If there is no backlight, you need to check the fuse and replace it if it is blown. All failed light bulbs must be replaced.
- If the sensors are not working, you should check the integrity of the wiring with a multimeter or other tester to check the wiring. Damaged sections of wires also need to be replaced.
- If the car interior is humid, over time this can lead to oxidation of the shield contacts. If such a malfunction occurs, the contacts must be cleaned or replaced.
- If the problem lies precisely in the inoperability of the instrument cluster, then it is better to entrust the repair to specialists. It is possible that in the process you will have to resolder some elements, so if you do not have experience in carrying out such events, then contact an electrician (the video was shot by Alexey Lipatov).
Instructions for dismantling the tidy
So, how to remove and disassemble the device for its subsequent repair or replacement:
- To begin, you will need to use a Phillips screwdriver to unscrew the two self-tapping screws located on the top trim.
- After this, you also need to unscrew two more bolts, they are located on the bottom of the lining.
- Then you need to carefully detach the cover and put it aside.
- Next, the connectors with wiring from the buttons located on the sides of the device are disconnected. This will allow you to move the trim to the side.
- Only after these steps can you unscrew the two bolts that secure the tidy to the center console. They are located at the ends.
- Then you need to carefully slide the combination back, parallel to disconnecting it from the metal plates installed on top.
- For complete dismantling, you also need to disconnect the two connectors with the wiring on the back of the panel. Having done this, you can remove the device from the mounting location and begin repairing or replacing it. The assembly procedure is carried out in reverse order.
Photo gallery “Removing the tidy with your own hands”
Replacing backlight bulbs
1. Take the plastic rim of the lamp and turn it to the left. When turning, you will feel that the lamp has become free.
2. Take a new lamp, insert it, and turn it to the right until it locks.
If you don’t understand anything about removing the shield or replacing lamps, watch the video below.
Video lesson
How to change the backlight using color film
Old dashboard of VAZ 2110
In order to change the color of the dashboard lighting, it is not necessary to change the LED bulbs. To do this you can simply:
- Take 12 LEDs and an LED strip.
- Remove the light bulbs from the base and insert one LED at a time in their place.
- You need to take the required amount of LED strip.
Note: its length is measured according to the size of the panel.
- The base and LEDs must be returned to their original location.
- The tape should be glued to the plastic of the panel (the appropriate temperature must be maintained).
- Tighten the block well.
With panel disassembly
The first stage is carried out according to the plan already described. Next, we proceed like this:
- We assemble the trim, installing our instrument cluster, air duct panels and those accessories included in the kit;
- At the base of the panel we carefully attach the wiring harness;
- We connect the wires from the Euro pad to this harness, tightening everything with mounting ties;
- We connect devices to the required buttons using connectors;
- We secure the cover with self-tapping screws.
This method, although it takes more time, provides high-quality sound insulation to eliminate all annoying squeaks.
We also recommend replacing light bulbs with high-quality analogues or LEDs. So, the updated panel will look even more solid.
Components
When purchasing, you will receive what is included in the kit, namely:
- Europlate;
- Inserts for switches (buttons) of devices;
- Trim on the instrument panel;
- Since your instrument combination may differ from those whose installation is structurally provided, there should also be six plugs; they can be inserted instead of buttons;
- The buttons themselves and two pads for them: • Double – for low beam and dimensions; • To turn on the fog lights; • Heated rear window.
- Air ducts;
- Block and wiring harness designed to connect a double button for side lights and low beam;
- Brackets securing the instrument panel.
In addition, if you are not entirely satisfied with this combination, and you need more buttons for other devices, then they, as well as the pads for them, can be purchased separately.
1. The pad itself
3. Buttons, pads, plugs, harnesses
2. Inserts for buttons, air ducts, instrument panel trim
Possible malfunctions: signs and causes
Now let's look at the main signs and causes of malfunctions in the operation of the shield:
- The backlight failed. If the instrument cluster does not light up, but all the sensors on the device, as well as the equipment lights, work, then most likely the reason is a broken brightness control. If you constantly use this device, then as a result of prolonged use the contact from the regulator to the plug may have become disconnected. The backlight may not work due to a burnout or breakdown of the safety device, which is located in the mounting block under the hood. If only some of the backlight bulbs do not work, then the reason may lie in the burnout of the lighting sources themselves.
- The device is not working. The backlight does not turn on, when the equipment (headlights, rear window defroster, etc.) is activated, the corresponding indicators on the device do not light up, and the sensors also do not work. This malfunction is one of the most unpleasant, since it indicates a breakdown of the device. Detailed diagnostics of the device will be required.
- The speedometer is broken. The regulator needle either does not move along the scale at all, or moves, but too slowly and intermittently, with a delay. If such a malfunction occurs, then first of all you need to check the speed sensor, since due to its malfunction the speedometer will not be able to work. Depending on the vehicle, the sensor is either mechanical or electronic. If the first, then you need to diagnose the condition of the end of the cable connected to the control panel. In practice, it wears out quite often, especially due to the removal and installation of the tidy, so to solve the problem you can try wrapping a piece of food foil on it. With an electronic device, contacts and the device are subject to diagnostics. Sometimes you can solve the problem by disconnecting, cleaning the contacts and reconnecting the device.
- The gauges work, but the lights don't turn on. We are not talking about backlighting, but about working indicators for head lighting, heated rear window or turn signals. Maybe the indicator has simply failed and the bulb in it needs to be replaced. If we are talking specifically about turn indicators and optics, then you need to check whether the headlights turn on or not. If not, then you need to test the operation of the steering column switches.
- The fuel sensor in the tank does not work on the instrument cluster. When the ignition is turned on, the gauge needle does not rise or it has moved to the very top of the scale all the way. If the needle does not move, then the fuel sensor itself, which is located in the tank, may have broken down. You need to find the controller and check if it works. If the arrow jumps up and does not go down, then it looks like a short circuit in the wiring. In case of such a problem, the electrical circuit should be checked with a multimeter.
- The arrow of the engine temperature regulator does not function. You need to check the controller itself installed in the engine. The wire contact could have come loose from it, or the wiring could have been damaged, which is less likely.
- The tachometer may also fail. If this problem occurs, you need to check the crankshaft position sensor. As in previous cases, the sensor could break, the connector and wiring could also be damaged. It would be a good idea to check the electrical circuit for possible short circuits (video published by RAVIL Shayakhmetov).
