The instrument panel of the VAZ 2110, as in any car, both imported and Russian, must determine the general condition of the car, and must show all information about: the amount of fuel, engine temperature and the presence (quantity) of engine lubricants.
In addition to the above data, the VAZ instrument panel displays all the errors (current malfunctions) of the car.
Further in the article, I will give you a complete description of the VAZ 2110 dashboard and tell you about the description of buttons, lamps, light indicators, and tell you about common errors that may appear on your display while on the road.
Icons on the on-board computer of the VAZ 2110
WARNING To avoid fire, do not hold the cigarette lighter in the pressed position.
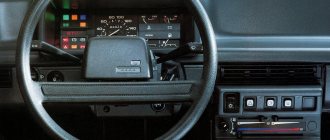
34 — ashtray cover.
To clean the ashtray, remove it from the lid by pulling it up.
35 — display unit of the on-board control system.
For more information, see “On-Board Monitor Display Unit, Immobilizer and Heater Controls.”
36 — gear shift lever.
The gear shift diagram is printed on the lever handle.
The gear shift drive mechanism is blocked from erroneously engaging reverse gear instead of first gear. To engage reverse gear, you must first press the lever from above and then move it to the left and forward until it stops. 38 — gas pedal. 39 — socket for connecting a portable lamp. 40 - immobilizer sensor with indicator.
The immobilizer blocks the engine from starting without using the electronic key supplied with the car.
To disarm, you need to bring the black key to the sensor. The sensor has an LED indicator that informs the driver about the state of the electronic anti-theft system (see On-board monitoring system display unit, immobilizer and heater controls, paragraph 9). If the immobilizer is not activated, then with the doors closed and the ignition off, the LED will flash twice per second. 41 - brake pedal. 42 - ignition switch lock (ignition switch).
You can turn on the ignition only with the key supplied with the car. The lock has three fixed positions: 0 - “off”. The ignition is turned off, while the hazard alarm, radio, light and sound alarms, brake signals, electric drives for the trunk lid lock and side door locks can operate. The key can only be removed from the lock in this position. When the key is removed, the mechanical anti-theft device will turn on. If you try to rotate the steering wheel, the steering shaft will lock. I - “on”. The ignition is on, and you can turn on various electrical equipment that operates without starting the engine.
WARNING To avoid discharging the battery, do not leave the key in position I for a long time when the engine is not running.
II - “starter”. Ignition and starter are on. The position is not fixed, intended for short-term activation of the starter to start the engine. WARNING To avoid damage to the starter, do not hold the key in this position after starting the engine.
43 — clutch pedal.
44 — lever of the steering shaft column fixing mechanism.
To adjust the steering wheel to a comfortable position, you need to lower the lever.
After adjusting the angle of the steering column, the lever should be returned to its original position. WARNING Do not adjust the steering column angle while the vehicle is moving.
45 — steering wheel pad (horn button).
To sound a sound signal, press the pad.
46 — cover of the mounting block of fuses and relays.
To access the fuses and relays in the mounting block, press the cover open button (pos. 47).
47 — button for opening the cover of the fuse and relay mounting block. 48 — control knob for hydraulic headlight adjustment.
The handle is designed to adjust the angle of the headlight beam from the driver's seat when the vehicle load changes.
The adjustment ensures proper illumination of the road with low beam headlights (reduces the likelihood of dazzling oncoming drivers). 49 — hood lock opening lever.
To open the hood lock, the lever must be pulled up.
50 — button for the electric drive of the trunk lid (or door) lock.
When you press the button, the trunk lid (door) lock will open.
Controls in the front part of the cabin
- useful tips for the motorist
What standard trip computers exist?
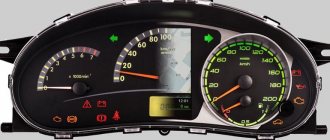
Option 1. In the instrument cluster.
Option 2. Installed instead of a small plug next to the ACS unit
These were installed on “luxury” dozens.
There are models AMK 211000 without diagnostics, and AMK 211001, AMK 211002 with diagnostics. You can find out which one you have by looking at the numbers on the back cover. To do this, naturally, the MK must be removed. If on the back there are the inscriptions AMK-211001 or AMK 211002, and in clock mode, when you press the “clock” button, the inscriptions Err appear and then two more - great. You have a full-fledged bookmaker. If these are the inscriptions:
Unfortunately, this is a BC that either lacks diagnostic capabilities or has “cut-off” firmware.” Craftsmen resolder and reflash such models, but in my opinion they are not worth it.
It is very easy to remove such a MK. We disconnect the terminal of the “negative” wire from the battery terminal. We pry it off with a screwdriver...
remove the MK from its seat....
....disconnect the wire block from it.
Instructions for replacing the tidy yourself
Instructions for replacing the shield yourself:
- First, you need to turn off the ignition and turn off the power to the Tens electrical network; to do this, open the hood and disconnect the terminal from the battery.
- The switches located on the sides of the tidy are removed.
- Then use a Phillips head screwdriver to unscrew the bolts that secure the device.
- Next, you need to dismantle the mountings of the tidy to the trim. After this, the shield can be easily removed from its seat, and the glass can also be removed.
- The next step is to disconnect all the connectors and connectors connected to the dashboard.
- When the connectors are disconnected, the panel is dismantled. It is repaired or replaced with a new one, the assembly steps are performed in the reverse order (the video was filmed by the channel In the Garage).
Designations on the MK screen
The trip computer (MC), shown in the figure, is installed in a variant version instead of a clock. MK has 15 functions, divided into 3 groups. The group is selected using buttons 1, 2 and 3.
In each group, functions are divided into basic and additional. The main functions are navigated through the ring using buttons 1, 2 and 3. Additional functions are navigated through button 5. When the ignition is turned off, the computer is always in the “Current Time” mode. When the battery is removed, the clock progress and all accumulated parameters are retained for at least 1 month.
ADJUSTING THE COMPUTER FUNCTION Correcting the clock rate Press button 4 in the “Current time” mode. At the sixth signal of the exact time, press button 1, this resets the seconds and rounds the clock readings.
Setting the current time (calendar) Press button 4 in the “Current time” (“calendar”) mode. Use buttons 5, 6 to set the desired hour (day). Press button 4. Use buttons 5, 6 to set the desired value for minutes (month). Press button 4 to complete the time (calendar) setting.
Click on the picture to enlarge.
Setting an alarm
Press button 4 in Alarm mode. Use buttons 5, 6 to set the desired hour value. Press button 4. Use buttons 5, 6 to set the desired minute value. Press button 4 to complete the alarm setting. In the “Current time” mode, the alarm symbol will light up (the alarm is on).
Turning off the alarm
Press button 4 in Alarm mode. Press button 1 to turn off the alarm. “—.—” will appear in the digital digits, and in the “Current time” mode the alarm symbol will not light up (the alarm is turned off).
Adjusting the brightness of the indicator backlight
When the side lights are on, the illumination level is adjusted using the instrument scale illumination regulator. When the side lights are turned off, the backlight level is adjusted by software: - press button 4 in the “Traveling time with stops” mode. All single segments (pictograms) will be displayed on the indicator, which is a sign of the backlight level adjustment mode, and the digital digits will display a number corresponding to the backlight level as a percentage of the maximum value; — use buttons 5, 6 to set the required level of backlight brightness; — press button 4 to end the brightness adjustment mode.
Calibrating the fuel level sensor
To carry out the correction, it is necessary to drain all gasoline from the tank. Press and hold button 4 for more than 2 s in the “Fuel level” mode. A flashing number “0” will appear on the indicator. Press and hold button 3 for 1 s until a confirmation beep appears. After this, a flashing number “3” will appear on the indicator. Fill the gas tank with 3 liters of gasoline using a measuring container, wait the time necessary for the fuel level sensor to calm down, press and hold button 3 for 1 s until a confirmation sound appears. Continue this procedure until the maximum value is 39 l, after which the computer automatically exits the mode.
Installing an overspeed warning light
Press button 4 in the “Medium speed” mode. Use buttons 5, 6 to set the required speed threshold. Press button 4 to exit the overspeed alarm setting.
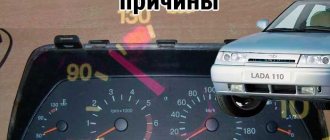
Dashboard VAZ 2110 icon designations
The VAZ2110, like any other modern car, has a complex dashboard equipped with many icons. It is located behind and on top of the steering column. Sometimes the instrument panel is called a dashboard. Some of the indicators are also located on the car's dashboard.
Many novice and even motorists with some driving experience do not clearly understand the meaning of many of the icons on the instrument panel of the VAZ 2110. The reason for this is that most of them light up only when the ignition key is turned for a few seconds, and then they go out. In rare cases, only one of them remains burning. This means that one of the car's systems is faulty.
We will describe in detail the instrument panel of the VAZ 2110 and provide descriptions of all the pictograms, lamps and indicators available there.
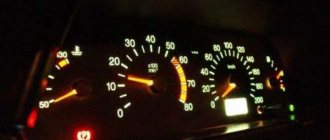
Let's start from the top
(we will go from the far right to the far left):
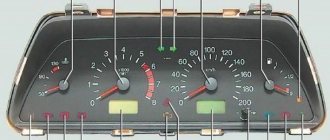
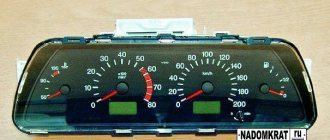
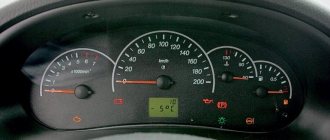
- Large scale with an arrow pointing to it. At the top and bottom there are gas station icons. The top one is white and the bottom one is red. The arrow shows the level of gasoline in the tank; when it drops to a level of about 5-7 liters, the red gas station icon lights up. Important! Do not allow all the fuel in the tank to be depleted. Otherwise, it will damage the fuel pump.
- Close-up image of a speedometer with an arrow. It shows the speed at which the car is currently traveling (km per hour).
- Just above and to the left of the speedometer there are two arrows in different directions - they show the operation of the turning lights.
- The scale is as large as the speedometer - it is called a tachometer and reflects the speed of rotation of the engine crankshaft. (from 0 to 80). Important! The driver needs to monitor the tachometer readings - its needle should not go into the red zone.
- The leftmost scale marks the antifreeze level from 50 to 130. Antifreeze is responsible for cooling a running car engine. If there is a lack of antifreeze (most often it is antifreeze), interruptions will very quickly follow, and then engine failure due to overheating.
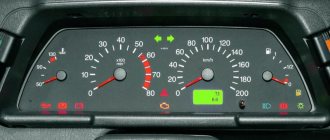
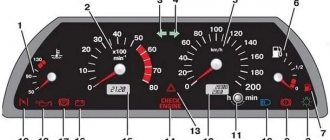
Instrument panel VAZ 2110 designations: 1 - coolant temperature indicator; 2 — tachometer; 3 — control lamp for turning on the left turn signal; 4 — control lamp for turning on the right turn signal; 5 — speedometer; 6 — fuel level indicator in the tank; 7 — fuel reserve warning lamp; 8 — control lamp for turning on external lighting; 9 - warning lamp for emergency condition of the working brake system; 10 — control lamp for turning on the high beam headlights; 11 — button for resetting the daily mileage counter and setting the clock; 12 — liquid crystal mileage indicator (odometer); 13 - warning lamp for malfunction of the engine management system; 14 — warning lamp for turning on the hazard warning lights; 15 — liquid crystal display of time and ambient temperature; 16 — battery charge indicator lamp; 17 - control lamp for turning on the parking brake; 18 — warning lamp for insufficient oil pressure; 19 — control lamp for closing the carburetor air damper (for cars with carburetor engines).
The lower part of the dashboard of the VAZ 2110
carries the following lamps and indicators (from right to left):
- The pictogram of a light-emitting lamp indicates the operation of the vehicle’s side lights.
- A red circle with an exclamation mark inscribed in it - this indicator begins to glow when there is insufficient fluid in the brake system. Operating the car in this case is not recommended to avoid accidents. There is an urgent need to diagnose and probably repair the brake system of the VAZ 2110.
- A symbolic image of a burning headlight - it lights up when the high beam is turned on. Important! When driving, do not forget to switch to low beam if another car is moving towards you.
- Dedicated setting button and adjustable LCD display. It displays the mileage of the car for a certain period of time and the current time.
- Engine fault and alarm icons - they are located one above the other. The first glows yellow, and the second glows red.
- Battery icon. It lights up when car devices are operating from this power source.
- An icon in the form of a red circle with a symbol inscribed in it indicates that the parking (hand) brake is applied.
- A red pictogram in the form of an oil can indicates an insufficient amount of oil in the engine unit. Important! Under no circumstances should you start the car engine if this pictogram is illuminated. Otherwise, serious damage is inevitable!
- Yellow symbolic image of a deployed airbag. Indicates a failure in the operation of this system.
An additional panel located on the dashboard houses additional indicators and lamps. They partially duplicate and complement the information of the main dashboard.
This is first of all:
- open door designation;
- problem in the operation of the windshield wipers (lack of fluid in the reservoir);
- brake pad wear indicator;
- not wearing a seat belt;
- breakdown of side or brake lights.
More about the block
Open doors
This function works thanks to limit switches in the door. When the door is opened, the switch contacts close and the door open lamp lights up. Each limit switch is responsible for the door in which it is installed.
Quite often it happens that due to oxidation of the limit switch contacts, the indication does not operate. This problem is solved by removing the end switch and cleaning its contacts with sandpaper.
Low oil level
A special oil level sensor is installed in the engine crankcase, which informs the driver when the level drops to a minimum value. The sensor is a reed switch with a float; the contacts of the reed switch close when the oil level drops, which leads to the lighting of the corresponding lamp on the display unit.
Low antifreeze level
This indication system is similar to the oil level design. A sensor is installed in the expansion tank, operating on the principle of an oil level sensor. When the coolant level decreases, the contacts on the sensor close and the low antifreeze level indicator lamp lights up.
Low washer fluid level
The principle of operation of this indicator is to measure the windshield washer fluid level. There is a level sensor in the washer reservoir, the same as in the expansion tank. It measures the level and, when the minimum mark is reached, lights the lamp on the display unit.
Front pad wear
This indication informs the driver about the wear of the front pads; this occurs using a sensor that is connected to the pad itself. It is important to note that in order for this indication to work, it is necessary to use special blocks in which this sensor is built-in.
Unfastened seat belt
This function has long been known on cars of foreign origin, but it was used for the first time in AvtoVAZ. The sensor built into the seat belt buckle closes its contacts when the belt clip is inserted into it. If you start driving without a seat belt fastened, the display unit will begin to emit a sound warning of danger.
Burnt out lamp indication
The essence of this function is to inform the driver about one of the burnt-out lamps in the headlights or taillights. This function works by measuring the resistance in the power supply circuit of headlights or flashlights. As soon as the lamp burns out, the power circuit is interrupted, which causes the indicator on the unit to light up.
display unit for on-board control system of VAZ 2110 cars | VAZ 2111 | VAZ 2112
Rice.
1-8, on-board control system display unit The on-board control system display unit (Fig. 1-8) informs about the state of components and systems of the VAZ 2110, VAZ 2111, VAZ 2112 vehicle through signaling devices. 1 — the indicator of insufficient oil level in the engine crankcase lights up in orange when the oil level in the engine crankcase drops below the “MIN” mark of the indicator. Before adding oil, check whether there is any oil leakage due to loss of tightness of the lubrication system. 2 - the left front door ajar indicator lights up red when the left front door is not closed. 3 — the right front door ajar indicator lights up red when the right front door is not closed. 4 - the brake light and side light bulb malfunction indicator lights up orange if one of the brake light bulbs or side lights is faulty. 5 — the front brake pad wear indicator lights up orange if the thickness of the linings has decreased to 1.5 mm. 6 - the seat belt warning light lights up red when the driver is not fastening his seat belts. 7 — the right rear door ajar indicator lights up red when the right rear door is not closed. 8 - the left rear door ajar indicator lights up red when the left rear door is not closed. 9 - the indicator of insufficient coolant level in the expansion tank lights up orange when the coolant level in the expansion tank on a cold engine drops below the permissible limit. Before adding fluid to the expansion tank, check the tightness of the cooling system. 10 - the indicator of insufficient washer fluid level in the tank lights up in orange if there is less than 1 liter of washer fluid left in the tank. The display unit of the on-board control system of VAZ 2110, VAZ 2111, VAZ 2112 vehicles can be in the following modes: off; Standby mode; pre-departure monitoring of signaling devices; parameter control. The display unit of the on-board control system of the car VAZ 2110, VAZ 2111, VAZ 2112 is in the “Off” mode if the key is not inserted into the ignition switch. In position 0 (“Off”) of the key in the ignition switch, the display unit of the on-board control system goes into “Standby Mode”. If the driver’s door is opened, the “Forgotten key in the ignition switch” malfunction will occur and the on-board control system display unit will sound for 5-10 seconds. will give an intermittent signal. The signal can be interrupted either by closing the door, or by removing the key, or by turning the key in the ignition switch to position I (“Ignition”). In position I of the key in the ignition switch, the display unit of the on-board control system of the VAZ 2110, VAZ 2111, VAZ 2112 vehicles switches to the “Pre-departure control of alarms” mode, in which to check their serviceability for 2-6 seconds. all light and sound indicators turn on, and then after a pause of 1 second, the display unit of the on-board control system switches to the “Parameter Monitoring” mode and, if there is a malfunction, generates an alarm according to the following algorithm: the indicator light for the parameter that is outside the normal range begins to flash for 5-10 seconds, after which it switches to a constant glow mode until the malfunction is eliminated or the key in the ignition switch returns to position 0 (“Off”); simultaneously with the light indicator for 5-10 seconds. the sound alarm turns on; If at the same time another malfunction occurs, then the sound alarm and light alarm in the blinking mode begin to work for the last malfunction, as a higher priority, and the light indicator of the previous malfunction goes into constant light mode.
When using site materials, an active link to car-exotic.com is required!
Trouble-shooting
To eliminate the malfunctions indicated by the alarm, you must take important troubleshooting steps:
- If the low oil alarm is on, add oil to the engine crankcase.
- Washer system alarm - add windshield washer fluid.
- Alarm – bringing the coolant level to normal.
- Door open alarm - close the doors or remove the key from the ignition.
- Malfunction of brake lights and side lights - correct the operation of these systems.
- The disadvantage of brake linings is to fix the damage.
- Seat belt warning – fasten the seat belts in the required position.
All these alarm indicators are placed in a special place and are called the on-board system display unit for the VAZ 2110. When triggered, they emit both a light signal and a sound signal. There are two sensors that constantly operate when the engine is on. This is also a brake pad wear sensor. If they are faulty, the on-board control system, or rather the on-board systems display unit of the VAZ 2110, will not show a reliable result. It is necessary to constantly monitor the operation of these sensors.
It should be noted that the moment you turn the ignition key, all indicators on the dashboard are fully tested. At this point, it is necessary to check the operation of each alarm light. When the door is open, it turns on. You need to carefully monitor these devices, since their working condition is necessary and very important.
Control system repair
To repair this control system, you must do the following:
- First of all, you need to remove the negative terminal from the battery.
Note: For ease of access to the control system, actions take place in the cabin, since this is where the display unit of the on-board control system of the VAZ 2110 is located.
- Use a screwdriver to slightly pry off the clock in the car.
- After removing them from the connector, you need to disconnect the fastening of the wires.
- The clock is put aside.
- The on-board control system display unit is removed through the free space from the clock.
- All wire fastenings are disconnected.
After completing this work, it is necessary to repair this unit or replace it with a new one. This work is best left to specialists if the driver does not have skills in working with electronic equipment. You may have to purchase this unit. Its cost may fluctuate, but the price will remain within 1000 Russian rubles. After disconnecting this system and carrying out repairs/replacements, it is necessary to place all the parts in the same place in the opposite order. One of the problems may be an electrical wire that has become disconnected or burned out. In this case, it is necessary to analyze the signal received from the sensors over the entire distance of the wire using special instruments. This diagnosis must be carried out carefully. In any case, you can carry out the above work yourself. To do this, it is recommended to watch the corresponding replacement video and use the photo as a visual aid. You need to do everything with your own hands carefully, as required by the instructions, and then everything will work out perfectly. And why pay extra money to specialists if everything works out that way?
(staff). You can download the instructions in pdf format at.
Diagram and pinout of the on-board control system BSK VAZ-2110, 2111 and 2112
Pinout of on-board control system VAZ 2110, 2111, 2112
1 — the indicator of insufficient oil level in the engine crankcase lights up in orange when the oil level in the engine crankcase drops below the “MIN” mark of the indicator. 2 - the left front door ajar indicator lights up red when the left front door is not closed. 3 — the right front door ajar indicator lights up red when the right front door is not closed. 4 - the brake light and side light bulb malfunction indicator lights up orange if one of the brake light bulbs or side lights is faulty. 5 — the front brake pad wear indicator lights up orange if the thickness of the linings has decreased to 1.5 mm. 6 - the seat belt warning light lights up red when the driver is not fastening the seat belts. 7 — the right rear door ajar indicator lights up red when the right rear door is not closed. 8 - the left rear door ajar indicator lights up red when the left rear door is not closed. 9 - the indicator of insufficient coolant level in the expansion tank lights up orange when the coolant level in the expansion tank on a cold engine drops below the permissible limit. 10 - the indicator of insufficient washer fluid level in the tank lights up in orange if there is less than 1 liter left in the tank. washer fluid.
Date added: 07/14/2014
Author: Dmitriev Alexander
Removal and modification
Here's a quick look at the device and control panel icons. If for some reason she refuses, don’t immediately panic. Most often, the reason is the absence of contacts in some place in the wiring. But of course, if you wish, you can completely change or tune the panel.
For example, remove the cover and replace the light bulbs with brighter LEDs. Such a panel works brighter and the signals sent by the car will be more noticeable to the driver. If desired, you can install a more solid europanel, which will transform the interior.
To remove the panel you need:
- Disconnect the “-” wire from the battery;
- Remove the shield by unscrewing the screws;
- Remove the fastenings of the control panel to the trim, remove the instrument cluster from the socket;
- Remove the glass mask;
- Disconnect the wires from the block;
- Make changes to the instrument panel or replace it with a new one. Reassemble everything in reverse order.
The on-board control system of the VAZ 2110 is represented by several sensors and alarms that help eliminate deficiencies in the operation of the vehicle system. At one moment they may no longer be necessary, and at another they can save a person from unexpected breakdowns or even save a person’s life. Their serviceability must be constantly monitored. In order for the on-board display unit of the VAZ 2110 control system to always remain in working condition, you need to know the number of sensor data.