Like any modern car, the Lada Priora is equipped with dozens of various sensors, the functioning of which determines the condition of the main vehicle systems. Diagnostics of the machine for errors allows you to detect all sensor faults in order to eliminate breakdowns. Now you will learn how Priora error codes are deciphered and how to independently diagnose the on-board computer (hereinafter referred to as BC).
Self-diagnosis using BC
The owner can identify the main error codes of Priora 8 and 16 valves using the built-in controller and on-board computer (BC), without resorting to the services of car service diagnosticians. To do this, you must activate the vehicle testing option. The arrows on the instrument panel move to the maximum possible position. Further manipulations are performed in the following sequence:
- The ignition is turned off and the daily mileage reset button is activated. Then the ignition is turned on again with the button held down;
- After this, all the icons on the instrument panel should light up, and the arrows of the control devices should begin to move from zero to maximum values. This behavior indicates the normal functioning of all sensors;
- On the right steering wheel switch there is a key for selecting BC functions. After pressing it, information about the software category will appear on the display;
- You should press this button again, combinations of problems will be displayed on the monitor. If necessary, error information is also reset here. To do this, hold down the mileage reset button for a few seconds.
Priora: why the check is blinking or on - the main reasons
The diagnostic connector will help you “talk” to the electronic control unit and find out why the check light is on. Well, before you start diagnosing, check out the list of the most common Priora “errors”:
- Low Oil Level – Low oil levels ultimately lead to increased engine wear. If the oil level turns out to be normal when checked, then it needs to be replaced and the integrity of all Priora components checked. Faulty fuel pump or fuel filter. You can’t always “hear” this, but diagnostics, replacing the filter, and checking the fuel pump will “cure” the breakdown.
- An error in the operation of the exhaust gas system - this is not something to joke about - it is better to start repairs as soon as possible.
- The ignition coil does not produce a spark / the catalytic converter is unstable.
- Wiring problems - high voltage wires can give an erroneous signal to the ECU - "Check" will light up on the dashboard.
- Malfunction of sensors - unfortunately, they very often fail. The “check” lights up due to the fault of the mass air flow sensor (MAF), two oxygen sensors (after the fuel afterburner and in the exhaust manifold), the crankshaft sensor and the camshaft sensor. In frosty weather, the “Check” may light up because three cylinders are turned on first, and then, during normal startup, it does not go away. This is due to the fact that soot particles remain on the contacts - they disappear after a few days.
- False sensor activation due to high humidity
- The engine starts running when cold and the check light comes on.
The reasons for the “Check” fire on a Priora (16 valves), as we see from the list, can be serious. There is no need to panic: when the “Check” light comes on, you need to immediately reach for the diagnostic connector. It’s funny, but earlier diagnostics were carried out in the service with special software, but today any error code can be displayed on your smartphone, deciphering it using a mobile reading device.
If this causes the spark plugs to flood, you will see the “check” blinking. Low-quality gasoline can be sold at any gas station; experienced car enthusiasts advise carrying a couple of candles with them. Sometimes the “Check” light comes on due to gasoline and the engine stalls. If he continues to work intermittently, things will be bad.
“Check” should light up when the ignition is turned on. A malfunction is also considered to be the case when the check light does not light up when the ignition is turned on, that is, the ECU does not send a system check report stating that “the system is ready for operation” - there is a problem in the wiring. You need to get rid of the chek icon not so as to “hide all the problems”, but so that the process of processing the fuel mixture occurs in order. Otherwise, you will have to seriously repair the car.
Code meanings for self-diagnosis
Using the on-board computer, the driver can determine the following faults:
- Code “ 2
” – excessive voltage in the on-board network. To eliminate it, you need to check the main electrical circuits; - The number “ 3
” indicates a malfunction of the fuel control indicator; - «4
» – problems with the refrigerant temperature sensor; - The number “ 5
” means incorrect operation of the environmental indicator; - Code “ 6
” means engine overheating; - «7
» – critical lubricant pressure; - The number “ 8
” indicates a malfunction in the brake system; - «9
» – signals that the battery is low; - The " E
" symbol indicates a problem with the packet data.
It is worth noting that if the BC options switch key is inactive for more than 10 seconds, the instrument panel will return to normal operation.
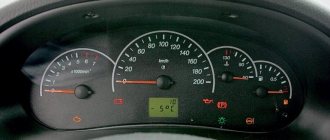
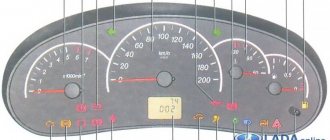
PRIORA instrument panel self-test test
Decoding error codes in the dashboard:
2-increased voltage of the on-board network; 3-fuel level sensor error (if a break in the sensor circuit is detected within 20s); 4-error of the coolant temperature sensor (if an open circuit of the sensor is detected within 20s); 5-outside temperature sensor error (if there are no sensor readings within 20s, indication on the LCD is “-C”); 6-engine overheating (the criterion for triggering the acoustic alarm has been met); 7-emergency oil pressure (the criterion for triggering the acoustic alarm is met); 8-defect of the brake system (the criterion for triggering the acoustic alarm is met); The 9-battery is discharged (the criterion for triggering the acoustic alarm is met); E-determination of an error in a data packet stored in EEPROM.
Video Self-test test of the PRIORA instrument panel channel Automotive diagnostics
Checking with a plug-in tester
More accurate and comprehensive diagnostics can be performed using a connected computer or a special tester. However, the data displayed on the screen is alphanumeric. The letters have the following meaning:
- P
– errors in the operation of the electronic systems of the power unit; - C
– problems with the functioning of the chassis; - B
– electronic malfunctions in the cabin; - U
– joint system errors.
In addition, the number 0 means OBD code 2, numbers 1 and 2 indicate the enterprise code, and 3 is the backup password.
Basic ignition system
(the letter P precedes the digital designation):
- 0300
– no spark in the cylinders of 16 valves; - 0326
– defect or short circuit in the knock indicator circuit; - 0337
– difference of the crankshaft controller to ground; - 0343
– high level in the headlight sensor circuit 0342 – a similar low indicator; - 0422
– signaling device malfunction; - 0444, 0445
– failure of the adsorber valve; - 0480, 0481
– problems with the fan assembly.
Why does it occur: reasons
The reason for the appearance of the number on the display is rarely clear without a detailed analysis of the issue; there is only general information. But, according to the experts, the options are as follows:
- The greatest probability is due to a malfunction of the coolant temperature sensor.
- Further in descending order - the circuit with this sensor could break.
- Due to external influences (accident, shock, etc.), the control unit system sometimes malfunctions and generates an error.
- Plaque on the device may contribute to loss of contact.
Such reasons will not be a serious stumbling block to free travel, and will not make your wallet noticeably empty. Each of the points is completely solvable, both independently and at a service station, you just need to allocate time and a little effort for this.
How to check on the on-board computer
To carry out a check on the on-board computer, you need to insert the ignition key and simultaneously hold down the button that resets the daily mileage. When the correct actions are performed, all elements on the LCD will light up. And the arrows (speedometer, tachometer, etc.) will begin to quickly and continuously move from zero to the maximum indicator and back. Already here you can see how good the LCD indicator and sensors are.
Next, you can use one of the buttons that switches the functions of the bookmaker. As a result, a set of numbers will appear on the display indicating the version of the program currently installed. Now you need to apply pressure on the key again, then the error codes that are available in this car will appear there.
If you need to reset information from the LCD, it is best to press the button for three seconds, which resets information about mileage during the day. Now it's time to return the light to the sensors and use one of the BC keys. Due to the lack of impact on the system, after about half a minute the instrument panel will return to working condition.
Bench diagnostic systems
These systems are not connected to the vehicle's on-board electronic control units and are therefore independent of the vehicle's on-board diagnostic system. They usually diagnose individual engine mechanisms and ignition systems, which is why they are often called engine testers. The main elements of the motor tester are sensors, as well as a processing and display unit for the measurement results of perceived signals. Sensors and recording devices are connected to cables using plugs and clamps.
Motor testers are computer-based and have a keyboard, display, disk drives, and a CD-ROM drive. The kit usually includes a set of connecting wires and cables, a strobe light, and in some cases an exhaust gas analyzer. Information is entered into a computer using an appropriate analyzer, which houses analog-to-digital converters, comparators, amplifiers and other signal pre-processing devices. The analyzer is connected to the necessary elements on the car using a set of cables, which is a set of wires connected to the negative and positive terminals of the battery and the ignition coil, high voltage wires to the ignition coil and to the spark plug of the first cylinder, and in addition, a contactless current sensor on the bus battery charging, engine oil temperature sensor (inserted instead of the dipstick), vacuum sensor in the intake manifold, etc.
The main part of the motor tester is an oscilloscope, on the screen of which various oscillograms appear, reflecting the operating mode and technical condition of the parts and ignition system devices being tested. Evaluation of the signal appearing on the oscilloscope screen is based on an analysis of changes (in the presence of faults) in the nature of electrical processes occurring in low and high voltage circuits. Based on individual parts of the image, one can also judge the operation of certain elements of the power and ignition systems, and the nature of the changes allows one to identify the causes of malfunctions.
The motor tester computer processes the information received from the engine and presents the results on the display or as a printout on a printer. The motor tester can be supplied with a set of laser CDs with technical information about various car models, as well as instructions to the operator on the procedure for connecting the motor tester to the car and the sequence of control operations.
Before diagnosing, enter the car model, type of engine, transmission, ignition system, fuel injection and other parameters characterizing the object being diagnosed. Motor testers are capable of diagnosing most automotive systems, including starting systems, power supply, ignition, assessing compression in cylinders, and measuring power system parameters.
Modern motor testers can provide information about the state of the ignition system in the form of numbers or an oscillogram of the process. An example is the M3-2 motor tester (Belarus), with which you can determine the condition of the engine (by developed power, power balance among cylinders, relative compression), starter, generator, relay regulator, battery, switch distributor, electrical wires, spark plugs ignition, lambda sensor, injectors of the injection system of gasoline engines, diesel fuel equipment, measure ignition timing for gasoline engines and injection for diesel engines using a strobe.
As automotive electronics become more complex, the functionality of stationary systems also expands, since it is necessary to diagnose not only engine management, but also braking systems, active suspension, etc.
The versatility of computer motor testers is determined by their software. Many of them work in the Windows operating system familiar to most users.
The disadvantages of motor testers include the fact that with their help it is difficult to detect intermittent faults in complex electronic systems, when a fault in one system manifests itself in the form of symptoms in other systems that are functionally related to the first.
Troubleshooting
There are several methods for troubleshooting the problem, but together they constitute a complete diagnosis of the car for faults in the coolant temperature sensor. After all, error number 4 gives a signal about exactly this. You can fix it like this:
- First we check the sensor to see how well it functions. It copes with the assigned tasks, there are no complaints about the speed and clarity of data transmission - let's move on to the next point. Does not respond to signals - most likely, it is completely broken and requires replacement.
- This is followed by checking for contact and absence of plaque. If a problematic connection is identified, the sensor will have to be replaced with a new one. And if the surface is covered with plaque, it is necessary to thoroughly clean the seat.
- Now you can move on to the on-board circuit, make sure that there is contact there.
- The remaining dilemmas usually lie in electronics, for this reason the car is taken to a specialist who can adjust the device. Usually in such a situation the ECU is re-flashed, which means that errors are prudently reset.
Decoding errors
Each error code consists of five characters. The last two characters indicate the serial number of the specific error.
The first character changes based on the fault system in the car:
- P – malfunctions in the operation of the power plant or defects in the operation of the gearbox.
- U – disruption of interaction between system units.
- B – electric lifts, airbag and other defects in body systems.
- C – faults associated with the EUR.
- 3 – reserve;
- 1 and 2 – manufacturer codes;
- 0 – general code for on-board diagnostics.
The third character indicates the nature of the malfunction:
- 1 and 2 – inform about the appearance of defects in the operation of the fuel system or malfunctions during the air supply;
- 3 – breakdown in the ignition system;
- 4 – additional control;
- 5 – incorrectly operating components in idle mode;
- 6 – electronic unit, as well as its circuits;
- 7, 8 – gearbox malfunction.
Identification of faults and their causes
The illuminated battery light informs the car owner that a malfunction has occurred. As a rule, failures that result in a lack of charging occur either in the generator or in the car battery itself.
Battery fault. It is quite simple to identify deviations in the operation of the battery itself; you should remove the unit that aroused suspicion and put another one (new or working) in its place. And compare the dashboard indicators: if the light goes out, we can safely conclude that the problem is in the battery itself. And this problem can arise when the plates become sulfitated, which in some cases can be eliminated by repair. If the plates are shorted, the device must be replaced.
Installing a new battery
It should be remembered that the battery may be in good working order, but discharged due to leaving the headlights or car radio on while the engine is off. It is necessary to analyze your own actions that preceded the indicators of the lit battery light.
If, when replacing the device, the charging lamp is still on, then the reason lies in the incorrect operation of the generator.
Generator malfunction. The lack of voltage supply from a generator is easy to determine. It is enough to disconnect the wires from the battery with the engine turned off, measure the voltage, its readings should be in the range of 12.5-12.7 V. Then connect the wires to the battery, turn on the ignition and measure the voltage at the terminals again. The device readings should vary between 13.5-14 V. And as the speed increases, the voltage should also increase. Do not forget about personal protective equipment when performing these manipulations: be sure to wear rubber gloves.
Measuring battery indicators
If the voltage decreases with increasing speed, then the reason may lie in the wear of the generator “brushes” or diodes in the diode bridge.
A visual inspection can determine whether the belt is broken or loose. By pressing your fingers on the belt, you can determine its tension: if the belt bends less than 1-1.5 cm, then this may be the reason. The presence of oxidation of the terminals is also visually determined.
It's worth checking the generator wires. They tend to oxidize and burn out (a characteristic burning smell appears).
But there are also more global causes of device malfunction, such as: relay failure, rotor wear, circuit break, etc. Such problems can only be diagnosed by a specialist.
Error 1602
If the standard on-board computer of the Lada Priora 16 valves showed error 1602, then this indicates that the on-board voltage in the controller has decreased.
As practice has shown, this error 1602 does not affect the performance of Priora in any way.
If you remove the terminal from the battery, the problem disappears for a while, but it will definitely appear again. There may be more than one reason for this error to appear:
- Generator malfunction. To determine accurately, you need to measure its voltage in operating condition, it should be within 14 V.
- A large voltage drop when starting the engine also leads to this error. First of all, you need to check the ground and the ECU.
- This error code also appears when the security system blocks one of the electrical circuits.
Priora dashboard test
order in accordance with pressing the button: 1. Tidy test 2. Software version (1.1 IMHO) 3. Errors (the number 14 was displayed) 4. Deleting errors.
Can you tell me more about this procedure? Which panel?
Can you tell me more about this procedure? Which panel?
if these are errors, then not the ECU, but the combination itself
This is what is written in the “Murzilka”: 1. The ignition is turned off. Battery included. 2. Press the “Reset” control button and, holding it pressed, turn on the ignition. All positions of the familiar areas (segments) should light up on the LCD—LCD control. 3. Press any of the control buttons. The LCD should display the program version (Ver 1.0). 4. Press any of the control buttons. The following error codes (if any) should be displayed on the positions of the first and second lines of the LCD: 2-overvoltage of the on-board network; 3-fuel level sensor error (if a break in the sensor circuit is detected within 20s); 4-error of the coolant temperature sensor (if an open circuit of the sensor is detected within 20s); 5-outside temperature sensor error (if there are no sensor readings within 20s, indication on the LCD is “-C”); 6-engine overheating (the criterion for triggering the acoustic alarm has been met); 7-emergency oil pressure (the criterion for triggering the acoustic alarm is met); 8-defect of the brake system (the criterion for triggering the acoustic alarm is met); The 9-battery is discharged (the criterion for triggering the acoustic alarm is met); E-determination of an error in a data packet stored in EEPROM. 5. Press the “Reset” control button and hold it for no more than 3 seconds. (maybe a typo, I need more than 3c). Error codes should clear to zero. 6. Press any of the control buttons. All positions of the familiar areas (segments) should light up on the LCD—LCD control.
From yourself if you do not press any control buttons for about 15-30 seconds. the panel enters the operating state.
“Reset” is the one that resets the daily mileage
PS I copied it somewhere from the forum
Where does this information come from?
Well, then tell me what the combination errors are. 7 If it's not difficult of course
(the criterion for triggering the acoustic alarm is met);
Tell me how to read fault codes through a check in a Priora? The “Change engine” light came on and there was nothing to look for. The terminal was removed, but the light still came on. No changes in engine performance were noticed.
We did this: Click on the daily mileage on the dashboard and turn on the ignition. The tidy starts to go crazy, and the display shows the following: (First display reading) UEr 2.1 (Second display reading shows the following) -23456 789E
Tell me how to read fault codes through a check in a Priora?
This is what is written in the “Murzilka”: 1. The ignition is turned off. Battery included. 2. Press the “Reset” control button and, holding it pressed, turn on the ignition. All positions of the familiar areas (segments) should light up on the LCD—LCD control. 3. Press any of the control buttons. The LCD should display the program version (Ver 1.0). 4. Press any of the control buttons. The following error codes (if any) should be displayed on the positions of the first and second lines of the LCD: 2-overvoltage of the on-board network; 3-fuel level sensor error (if a break in the sensor circuit is detected within 20s); 4-error of the coolant temperature sensor (if an open circuit of the sensor is detected within 20s); 5-outside temperature sensor error (if there are no sensor readings within 20s, indication on the LCD is “-C”); 6-engine overheating (the criterion for triggering the acoustic alarm has been met); 7-emergency oil pressure (the criterion for triggering the acoustic alarm is met); 8-defect of the brake system (the criterion for triggering the acoustic alarm is met); The 9-battery is discharged (the criterion for triggering the acoustic alarm is met); E-determination of an error in a data packet stored in EEPROM. 5. Press the “Reset” control button and hold it for no more than 3 seconds. (maybe a typo, I need more than 3c). Error codes should clear to zero. 6. Press any of the control buttons. All positions of the familiar areas (segments) should light up on the LCD—LCD control.
Error p0504
Many drivers do not understand what the appearance of code p0504 on the display means. This error appears when the brake pedal sensor is faulty. To determine the exact reason for the appearance of this code, you need to disassemble the sensor and carefully examine it. Perhaps one of the springs has burst or the contacts have simply burned out. In some cases, error p0504 on a Priora appears due to the incorrect position of the brake pedal sensor. It must be installed in the correct position, then error p0504 will disappear.
The dashboard is blinking - Community “Lada Priora (Lada Priora Club)” on DRIVE2
Comments 21
Participate in the discussion can only registered users.
A slight blinking is normal. The masses would most likely give themselves away - the instrument would indicate overheating and the window regulators would barely raise the glass
Most of all it looks like a mass. Only she can do this. You can try changing the BUS if it’s a complete dead end. Maybe he's dying.
Electronics control unit. It is located in the middle of the dashboard in the leg area.
There was such a topic on Prior. Replace the capacitor that is in the generator and you will be happy. It acts as a filter against interference that the generator creates.
Or maybe the ground terminal, which on the engine should be cleaned first?
try. This happened to me because of the air conditioner
I didn’t write about the air conditioner, but about the capacitor
everyone does it, including me
My backlight on the boletus screen only blinks, and then only when the turn signal is on, has anyone encountered this?
When I turn on the turn signal, this is also noticeable. and when there is an emergency signal, it seems normal
the same bullshit, if you solve the problem please write
The same nonsense, the generator and battery are new.
Somewhere the ground wire is poorly fixed, you should contact an electrician. I think a competent specialist will quickly find...
Error p0422
This error informs the owner of the Priora that the effectiveness of the neutralizer has been reduced below the permissible level. Practice shows that error p0422 appears on the screen of a 16-valve Priora quite rarely, but if it does happen, you must:
- Inspect the catcollector. Its body must be free of mechanical damage.
- If any defects are found, it must be replaced.
- If the cause of error p0442 is not in this element, you need to contact specialists, since in some cases the catalytic collector will need to be re-flashed.
Where might the brake fluid leak?
It is very easy to find out whether the required level of brake fluid is in the system, since it can be seen visually through the brake fluid reservoir. Its level should always be closer to o, and if it is significantly less, or its level has dropped, then a leak is possible.
First of all, inspect the brake cylinders on all wheels for leaks. As a rule, leaks most often occur on the rear drums due to their excessive overheating. It is not difficult to notice a leak on the cylinders, since in the case of the front cylinder, the leaks will be noticeable on the caliper, and on the rear, it can drip directly from the drum. Problems with these elements usually arise during the cold season.
Error p1558
It often appears when the throttle valve is not operating correctly, the quality of which leaves much to be desired. It does not interfere with the proper functioning of the engine, but you should still try to remove it. Some people prefer to solve this problem by flashing it, but there is another way.
To do this, you need to remove the throttle valve, disassemble it and lubricate the plastic gear, which is the working part of this element. In most cases, after lubricating the gear, error p1558 disappears.
Self-diagnosis
Once the main code errors have been studied, you can perform self-diagnosis of the car. The Lada Priora has a special controller that allows you to perform diagnostics. If an on-board computer is installed in the car interior, then diagnostics are performed with its help. In addition, there is special equipment that allows you to more accurately perform this procedure.
Diagnostics begins with activation of the test mode. The procedure is performed as follows:
- Turn off the ignition and hold down the mileage reset button, then turn it on again without releasing the button.
- When the ignition is turned on, all components located on the instrument panel will begin to glow. All devices will begin to move to the maximum mark, and then back. This behavior of the car indicates the beginning of the diagnosis.
- Next, we move on to the right steering wheel switch, on which there is a button for switching the settings of the on-board computer. After clicking on it, an information message with the software version will appear on the screen.
- After pressing the button again, error diagnostics will begin. Error codes will appear on the display, which can be deciphered using the corresponding table.
- Once the diagnostics are complete, you can reset the error data. To do this, hold down the mileage reset button for five seconds.
Failures in the idle speed system (IAC) and ESC
- P0500 - speed sensor is broken.
- P0506 - very low engine speed at idle.
- P0507 - too high speed at idle.
- P0511 - the XX regulator network is faulty.
- P0560 - BS voltage is below the minimum threshold.
- P0562 - very low voltage in the BS.
- P0563 - very high voltage in the BS.
- P0601 - ROM checksum error.
- P0615 - the wires of the additional starter relay are broken.
- P0616 - the same wires are shorted to ground.
- P0617 - they shorted at the BS.
- P0627 - the fuel pump relay wires are broken.
- P0628 - the same wires are shorted to ground.
- P0629 - they shorted it to the BS.
- P0645 - break in the wiring of the air conditioning compressor clutch relay.
- P0646 - the same wiring has shorted to ground.
- P0647 - she shorted to BS.
- P0650 - Malfunction indicator light circuit does not operate.
- P0654 - Tachometer control circuit is faulty.
- P0685 - the main relay electrical wire is broken.
- P0686 - the same electrical wire has shorted to ground.
- P0687 - he shorted it to the BS.
- P0691 - the electrical wiring of the fan control relay is shorted to ground.
- P0692 - the same wiring has shorted to the BS.
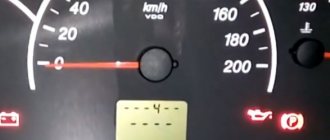
So, when self-diagnosis is carried out and error 4 lights up on the panel, then most likely the car has a problem with the coolant temperature sensor. Many people immediately ask the question “Which sensor should I change?”, but first you need to find out what exactly the problem is.
Note that in order to start self-diagnosis, you need to press and hold the daily mileage reset button + turn on the ignition. After a few seconds, the on-board computer displays an error code.
It is noteworthy that codes in different firmware versions may indicate different problems. Therefore, we recommend that you stock up on an up-to-date reference book. In our case, the software version is 1.0.
How other error codes are deciphered:
- code 2 indicates that there is high voltage in the on-board network;
- code 3 indicates a fuel level sensor error;
- error number 5 indicates incorrect operation of the outside temperature sensor;
- code 6 is engine overheating;
- code 8 - problems with the brake system;
- error number 9 indicates that the battery is discharged;
- P0441 - high or low air flow through the valve;
- P0443 - faulty canister purge valve control circuit;
- P0480 - cooling fan relay failure No. 1;
- P0481 - failure of the cooling fan relay No. 2;
- P0500 - incorrect vehicle speed sensor signal;
- P0503 - intermittent car speed sensor signal;
- P0506 - low idle speed if the idle speed control is blocked;
- P0507 - high idle speed when the idle speed control is locked.
You can get acquainted with all error codes in more detail if you purchase a special book or on the official website of the manufacturer.
ABS fault detection
You can find out about problems with the ABS by looking at the indicator light on the instrument panel. If it lights up for no reason or does not go out after the required period of time, you need to go to a service station and undergo computer diagnostics. Modern Priora ECUs have a diagnostic connector through which you can easily connect a portable scanner or a stationary motor tester.
All ABS electronics are connected to the mechanical part of the car, so only an experienced diagnostic technician can accurately determine the error that the system produces. ABS error codes start with 0035 and end with 0800. In order to deal with them correctly and determine the reason for the light bulb to light up, you need to have a table of error decoding on hand or resort to qualified help.
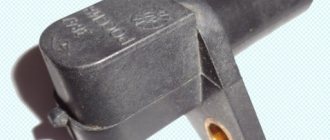
What is the effect of a DS malfunction on a Priora?
All Priora car owners are familiar with the situation when the speedometer begins to act up. The arrow either shows the wrong speed value, freezes at some position or shows no signs of life at all. The reasons for this behavior are often related to the speed sensor. Such a device affects not only the operation of the speedometer, but also the engine.
If the speed sensor on the Priora is faulty, the engine will function, but the possibility of it going into emergency mode is possible when the fuel-air mixture is prepared at average values. Even on a Priora with electric power steering, if the speed sensor malfunctions, the power will not work (or work intermittently).
This is interesting! The speed sensor on Priora is a problem for all cars of this brand. And therefore, when faced with the first signs of a malfunction, you should resort to eliminating them.
Let's immediately look at how the speed sensor affects engine operation. When the vehicle speed increases, the ECU understands that frequent fuel supply through the injectors is required. Naturally, the rapid movement of the car is also recorded by the level of throttle opening, for which the throttle position sensor is responsible.
If the car is coasting (downhill), then approximately the following picture occurs:
- the speed of the car increases, as evidenced by the DS readings;
- however, intensive fuel supply to the manifold is not necessary, since the ECU records the closed position of the throttle valve;
- Thus, the ECU understands that the car is coasting, which means that fuel consumption at such a moment is minimal.
In modern cars, DS play a very important role, and if you could drive a carburetor car with a broken cable as much as you like, then on injection cars, where the DS is presented in the form of an electrical element, such a breakdown will entail an increase in fuel consumption, as well as interrupted operation of the engine
That is why it is very important, if such a malfunction occurs, to eliminate it as quickly as possible.