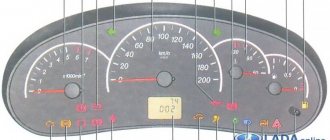
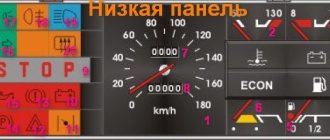
The Lada Priora/Kalina instrument cluster is designed to display driving characteristics, the current state of vehicle systems that ensure traffic safety, as well as the correct operation of the entire vehicle as a whole. If you are a novice driver, then this description of the dashboard will help you understand the readings of instruments and indicators.
- Tachometer. Shows engine speed in real time. The red scale zone indicates a dangerous operating mode for the engine;
- Malfunction lamp of the electronic brake force distributor. To check, the lamp lights up red for a few seconds when the ignition is turned on. The burning of the lamp in other cases indicates a malfunction; when driving with a burning lamp, increased safety measures must be observed;
- Battery charge lamp. To check, the lamp lights up red when the ignition is turned on and goes out after the engine starts. If the lamp is lit in other cases, it indicates a lack of battery charge;
- Left turn signal lamp. Flashes when the turn signal or hazard lights are on;
- Speedometer. Shows at what speed the car is currently moving;
- Engine oil pressure warning lamp. To check, the lamp lights up when the ignition is turned on and goes out after the engine starts. In other cases, the lamp is lit indicating low pressure in the engine lubrication system. It is not recommended to operate the engine in such conditions;
- Right turn signal lamp. Flashes when the turn signal or hazard lights are on;
- Handbrake lamp. Lights up red when the parking brake is applied;
- Coolant temperature gauge. Engine operating temperature is 90 degrees and above to the red zone. It is prohibited to operate the vehicle if it overheats. When the arrow reaches the red zone, a buzzer will sound. To extend engine life, it is recommended not to operate the engine at high speeds until the coolant temperature reaches operating temperature;
- Gasoline level indicator in the tank. The arrow shows the fuel level. Lack of gasoline can damage the fuel pump;
- Fuel reserve lamp. Lights up with an accompanying buzzer signal when there is less than 10 liters of fuel left in the tank;
- Button for switching display modes and resetting daily mileage readings. A short press switches between daily and total mileage. When you hold the button, the daily mileage is reset, accompanied by a sound;
- Hazard warning light. Flashes red when the emergency lights are turned on simultaneously with the turn signals.
- Electric power steering (EPS) malfunction lamp. To check, the lamp lights up yellow when the ignition is turned on for a few seconds. Lighting of the lamp in other cases indicates a malfunction of the EUR;
- Headlight high beam lamp. Lights up when the high beam headlights are turned on;
- Lamp for turning on external lighting. Lights up when the headlights are turned on or the headlights are low beam;
- Airbag system malfunction lamp. To check, the lamp lights up yellow when the ignition is turned on for a few seconds. In other cases, if the lamp is illuminated, it indicates a malfunction in the airbag system. In this case, in the event of an accident, the airbags will not deploy;
- Immobilizer lamp. If the system is working properly and the engine is allowed to start, when the ignition is turned on, the lamp flashes once and goes out. If the lamp flashes constantly (accompanied by short beeps), then the system is faulty. If, after turning on the ignition, the lamp lights up for 15 seconds and goes out, then the anti-theft system is not activated;
- Liquid crystal display of the on-board computer (BC). Displays daily and total mileage, as well as information from the BC;
- Seat belt warning light (optional). The lamp lights up when the driver's seat belt is not fastened, accompanied by buzzer signals for 1.5 minutes;
- Brake system emergency lamp. To check, the lamp lights up red when the ignition is turned on for 4 seconds. In other cases, the lamp is lit indicating an insufficient level of brake fluid, or another malfunction of the brake system;
- Front passenger airbag lamp (optional). Passenger airbag deactivation lamp;
- Anti-lock braking system fault lamp (optional). To check, the lamp lights up when the ignition is turned on and goes out after a few seconds or after the engine starts. When the lamp is lit, there is a malfunction in the ABS system, but the brakes remain fully operational;
- Engine management system malfunction lamp (Check Engine). To check, it lights up when the ignition is turned on and goes out after the engine starts. In other cases, the lamp is lit indicating a malfunction in the system. See the error code.
Standard instrument panel - article number and price
The original car tidy exists in three types.
- the first is an option for a pre-restyling car;
- the second panel is for a restyled car;
- and the third is the “Lux” option for the restyled one, which has become faintly similar to all previous torpedoes.
Each of them contains standard elements such as a tachometer, so their functionality does not decrease. . Who wants to do tuning of the instrument panel, this option is for them.
Priora first generation
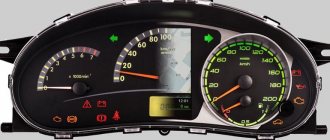
The instrument cluster for the first generation Lada Priora received catalog number 2170-3801010. Cost – about 6,000 rubles. Everything is standard with it - from left to right there are four arc scales with red arrows: odometer, speedometer, coolant temperature, fuel level. Below the speedometer there is a small on-board computer display, and above the arches are all the indicators, including the direction indicators.
Priora 2
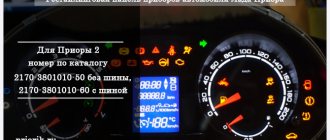
For the Priora “Lux” variation there are two more “subtypes” - with or without a CAN bus. Different subtypes were made so that the panel could be connected to any car. Catalog number – 2170-3801010-50 without tire, 2170-3801010-60 with tire. It is distinctive in that it contains an elongated display with a screen that can highlight the navigator.
The catalog number of the combination for the “Norma” assembly is 21720-03801010-20. Cost – 6,500 rubles. Like the “Lux” version, it received a brighter speedometer and odometer, and the coolant temperature along with the fuel level indicator is hidden at the bottom of the speedometer and odometer. The base will not create a route on the display, but will show all the information in color.
Tuned instrument panels for Lada Priora
Owners of Lada Priora cars are not always satisfied with the functionality of the standard dashboard. Therefore, they come to the decision to replace the shield with a tuned one. This shield provides the following capabilities:
- on-board computer;
- built-in ECU diagnostics with description of error codes;
- more pleasant lighting;
- electronic indication of speed and tachometer parameters.
The leading manufacturers of such instrument panels are Flash, Itelma and Gamma.
The most functional and pleasant is the instrument panel from the Flash company, while Itelma is the official supplier of electronics to the Lada conveyor.
It is worth considering that a tuned instrument panel is quite expensive. Some samples can cost up to 35-40 thousand rubles.
Dashboard indicator symbols
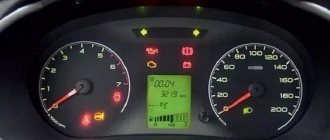
When starting up, almost all the icons on the dashboard light up - this way the operation of the light bulbs is checked. Some drivers believe that these are messages about malfunctions of some Lada Priora systems.
| No. on the diagram | Indicator designations |
| 1 | Tachometer. The device measures the engine crankshaft frequency (revolutions per minute). If the arrow goes beyond the red value, it means that the Lada Priora engine is operating in a dangerous mode; |
| 2 | Brake force distributor indicator. Reports defects in the operation of this node; |
| 3 | Battery charge. If the lamp lights up while the engine is running, the battery is discharged; |
| 4 | Left turn signal. The sign flashes when there is an alarm or the left indicator is on; |
| 5 | Speedometer. The device reports the speed at which your Lada Priora is currently moving; |
| 6 | Emergency lubricant pressure in the engine. If the sign lights up during operation of the power plant, it means the pressure in the system is low; it is highly not recommended to operate the engine in this condition; |
| 7 | Right turn signal (see No. 4); |
| 8 | Handbrake indicator. Lights up yellow if the Lada Priora is in the handbrake; |
| 9 | Antifreeze temperature in the cooling system. The operating temperature of the motor starts from 90° and above to the red mark. If overheating occurs, turn off the engine; |
| 10 | Gasoline level in the tank. If the fuel level approaches the minimum, the fuel pump may break; |
| 11 | Reserve gasoline level. The indicator lights up when there are less than 10 liters left; |
| 12 | Key for resetting the daily mileage and switching between display modes; |
| 13 | Alarm. If you have triggered the emergency lights, the lamp will flash along with the turn signal arrows; |
| 14 | Malfunctions in the electric amplifier. If defects appear in the EUR, the lamp will light up while the engine is running; |
| 15 | High beam designation. An active indicator indicates that you have switched to distant; |
| 16 | Outdoor Lighting. The system notifies the driver about the operation of the headlights or low beams; |
| 17 | Airbag malfunctions. If the lamp lights up after starting, then there is a high probability that the airbags will not deploy in a collision; |
| 18 | Immobilizer. An audible signal and flashing indicate that the immobilizer system is faulty; |
| 19 | Computer screen. Here you can view information from the bookmaker, as well as find out the total and daily mileage; |
| 20 | Indication of unfastened seat belts. The buzzer will signal a violation for 90 seconds; |
| 21 | The brake system is in disrepair. Most often these are worn pads or insufficient fluid in the system; |
| 22 | Disabling a specific airbag; |
| 23 | Indicator of defects in ASB operation, the braking system is operating normally; |
| 24 | Check Engine – there is a breakdown in the engines; diagnostics and subsequent repairs are urgently required. |
Icons on the Priora dashboard
Please describe the icons on the Lada Priora instrument panel.
- Tachometer . Crankshaft rotation speed. The needle must not go into the red zone. The red zone is dangerous for the engine.
- Brake force distributor malfunction lamp . Lights up red for a few seconds when the ignition is turned on. If the lamp lights up in other cases, this may indicate a system malfunction.
- Battery charge lamp. Lights up red when the ignition is turned on and goes out immediately after the engine starts. If it lights up even after starting the engine, this indicates that the battery charge has expired/the battery is faulty.
- Left turn indicator. Flashes when the turn signal is on, also flashes when the hazard lights are on.
- Speedometer. Shows the speed of the car.
- Emergency oil pressure lamp. Lights up red when the ignition is turned on and goes out immediately after starting the engine. If the lamp is lit in any other case, this indicates low pressure in the system. Operating the car in this case is dangerous for the engine.
- Right turn indicator. Flashes when the right turn signal or hazard warning lights are on.
- Parking brake. Lights up red when the handbrake is applied.
- Coolant temperature indicator. Under normal conditions, the needle is located in the middle of the scale. Engine operating temperature is 90 degrees and above to the red zone. The arrow should not fall into the red zone, which indicates engine overheating. In this case, it is prohibited to further operate the car. You can continue using the car as soon as the needle drops to normal values.
- Fuel level indicator in the gas tank. P shows the fuel level. If there is no gasoline, the fuel pump may fail.
- Fuel reserve lamp. Lights up when there is less than 10 liters of fuel left in the tank. Also, a beep sounds.
- Button for switching display modes and resetting the daily mileage counter. To reset the daily mileage, hold the button pressed for 3 seconds.
- Alarm. Flashes along with turns when the emergency lights are turned on.
- EUR malfunction icon. Lights up yellow when the ignition is turned on for a few seconds and goes off. In other cases, if the lamp is lit, it indicates a malfunction of the EUR.
- High beam headlight lamp.
- Lamp for turning on external lighting. Lights up when the headlights and low beam are turned on.
- Airbag system malfunction icon. Lights up yellow for a few seconds when the ignition is turned on and goes off. If the lamp burns in any other cases, it may indicate a malfunction in the airbag system.
- Immobilizer icon. Lights up or flashes yellow and displays the status of the immobilizer system and the vehicle's security mode. If the system is in order and the engine is allowed to start, when the ignition is turned on, the lamp flashes 1 time and goes out.
- LCD display of on-board computer. Displays information from the on-board computer, as well as daily and total mileage.
- Unfastened seat belt. Lights up when the ignition is turned on if the driver's seat belt is not fastened.
- Brake system emergency lamp. Lights up red when the ignition is turned on for a few seconds and goes out. The lamp also lights up when the brake fluid level is insufficient and when a malfunction occurs in the service brake system.
- Passenger airbag deactivation icon (optional). Lights up when the ignition is turned on.
- ABS fault icon (optional). To check, the lamp lights up when the ignition is turned on and goes out after a few seconds or after the engine starts. If the lamp is lit, there is a malfunction in the ABS system. However, the performance of the braking system is not affected.
- Engine fault lamp. Check Engine. To check, it lights up when the ignition is turned on and goes out after the engine starts. In other cases, the lamp is lit indicating an engine malfunction. It is not recommended to operate the car in this case.
Instrument cluster
First, let's look at the description and pinout designation of the icons of the new instrument panel on the Lada Priora car.
So, the shield includes the following elements:
- A tachometer device designed to demonstrate engine speed. Red arrows on the combination indicate speeds that are not recommended to be exceeded. Lada Priora allows you to accelerate the engine to six thousand revolutions.
- Pinout icons for light alarms or turn signals. A green arrow pointing to the left lights up on the dashboard when the left turn is engaged. It not only lights up, but also blinks, the same applies to the right turn signal. In addition to the fact that the icon turns on, at this moment the sound signal also works; its shield turns on along with the turn signal.
- The speedometer shows the speed level at which you are traveling.
- Refrigerant temperature level sensor in the system. If, as a result of any malfunctions, the coolant temperature increases to 115 degrees, an audible signal will tell the car owner about this. This will happen for five seconds until the temperature drops to 110 degrees. To prevent the engine from overheating, you should turn it off and get rid of the problem of antifreeze boiling.
- The designation of the arrow for the level of gasoline in the tank is known to everyone. If the arrow on the Lada Priora instrument cluster has approached the red zone, this indicates that the tank needs to be refilled as quickly as possible, since there are about five liters left in it. Please note that sediments present in the fuel collect at the bottom of the gas tank, so it is not recommended to use gasoline completely.
- A pinout icon indicating that the gasoline reserve is turned on; this symbol is made in the form of a gas station. When it lights up orange and stays on continuously, it means refueling is needed.
- There is a button on the speedometer designed to reset the daily mileage; when you press it, the daily mileage will be reset to zero.
- Alarm. When this function works, red icons are activated on the Lada Priora instrument cluster. The vehicle's parking lights begin to flash, indicating a breakdown.
- An icon indicating the operation of the electric power steering. When the ignition is turned on, this icon works and passes the test, but after the engine starts, the backlight disappears.
- Icon with blue highlight. On the Lada Priora combination diagram, when you turn on the high beam headlights, you will be able to see the corresponding icon with a blue backlight, but it will be practically invisible during the day.
- Handbrake icon that illuminates when the lever is activated. The backlight of this element lights up in red; it also disappears when the engine starts, after the test.
- Symbol for turning on external lighting, that is, side lights or low beam. The icon turns on with a green backlight.
- The symbol of working airbags on the Lada Priora combination diagram turns on for 3-4 seconds after turning on the ignition, during the test, it lights up in orange.
- Engine fluid pressure emergency icon. There is also this icon on the navigation diagram for the driver; it always lights up in red when the ignition is on and goes out after the engine starts, that is, the test. The driver must always use the navigation panel of the Lada Priora and monitor the operation of this indicator. If it does not light up when igniting, this may indicate a sensor malfunction. If the fluid pressure level is below the required level, an audible signal will tell the driver about this within five seconds. It is not recommended to operate the car when the fluid level is low, as this will harm the engine.
- Immobilizer icon. On the navigation diagram you can see a symbol with orange backlight - the immobilizer icon. The element demonstrates to the driver whether the Lada Priora vehicle protection system is turned on or not.
- The computer is another symbol that shows the full mileage of the Lada Priora per day, with indicators of the main functions located in the middle.
- The seat belts disconnected symbol lights up red during the test; if the seat belts are not fastened, the system will sound a corresponding buzzer.
- Battery symbol. Another indicator that is tested when the ignition is turned on is the battery symbol. When you turn the key, it passes the test and lights up, the indicator goes out after the engine starts. It should be noted that the operation of this component of the Lada Priora instrument cluster must always be monitored. If it does not turn on, then there is a possibility that the battery is not ready for use or the sensor has failed. If the indicator functions while the engine is running, this may indicate a low battery charge. There is also a possibility that the timing belt is loose or broken, or the generator is not working correctly (the brushes are worn out).
- The brake system status regulator is also located on the Priora dashboard. This symbol on the combination lights up in red when the ignition is on, like other sensors, it stops working after the engine starts. If the brake system does not pass the test, then using the Lada Priora is not recommended.
- The Check Engine regulator on the Lada Priora combination indicates the condition of the engine. When the ignition is turned on, it passes the test and turns off when the engine starts. If the symbol continues to light while the engine is running, this indicates a malfunction of the unit; it is recommended to carry out computer diagnostics of the engine. This is the only way to obtain the most accurate data about possible breakdowns that need to be eliminated in the near future.
- The ABS system icon lights up continuously when it fails.
- Airbag disabled icon. The driver's navigation control panel also has this icon, in particular those located on the front passenger seat.
- Symbol of failure of the electronic brake force distribution system (video author - Automotive Diagnostics).
Description and location of indicators and instruments on the panel
In accordance with the diagram, the description and designation of the icons on the new combination in Priora is as follows:
- Tachometer. This controller is used to display the number of revolutions of the power unit (crankshaft) per minute. The red zone of the sensor indicates speeds that it is better not to reach and which should not be exceeded in order to avoid damage to the crankshaft.
- Left turn indicator. When the turn signal is turned on, this symbol flashes, and the sound signal also turns on when it is on.
- One of the main sensors - the speedometer - allows you to determine the speed at which the car is moving.
- Right turn signal. Both left and right turn signals are activated when the hazard lights are turned on and light up synchronously.
- This sensor on the Lada Priora dashboard shows the temperature of the engine warming up or antifreeze in the cooling system. The controller arrow should not rise to the specified limit, otherwise this may indicate overheating of the power unit. In case of such a problem, you need to immediately turn off the engine and allow it to cool, and also identify the cause of the problem.
- In accordance with the pinout, this sensor on the dashboard with or without navigation determines the volume of the fuel level in the tank. It is advisable not to allow the indicator arrow to move towards the red zone, this will indicate the need to refuel the car. In any case, sediment collects at the bottom of the tank, no matter how high-quality fuel you use. When the fuel pump tries to produce this fuel, it clogs faster and may fail.
- This indicator indicates that the fuel pump has started pumping reserve fuel; the icon is shaped like a column. If it appears, then the tank needs to be refilled urgently.
- A button used to reset the daily mileage information.
- Light signaling. When this function is activated, the left and right turn signals on the dashboard will flash.
- Indicator light indicating that the EUR is not working. The icon always appears when the ignition is activated, at this time the instrumentation and amplifier are tested, when the engine is started, the indicator will disappear.
- The high beam activation indicator lights up blue.
- The next icon on the Priora control panel is the activation of the parking brake, which appears when the driver lifts the lever. If the handbrake is raised, the icon will light up even when the engine is running.
- The icon for activating the headlights, in particular, we are talking about side lights or low beams. The indicator lights up green.
- Functional airbag indicator light. If the indicator continues to light after starting the engine, then most likely there are problems with the security system. First of all, you need to check the condition of the sensors.
- Symbol of critical engine oil pressure. The indicator always lights up when testing the device, but if it appears while driving, the car owner should check the lubrication system. First of all, you need to make sure that the volume of oil in the engine corresponds to the norm - if the volume is insufficient, the fluid must be added. The reason for the appearance of the lamp may also be due to a failure of the pressure sensor or its poor contact with the on-board network.
- The immobilizer symbol lights up orange. This icon is intended to alert the driver that the anti-theft system has been activated.
- A display showing the car's mileage over the past 24 hours. Also in the middle of the screen are indicators of the main options.
- The seat belts not fastened icon, lights up red, always lights up during self-testing of the shield. If you are not using seat belts, an audible signal should also sound.
- Battery icon. It also always appears when the ignition is turned on, so the dashboard tests all indicators. If the icon continues to light after starting the engine, this indicates that there is something wrong with the battery. The reason for its appearance may be related to either the battery being discharged due to the inoperability of the battery itself (shedding of the plates, boiling off of the electrolyte, etc.), or to problems with the operation of the generator. In particular, we are talking about a worn assembly belt or its damage; sometimes the reason lies in the wear of the brushes.
- Brake system condition controller. This indicator lights red and indicates a malfunction in the above system. There may be several reasons; the fault can only be determined through diagnostics.
- Symbol of problems with the electronic brake force distribution system. It should not light up when the power unit is running.
- Airbag deactivation or inoperability symbol. In this case we mean the front airbags.
- If this symbol appears, then we can conclude that the ABS does not work or is not functioning correctly. It is necessary to carry out detailed diagnostics of the system to identify the malfunction. In some cases, the reason lies in a malfunctioning sensor.
- Check Engine is an indicator that appears if the control unit has detected problems with the operation of the power unit. Problems can be very different; it is unlikely that it will be possible to determine the problem at random, so most likely you will need computer diagnostics (the author of the video is the Automotive Diagnostics channel).
The exclamation mark is on - what to do?
We have noticed that new topics often appear on car forums where drivers ask about the exclamation marks that are displayed on the Lada Priora panel. They rarely specify where it is lit and what is depicted on the icon. In this section we have collected a small FAQ Below are all the exclamation marks that can light up on the instrument panel of a VAZ 2170 car. The designations of these icons are as follows:
- The red exclamation mark in the circle (bottom) is lit. The indicator indicates that there is a problem with the vehicle's brake system. This is usually a low brake fluid level. Add it to the tank and, most likely, the sign will stop lighting. If this does not happen, then it is worth checking the system for damaged components. When igniting, the indicator lights up for 4 seconds and then goes off.
- The red exclamation mark in the triangle/circle (above) is lit. Modern versions use a triangle instead of a circle. The indicator tells us about defects in the operation of the brake force distributor. Use extreme caution if the light comes on while driving.
- Exclamation mark next to the steering wheel icon. When illuminated for a long time, it indicates a malfunction in the electric power steering (EPS). Like other icons, it lights up when ignited and goes out after a few seconds if the system is working properly.
If the red triangle lights up while the engine is running, then you should diagnose the brake force distributor
Sometimes the indication is caused by faults in the electronics. Terminals are coming off, contacts are oxidized, defects in the on-board computer are a few reasons for the random appearance of icons. To avoid damaging one of the systems, check the electronics first. To do this, it is enough to dismantle the device on the Lada Priora and see if the terminals are securely seated in the sockets. If the brake system indicator lights up, first check the fluid level in the reservoir, and only then fill in new antifreeze.
An exclamation mark lights up on the dashboard: what actions should car owners take?
Before you begin troubleshooting problems indicated by an exclamation mark that lights up on the instrument panel in a Priora, you should determine:
- where will it light up?
- what the icon will represent.
An icon can have multiple images:
- If a red exclamation mark starts to burn at the bottom of the circle, this will indicate a problem with the brake system, namely the minimum level of brake fluid. This problem can be solved quite simply by adding brake fluid to a special reservoir to the required level. If after this the indicator light continues to light, then experts advise checking the serviceability of all components of the brake system.
- If a red exclamation mark starts to light up in the triangle at the top of the circle on the Priora’s instrument panel, this will indicate a problem with the car’s brake force distributor. It is worth noting that the most modern models use not a circle, but a triangle. Only experienced specialists can fix this problem, so you need to visit a service station as soon as possible. And when driving, if you see that the light in the triangle has begun to light, you should be extremely careful.
- If the red exclamation mark, located at the bottom of the steering wheel icon, stays on for a long time, this will indicate a malfunction in the EPS (electric power steering wheel).
It is worth noting that if the above systems are working properly, the icons on the instrument panel will light up when the ignition system is turned on, but after a couple of seconds they should go out.
If the car owner sees that the light comes on while the engine is running, then first of all you need to check the functionality of the car's brake force distributor.
For what other reasons might the lights on the dashboard start to light up?
According to experts, faults in electronics can also cause indexing. Icons may appear involuntarily on the dashboard due to the following breakdowns:
- if the contacts succumb to the oxidation process;
- if the terminals change their location;
- if breakdowns occur in the on-board car computer.
Taking into account the advice of experts, and in order not to harm one of the car systems, you need to check the functionality of electronic components. To do this, you will need to diagnose the electronic part, which is done quite easily - remove the dashboard and check the location of the terminals in the so-called sockets. And if the brake fluid level indicator lights up, then first of all the fluid level in a special tank is checked, and only after that new brake fluid is filled in to the recommended level.
Understanding why the light on the dashboard lights up and finding out what kind of breakdown this or that sign indicates is quite simple if you familiarize yourself with each element located on the instrument panel.
Tachometer, speedometer, on-board computer indicators, light bulbs - all these components are located on the Lada instrument panel. The “tidy” is designed to display the current state of various Lada Priora systems. An experienced motorist will immediately notice that one of the components requires repair; a certain icon will inform him about this. If you are a novice driver, then it will be useful for you to study the Lada Priora dashboard. This material provides a detailed description of each element of the tidy.
Types of lamps installed on a car plate
Prior can be equipped with lamps equipped with a VDO cartridge or the most common automotive lamps. Before you buy components without ordering, you need to find out what kind of cartridge they have. To do this, simply remove the screen so that you can carefully check the type of cartridge you are using. It is worth noting that used lamps in cartridges visually look the same, but if the analyzed element has so-called whiskers, then removal and installation of a new one occurs according to the following scheme:
In what cases is it necessary to remove the instrument panel?
Dismantling the Priora tidy is required for tuning or replacing burnt out lamps. The VAZ 2170 is a modern model, so there are not many fastenings on the panel. To disassemble you will need a set of screwdrivers. Don't forget to turn off the negative battery.
- The process begins with removing the mounting block.
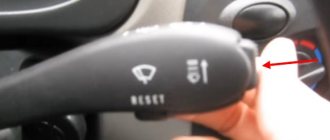
To do this, you need to turn the latches on the fuse cover and then remove it; Turn the marked latches to remove the cover. - It is not necessary to remove the steering wheel, just lower the steering column down. Using a Phillips screwdriver, unscrew the screws of the lining;
- Using the same tool, we unscrew the screws of the instrument cluster.
Tilt the top towards you and then remove the combination from the slots. Now you can turn the lock; Pull the cover out to remove it from the groove - After disconnecting the wires, the Lada tidy can be completely removed.
How to dismantle and install the Priora dashboard
To dismantle the module, you will need to prepare two screwdrivers – a Phillips and a flathead one. A complete replacement of the Priora tidy looks like this.
- Disconnect the wires from the battery.
- Pull the steering column all the way down and remove the steering wheel from the pin.
- You will also need to remove the cover covering the fuse box.
- Unscrew the 4 bolts holding the instrument panel and remove it.
- Loosen the two mounting bolts of the trim panel and remove it.
- Disconnect the wiring harnesses from the contact groups and completely remove the board from the machine.
Installation is performed in reverse order.
Specialization : Graduated from the State Automobile University, worked for 20 years at GAZ-56, now I drive a Zhiguli.
Source
Panel malfunctions: signs and causes
What malfunctions can occur in the operation of the control panel:
- The backlight does not light up. There may be several reasons - damage to the device’s power supply circuit, a short circuit in the system, failure of the control panel. But one of the most common reasons in this case is the burnout of the safety device. The marking fuse F10 is located in the mounting block; it must be checked first.
- The sensors do not work - the arrows on the speedometer and tachometer do not rise. The reason may be a bad signal coming from the speed sensor or crankshaft sensor to the dashboard. It is necessary to check the electrical circuit for breaks. Much less often the problem lies in a failed sensor.
- The controller for the volume of gasoline in the tank and the engine temperature do not work. As in the previous case, the cause of the malfunction may lie directly in the sensors themselves. The fuel volume controller is located in the tank with the fuel pump, and the coolant sensor is located in the cylinder head. Before replacing, we recommend checking the quality of the connection and contacts - perhaps they are simply damaged or oxidized, as a result of which the sensors do not work. The reason may also be a damaged electrical circuit; in this case, you will need to check the wiring.
- It happens that the dashboard as a whole works correctly, but the controllers transmit incorrect information. The reason may lie in the performance of the processor or a short circuit in the wiring. Sometimes the problem lies in bad mass.
- The backlight is partially not working. Most likely, the reason lies in the burnout of the lighting sources; they will need to be replaced.
When do you need dashboard repair or replacement?
The Priora tidy does not have a large number of parts that are subject to frequent breakdowns. Typically, repair of the indicator unit comes down to replacing light bulbs and individual elements of the device. Users resort to replacing the board only when there is a malfunction of the contact group, connectors, or the board is damaged.
In case of serious damage (major short circuit leading to burnout of the main structural elements), repair may not be cost-effective. The cost of labor and materials often exceeds the price of a new module.
Possible malfunctions and ways to eliminate them
When operating a vehicle, individual components of the instrument panel may fail. Among the most common breakdowns are factors.
- Burnt out contact of one of the indicator lamps. Usually resolved by replacing the light bulb.
- Failure of the contact group can be eliminated by completely replacing the module - resoldering the part is not economically profitable.
- Malfunction of arrow indicators. It can be fixed by replacing the block.
REQUIRED
The Itelma instrument panel with navigation can be of two types (externally they are no different):
- 2170-3801010-50 without CAN bus;
- 2170-3801010-60 from CAN bus.
They are not interchangeable, so before purchasing, you should determine whether your vehicle uses a CAN bus or not.
For Priora:
- until 06.2012, cars were produced without a CAN bus;
- remove the instrument cluster and look at the article number or at the block with wires (see pinout of connectors below).
For Kalina (VAZ 1117, 1118, 1119) - all cars without a CAN bus.
Additionally you will need:
- Right steering column switch with joystick (catalog number: 1118-3709340-20);
- Antenna (for roof installation): 1118-7903074.
You can also buy ready-made kits (device + antenna + switch):
- for Lada Priora - 2170-3801010-55;
- for Lada Kalina 1 - 1118-3801010-55.
Video “How to quickly change light bulbs in PP Priora?”
We invite you to familiarize yourself with a detailed guide on how to independently replace the light bulbs in the Priora dashboard (the video was shot by Kirill Zhukov).
Don’t ask me anything, I wrote everything I know.
You can copy this article to your blog, then notify me so that I can delete this entry.
First type of devices:
Kalinas and Prioras without can tires.
On the VAZ-1118 (Kalina) from 2004 to 2011, the device was installed 1118-3801010
All these devices have a 32-pin connector. You can, for example, install a Priorovskaya tidy instead of a Kalinovskaya one, but it is advisable to select the desired model (1118 or 2170).
Instead of such a tidy, you can install an expensive tidy with navigation 1118-3801010-50 for Kalina and 2112 with Europanel or 2170-3801010-50 s for Prior produced before July 2012 (without CAN bus). And they additionally need a GPS antenna and a wiper switch with a joystick (they are described below).
Addition from Shurik5891
On the first releases of 1118 devices, there are no LEDs for ABS, ESD, or seat belts.
Addition from Shandys
On Kalina1 2013
with e-gas and cable drive gearbox there is a tidy 11180-3801010-20 vdo _____________________________________ Second type of
Grant devices of the 1st generation
Granta appeared in 2011
From a smart book: “The electronic engine control system of the LADA GRANTA car implements a data exchange interface between the ECM, instrument cluster and diagnostic device via the CAN bus. The CAN bus is a two-wire line: - CAN L low level line (contact “X2/D2” of the ECM - contact “7” of the instrument cluster - contact “14” of the diagnostic block); - CAN H high level line (contact “X2/F1” of the ECM – contact “8” of the instrument cluster – contact “6” of the diagnostic block). The immobilizer is integrated into the instrument cluster." Pinout of devices 2190
: 1 - To the emergency oil pressure sensor, 2 - To the parking brake switch, 3 - Service. Panel diagnostics, 4 — To the exterior lighting switch, 5 — To the right turn signal switch, 6 — To the left turn signal switch, 7 — CAN-L, 8 — CAN-H, 9 — To the seat belt sensor, 10 — “RESET” key » on the steering column switch, 11 - To the brake fluid level sensor, 12 - To the high beam headlights, 13 - To the low beam headlights, 14 - To the rear fog lamp, 15 - To the front fog lamps, 16 - Immobilizer antenna input (b) , 17 — “Ground” panel, 18 — Immobilizer antenna input (a), 19 — To terminal “30,” 20 — To electric power steering, 21 — To terminal “15,” 22 — To door sensor, 23 — MK key “ forward", 24 - MK key "back", 25 - To the outside temperature sensor, 26 - To the fuel level sensor. Instrument clusters are interchangeable.
Pinout provided by fellow teemest
The connector for these devices is 26-pin.
Some devices have sound for turn signals and/or hazard lights, some do not. This is normal and is not a malfunction. Instead of a temperature indicator, there was only a light bulb, the lighting of which indicated overheating. On June 16, 2014, they began installing the device with firmware 092, and in the window it was possible to select engine temperature readings. On cars with the standard configuration, there is no outside temperature sensor. If the device has firmware 090, you can take sensor 2115-3828210, one contact to the body, the second to contact 25 of the devices, and the function of displaying the outside temperature will work. Devices may also differ in the presence/absence of an indicator for front fog lights, an indicator for an automatic transmission, etc. And there are these same devices with navigation.
INSTALLATION
Replacing the old instrument panel without CAN with a dashboard with navigation without CAN (2170-3801010-50) is carried out without modifications. We remove the old panel and install a new one in its place, insert the connector with wires, connect the antenna (we fix it on the roof) and, if necessary, change the right steering column switch.
If the old instrument cluster without navigation, but with CAN, and instead of it it is planned to install a new dashboard with navigation with CAN (2170-3801010-60), then you need to rearrange contacts 10-11 to 28-29 (if after connecting it still does not work, change 28 and 29 places). See the pinout of the instrument cluster (it was posted earlier).
After installing the new instrument panel, the mileage will be reset to zero.
Navigation in the instrument panel runs on Windows CE 6.0 along with Navitel software. It is possible to update the software and download navigation maps from a USB card via a special USB input. Operating the car will become much more pleasant, the only drawback is the high price.
Instructions for replacing the tidy yourself
The procedure for removing, disassembling and replacing the control panel can be carried out on your own; there is nothing complicated about it.
- First of all, turn off the ignition, and then disconnect the battery from the power supply.
- For greater convenience, you should remove the steering column cover, and also dismantle the steering wheel itself.
- After this, using a screwdriver, you need to unscrew the two screws that secure the upper part of the tidy.
- Next, two more screws are unscrewed, only now from the bottom.
- There are two more screws on the sides of the control panel; they also need to be unscrewed.
- After this, you can pull the tidy towards you, but do not remove it completely. Since wires are connected to the device, you need to disconnect the connectors on the back side, and then release the latch.
- The PP is removed and replaced with a new one. Assembly steps are carried out in reverse order.
Removing and installing the instrument panel on a Priora
When performing work on installing an alarm system, replacing backlight lamps or the panel itself, it is necessary to remove it.
The replacement work is the same for Lada Priora 1 and 2, since their panels have only minor differences. In this regard, in order to unify and simplify the repair and maintenance of the car, the manufacturer made this procedure identical.
Required tool:
- Phillips head screwdriver;
- flat screwdriver;
- plastic tool for disassembling the interior.
To make a replacement, you must perform the following procedure:
- Under the steering column, remove the lower trim covering the fuse box. To do this, rotate the three clamps 90 degrees.
- Unscrew the four screws securing the instrument panel trim. Two above and two below.
- Remove the decorative trim of the instrument panel.
- Unscrew the two screws securing the panel. Tilt it and disconnect the electrical connector.
- Remove it from the dashboard.
Installation of the instrument panel is carried out in the reverse order.
Ideas for tuning and modifying the shield
How to tune the shield:
- Instead of a standard shield, install a more advanced one, with a navigator. In such devices, the arrangement of indicators and sensors will be different - the sensors are located on the right and left, and in the middle there is a navigator display. This tuning option is considered one of the most expensive.
- Install ready-made or develop your own scales for sensors. To implement this idea, you will need to completely remove the tidy and disassemble it, as well as disconnect the arrows from the sensors. The scales are installed on existing sensors and are securely fixed.
- Use of LEDs in lighting. The device will also have to be disassembled, but here the method is simpler. You don’t have to remove the arrows, you just need to turn off the light bulbs on the device and dismantle them, and then replace them with new ones. If the base of the light sources does not match, the lamps will have to be soldered. Alternatively, instead of light bulbs, you can solder an LED strip.
- Paint the dials and gauges of the instrument panel with fluorescent paint, but for greater effect, again, you will need to install diode lamps. With this combination, the tidy will glow brightly, but keep in mind that the implementation of this method requires care and painstakingness from the car owner.
Tuning and replacement of the instrument panel
If you want to tune or replace the instrument panel, then you will probably find the instructions for removing and disassembling the panel useful. The tuning procedure involves removing and disassembling the shield, we will discuss this in detail below.
Tuned tidy of a Priora car
So, to tune and replace the device, follow these steps:
- First of all, to carry out replacement or tuning, it is necessary to dismantle the tidy, having first removed the lining and disconnected all the fasteners. You also need to disconnect all wiring harnesses. If you are installing a new dashboard, then simply replace it.
- To carry out tuning, you need to remove the arrows, first disassembling the device. To prevent the panel from scratching, place thin cardboard or a plastic card under the arrows.
- The next stage of tuning will be to dismantle the panel cover; to do this, it needs to be separated from the glass base.
- So, let's proceed directly to tuning. If you want to tune the backlight, then the green coating must be removed; for this, use a stationery knife. Then you can take a plastic bag of any color, cut a small piece out of it and place it on the back of the trim. For proper tuning, cellophane must be glued.
- Simple lamps are not suitable for good illumination; it is better to use LED indicators. If you decide to install tape, then it should be glued along the entire perimeter of the scale. The pieces glued to the instrument cluster must be connected to each other with thin wires, after which the power wire is removed.
- Another step is to disassemble the display. It is necessary to remove the light filter from this element or replace it with another one. The filter can be of absolutely any color, depending on what kind of tidy light you want to get.
- The final stage will be the installation of all arrows and components on the control panel with further connection to all the necessary wires.
Where is the temperature gauge sensor on the needle located on the Priora and the symptoms of its malfunction
To check the temperature gauge sensor on a Priora or replace it, you must dismantle it. To do this, you should first understand the location of the device. The temperature indicator sensor is located on the needle on the Priora next to the DTOZH. If the DTOZH is built into the thermostat housing, then the DTOZH is installed directly in the cooling system on the engine block (under it on the left, as shown in the photo below).
To get to this sensor, you need to remove the air filter housing.
Signs of malfunction of the product in question appear as follows:
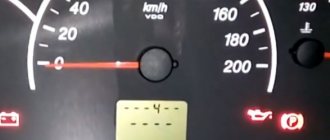
- The pointer arrow freezes in its initial position.
- The arrow shows incorrect values, for example, when the engine is warm, it shows 50-70 degrees, although it should be around 100 degrees.
- There is an abrupt change in readings, for example, the needle jumps from 90 degrees to 70 or 50, and returns back.
- Set at a maximum of 130 degrees.
Having an idea of the location of the element, you can resort to replacing it, and this process is described in detail in the next section.
Pinout of the instrument panel of a Priora car
The panel pinout looks quite complicated, but there is a more simplified diagram that will help you figure out the wires connected inside:
The decoding is as follows:
- EUR
- "emergency light"
- Engine oil
- Handbrake
- Immobilizer
- Airbags
- Headlights and dimensions
- Right turn signal
- Left turn signal
- Electronic control unit
- Pad wear sensor
- Seat belts (closing sensor)
- ABS
- Reset button
- Brake system, brake fluid
- ABS
- High beam headlights
- Torpedo shield lighting
- "Weight"
- Thirtieth terminal
- Fifteenth terminal
- Fuel consumption
- Forward key
- Back key
- Ambient temperature sensor (minus)
- Ambient temperature sensor (plus)
- Fuel level
- Speed sensors
- Coolant temperature
- Odometer
- Diagnostics of the shield (service)
- Generator regulator
How to enable self-diagnosis of the instrument panel
Using the panel you can “dig into the brains” of the Priora:
- Hold the button under the fuel gauge and turn on the ignition. The display should indicate the start of the test.
- Press the button again. The display should show the operating system version.
- Click again. The system should show error codes:
- (2) – High voltage level;
- (3) – DT malfunction;
- (4) – DTOZH malfunction;
- (5) – DTV malfunction;
- (6) – Motor overheating;
- (7) – Low oil level;
- (8) – Malfunction of the brake system;
- (9) – Battery discharge;
- E – Brain error, EEPROM.
- If necessary, reset the error: hold the button for three seconds.
- Release the button. Click again. All indicators should light up.
- Leave all the buttons. After 30 seconds, the self-test will automatically complete.
How to enable autotesting on Priora
Self-diagnosis of the VAZ Priora dashboard is necessary to be able to detect hidden problems or defects in on-board systems. To complete the procedure, you will need to perform a certain sequence of actions.
- Get into the car and insert the key into the ignition lock.
- Press and hold the daily mileage reset button.
- At the same time, turn on the car's ignition.
- If everything is done correctly, the instrument arrows will make several full revolutions and return back. All indicators will also flash.
The problem will be identified if any signal does not respond to manipulation.