The Volzhsky Automobile Plant is one of the leaders of the domestic automotive industry, which has been producing its products for many years. The brand is widespread not only in our country, but throughout the entire post-Soviet space.
Among the most popular models of the series, the VAZ 21099 is especially worth highlighting. This car has been produced since the late eighties of the last century and has been modified several times by the company’s engineers.
It is clear that the great popularity of VAZ cars leads to the fact that many car enthusiasts in our country have questions about servicing this particular model. This article offers readers information that will answer the frequently asked question of how to remove a torpedo on a VAZ 21099.
Step-by-step tuning steps
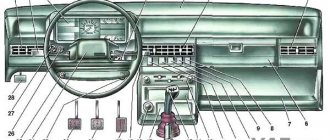
Before dismantling the VAZ 21099 panel, you will need to remove the terminals from the power supply by hand. Then the decorative steering wheel trim is removed. The nut should be unscrewed so that its end is flush with the similar element of the steering column shaft. You can’t turn it away right away. Then tuning the VAZ 21099 panel involves removing the steering wheel.
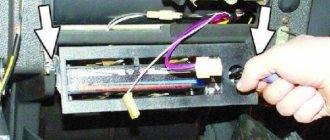
After unscrewing the 6 screws that secure the lower casing, you will need to remove it. The ignition switch trim is removed. The next step involves loosening the bolt that secures the base of the switches. The last element is removed from the shaft, and 2 blocks with the corresponding wires are disconnected.
In this case, you will need to label the washer and wiper switches. The block with wires is disconnected from the corresponding levers and direction indicators. The choke should be pulled out so that a draft occurs. At the same time, the handle of the first unit is pulled towards itself. Then the bolts securing the console trim are removed from the panel and the trim itself is removed.
The cigarette lighter cartridge and ashtray are pulled out of the socket. The VAZ torpedo is equipped with a heater fan that will need to be removed. To do this, it is recommended to use a screwdriver. The block and two wires are disconnected from the fan switch. They illuminate the europanel.
Tuning instrument panel
You also need to disconnect the handles for the hydraulic headlight adjustment and the light switch. After unscrewing the nuts, the corresponding switch is pushed inside the panel. The side nozzles are removed with a screwdriver. The high panel provides for turning away the bolts for fixing the linings. The last elements are located on both sides of the torpedo.
Subsequent tuning is carried out taking into account the removal of the radio socket. Existing audio equipment is pre-dismantled. Then, using a screwdriver, the latches are removed and the cover is raised. The block and wires are disconnected from the cigarette lighter. A similar step is carried out in relation to the backlight and alarm switch.
How to remove the high type panel
If your VAZ-2109 has a high panel model installed, then you need to act differently:
- First remove the steering wheel to gain access to the instrument panel.
- If you have a carburetor engine, pull out the choke and remove the handle from it.
- Now you need to remove the decorative trim; it is held on by two screws.
- Remove the ashtray and cigarette lighter.
- Pull the fan control handle towards you.
- Use a screwdriver to pry off the decorative control knobs for the interior heater drive.
- Be careful when removing the power wire connectors that go to the heater switch and to the heating control light.
- Remove the handles for the headlight hydraulic adjustment and the instrument panel lighting control.
- Use a socket to turn these adjusters and gently push them inward.
- Remove the air deflectors for the left and right side windows, and also remove the fasteners that were located under them.
- Pry the headlight switch with a screwdriver and pull it out to the length of the wires, disconnect it from the power supply. Place the block back behind the plastic part.
- Remove the stereo or standard radio, and then unscrew the center mount of the decor.
- Along the edges of the decorative trim there are latches that will need to be pressed in order to remove the decorative part of the torpedo by moving upwards.
- Disconnect power from the cigarette lighter, backlights, and hazard warning lights.
- Remove the decorative trims and speakers, disconnecting them from the wiring. After this, turn off the power to the heated rear window and fog lamp switches.
- Unscrew the fasteners and remove the instrument panel, remove the central screw on the speedometer and disconnect it from the cables. De-energize the shield.
- Turn off the power and remove the ignition switch, disconnect the choke control rod from the power supply.
- Disconnect the illumination lamp of the compartment for personal belongings from the power supply. Unscrew the remaining fasteners on the left and right and remove the panel.
Reassembly is carried out in the reverse order; it is especially important to monitor the connection of the power supplies. We recommend watching the video before disassembling the panel.
Source
The final stage of work
The high panel of the VAZ is dismantled carefully, since there are latches on the left that quickly break. After disconnecting the block from other elements, the entire instrument cluster is dismantled. The final step involves disconnecting the cable from the speedometer. If the Europanel is equipped with additional equipment, then you need to be even more careful. Tuning a torpedo involves disconnecting the block from the following units:
- on-board control system;
- ignition relay;
- remaining panel instruments;
- backlight lamps.
You will need to unscrew the screws for the lower fixation of the torpedo on both sides. Using a screwdriver, pull out the plug and unscrew the screws for the side fixation of the torpedo. The europanel is removed at the final stage. Installation of a new structure of this type is carried out in the reverse order. Upon completion of this procedure, the operation of the switches is checked.
Often, tuning a VAZ torpedo involves dismantling the plastic and removing the panel board. In this case, you will need the following tools and materials:
- soldering iron;
- europanel or insert;
- ultraviolet light bulb;
- wires;
- light bulbs;
- cartridges;
- glue;
- marker.
Initially, you will need to remove the old europanel, remove the glass and the existing edging. The insert and arrows are carefully pulled out. Particular attention should be paid to the new insert. It is recommended to make holes with some margin. This will prevent the arrows from sticking.
Further tuning is based on dismantling the standard backlight. This may break the plastic. Initially, the board is dismantled. Experts advise first drawing on paper the existing connection diagram and connections.
The standard lighting is replaced with neon lamps. Neon is glued to the panel. A plastic protection is fixed on top. In this case, you need to check whether this structure is securely held. The block with which the neon lighting is controlled should be glued to the europanel. To do this, you can use glue or double-sided tape.
Such tuning is easy to do with your own hands. An important point is the installation of the panel and the correct connection of its devices to the network. For this, auto mechanics recommend using books on repair and operation of the VAZ 21099.
Source
Tuning the interior of the VAZ 2109
The VAZ “nine”, despite its advanced age, is still popular to this day. There are many car owners who speak negatively about this car, but there are also those who like the model. The car is especially popular among young people and novice motorists. The affordable price allows you not only to purchase this car, but also to carry out various modifications. Tuning can affect both the exterior and the interior of the VAZ 2109. It is worthwhile to dwell on interior modifications in more detail, because it is in the cabin that the owner and passengers spend most of the time.
Improved instrument panel lighting
The standard lighting of the instrument panel of the VAZ “Nine” does not suit everyone, since the yellow glow is not only dim, but also does not give the tidy any expressiveness. To correct the situation, you have to resort to replacing standard lighting elements with modern LED ones. To upgrade the instrument cluster you need to prepare:
- diode strip of the desired glow color;
- soldering iron;
- wires;
- light bulb base;
- hot glue gun.
Direct modification consists of the following steps:
- Remove the shield from the torpedo.
- Disconnect the sockets with the light bulbs and remove the board, after which the glass with the visor is removed. To do this, press the corresponding latches.
Remove the plinths from the instrument panel and remove the glass. - The diode strip and the base are connected by soldering.
The LED strip is connected by wires to the base - Using a gun, apply glue and fix the tape and wires to the cover. After soldering, the LED strip is fixed in the shield with a glue gun
- Reassemble the shield in the reverse order. After modifications, the tidy is put in place
Free holes for the base must be sealed to prevent dust from entering.
Video: installing an LED strip in the instrument panel of a VAZ 2109
Refinement of instrument cluster scales
In addition to the lighting in the instrument panel, you can replace the scales, which will make the instrument more modern and readable. For tuning this unit, today a wide selection of linings are offered, which provide all the installation holes. After purchasing the overlays, you can begin upgrading:
- Remove the shield, and then the glass itself.
- Carefully dismantle the instrument arrows. To remove the scale, you must carefully remove the arrows
- The standard trim is removed from the shield. The trim is carefully removed from the shield
- Fix the new lining with a glue gun. Use a glue gun to fix the new lining
- Install the arrows and assemble everything in the reverse order.
If the new scale is designed for clearance, then an LED element can be installed on each device, which will significantly transform the panel.
To improve the illumination of the scales, you can install additional LEDs
Dashboard upgrade
Often, interior tuning affects the dashboard, since the standard product does not have a very attractive appearance. Leather is mainly used to finish the panels. It is quite difficult to do quality work with your own hands. Therefore, it is better to entrust the reupholstery to professionals. The essence of modernization comes down to the following actions:
- The panel is modified if necessary, for example, for the installation of any buttons or additional devices.
- Patterns are made from the frame, after which the elements are sewn together. Patterns are made from the material for subsequent reupholstery of the torpedo
- The part of the torpedo that will not be covered with leather is tinted or repainted in a different color.
- Reupholster the panel. If you have the skills, you can reupholster the panel yourself
Sometimes owners of "nines" install panels from other cars, for example, from a BMW E30 or Opel Astra.
You can install a torpedo from Opel Astra on the VAZ 2109
This procedure is not easy, since choosing the size and then adjusting the torpedo to its location is not easy. In addition, you will have to completely redo the mount. When installing a different panel, the instrument panel must also be replaced.
- Replacing the high instrument panel on VAZ 2108, VAZ 2109, VAZ 21099
When installing a panel from another car, you will also need to replace the instrument panel
Interior reupholstery
Interior tuning is not complete without reupholstering interior elements. Factory-made plastic and fabric in the decoration do not evoke any emotions, they look gray and ordinary. Those car owners who want to add some zest and improve the interior decoration resort to replacing standard ones and using modern finishing materials. Among the most popular are:
- leather;
- Alcantara;
- eco leather;
- velours;
- carpet;
- vinyl.
Door panels
One of the elements that cannot be ignored is door cards. Typically, the “nine” panels are trimmed with fabric or made entirely of plastic.
Standard door cards look pretty boring and unattractive
To improve the elements, you need to select the desired finishing material and prepare the tools:
- scissors;
- knife;
- marker;
- glue "Moment";
- screwdriver.
After the preparatory activities, perform the following steps:
- The panel is removed from the doors and the fabric insert is removed. The door cards are removed from the doors and the fabric insert is removed
- Measure out the required piece of fabric and make markings. Make the necessary markings on a piece of selected material
- Degrease and apply glue in two layers with some exposure after the first. Apply glue to the door card and wait the required time
- Apply the door card to the material according to the markings. According to the markings, glue the material to the door card
- Allow the glue to dry according to the instructions.
- Bend and stretch the material at the corners. To make the finish more pliable, you can use a hair dryer. The material is carefully pulled at the corners using a construction hair dryer
- The insert is finished in the same way, using a material of a different color for contrast. To give a more attractive appearance, materials of different colors are used in the decoration of door trims
Noise insulation
An increase in the level of comfort, one way or another, is associated with a decrease in the level of vibrations and noise that enter the cabin from the outside from the wheels, engine, wind, etc. To carry out high-quality vibration and noise insulation, the entire body from the inside, i.e. the roof, is treated , doors, floor, trunk, engine shield. Today, the choice of materials for the purposes under consideration is quite wide, but from all the variety the following items can be distinguished:
- Vibroplast;
- Vizomat;
- Bitoplast;
- Splen;
- foam.
The following list of tools will be needed:
- construction hair dryer;
- cutter;
- roller
To begin work, it is necessary to completely disassemble the car interior, that is, remove the seats, front panel and all finishing materials. The old sound insulation is removed, the body in places of corrosion is cleaned and primed.
- How to remove the visor of a high instrument panel without disassembling the entire panel
Motor baffle
It is recommended to start soundproofing with the engine shield:
- The surface is degreased with a rag soaked in solvent.
- Lay a layer of Vibroplast. The material is best applied in two layers, heating it with a hairdryer for better styling. The first layer is applied to the engine shield with a layer of vibration insulation
- A layer of Splen is applied. A layer of noise-insulating material is applied on top of the vibration insulation.
Floor and arches
In continuation of vibration and noise insulation, the bottom of the cabin is treated:
- Apply a layer of vibration-proofing material to the bottom and two layers to the arches. In places with an uneven surface, it is necessary to use a spatula. The floor is covered with a layer of vibration insulation, and the arches with two layers
- Polyurethane foam is laid on top of the vibration insulation. By analogy with the motor partition, noise reduction of the floor is performed
- The bottom is covered with foam 8 mm thick.
Video: noise reduction of the “nine” interior
Roof
When treating a roof, Vibroplast is applied between the crossbars, for which the material is cut into pieces of the required size. Splen is applied over the vibration isolation, securing it with double-sided tape.
A layer of vibration isolator is applied between the ceiling crossbars
Doors
Although noise insulation on VAZ 2109 doors is present from the factory, it is in minimal quantities and there is no particular use from it. Doors are processed as follows:
- The outer part of the door is covered with Visomat. The inside of the door is covered with vibration-isolating materials
- The surface facing the interior is treated with a solid piece of Splen. From the interior side, the door is treated with a solid piece of Splen
- If you plan to install acoustics in the doors, then they need to be vibration and sound insulated completely without gaps, including technological holes.
Plastic elements
Interior elements made of plastic should also be treated with sound insulation:
- Dismantle all parts and linings.
- The part of the torpedo that touches the body is treated with 4 mm thick foam.
- The lower part of the dashboard, as well as the shelf of the storage compartment, the space for the speakers and the side panels of the panel are covered with Vizomat and Bitoplast.
- The visor of the instrument panel is treated with Visomat.
- To prevent metallic rattling of the latches, they are coated with sealant.
- The central panel is treated with the same materials as the torpedo.
- The inside of the glove box lid is covered with Vizomat, and the carpet is fixed underneath with double-sided tape.
- After all procedures, the salon is reassembled in the reverse order.
Video: noise insulation of a torpedo using the example of a VAZ 21099
Steering wheel upgrade
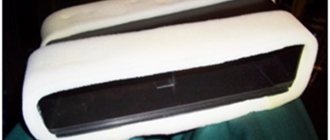
The steering wheel is one of the first elements that people pay attention to when getting into a car. Tuning the steering wheel involves using a braid made of modern materials or completely replacing the part with a sports version. When choosing a finish for a “nine” steering wheel, you should focus on the size of 37–38 cm. Among the most popular materials are leather and eco-leather. The simplest version of the braid has the form of a cover. To install it, just pull the product onto the steering wheel. There are options when the braid needs to be sewn together with thread or cord. In this case, each car owner decides for himself what he likes.
One of the simplest options for tuning the steering wheel is to install a cover
If you consider a sports version of the steering wheel, then you should consider some points:
- We replace the old instrument panel with a Europanel on a VAZ 2109 car with our own hands
- to install it you will need a special adapter;
- a tuned steering wheel, as a rule, has a smaller diameter compared to the standard, and it is not always convenient to control it.
The sports steering wheel looks attractive, but is not always comfortable to operate.
Seat reupholstery and replacement
The factory seats of the VAZ “Nine” can be improved in two ways:
- constriction;
- replacement with new chairs.
You can update the seats by simply reupholstering them or by completely redoing the frame with the installation of lateral support. To do this, you will have to completely disassemble the product. Carrying out such work requires certain skills, since incorrect actions can lead to an uncomfortable landing and, in general, unpredictable consequences in emergency situations.
The most common choices for reupholstering seats are:
- leather;
- suede leather;
- Alcantara;
- flock;
- velours.
After selecting the material, work is carried out in the following sequence:
- The seats are removed from the interior and disassembled, removing the old material. The seats are removed from the interior and completely disassembled
- If the old frame is damaged, they resort to welding.
- Foam casting is applied to the frame. Foam casting is applied to the frame; if necessary, replace it with a new one
- Using the old cover, blanks are cut out from the selected finishing material.
- Sew the elements together using a sewing machine.
- The upholstery is pulled over the back, hooking the material onto special teeth.The material is pulled tight, hooking it onto special teeth
- The seat cover is tensioned using a wire. The seat cover is tensioned using a wire
- All seats are reupholstered in the same way.
- After completion of the procedure, the seats are mounted in place. After completion, the seats are installed in place
If the goal is to completely replace the VAZ 2109 seats with more comfortable ones, then the selection should be carried out in such a way that modifications are minimal. With minor modifications, seats from the Opel Vectra are suitable for the car in question.
Content
Owners of domestic cars pay quite a lot of attention to interior tuning. This is due to the fact that cars come out of the factory with very unattractive configurations: low-quality plastic, poor assembly, outdated controls and instruments, and so on.
If a few years ago VAZ somewhat revised its view of what a car should be, which was reflected in the design, then older models were still produced using old technologies that had been circulating since the creation of the car plant. They only improved a little.
No one can argue with the fact that VAZ has always lagged several times behind even inexpensive foreign cars in terms of quality and level of equipment. Now it has become possible to slightly transform your car, for which the front dashboard is replaced or modified.
In this case, we will consider the features of replacing the front torpedo of a VAZ 21099: popular methods, difficulties encountered, and so on.
Description and location of indicators and instruments on the panel
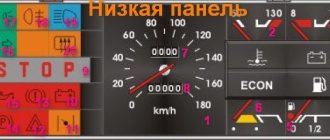
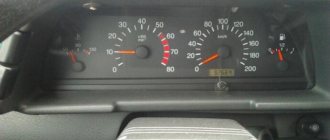
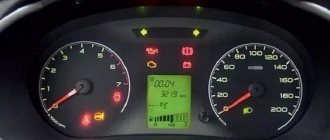
To begin with, we suggest that you familiarize yourself with the description and designations of the icons on the dashboard of the VAZ 21099 and 21093 carburetor or injector:
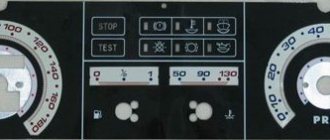
- A speedometer that allows you to find out at what speed the vehicle is traveling.
- Coolant temperature controller. If the indicator needle enters the red zone, this indicates engine overheating, sometimes this may be due to failure of the sensor itself. Overheating of the power unit can cause serious malfunctions, so it is necessary to diagnose the engine radiator fan.
- One of the features of VAZ cars is that the dashboard diagram involves the use of a voltage sensor in the car’s electrical network. According to the indicators of this controller, it is possible to determine the battery discharge when the indicator arrow is located in the left red zone. If it falls into the right red zone, then this means that an overcharge has been detected in the network. In case of such a problem, the generator device should be diagnosed.
- Gasoline volume sensor in the fuel tank.
- The symbol is in the form of a gas station; its appearance indicates that there are no more than 6.5 liters of fuel left in the tank.
- Another feature of VAZs is a fuel economy sensor. With its help, the driver can determine the optimal ratio of the number of crankshaft revolutions to fuel consumption. If the indicator needle is in the yellow zone, this means that there is excessive consumption of gasoline in the system; if it is in the white zone, then fuel consumption is economical.
- Daily mileage odometer.
- General odometer.
- If the word “STOP” appears on the instrument cluster while driving, the driver is warned to stop driving. Usually its appearance is associated with a decrease in the level of engine fluid pressure in the power unit. It can also appear due to a lack of brake fluid or when the parking brake lever is raised.
- The symbol in the form of a battery always blinks when the power unit starts. If it lights up after the engine has been started, then most likely the drive belt of the generator set has broken or the unit has failed. It also makes sense to check the charging circuit for damage and breaks.
- The choke icon indicates that the air damper is closed.
- An indicator in the form of a triangle indicates that the light alarm is on.
- An exclamation mark icon appears when there is insufficient brake fluid and the volume needs to be replenished.
- This symbol indicates that the vehicle's handbrake has been applied.
- The engine fluid icon informs the driver that the pressure in the engine lubrication system has decreased; first of all, you should check the fluid level and, if necessary, add oil.
- An icon in the form of arrows pointing in different directions indicates that the turning lights are turned on.
- Side light activation symbol.
- Indicator that the rear fog lights are on, if equipped.
- Symbol for activating high beam lights.
- This icon indicates that the rear window heating system is turned on.
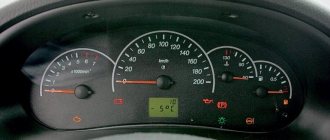
Features of high and low shield
Domestic “Nines” have been produced for more than thirty years, during which time AvtoVAZ engineers have made many improvements. Injection versions of cars equipped with power windows and other “tricks” began to appear on sale. The interior of the car has also undergone changes - instead of the traditional low tidy, high panels have been used. They were installed on cars with improved central consoles, which became known as Europanels.
Despite the differences in design, in fact the “stuffing” of icons and sensors in both dashboards remained the same, only the location of the controllers changed. High versions do not have a voltage sensor or econometer.
Popular methods for changing a torpedo
To begin with, here is a list of the most popular methods for changing the front panel. We include:
1. Complete replacement. Installing a new torpedo, which was taken from another car, can be called a rather difficult job. Note that if instrument panels and other small tuning parts can be found on sale, then suppliers of such parts do not create a torpedo (it can be found on sale extremely rarely). This is due to the fact that such tuning is carried out quite rarely. However, only by completely replacing the panel can you get rid of cheap plastic and put an end to the crickets that can make long-distance travel simply unbearable.
2. Quite often, partial modifications are carried out, which is represented by the creation of additional niches for the multimedia system, a control unit for new functions, and so on. Such work cannot be called difficult, since plastic is used in the manufacture of the torpedo - a material that can be easily processed using available tools. The main thing is to carry out such work carefully, since if mistakes are made, important electrical elements and so on can be damaged.
The first method is implemented quite rarely, but allows you to achieve truly unsurpassed results. The second is easier to implement, but does not allow you to completely get rid of low-quality plastic.
Reasons that can lead to disassembly of a torpedo, high panel
The reasons why the owner of a VAZ 21099 car needs to remove the dashboard can be very different. Among the main motives for carrying out this procedure are the following:
- the need to replace failed panel elements;
- carrying out repair work in the heating system of the internal part of the machine;
- repair of body parts;
- car painting;
- replacing the panel itself with a more modern version.
It is worth noting that the procedure itself is not particularly complicated and therefore even not the most experienced car enthusiast can cope with it. Moreover, today, thanks to the Internet, all its users have the opportunity to receive a hint that will allow them to carry out work with a high degree of efficiency.
Car dashboard cover
Another way to get rid of low-quality plastic in the car interior is to cover the dashboard. As a rule, leather or a high-quality substitute is used for this. It is quite difficult to do the covering yourself; the plastic, which was previously part of the interior design, will serve as the basis.
Sidebar: Important: It is recommended to carry out the covering only after creating all the necessary niches for installing additional equipment. Otherwise, costs increase significantly.
When choosing a material, you need to abandon fabric, since the front panel is constantly exposed to direct sunlight and is often exposed to greater impact than other upholstery elements. When choosing a color, you need to give preference to not bright shades that will not be very noticeable. Quite often you can find examples of tuning that use bright fabric: red, blue and other colors. Note that this option looks quite attractive, but during a long trip the driver and passengers will be very tired.
Photo gallery: tuning the interior of the “nine”
Refinement of the seats allows you to change not only their appearance, but also improve the fit. Installing a dashboard from another car allows you to make the interior more modern. Improved interior lighting provides additional comfort not only for the driver, but also for passengers. Sports seats allow the driver to feel as comfortable as possible when sharpening the car under sports Upgrading a torpedo with your own hands allows you to integrate acoustics or multimedia into it The introduction of additional devices makes the operation of the car more comfortable, giving the driver additional information about the state of important components and systems Illumination of the passenger and driver’s feet adds some zest to the ordinary interior of the “nine” The introduction of LED lighting in the glove compartment is one of the options for tuning the interior. Modern floor mats are also an option for upgrading the interior of the VAZ 2109. A tuned panel together with a sports steering wheel makes the car different from others.
Tuning the interior of a VAZ “nine” is an exciting process. Depending on the wishes and financial capabilities of the owner, the interior can be changed beyond recognition. By replacing the interior finishing materials with modern ones, the car will be pleasant for both the driver and passengers. In addition, the upgrade can be done with your own hands without the use of special tools.
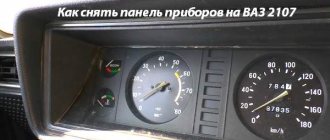
Standard dashboard VAZ 21099
Tuning the interior of a VAZ 21099 with your own hands involves dismantling and installing a Europanel. It should be noted that the high VAZ panel takes longer to remove than the low design of this type. In any case, for such tuning you need the following tools:
- Screwdriver Set;
- nuts and washers;
- current indicator;
- wires.
Return to contents
Installing a torpedo from another car
A significant modification can be called the installation of a torpedo, which is intended for another car. Such work is carried out extremely rarely, as it is difficult to perform. Its features include:
- The panel must be selected according to the width of the cabin, otherwise it will not become simple even after modification. At the same time, attention is also paid to the height. For example, SUVs have a higher dashboard, which will not fit into the car in question. Most often they choose torpedoes from foreign cars that were produced in the last millennium. This is due to the fact that they can be found at an affordable price when disassembled, and modifications may be insignificant.
- All elements of the front part will have to be redistributed. Particular problems arise with the location of the stove and steering column. If these elements do not significantly coincide in location, then significant changes must be made to the design of the torpedo.
- In any case, you will have to create new seats and fasteners on the body, since it is more difficult to change the torpedo. This moment determines the need for precise marking, as well as welding, creating holes, and so on.
- Many problems arise if the panel does not fit the width of the body. It is quite difficult to shorten a torpedo qualitatively, but it is still possible. After this, you will have to use additional decorative elements to close the seams.
Installation of a multimedia system and other elements
With the spread of touch screens, they have become quite often used in the production of multimedia systems that are installed in cars. Of course, you can purchase a GPS navigator that will be mounted on top of the panel. But still, this design option is impractical, as it takes up a lot of free space and impairs visibility.
If desired, you can implement a multimedia system into the torpedo. For this:
1. Select a multimedia system. 2. Find out its exact dimensions. 3. We mark the area on the dashboard. 4. We cut out the plastic. 5. Install the multimedia system. 6. Connect the system. 7. We carry out decoration.
In the same way, you can install control units for additional functions, for example, self-installed fog lights or interior lighting. In order to significantly simplify the work, you can buy a disassembled control panel from another car, also mark the location on the dashboard and cut out a place to install the panel.
In general, we can say that it is possible to modify a factory torpedo almost beyond recognition.
Sound insulation and cladding
After the dashboard tuning has been carried out, it’s time to start. So:
- We dismantle all interior elements and standard trim.
- We cover all the necessary surfaces with sheets of vibroplast (how to carry out high-quality sound insulation is described in detail in the article “VAZ 2109 interior sound insulation”).
Note. Typically it takes about 14 pieces of insulating material measuring 0.6 x 0.9 meters.
- After soundproofing, we trim the interior.
- First of all, we change the covering on the ceiling (professionals advise gluing it twice, leaving an interval of 5 minutes).
Note. When upholstering the interior, it is imperative to take into account the color scheme and do not forget to glue the doors, dashboard, area next to the gearbox and other parts of the car.
Experts' opinion
Alexander. It is recommended to abandon GPS navigators with external installation: there is no need to mount them on glass, as the view from the driver’s seat is significantly reduced. If the navigator is really needed, then you can create a special niche for it in the dashboard. The VAZ torpedo is quite simple and has a large amount of free space to accommodate various control units and multimedia systems.
Alexei. I installed a new torpedo from another car - a difficult job that required patience, precision and a lot of free time. I’ll say right away that you need to be well versed in the placement of important elements of your car: wiring, air ducts, and so on. Dismantling must be carried out carefully, since the original torpedo may still be needed.