| After the car was released, many owners began to notice that the Priora gearbox lever began to rattle in the same way as on previous VAZ 2108-2010 cars. It's all about the same type of design of the gearbox control drive. We'll tell you how to remove vibrations in the VAZ 2170 gearbox handle. |
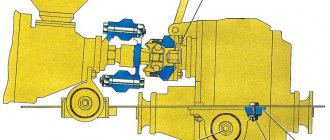
The vibration of the gearshift lever is shown on the example of a VAZ 2110 car (it’s the same on the Lada Priora):
If there was no rattling of the gearshift knob before, then most likely you can get by with a repair kit and replacing the ball joint race of the gearbox knob (in Fig. No. 5). Also, excessive vibration may be due to old gearbox and engine mounts.
If nothing helps, then we go directly to the source of the rattling sound - this is a metal spacer bushing (in Fig. No. 8). It is she who, under the influence of vibrations of the gearshift knob, makes a rattling noise.
What manual transmissions are on the Priora?
VAZ cars of the Lada Priora family are equipped with three types of manual transmissions (2170, 2180 and 2181), which differ in the way the gearbox is controlled - rocker (2170 and 2180) and cable (2181).
In the first case, the operation of the box is controlled directly through a rigid rod, pivotally connected at one end to the gear selection lever in the cabin, and at the other end to the control rod of the actuator inside the gearbox itself.
In the second case, a pair of flexible cables are used to control pendulum levers located on a separate speed selection and activation device mounted on the top of the box.
The easiest way to eliminate rattling gear lever is to install a spring
The simplest solution would be to install a spring that will hold the gearbox lever and prevent it from vibrating and making an unpleasant rattling sound. The best part about this modification is that we don’t have to disassemble anything! The photo below shows how to install the locking spring (and they also say that you can wrap the gearshift lever with a medical tourniquet along with the spring for a tighter fixation).
A more reliable way to combat gearbox rattling is to install plastic or rubber washers on the gearbox axle. True, this method takes a little longer and requires a little disassembly.
In order to install rubber or plastic washers on the gearbox axle you will need:
An ordinary plastic lid from a glass jar (or any soft plastic);
- Scissors;
- Key for 10 and 13;
- File; Screwdriver.
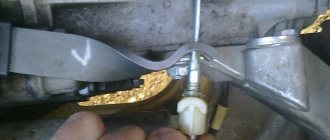
First, you need to remove the casing from the gearshift knob and lift it up (there is no need to remove the gearshift knob itself). Then unscrew the nut by 13 (the photo below clearly shows where it is located).
Then use a Phillips screwdriver to unscrew the screw (see photo below).
After this, unscrew the two nuts by 10 (see photo below).
We remove the bolt, bushing and washers and generously lubricate them with thick lithol (photo below).
You need to cut a washer out of plastic to fit the sleeve. After this, we return the entire gearbox mechanism to its original position by adding two plastic (or rubber) washers to the small slots along the edges (photo below).
The washers, as can be seen in the photo above, must be inserted to the right and left of the bushing (the bushing will, apparently, have to be sharpened a little).
What to do
Depending on the identified cause, it will be necessary to take measures to eliminate it by adjusting serviceable ones or replacing failed components. For cable and rocker structures of manual transmissions, you need to follow the steps described below.
At the rocker checkpoint
If the selector handle dangles and plays in the vertical plane, you need to check the integrity of the ball joint seat and spring. For this:
- Remove the casing.
- Using a 13 key, unscrew the nut securing the axis of the gear selector knob.
- Use a ratchet bat to remove the axle mounting screw.
- Pull out the axle.
- After removing the lever from the fork joint, remove the bushings and check them for wear.
- Remove the retaining ring using pliers or a slotted screwdriver.
- Pull out the hinge assembly with the lever, then the spring.
- Unclench the seat and remove the ball joint from the spherical tip of the lever pin.
- Replace worn parts and reassemble in reverse order.
Repair of the Priora gearbox
If the gear selector lever of the Priora gearbox rattles and still dangles in a horizontal plane, the problem may be a worn bushing through which it is connected to the rocker. In this case, you need to follow steps 1-5 from the list above.
The problem may be a misaligned linkage or reaction rod, and in the worst case, a broken spring on the axis of movement of the reverse and forward gear selector lever in the mechanism located inside the gearbox housing. In the latter case, you will have to make the inevitable decision to remove the box and change the mechanism.
If the problem is misalignment of the drive rod due to wear on the joint, then replacement is necessary. To do this you need:
- Unscrew the clamp and 2 bolts securing the bracket.
- Pull the hinge out of the rod, unscrew the nut and put a new one in its place, reassembling it in the reverse order.
- Insert into the rod and secure the bracket bolts, then tighten the clamp.
If adjustment of the rocker is required, it is done by first placing (and holding) the gear selector knob in the “reverse speed” position. Then, by loosening the clamp at the junction with the gear shift rod in the box and slightly moving the lever, select its optimal position with reverse gear engaged. Tighten the rocker clamp and carry out a full switching cycle to check. The adjustment is done by two people.
On a cable transmission
If the Priora gearshift knob rattles and the cause is wear or breakage of the ball joint, it is replaced with a new one.
Engine mounts - it’s better to immediately check the integrity
The main element of vibration under the hood is always the power unit and gearbox cushions. Typically, the rear cushion, which holds both the gearbox and the engine, is responsible for lever rattling, but this greatly depends on the design of the car. It is impossible to find a definite answer to the question of how to check pillows yourself. You can watch videos of masters and craftsmen and use their advice, but the fastest way to do this is with the help of specialists at a service station. This is an accurate and quick diagnosis on a lift.
You can check these details yourself like this:
- ask an assistant to get behind the wheel, open the hood, stand in front of the car and give the command to start the engine - if there is strong vibration, there is a problem with the airbags;
- again, ask your assistant to start the car with the hood open, stand on the side of the car and command a smooth start, see if the entire power unit shakes along with the lever;
- with the car turned off, use gloved hands to shake the engine from side to side, it should give in a little, but very moderately; in no case should there be any metallic knocks;
- lift the car onto an overpass or select a convenient diagnostic pit, then use a flat mount to check the quality of fixation of the engine mounts in the lower part and their play;
- in general, listen to the operation of the power unit at idle speed - is there any vibration, is there a knocking or dull tapping when switching to different speed modes.
If at least one of these symptoms is present, you need to start replacing the engine mounts. Doing it yourself is also not advisable unless you have experience. An incorrectly positioned power unit on the cushions will rattle and cause even more problems. It is important to find a specialist who can properly adjust the cushions, set the motor perfectly and test its operation in all modes. This is the only way to hope to fix problems in your car. Otherwise, repairs will only make the situation worse.
Subsequence:
- Using a size 8 wrench, unscrew the nut of the drive housing. Disconnect the cable from the clutch pedal retainer.
- Remove the compensation system box and ring from the pedal. To avoid damage, carefully pick out the box with a knife.
- Remove the plastic sleeve from the pin. If there are signs of damage, replace with a new one. Lithol treatment is required before installation.
- Remove the drive seal from the hole in the front of the shield.
- Remove the tip, first dragging it in the direction of movement of the car.
- Unscrew the cable end fixing nut. It is screwed onto a bracket, which is attached to the transmission with a 17-point head.
- After removing the tip, pull out the cable.
- Unfasten the latch and remove the speed sensor chip.
- Unscrew the fixing screws of the pallet flap and remove it.
- Secure the engine with a reliable support.
- Unscrew the fixing bolt of the rear engine mount to the bracket.
- Remove the limiter on the rear surface of the motor.
- Unscrew the bolts that secure the motor to the body surface.
- Remove the support from the rear side.
- Remove the limit rollers from below.
- Unscrew the motor bracket clamps on the rear surface of the transmission housing.
- Using a size 8 wrench, unscrew the top screw and remove the bracket.
- Unscrew the screw and remove the speed sensor chip.
- We unscrew the bolt securing the gearbox hinge box.
- Remove the click rod from the hinge base.
- Loosen the torque clamps.
- Remove the designer hubcaps from the front wheelbase.
- Using a knife to pick up the edge, remove the hub protective lining.
- Align the hub nuts.
- Loosen the screws securing the wheelbase. Using a 30mm socket, unscrew the hub bolt.
- When you unscrew the screws that secure the wheelbase, the car is positioned on the platform with all wheels.
- To prevent the vehicle from moving, tighten the handbrake and install supports under the rear wheels.
- Unscrew the ball joint clamps and remove the maneuvering knuckles.
- Remove the shank from the hub.
- After removing the left drive, put a plug in its place.
- Press out the drive on the right side. Remove it.
- Place a support under the transmission.
- Remove the screws securing the transmission to the engine.
- Move the gearbox as far back as possible, remove the support, holding it.
The transmission of AvtoVAZ models has the advantage of simplicity of design and the ability to install it yourself if you have the necessary skills.
Standard gear knob - article number and price
The gear knob on a Priora, the price of which is quite reasonable, differs for different generations of the car. After restyling, the internal appearance of the Priora really changed, and even the gear shift lever changed in appearance. It has become a small detail against the backdrop of all the changes, but for many the part from Lada priora 2 remains more preferable when the time comes to replace the gear shift mechanism.
Dorestyling
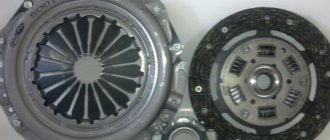
The pre-styling mechanism consists of the following main parts
- Gear shift lever – 2110-01703088-00, price – 200 rubles;
- Pressure plate – 2110-01703238-00, price – 30 rubles;
- Protective cover – 1111-01703200-00, price – 200 rubles.
Restyling
The restyled gear shift mechanism consists of spare parts included in the following list:
- Handle overlay – 2170-01703124-00, cost – 50 rubles;
- Gear shift lever - 2170-01703088-00, cost - 250 rubles;
- Protective cover – 1111-01703200-00, cost – 200 rubles.
Manufacturers and prices of analogues
Gear shift levers are also produced by other manufacturers:
- Sphere AutoBra 2138-K (together with a leatherette cover, with red inserts) – 390 rubles;
- Sphere AutoBra 2138-SR (together with a leatherette cover, completely black) – 390 rubles;
- Sphere AutoBra 2140-CH (together with a leatherette cover, black, perforated surface) – 450 rubles;
- Sphere AutoBra 2141-Sr (together with a leatherette cover, the lever itself is gray) – 400 rubles;
- Azard KPP-00132 (black set with genuine leather frame) – 480 rubles.
Vibration of the Priora gearbox handle
Good afternoon I'm tired of the engine jerking very strongly, as if it was unscrewed, and the constant vibration, accompanied by a crackling sound, in the gearshift knob.
It was decided to install a rear additional engine mount, because... 16 valve priors do not have it installed from the factory. A short-stroke rocker with a Kalinovsky cardan was also installed + a boot for the cardan + a repair kit for the gearbox handle + a gear shift rod oil seal (Balakovo). I also changed the lower engine mount (guitar) to a reinforced one (sport).
On the plus side: they certainly exist. The gearshift knob has stopped twitching. It’s standing still)) I didn’t experience any particular impact from the short-throw rocker, but there was still a little less body movement, especially when turning on speed 5, which is good news.
Of the minuses: there is a slight vibration throughout the car in neutral. It feels a little stronger when the fan is on. The handle has become higher and now you will have to buy a new casing.
I close my eyes to the negatives. It's not annoying. Yes, and I notice it extremely rarely.
Hello everyone, forum members!
Today I decided to start eliminating vibration from the gearshift lever. I'm already tired of taking a break from the holidays, my sides hurt)))
Previously, this vibration was observed in the range of 5500-7000 rpm, and it did not bother me much, but now it has become completely impossible, sometimes on ice, slipping starts in the range of 2000-3000 rpm and there is a terrible vibration from the gearshift lever, also when the reverse gear is engaged It began to vibrate, in short, I had to climb anyway! Having removed the protective casing, it became clear that the plastic washers under were worn out, because there are 1 mm gaps between them on both sides, which causes backlash and subsequently vibration.
I thought the easiest way would be to simply tighten the nut on the right side of the lever
but it didn’t stretch, apparently the spacer was tight. In short, I decided to disassemble it, but not everything is so simple, the casings are in the way and there is very little space, besides, there is a cross bolt on the left that cannot be reached with a screwdriver. Let's remember because I once saw someone in a car do this kind of manipulation which ended with dismantling the tunnel and dismantling the seat, but I didn’t really want to turn over the floor of the cabin, I decided to split hairs, took a screw from raw metal and sharpened it on a sharpener
Do-it-yourself adjustment of the scenes on a VAZ 2110
The gearbox of the car performs the function of blocking spontaneous changes in the gear ratio
It is very important that this component of the transmission is clearly adjusted, because the condition of the gearbox as a whole depends on it. With a precisely adjusted rocker, gear shifting will occur in a timely manner, clearly and with the correct position of the handle
An incorrectly fixed or loose linkage causes a number of unpleasant consequences: loss of gears, inaccurate shifting, free movement and rattling of the gearbox lever.
Adjusting the rocker on a VAZ-2110, as on any other car, is a fairly simple procedure that will not take too much time. First of all, you need to drive the car onto an overpass or bring it to a pit. The second option is preferable, and more common: there is a pit in the garage of every car enthusiast. In order for the car to be clearly fixed, not to dangle or move away, you need to set up wheel chocks. Adjustment of the rocker can be done in three ways: with first gear engaged, in neutral gear and, finally, with reverse gear engaged. The easiest way is to adjust in reverse gear. First, the clamp is loosened, and then the lever is turned to position R.
Next, you need to set the gearshift knob to a comfortable and correct position. After this, the clamp is tightened, and the operation of the rocker is checked by re-engaging the reverse gear. If the handle continues to wobble, you can repeat the procedure or use the following method.
Adjusting the rocker on a VAZ 2110 in first gear
The gear lever is turned to position “1”. As in the previous case, you need to loosen the rocker clamp to allow free play for adjustment.
The rocker is adjusted by turning the drive until it stops against the locking latch. You need to turn it counterclockwise. As soon as the drive is fixed at the reverse gear stopper, the clamp is tightened until it stops. If the rocker is fixed, the gears will be engaged more accurately, and the handle will stop moving from side to side.
In neutral gear
If there is no plastic reverse gear delimiter and, accordingly, the stop cannot be reached when turning the drive, then the adjustment of the rocker on the VAZ-2110 is carried out in neutral gear. To adjust, you will also need to loosen and tighten the rocker clamp. However, in order to do everything correctly, you will need to determine the depth of the linkage extension to the cardan.
With the correct calculation of the depth of removal, it will be possible to adjust the operation of the lever and eliminate rattling. And, the last piece of advice: it’s better to do the work with a partner - it will be easier to both fix and check the slide. These were the main recommendations for adjusting the scenes on the VAZ-2110. If no positive result can be achieved, then either professional help or a complete replacement of the backstage will be required.
Do you know about the main malfunctions of the manual transmission knob?
The device, together with the gear shift mount, is quite simple. There are several basic faults that can be corrected or simply repaired part of the box drive. Malfunctions of the gear shift knob include the following:
- External signs of wear. The part itself can wear out quite well, lose its color and become “greasy”. This is unpleasant, because this appearance ages the interior, and the lever itself becomes unpleasant to hold in your hand.
- Torn cover. The cover will collect all the dust along with small grains of sand so that they do not get inside. If the cover breaks in at least one place, all the dust will fall down. It will interfere with the standard operation of the Priora gearbox mechanism, so that over time, signs of a malfunction of the large mechanism will appear.
- The gearshift knob dangles like a play. First of all, such play interferes with correct and quiet gear shifting.
Gearbox cover: price and manufacturers
Even a malfunction of such an insignificant part as the gearshift lever cover can cause quite a lot of trouble. There are several options for a box cover that can be installed instead of a torn standard one:
Autobra 2183-CH. Black, made of genuine leather – 400 rubles.
Universal options. Manufacturers often present a cover (boot) for Lada Priora along with a lever. It can be completely different: black, two-color, with or without edging. You don't always want to change everything at once, so searching for a new boot may take some time.
CV joint - why could it be the culprit?
Another problem that can cause such unpleasant moments during operation is a breakage of the CV joint on one side. The problem is that this mechanism does not always break, with obvious consequences such as crunching when turning. It is involved in the transmission of torque to the wheels, so it may well result in uneven transmission of this torque and twitching when starting in any gear as a consequence. This is also important to remember when diagnosing problems with such manifestations in the car.
The CV joint is more difficult to check, but you can do the following:
- Turn the wheels on a stationary car all the way and pull the axle shaft with your hand near the entrance to the CV joint; often broken elements will give a play that can be felt without special tools;
- You can also check the CV joints on the go - find a flat area and perform several circles with the steering wheel turned completely to one side, listen for extraneous sounds in the suspension;
- You can also check this element in a pit by carefully examining the boots; most often the CV joints fail when the boot breaks, dirt gets into the mechanism and simply destroys it;
- Service specialists check and give a final verdict on this part only after removal from the installation site, but usually in this case it is better to replace the CV joint with a new one;
- If you are not sure that the problem is in the CV joints, do not rush to change them, check for other reasons, since lever rattling in first gear is not the most likely symptom of their failure.
Replacing the clutch and release bearing of a VAZ 2114 without removing the box
Clutch replacement
and release bearing VAZ 2114 (VAZ 2108, 2109) without removing the box
, drives (grenade) and drain.
It is noteworthy that when installing new parts, the length of the lower threaded part of the cable tip is usually not enough to restore its original position.
Therefore, it is necessary to restore the wear compensation mechanism to its original position. To do this, size L must be installed between the leash and the clutch release fork lever.
The clutch pedal should be raised all the way up. Replacing the VAZ 2110 clutch without removing the box. Replacing the Lada Priora clutch with and without removal. Then the spring will automatically return the slider to its original position. After this, all that remains is to check the result of the work and, if necessary, adjust the clutch.
See:
Video eliminating bouncing of the VAZ 2110 gearbox lever
You can view the entire process described above in the video by following the link
Of course, all the methods described are good, but only for masking the negative consequences of a rattling gearshift knob. It is worth looking for the reason for the rattling of the gearbox lever deeper, in the gearbox linkage or in the engine - only by eliminating the main cause of the rattling can you no longer worry about the condition of your VAZ 2110.
The gearshift knob rattles when accelerating in 2nd, 3rd gear and at high speeds, what should I do?
Because I changed the handle, I thought there was some play. I pasted the metal part itself lengthwise and crosswise, but it didn’t help.
I found a solution on the Internet, I had to do it right away.
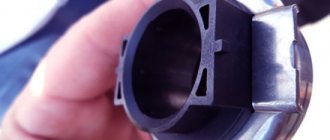
The bushing rattles due to a small play that is located inside, here:
Found 3 solutions
this problem:
1) Replacing this bushing with a solid fluoroplastic bushing
(soft plastic). Here she is:
If anyone wants to mess with this, here's the drawing:
2)Install the spring
, which will hold the gearshift knob and prevent vibration from making the handle rattle.
3) Installing a plastic washer - this is the method I chose!
The washer should be installed between the gear lever itself and the rocker. As shown in this photo:
We cut out a washer from any soft plastic with an outer diameter of 27mm and an inner diameter of 9mm. I cut it from the lid of a jar of children's soft plasticine. But it will also work with a regular glass jar lid.
We tear off the casing by prying it off.
Now we need to get to the bushing!
You need to unscrew 4 nuts to “10”
(blue arrows) to remove the yellow plastic plate (yellow arrow)
Screw
(red arrow) -
hemorrhoids
.
We put it in 5th gear and act:
Unscrew the 3 nuts to “10”:
Remove the yellow plate.
Unscrew the nut to “13”
Next, to get to the hemorrhoid screw, we need either a small screwdriver, which I don’t have, or a bit with a ratchet, which was also not so easy to unscrew this damn screw. As a result, I managed to turn it millimeter by millimeter with a ratchet. Here is the ratchet itself with a bat:
This is how I got around to it:
Let's pull out this rod a little:
And push the puck here:
READY!
Reassemble in reverse order.
The result was pleasing - the rattling disappeared, otherwise I would not have created this recording. The gears began to stick in tighter, which eliminated the play and swaying of the handle itself at idle.
I'll have to try it too.
Recently a slight vibration appeared, I tightened the nut a little to 13 and it was fine.
It’s easier to make a slot in the washer, bend it with a screwdriver and insert it from above, then tighten the nut. and there is no need to sort everything out. I did this, the sound disappeared.
It’s easier to make a slot in the washer, bend it with a screwdriver and insert it from above, then tighten the nut. and there is no need to sort everything out. I did this, the sound disappeared.
where were you before with this thought))))) this is five!
It’s even interesting to look at the crutch in traffic jams (you can laugh) my wife says that Skoda doesn’t have this, I answer that the VAG people didn’t think of this, that this is VAZ know-how, and that soon all the cars in the world will switch to such a crutch, my wife doesn’t believe it. ))
There is also a 4th method, grind the bushing down 2mm, it works, it’s been tested and doesn’t crack)))) I suffered a lot when I took it apart
This is also possible, I didn’t want to touch anything, maybe I’ll resharpen it or something else
There is also a 4th method, grind the bushing down 2mm, it works, it’s been tested and doesn’t crack)))) I suffered a lot when I took it apart
so sharpening it also requires fiddling with a file
why a file? on the grinder bro))))) once and done
There is no rattling or clanging at revs, but the lever even wobbles at idle, will this device help?
I think it will help, because You remove the play and it starts to sit tightly. By the way, I forgot to write that the more you tighten this nut to “13”, the tighter the box becomes, just try to tighten it.
ok, thanks for the advice!
as always, a very detailed post! Thank you. To favorites!
No one has described this problem in such detail))))
A friend fitted me with a fluoroplastic one, it was lying around idle for 2 years) I recently installed it - it became much better, the sound disappeared. By the way, over the weekend I came up with a simple way to remove the locking screw: you insert a long thin screwdriver under the plastic casing at the bottom on the driver’s side and guide it behind the ill-fated screw. Unscrews/screws in 20 seconds)
A friend fitted me with a fluoroplastic one, it was lying around idle for 2 years) I recently installed it - it became much better, the sound disappeared. By the way, over the weekend I came up with a simple way to remove the locking screw: you insert a long thin screwdriver under the plastic casing at the bottom on the driver’s side and guide it behind the ill-fated screw. Unscrews/screws in 20 seconds)
I also heard about the screwdriver, but I didn’t see where to insert it
It shakes even at idle), it was depressing for the first week, but now I don’t even look there.
The vibration of the gearshift lever is shown using the example of a VAZ 2110 car (exactly the same on the Lada Priora):
”
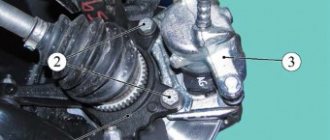
If there was no rattling of the gearshift knob before, then most likely you can get by with a repair kit and replacing the ball joint race of the gearshift knob (in Fig. No. 5). Also, excessive vibration may be due to old gearbox and engine mounts.
If nothing helps, then we go directly to the source of the rattling sound - this is a metal spacer bushing (in Fig. No. 8). It is she who, under the influence of vibrations of the gearshift knob, makes a rattling noise.
Removing the gearbox spacer
Remove the gearshift knob cover (pick it up with a flat screwdriver). There is no need to remove the gear knob.
Unscrew the nut with a '13' wrench. Unscrew the two nuts of the rear gear fixing bar using a '10' wrench. Unscrew the screw using a short Phillips bit. Remove the gear shift lever shaft.
The photo shows: the remote bushing of the gear shift lever (the source of the problems) and the lever axis.
After the modifications that will be discussed below, we lubricate the parts with lithol and carry out assembly in the reverse order. When tightening the last nut 'to 13' (point 1), you need to take into account that the more you tighten it, the harder the gearshift knob will move.
Installing the washer
To eliminate rattling of the metal gearbox bushing, it is enough to cut a washer with an outer diameter of 27mm and an inner diameter of 9mm. The washer should be installed between the gear lever itself and the rocker. The plastic must be soft so that it does not crumble or tan in frost.
Replacing the gearbox bushing with a fluoroplastic one
You will need the help of a turner, who must machine a new fluoroplastic bushing according to the following diagram:
By the way, he should also have all the necessary material. We install a fluoroplastic bushing on the gearbox lever instead of the standard metal one.
Grinding the gearbox handle bushing
To prevent the gearbox lever from rattling, you need to file the metal spacer bushing 2mm from each edge. Lubricate generously with lithol and install in reverse order.
By the way, you can get rid of vibrations in the Priora gearbox handle by installing a short-throw rocker.
Eliminating the rattling of the gearshift lever may seem like a small thing, but in fact it is a very unpleasant thing. As a rule, it rattles from play.
Gear shift knob
1. Remove the boot and gearbox shift knob;
View without anther
2. Next you will need scissors or a knife (optional, an ordinary ruler and a small piece of roofing material, or (in my case, a piece of rubber). Cut out two rings from this material (only one was needed).
The outer ring diameter is 25 mm, the inner ring diameter is 8 mm, the gasket thickness is 1 mm (in my case..
3. Then unscrew the central and auxiliary bolts (photo 5, a and b, respectively.;
4. Next, insert one or two gaskets (in my case, one, in the places shown in photo 6;
In my case, two didn’t fit, so I installed one and it was enough.
5. Tighten back the previously unscrewed bolts;
6. Insert the dust cover into place;
7. We try to switch speeds;
There is one small flaw in the operation of the heater: when you turn on the airflow, I think some people also have this, as if something was whistling, like some kind of draft.
I did everything according to the diagram and the whistle was eliminated. Now the heater blows normally and silently, i.e. as it should be.
Selecting synthetic transmission oil for Lada Priora
Last winter I thought about changing the gearbox oil. The reason for this was severe freezing and thickening of the oil
Leave your comment
Login to leave a comment
Leave a comment on behalf of the guest
- No comments found
Pinned
Liked
Lada Priora section menu
Lada Priora – news
LADA PRIORA 1.8 is the flagship model of the Lada AVTOVAZ, with increased power and dynamics characteristics. The main thing is hon.
A big problem has arisen. While driving, the temperature of the Priora engine coolant began to rise to 105-1.
- engine pump
Contents of the article: Installing a Grants engine cooling system in a Priora Replacing a Priora engine pump Installing a system.
- backlight
- dashboard
Task: replace the dashboard backlight in the Lada Priora. We remove the dashboard of the Lada Priora. Let's analyze it, that one.
- generator
- BATE 90A
- ATE-1
Contents of the article: 1. Replacing the Lada Priora generator 2. How to remove the generator on a Priora with air conditioning 3. Installing the gene.
- timing belt
How to check the timing belt on a Priora and after how long to change it? How to change the timing belt on a Priora with your own hands? Broken
- sound insulation
To soundproof the Lada Priora with your own hands, first I bought five or two rolls of Splen, STP sheets, and corrugations for audio wires.
- heater radiator
- heater gear motor
- heater resistor
Contents of the article: The Lada Priora stove only works in the max position - causes of the malfunction Repair of the frequency regulator.
- cylinder head repair
- cylinder head gasket
Contents of the article: Pressing out the cylinder head guides of the Lada Priora Sealing the cylinder head cover and housing.
in stock, the cylinder block of the Lada Priora engine has the following characteristics: Height: 197.1 mm Type: 16 cl. Volume: 1.6 l. Diameter.
>
VAZ 2110 replacement of the ball joint cage of the gearshift knob
Replacing the gearshift pad on VAZ-2110, VAZ-2111, VAZ-2112 cars
On VAZ-2110, VAZ-2111, VAZ-2112 cars, when unpleasant rattling, vibration and increased play in the gearshift knob appear, the happy owners of these vehicles should pay attention to the condition of the ball joint race of the gear shift link or as it is also called in common parlance gear shift pad. There is another option - butterfly wings But, I personally like the second option)))
Due to the fault of this very pillow (ball joint cage) being completely broken, the clarity of gear shifting may also disappear. Yes, I know that all the listed symptoms also include a broken cardan (joint) of the gear selection rod. What kind of cardan is this and how to replace it you can find out from this article. But we’re not talking about him now and let’s assume that everything is ok with him. Or, as another option, the cardan was replaced, but the rattling and play of the rocker did not disappear. This also happens; not everyone immediately pays attention to the backstage cushion. But, it exists and it periodically fails (breakage of rubber “ears”, flying out of metal bushings, breaking of a plastic bushing or spring). The destruction of the rubber part of the cushion (ball joint race) of the rocker is not difficult to replace (see photos 1 and 15). And if you find them, then it’s time for you to get ready for work. Let me reassure you right away, it’s not complicated. But for everything to go smoothly, you need to be thoroughly prepared. That is, buy the necessary spare parts, decide on the location of the work, assemble the necessary tools and, of course, familiarize yourself with and remember in what sequence you should replace the cushion (ball joint race) of the gear shift lever on VAZ-2110, VAZ-2111, VAZ- 2112. And I will try to help you with this, and I invite you to further read this material.
Spare parts. Here the choice is obvious. I recommend choosing the ball joint bracket for the gearshift mechanism of VAZ 2110-2112 cars - BRT (Balakovo). As they say, time-tested quality. Photo 2.
List of tools that you will need to replace the cushion (ball joint race) of the gearshift gates of VAZ-2110, VAZ-2111, VAZ-2112 cars: a 13-socket and socket wrench, a 10-size combination wrench, pliers, a flat-head screwdriver and a small ratchet with with a cross attachment (photos 3 and 4). The need for a ratchet with an attachment will be shown a little later. And you should immediately decide on the location of the work. It is advisable to replace the cushion in an inspection pit, overpass or lift. Why is it desirable? Because this work can be done “from the ground”, but believe me, it will take more time and effort. And it will still be a pleasure.
And so, into battle! Let's proceed to independently replacing the cushion (ball joint cage) of the gearshift slides of VAZ-2110, VAZ-2111, VAZ-2112 cars:
Let's start working inside the car. Use a screwdriver to pry up the frame of the decorative cover of the gearshift slide (photo 5). Pull the lever handle up and remove it along with the cover.
Using a 10 mm spanner, unscrew the two fastening nuts and the bolt of the reverse locking bracket lining and remove it (photos 6 and 7).
Using a 13mm wrench, unscrew the lever axle nut (photo 8). After this, use a wrench with an attachment (in my case it’s a ratchet) to unscrew the axle locking screw (photo 9). Without such a key, this screw will be difficult to unscrew. We take out the axle (photo 10). We remove the set of bushings from the lever, otherwise we risk losing them (photo 11). All. Now the work inside the car is finished, let's climb under the car.
Using a 13 mm socket wrench, unscrew the two nuts of the rocker pad bracket (photo 12). And remove the bracket.
Next, you should disconnect the reaction rod from the cushion (ball joint cage) of the rocker. We use a spanner wrench (hold the nut on top with it) and a 13mm socket wrench (photo 13).
We manufacture and replace short-stroke gearbox shifter for VAZ 2112
We pull down the pillow along with the lever (photos 14 and 15). Remove the retaining ring (photo 16) and remove the lever along with the plastic bushing (photos 17 and 18).
All. We clean the lever hinge from dirt, lubricate it, and put on a plastic bushing. We place this whole thing in the pillow body and secure it with a locking ring (photos 19 and 20). We return this entire structure to its place (photo 21). Don't forget to put a cover on the pillow (photo 22).
Ready. We carry out the rest of the assembly in reverse order. The work on replacing the butterfly cushion (ball joint cage) of the gearshift gates of VAZ-2110, VAZ-2111, VAZ-2112 cars has been completed. I hope it's successful)))
If you find an error, please select a piece of text and press Ctrl+Enter.
How to change the gear knob on a Priora
In order to remove the gearshift knob on a Priora, as well as to carry out any replacement or modification operations with it, it is necessary to dismantle the control system. So, for example, you can change a part by installing the version developed for Vesta. But the easiest way is to replace it with a standard part: you don’t have to make any modifications.
We remove the Priora gearshift knob, following the standard algorithm:
- Tighten the handbrake so that the Priora is locked in place;
- Remove the cover - just lift it to the top;
- It is better to heat the plastic part with a hairdryer and use a screwdriver to remove the sign with the painted speeds;
- Having rested a piece of a pre-prepared square at the bottom of the lever, use an adjustable wrench to make a stop so that the part goes up.
Watch this video for more details:
How to remove vibration and noise from a gearbox (rear bearing from a Priora)
24.02.2019
Reinforced rear bearings began to be produced for ten-speed gearboxes, which are not only more reliable, but also quieter due to their design features.
For a long time I was haunted by an article from ZR. I remember reading the Priora test in “60 Hours Behind the Wheel” and came across the following information:
“To avoid similar incidents in the future, the designers decided to replace the standard bearing 6-50305A2ESH1 with a more durable 750305AU. Its dynamic load capacity is 20,800 N versus 19,000 N for the old one. The new bearing has a double-sided seal that prevents wear and tear products from entering the rolling surfaces. It would seem that there is a magnet in the crankcase to collect steel particles. But it cannot control aluminum and brass particles, which are considered the most dangerous. They are firmly pressed into the race tracks, interfering with the balls, which leads to noise and knocking.
Next to the rear bearing of the primary shaft, a similar one works on the secondary shaft. This one seems to be in order, but they decided to replace it with a new one - it’s more reliable, and there won’t be any confusion during assembly.”
From the very first thousand kilometers I was bothered by the noise of the gearbox in second or third gear. And when braking with the engine in fourth or third, it completely blew my mind. And the dream was ripening to change these damn bearings, God willing, at least it would howl less. Moreover, the plant doesn’t even look in this direction.
But what about the owners of cars that have a gearbox with an outdated bearing? Experts say: our case is an isolated one, there is no need to recall the cars. The factory carried out tests several times, and the rear bearing coped with its task.
All units, without exception, are tested at the stand.
The story can end here - the unpleasant story ended quickly and happily. There is, however, one “but”. The unfortunate rear bearing has long been a concern for owners of front-wheel drive VAZs. Even on cars with low mileage, it begins to sing at idle, and by 60 thousand km its noise becomes annoying.
It is unlikely that the factory workers did not know this. Unlike the outdated 1.5-liter carburetor engine with a torque of about 106 N.m, the updated 1.6-liter VAZ-21114 and VAZ-21124 already produce 120 and 131 N.m, respectively. The load on all parts of the box, including bearings, has increased. And if the box modernization described here had been carried out in a timely manner, Priora would have finished our test in triumph, and not on a rope.
We recommend
“Volvo S80 automatic transmission repair: typical breakdowns and what to do about them” More details PS I wonder what the manufacturer of “crooked” bearings thinks about this?
Thanks to “Behind the Wheel”, a weak point in the Lada-Priora box has been eliminated.
In searching for information on these bearings, and just about bearings for VAZ front-wheel drive gearboxes, I couldn’t find anything, I even found a description of how to change them without removing the gearbox, right on the car, I even wanted to buy and change them, but the bearings were not on sale .
And here’s the thing, replacing the clutch, removing the box anyway, why not change the bearings at the same time? They just went on sale.
Well, two 750305AU bearings were purchased and installed to replace 6-50305A2ESH1. More precisely, not 6-50305А2ЭШ1, but, as it turned out after disassembly, I had 63052RS2.
When searching, this catalog number appears in some Chinese catalogs marked SKF analogue and the like.
I will not describe the replacement process; it is described in pictures in any Murzilka. The only thing is that the box does not need to be completely disassembled.
So here it is. After replacement.
There are no enthusiastic cries of “Wow,” but you can’t even say that it remains as it was.
How can I more accurately describe what has changed after the replacement...
Transmission noise in second or third gear. And when braking the engine - fourth or third
We recommend
“Problems with the clutch: causes and solutions” Read more It’s as if this has now been spread across all gears and has become much quieter.
The box did not stop talking, but began to sing on a different note, moving to a higher frequency part of the range. Approximately the sound now resembles the sound of a howling generator (maybe this is it, and I'm confusing it?)
But quieter.
Much quieter.
Priora gearbox lever rattling
Since 2013, AvtoVAZ began installing a modernized manual cable transmission with the manual transmission index 2181 on Lada Kalina and Granta cars. According to the auto giant, modifications to the gearbox made it possible to reduce backlash and make gear shifts clearer. But in practice, car enthusiasts began to notice that the gearshift knob was rattling.
In 2013, Lada dealers began to receive numerous complaints from Granta and Kalina owners. Drivers were pointed out a problem with the gearshift knob: when it shakes and vibrates (especially in 3rd and 4th gears), crackling and knocking noises appear. AvtoVAZ issued instruction No. 31-13 (To download files you need to log in to the website), which stated that in order to solve the rattling of the gearbox knob, it is necessary to replace the gear shift mechanism. But this did not help, nor did replacing the gearbox cables.
At the same time, enthusiasts began to get involved in solving the problem and tried to eliminate the rattling of the gearshift knob with the help of modifications. For example, they put two springs on the cables near the gear shift mechanism, or put polyethylene in the plastic clip of the lever tip, but this also did not bring the desired result.
Soon AvtoVAZ finds another solution to the problem, which it describes in a new information letter No. 23-15 (To download files you need to log in to the site). The modification of the design consisted of placing a damper (dimensions 30x30x50 mm) under the right cable in the tunnel. Dense foam rubber can be used as a damper, which restores its shape after compression.
In October 2022, AvtoVAZ issued another information letter No. 64-16 “On eliminating chatter in the gearbox control drive of LADA vehicles equipped with a cable gear shift drive.” Now, whoever complained about the rattling of the gear shift lever in the control drive, it was proposed to replace the gear shift cables and their mounting bracket.
( 2 ratings, average 5 out of 5 )
Gearbox slide: what it is, signs of wear, how to adjust it yourself
Not all motorists have any idea what the name of this or that part in their car is. In this case, we are talking not only about the mechanisms “hidden” in the engine, but also about the devices with which they interact literally every day. One of these parts is the gearbox linkage.
Please note: The name "slide" is not official for this mechanism, but it is generally accepted. In fact, this part is called the transmission control rod
1. What is a gearbox rocker 2. Signs of gearbox rocker wear 3. Adjusting the gearbox rocker
What is a gearbox rocker?
Many drivers mistakenly believe that the rocker refers to the gear shift lever, but this is not entirely true. If we are talking about a gearbox rocker, we mean a composite mechanism whose task is to connect the gearshift lever and the rod. That is, the driver cannot see the backstage, much less touch it. This element is located between the lever and the gearbox itself, and it is located under the bottom of the car, near the driveshaft, and in some cases under the gearshift lever itself.
As can be understood from the description, the rocker regularly has to deal with serious loads, so this element must have good strength. Despite this, the slide is susceptible to damage. If it does not contain enough lubricating components, drops of water, dust or other “debris” have entered it, there is a high risk of part failure.
Please note: On some cars, the rocker can last 200-300 or even more than thousands of kilometers without replacement. But, if we take the average result, the gearbox usually fails after 100 thousand kilometers of operation
Signs of gearbox wear
The driver must pay attention to possible failure of vehicle components, including knowing the characteristic signs of wear on the gearbox linkage in order to take timely action to replace it. Despite the fact that the mechanism is quite reliable, you should be aware of the following “symptoms” of its imminent breakdown:
- Increased play at the gearshift knob. This can be noticeable both when the handle is in neutral and in one of the gears;
- Difficulty shifting gears. For example, one or more gears are difficult to “stick”, or maybe a crunching noise occurs when the lever moves in their direction;
- It feels like changing gears has become more difficult, as if the lever has become much heavier;
- Gears are engaged incorrectly, for example, instead of fifth, third is engaged or vice versa.
Drivers often ignore the appearance of play in the gearbox, believing that this is a normal situation. In fact, if backlash occurs, it is imperative to diagnose the gearbox, and, if necessary, adjust or replace the linkage. The fact is that a slight play is already a fairly serious symptom of a faulty gearbox linkage.
If it “breaks” while the car is moving, this can lead to serious consequences for both the car and the driver, since in such a situation there is a high risk of getting into an accident.
That is why, if you notice problems with gear shifting, be sure to contact a service center for diagnosis and repair of the linkage, if necessary.
Adjusting the gearbox rocker
It is not always necessary to completely or partially replace the scenes. Quite often you can limit yourself to simple adjustments. At the same time, it is possible to adjust the link with your own hands, without contacting a service center. There are two ways to adjust:
- In reverse gear. In order to adjust the rocker for reverse gear, you need to loosen the clamp on it, and then move the gearshift lever to the position that corresponds to the ideal engagement of reverse gear. After this, the clamp is tightened, and the work is considered completed;
- On the first transfer. If it is not possible to engage reverse gear, you can adjust the gearbox rocker in first gear. To do this, engage first gear, and then loosen the rocker clamp. Next, rotate the rocker drive counterclockwise until the gearshift lever stops in the plastic reverse speed lock, and then tighten the clamp.
It is worth noting that the general processes for adjusting the gearbox rocker are described above.
It is important to say that the process may differ depending on the car, so before starting work it is recommended to read the instructions specifically for your car model
Is it worth fixing the problem?
Many people don’t even try to fix the gearshift lever of a VAZ 2114, but this task is completely solvable, it doesn’t require skills, and the undeniable advantages are worth an hour of time. The difference is so noticeable that if a breakdown has been present in your life for a long time, you will constantly remember that there is not enough noise.
The main thing to remember is that a machine is like a person, what “cured” one is not the fact that it will help the other, and don’t get upset.
The repair will take very little time, you can get away with a small sum, and in return you will receive a number of huge advantages, such as:
- the unpleasant sounds accompanying the increase in speed will disappear;
- the gearshift lever will be fixed;
- switching will become smooth;
- At idle, the lever will stop “dancing the lambada” under your hand.
( 2 ratings, average 5 out of 5 )
Handle from Vesta to Priora
A detail from Vesta on Priora attracts the attention of many VAZ-2170 owners. Even analogs cannot compete with it. The insert on the gearshift lever itself is made of high-quality black mirror plastic with a silver edging. The catalog number of the standard part for the VAZ 2170 assembly is 8200-379945. Cost with dust cover – 2,000 rubles.
It is important to note that there will be no problems with installing the gear shift part - the mounting is similar. Completion of minor tuning should be indicated by a thorough check of the lever's functionality. It is better to detect the lack of “response” of the box while the car is standing still. Carry out a little diagnostics, then hit the road.