Reversing lights are generally not a legal requirement, but they are useful. They serve two main purposes - to warn other road users that you are about to reverse, and to illuminate if you are reversing at night. The circuit is a simple mechanism consisting of one or two rear lights, which are activated using a switch. So if something goes wrong and you find that the reversing lights are not on, it will be quite easy to identify the cause of the failure.
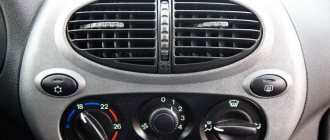
On most cars, the switch is installed on the transmission, and it operates automatically when reverse is engaged. If you or the previous owner of the car made your own adjustments by adding lights yourself, the reverse lights can light up manually. In this case, the switch is most often installed on the dashboard, closer to the driver.
Why the reverse light doesn't light up - common reasons
These lighting devices, in principle, like all others that have at least some connection with the electrical part, quite often fail during the operation of the car. And there are many reasons for this; it makes no sense to consider each of them. Therefore, we will try to analyze the most common of them.
Device of a warning system about a change in direction of a car
The main reasons for failure of reverse lights:
- the light bulbs are burnt out;
- fuses have failed;
- contacts have oxidized;
- The reverse sensor has failed;
- there was a break in the electrical circuit.
In order to identify the cause of the malfunction and eliminate it as quickly and efficiently as possible, we will consider each option separately.
Main reasons
- The fuse has blown. Both lamp bulbs are protected by one fuse link. Together with the lamps, the fuse will most likely protect some other circuits. Therefore, if your car’s taillights not only stop lighting, but also, for example, the dashboard backlight does not work, the first thing you need to do is check the fuse. You can find out which “socket” in the mounting block the lamp circuit goes through from the repair and operating manual for your car. In many cases, the main circuits are shown graphically on the inside of the fuse box cover.
Instead of a burnt-out insert, install only a fuse of the same rating. Installing a fuse link with a higher rating may cause the vehicle to catch fire. You can familiarize yourself with all the selection rules in the article “Classification of fuses for cars.”
- Limit switch faulty.
- Open circuit (breaking off pins in connectors, chafing wires).
- Formation of oxides, corrosion at the junctions of contacts, burning of pins.
- Poor ground contact of the lights. In case of problems with the general “mass”, brake lights and turn signals may also not work. It is extremely unlikely that both bulbs stopped lighting at the same time due to contact problems in the lanterns. But a bad ground can cause the reverse gear light to not light up on only one side. Of course, in this case it is worth checking the lamp itself.
Burnt out lamps
One of the most common problems is a burnt out lamp. To check this, remove the light bulb from the holder and connect it to the battery terminals with a short wire. If the light comes on, then the fault must be looked for at another point in the electrical circuit.
First, check that the light bulb socket and electrical terminals are clean and bright. If there are any signs of corrosion, clean the socket with wet and dry paper, then reinstall the bulb and retest.
A burnt out light bulb is the most common cause
If the reverse light still does not come on, the fuse may have blown. Also, everything indicates a blown fuse if two reversing lights are constantly on. In this case, a replacement will be needed. Fortunately, getting to the fuse box where they are located will not be too difficult for you.
LEDs for tail lights: fashionable diodes
If you can’t buy a normal LED lamp for headlights yet, maybe the situation is better with the rear lights? The author appreciated their proposal and tried it on the Lada Priora.
Here it is, a scattering of LED replacements for light bulbs in the rear lights.
Here it is, a scattering of LED replacements for light bulbs in the rear lights.
Car taillights are not just lighting equipment, but also an important design element. It is enough to stand in an evening traffic jam to appreciate the wealth of imagination of their developers.
Most lanterns still use the good old incandescent bulbs, but here, unlike headlights, there is a fair amount of variety: single- and double-filament, base and baseless, 21 and 5 W, with clear or colored glass.
But the bulbs themselves, as a rule, are not visible from the outside: the light from their spirals scatters into thousands of lights thanks to the design of the reflector, which resembles crumpled foil. There are other solutions, such as a corrugated diffuser. But the trend of recent years is still transparent smooth glass and a faceted reflector.
Reference sample: lantern with all standard lamps lit. We have recorded the exposure - now it is possible to evaluate the effect of replacing lamps with LEDs.
Reference sample: lantern with all standard lamps lit. We have recorded the exposure - now it is possible to evaluate the effect of replacing lamps with LEDs.
At first, looking at the scattering of LED replacement lamps for flashlights, you are amazed at the variety. The number of individual LEDs is sometimes measured in dozens, and they are located in a variety of places: either at the end, then on the sides, or on the drop-down panels of the “space station”. But how to choose the right “lamp” for a particular car? We decided to check the LED lights in the Lada-Priora headlight and were disappointed: somehow it immediately dimmed and lost the look originally intended by the designers.
We especially note: our winner turned out to be the best only in comparison with other participants, but not with standard light bulbs. In addition, in another flashlight the result may be different.
OLLO S25 W
4 white LEDs at the end, metal
Current consumption 0.18 A
Approximate price 350 rub.
It was in this light bulb that two of the four LEDs periodically went out or dimmed. It turns out that you can’t drive in reverse in the dark, and you won’t see a brake light or fog light!
OLLO S25 R
4 red LEDs at the end, metal
Current consumption 0.075 A
Approximate price 350 rub.
Obviously too weak even for side lights.
OLLO S25 Y
4 yellow LEDs at the end, metal
Current consumption 0.14 A
Approximate price 350 rub.
Comparison with the power-hungry original is not in favor of a fashionable replacement: such a turn signal is easy to overlook.
Starled 6G
15 red LEDs at the end and sides, “double-filament”, metal
Current consumption 0.19 A
Approximate price 590 rub.
This one is at least visible, but again somehow. And it also costs money. Keep in mind that a base with lock pins offset along the axis is used here.
Starled 7G - CHOICE OF ZR!
12 white LEDs on the sides, metal
Current consumption 0.39 A
Approximate price 540 rub.
Perhaps the best option, this is confirmed by the maximum current consumption. But keep in mind: in a flashlight of another model, the result may be completely different.
Type and manufacturer not specified
36 white LEDs at the end and sides, “double-filament”, plastic
Current consumption 0.20 A
Approximate price 300 rub.
It would hardly work as a reversing light, as a brake light is not suitable. The base has pins offset in height.
"Mayak-12T25"
24 white LEDs at the end and around the circumference, plastic
Current consumption 0.13 A
Approximate price 170 rub.
The light is a little worse in the reversing light, better in the fog section. But still far from standard.
Neither type nor manufacturer is specified
12 yellow LEDs at the end, plastic
Current consumption 0.035 A
Approximate price 35 rub.
On the price tag, this unknown “beast” was offered as a turn signal. But no one will notice such a signal!
"Mayak-12T25"
12 white LEDs at the end, “double-strand”, plastic
Current consumption 0.075 A
Approximate price 60 rub.
The light bulb flatly refused to fit into the standard hole in the lantern. The reason is the tides of plastic around the circumference.
Fuses
In many cases, the fuse protects the reversing lamps and also covers other accessories. If this does not give a positive result, replace the fuse and test again. If after replacement the new fuse melts again, then this indicates a short circuit that has occurred somewhere in the circuit. In this case, you should contact an electrician who can quickly determine the location of the short circuit in the electrical circuit.
If the other fused components are still working, then you need to check the rest of the circuit using a test light.
How to replace spark plugs on a car?
You can find an article about this here. You may also be interested in our new article on the topic “How to adjust the clutch.”
Replacing the sound signal on Kalina
For some reason, there is an opinion among car enthusiasts that to replace the sound signal, you will need to remove the front bumper of the car. In fact, it is possible to get by with a little “blood” without resorting to dismantling the bumper, but limiting yourself to removing just two radiator grilles. To carry out all the work you will need: a long screwdriver, a key “13”.
To make the whole process clearer, it can be divided into 5 steps:
- First, unscrew the radiator grille. To do this, you need to open the hood, unscrew the three upper mounting screws holding the grille. Then, using a long flat-head screwdriver, release 2 latches on the right side and 2 on the left. Pull the grill towards you and remove it from its fastening points.
- To carry out work safely, disconnect the negative terminal from the battery.
- To remove the lower grille, you only need to unscrew two screws, which are located at both corners of the upper part of the grille.
- Between the radiator and the body we find the horn itself. Using a “13” wrench, unscrew the fastening nut. Disconnect the contacts (pull out the contact plug) and remove the device.
- Installation of a new product is carried out in the reverse order of the removal process.
If you want to adjust the volume and tone of the sound signal of the horn itself, then on the back of its body there is a special adjustment bolt that must be turned using a Phillips screwdriver.
Car sensors work very simply: when they receive physical data (be it various engine speeds or temperature) or chemical data (exhaust emissions), they convert it into electrical signals and transmit it to the vehicle's control unit. The unit is responsible for interpreting them and instructing the actuators to operate in accordance with the conditions or operation of the engine.
These sensors are very important as they are designed to ensure that the vehicle performs well and of course to prevent failures in its various systems.
Both modern and diesel cars have different sensors. Their classification corresponds to the function performed:
- Mechanical sensors: designed to open and close circuits.
- Electronic sensors: efficient and fragile.
- Electrical Sensors: These sensors have a coil or resistance that is responsible for sending a signal to the control unit.
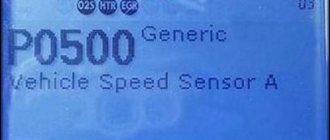
Checking the reverse sensor
It doesn't take too much effort to check your vehicle's reverse sensor (switch). In fact, this process can be completed in several steps.
Step 1: Locate the reverse sensor location. In almost all models it is located at the bottom of the gearbox housing. In fact, there are two sensors installed there: one to measure the speed of movement, and the second is a reverse sensor. To get to it, you will need to drive into the “pit”.
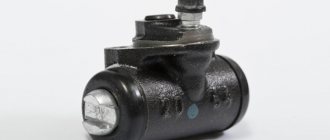
This is what the reverse sensor looks like
Step 2. Once you reach the sensor, disconnect the power wires from it.
Step 3. Connect the disconnected wires to each other (connect them).
Connect the wires together
Step 4. After this, you need to turn on the ignition and “stick” the reverse gear.
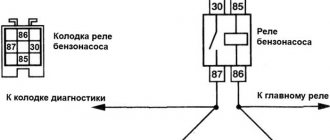
Place of the switch in the light switching circuit
On cars with manual transmission, voltage to the lamps when reversing is supplied through a limit switch (the so-called frog), which is screwed directly into the gearbox housing. When reverse gear is engaged, the switch button is pressed inside the gearbox. The contacts inside the “frog” bridge, and current begins to flow to the lamps.
On the circuit diagram for turning on the reversing lights, we can see that on the VAZ 1118 Kalina, the current from the battery through the ignition switch (No. 2) is supplied to fuse F1. Passing through the fuse that protects the switching circuit, “+” goes to the limit switch (No. 10). The contacts are in a normally open state and close only when reverse gear is engaged. Thus, current begins to flow to the light bulbs. The second contact of the lamps is connected to the “–” battery through the common ground contact of the lamps.
On cars with automatic transmission, the role of the limit switch lies with the selector position sensor. Information about changing the location of the gearshift knob is transmitted to the engine ECU, the light control unit.
How to check the "frog"
- Remove the headlight switch chip.
- Turn on the ignition.
- Using a small piece of wire, connect the contacts of the reverse gear sensor connector to each other.
If the reverse lights are on, then the problem is in the “frog”. Some drivers disassemble the switches, clean the contacts, after which the device continues to work properly. It is up to you to judge the appropriateness of such measures. But keep in mind that on many cars (including VAZ models) the limit switch is located below the oil level in the gearbox. We recommend simply replacing the power sensor. To minimize oil loss, jack up the car on the side where the end switch is installed.
On some cars, the reversing lights do not light up due to incomplete activation of the limit switch. The problem can be solved by installing a thinner washer under the “frog”. To make sure that the switch is working, check with a multimeter in ohmmeter mode whether the contacts close when you press the button.
Checking the circuit
The essence of diagnosing the reason why the reverse lights do not work comes down to identifying the section of the circuit where the voltage is lost. To do this, you can use a regular control light. Continuity testing is done with an ohmmeter, so you need to know how to use a multimeter.
You can start checking directly from the limit switch connector. Turn on the ignition. Connect one contact of the control light to an unpainted metal part in contact with the body, and the second to the “+” connector.
- If power comes in, check the reverse sensor.
- If after installing the “jumper” in the connector the lights do not light up, then the problem is in the section of the wire circuit going from the connector to the lights. Ring the wire to the point where it divides into light bulbs on the left and right sides. Most likely, the reason is the break.
To find the pinout of connectors, light contacts, and wire colors, be sure to study the electrical diagram of your model and vehicle configuration.
The lamps are constantly on
If the lights on your car are constantly on or come on regardless of whether reverse gear is engaged, the cause will be among the following breakdowns:
- short-circuiting the “+” going to the reverse gear sensor and the light bulb wires from the switch;
- the wire going from the connector to the lights has a short to “+” (this happens if the wires in the harness fray);
- The sensor is stuck in a closed state.
If the lights do not come on when you engage reverse gear, the reason may be a malfunction of the switch or the so-called reverse “frog”. This part is located in the same inconvenient place as the solenoid, so it is better to perform the operation either with the crankcase protection removed, or by first unscrewing the left engine splash guard.
First, disconnect the plug with the power wires from this switch, simply pulling it to the side with a little force.
And after that, we unscrew the “frog” of the reversing lighting, for which you will need a 22mm spanner or open-end wrench. In the photo below everything is presented clearly:
Just as in the case of the solenoid, this operation must be carried out very quickly, almost instantly, after unscrewing the switch, immediately screw in a new one! Otherwise you will end up swimming in oil. Or we carry out the replacement procedure when the oil from the Kalina gearbox is drained.
I HAVE A 2005 KALINA. PROBLEM WITH REVERSE LOCK SENSOR. MY ONE STOOD FOR 11 YEARS WITHOUT PROBLEMS, BUT STARTED LEAKING. IT'S ALREADY 6 MONTHS SINCE MY TORMENT BEGAN. NEW SAMPLE SENSORS COST 550 RUB. OLD LIKE MINE RUR 1300. AND YOU WILL NOT FIND IT IN A DAY WITH FIRE. IN KALUGA THERE ARE ONLY TWO STORES. I HAVE ALREADY BUYED AND CHANGED 5 SENSORS. TWO THE THREAD BROKES WHEN TWISTING, THREE LEAK IN THE REAR PART WHERE THE ROLLING IS. EVERYTHING CHANGED PROF. THE MASTERS PLACED ON THE SEALANT AS SUPPLIED. 6 THE SENSOR ORDERED BY THE SUPPLIER OF. AVTOVAZ DEALER. I BARELY FOUND IT THROUGH THE ONLINE STORE. FAILURE AGAIN. ACTUALLY THEY DID NOT TAKE ANY MONEY FROM ME. SO I HAVE ALREADY SPENT ABOUT RUR 10,000. AND WHO IS STILL THERE, THE PROBLEM IS NOT SOLVED. I DON’T KNOW WHAT TO DO. ALL THE MASTERS PITY ME, BUT THEY CAN’T HELP IN ANY WAY. THEY SAY, APPEARANTLY SOME LEFT SHOP IS STAMPING THESE SENSORS ALL OVER RUSSIA, EVEN I CAN’T FIND, ON THE INTERNET, WHO PRODUCES THEM. THERE ARE NO MARKINGS ON THE SENSORS THEMSELVES. AND I CANNOT TAKE IT TO THE STORE, BECAUSE THEY WARN IMMEDIATELY THAT YOU CAN ONLY RETURN IT IF IT HAS NOT BEEN USED. THIS IS SUCH THINGS, I’M SITTING WITHOUT A SENSOR, WITHOUT MONEY, WITHOUT A BROKEN TRUTH. CAN ANYONE TELL ME WHAT TO DO? IF ANYONE IS INTERESTED. ON OLD SENSORS THE THREAD DIAMETER IS 16 ML. AND ON THE NEW 25ml..
Sergey, there is always a way out in everything. In your case, you need to buy a new one, in order to install it on a thread diameter of 16 mm, you need to make an adapter sleeve from a diameter of 25 mm to 16 mm. You can turn it on a lathe (preferably). Or you can do it manually. For example, when I tore off the threads on the aluminum cylinder block cover in order to tighten the spark plug, I did just that - by hand. I bought taps for a diameter of 18 mm secondhand on the market; took a piece of 15 mm water pipe with an internal cross-section; at one end there was already a finished thread on the outside of the pipe; to insert an 18 mm tap, I scraped one millimeter with a round file to a diameter of 16 mm and cut a thread inside the tube; Then I sawed it off with a metal hacksaw and screwed it into place. Everything works great.
Checking the electrical wiring
If the current does not reach the lamp socket, you should check the rest of the electrical circuit in reverse order.
- Check your repair manual for the color and route of the reversing wires.
- Probe each wire along its entire length.
- In most cases the wire will disappear into the cable where you can't reach it.
- In this case, you should be extremely careful, because you risk damaging the working wire.
- Once you have identified the faulty section of the wire, remove it and install a piece of new wire in its place.
Important! Be sure to provide high-quality insulation at the wire connection points. The quality of the insulation primarily determines the reliability of the contact and the safety of the driver. You can also eliminate the possibility of a short circuit.
Video - Reverse gear does not light up on VAZ 2108, 2109, 21099. We are looking for the reason
A modern car is literally packed with electronics, and the Lada Kalina is no exception in this sense. On the one hand, electronics make life much easier for the driver. On the other hand, it can also become a cause and source of headaches for the driver, since the abundance of electronics can seriously complicate troubleshooting. The most common electronics-related problem on Kalina is the inability to engage reverse gear. We will tell you why the transmission does not turn on and how to fix it in this article.
The design of the reverse gear locking mechanism in the Lada Kalina
All the main elements of the locking mechanism are listed
To engage reverse gear on Kalina, the driver needs to move the gearshift lever slightly towards himself and then forward. This must be done by lifting a small plastic ring on the lever, which serves as a kind of insurance. There is a solenoid in the gearbox that prevents reverse gear from being engaged until the ring is raised. After lifting the ring, the magnetic switch built into the lever is activated, the solenoid is connected to ground, after which the rod inside the solenoid moves. This leads to the fact that the stroke of the gear selection mechanism increases and it becomes possible to engage another speed - reverse.
Characteristics of the XX controller
Let's take a closer look at the XX sensor.
Purpose and principle of operation
The idle speed sensor is an electric motor with a conical needle of a certain thickness. This device is located on the throttle body next to the throttle position device, and is secured with two screws or using technical varnish.
The device has a single purpose: to stabilize the engine idle speed, and everything happens this way:
- When the engine is idling, a certain volume of air enters, which allows it to operate normally.
- The device does not read or control anything, it does what the ECU tells it to do. The unit controls, reads and, according to the tachometer readings, gives a command to the XX regulator.
- If you warm up the car engine to the optimal temperature, the controller will maintain speed. If it is not warmed up, then due to the operation of the IAC controller, the speed will increase. This manipulation will ensure the optimal engine temperature at higher speeds by analyzing the operation (author - RussianTuning).
Typical faults
Like any systematically operating device, the DXH may experience various problems, for example:
- The car suddenly stalls while idling.
- The DXX turnover is not systematic and “floats”.
- When starting the engine without preheating, the controller does not start working and the sensor does not rotate as it should.
- It suddenly stalls when changing gear on the gearbox.
- The DHW speed hangs after releasing the pedal or when activating various automotive equipment.
When all these strange things happen to a car, it is obvious that the problem lies with the regulator. Unfortunately, this device does not have self-diagnosis, so to figure out what exactly is the cause of the malfunction, you need to check it yourself. And if it can’t be fixed, then replace it. Replacing the idle speed sensor on Kalina will be covered below.
Why did reverse gear stop turning on and how to solve it
Difficulties engaging reverse gear can arise for a number of reasons, the most common of which are listed below.
The interlock fuse has blown: reason number one
Fuse F21, responsible for blocking reverse gear, is located in the bottom row, in the eighth connector
Operating principle of the display system
There is a special ring on the gear shift lever. You can't shift into reverse without it. When this ring is lifted, a current pulse is produced (it is transmitted to the coil), which retracts the coil core, and the space for engaging reverse gear is freed up. The same impulse creates a signal to turn on the reverse indicators.
In the reverse process, on the contrary, the core falls into place, this creates a pulse in the coil, which is transmitted to the rear light control system, and they turn off.
Restoring functionality
Reverse problems can occur throughout the reverse indication circuit. Therefore, you should not rush to drive the car onto an overpass and change the sensor. To begin with, it is worth checking out the more accessible places (but no less important).
Let's start with the ring on the gear lever. In principle, some craftsmen can easily disable both the sensor and the gearbox lock in 1 hour. But you shouldn't do this. This is not just a display system. It is also a security system. And since they did it (they didn’t save money on it), then this is a reasonable requirement. And any safety requirements, as you know, were written by those who neglected them.
The thing is that first gear and reverse gear are switched in the same way in the Lada Kalina: “toward and forward.” But the first speed is engaged simply, and the reverse with the help of a ring. Some protection “from accidents”. This is why you need a reverse sensor.
If you lift the cover that covers the gearshift lever, then under it you will find several wires running from the ring to special connectors. These wires are specially made not solid, but through a connector, because they are always in motion (the lever is pulled all the time). That's why they often break. It's worth checking them out first.
However, most often the Lada Kalina loses reverse gear due to the wires that lead from the sensor attached to the gearbox. There the wire is in “street” conditions. That is, it is influenced by all weather conditions that exist in the environment. Moreover, this is the bottom of the car. Sand, pebbles, dirt, moisture, etc. fly there. Of course, this is not directly under the wheels of the car, but closer to the middle, but still there is some constant impact.
These wires are easy to find. Lada Kalina does not have a very complicated gearbox. Therefore, the only electrical wires that go to the transmission are the reverse sensor wires. You should check them (or better yet, “ring” them, since every electrician knows that it is often impossible to see a break in a braided wire). If everything is in order here (rather rarely), then the reverse sensor itself should be changed.
Advertisements on NN.RU - Auto
A wide selection of hydraulic pumps and hydraulic motors of all series: spline hydraulic pump of right rotation. It is used in road construction and... Price: 1,000 rub.
A specialized company for converting trucks into tow trucks invites you to install a tow truck platform on.
Extend the chassis (frame) on Gazelle Next, Gazelle farmer under a body of 4.2 m, 5.1 m and 6.2 m. Extend the frame on Gazelle Next, Gazelle Gas 3302. Price: 25,000 rubles.
A specialized company for the conversion of trucks produces extensions for man man, iveco and iveco truck tractors.
We are forced to buy unnecessary things because they come with what we need. Moreover, according to the sellers, they are inseparable, like Jack and Rose.
Today, Nizhny Novgorod fast food lovers have a real holiday: a new worldwide outlet has opened on the renovated Nizhne-Volzhskaya embankment.
A street film festival will be held in Nizhny Novgorod for the second time. Short films by young Russian directors will be available for free.
An accident occurred in the Moskovsky district of Nizhny Novgorod: a girl was swinging her friend, but the swing suddenly fell. As a result.
Source
Replacing the sensor
Replacing the sensor is easy, but requires some skill and knowledge.
You can see the sensor by looking under the car from the front, after turning the steering wheel to the left. But the replacement is done on an overpass or from a pit:
- First of all, you need to disconnect the wires.
- Then unscrew the reverse switch from the box and immediately screw in a new one. If you hesitate, a lot of oil will leak out of the box. Therefore, everything must be done quickly. When unscrewing, do not stand directly under the box, the oil will simply flow out. It is recommended to let the machine cool down a bit before replacing the sensor. Then the oil pressure will not be so strong (and its fluidity will decrease slightly). But most importantly, keep the new sensor on hand.
- They pulled out the old one and immediately installed a new one. Then oil loss will be minimal.
If you do not have enough experience, simply place a clean container under the crankcase to catch the spilled oil. Then it can be refilled.
Repair methods
To repair the reverse signal, you can proceed in two ways. They differ in the way the sensor is accessed.
- Drive the car onto a lift or pit.
- Do the work by climbing under the car.
If you have already encountered a similar problem, then you will probably agree that replacing the DZH is best done using a pit or overpass. This makes access to the sensor as comfortable as possible, plus you minimize the risk of being splashed with oil from the gearbox.
Replacing the DZH is not the cleanest job
Of course, there is another cleanest way - sending the car to a car repair shop. But then you will have to pay not only for the sensor, but also for the services of the specialists. And this is another 2-3 times the cost of the sensor. The choice is yours anyway.
Self-replacement
It’s not difficult to get to and replace a failed DZH on your own. Follow the instructions, do not break the sequence of operations, and then the process will not take you much time and effort.
- Place the car on a pit or overpass. Be sure to apply the handbrake and place the transmission in first gear. This will help prevent your car from accidentally rolling away.
- Remove the protection from the contacts of your sensor, disconnect the contacts.
- Prepare a container into which the oil will be drained when unscrewing the DZH.
- When the container is ready, remove the sensor. In some cases, it may not be unscrewed by hand. In such a situation, use a 22 mm socket.
- Very rarely even the key cannot help, since the sensor becomes stuck to its location. Here you will have to arm yourself with a hammer and chisel and try to remove it as carefully as possible.
- Take out the failed device and insert a new one in its place.
- If oil gets on the gearbox housing, remove it with dry rags. There is no need for extra dirt. Plus, it can lead to a decrease in the efficiency of the device.
- Return all contacts to their places, put the protection back on.
- If a decent amount of lubricating fluid has spilled out of the box, be sure to top it up. Just use fresh ones. By the way, this is one of the reasons to completely change the oil in the gearbox if it has been there for more than the first season.
- The decision to change the oil will simplify the task when removing the sensor. If the liquid is drained in advance, it will not flow in different directions when the sensor is unscrewed. The work will be cleaner, plus you will kill two birds with one stone - replace the sensor and gearbox oil.
Article on the topic: Self-adjustment of the clutch on a VAZ 2114
Removal and replacement
After completing the work, do not forget to check whether the reverse traffic warning system is now working. For this:
- Turn the ignition key, but do not start the engine;
- Engage reverse gear on your gearbox;
- See if the white lights turn on. If yes, everything went great.
How much it costs?
Many VAZ 2114 owners are often interested in the cost of certain spare parts. In the case of DZH, a new device will cost you up to 300 rubles. You can find devices for 100 rubles.
The price depends on the manufacturer, quality level and pricing policy of the auto parts store where you decide to shop.
Additionally, it wouldn’t hurt to purchase WD40, which can be used to clean contacts. Plus, the wires may need to be replaced. We do not recommend doing this on your own if you do not have the relevant experience.
If the culprit for the problem with the rear lights is the light bulbs themselves, replacing them will cost a pittance. Today they cost up to 50 rubles.