Every car, including the Chevrolet Niva, has an exhaust gas exhaust system in its design. As you know, the combustion process of the combustible mixture occurs in the engine, due to which the car is set in motion. The burnt mixture, in turn, cannot dissolve inside the engine and is therefore removed from it through a system consisting of basic elements. These elements serve not only for the removal of gases, but also for... However, this article will tell you about this, as well as how to replace and tune the exhaust system of a Chevrolet Niva car.
Exhaust system Chevrolet Niva
We will find out what the Chevrolet Niva exhaust system looks like in the material below.
Initially, Chevrolet Niva cars were developed exclusively from the point of view of an inexpensive alternative to a significant number of cars. By and large, the developers succeeded, since in society this model has a strong opinion about its high performance. The car has excellent practicality, since in addition to movement, it allows you to transport small loads. The high level of practicality is explained by the special suspension design. Its height allows you to avoid most problems associated with the road surface. In this case, we will talk about the exhaust system and possible options for improving it. Drivers who use the car for a long time note that during engine operation, a sound appears that is reminiscent of a “roar” or “growling” in its content. This behavior is explained by the formation of sound vibrations, which are caused by gas that has been processed and is under pressure. Due to this, the speed of gas movement is quite high, which determines the appearance of the characteristic sound. Thus, a system with affected areas produces a huge amount of noise during operation, which is not typical for a complete structure.
As gases escape, the temperature decreases and a cooling process occurs. According to environmental requirements, modern cars are equipped with special cleaning filters that help retain and remove harmful impurities. Chevrolet Niva cars are no exception. For proper operation of the injector and electronic control unit, a lambda probe must be used.
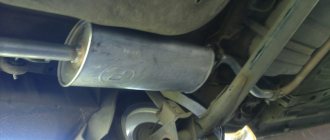
In general, if the exhaust gas exhaust system is disassembled into elements, then at the end you will get the following sequence: muffler; muffler for additional purposes; catalyst; Lambda probe; receiving tube. The elements are connected through auxiliary tubes and fastening clamps.
Adviсe
Whatever method is used, it is important to know that after removing the catalyst, the electronic unit will still show an error. This is accompanied by a yellow "Check Engine" light. And all because the oxygen sensor will record incorrect data about the amount of oxygen remaining in the catalyst
How to solve this issue? To get rid of the yellow lamp once and for all, you need to use a fake oxygen sensor. This is a kind of mechanical plug that has the same thread and dimensions as a standard lambda probe. It is the snag that can adjust the values of the lambda probe
And all because the oxygen sensor will record incorrect data about the amount of oxygen remaining in the catalyst. How to solve this issue? To get rid of the yellow lamp once and for all, you need to use a fake oxygen sensor. This is a kind of mechanical plug that has the same thread and dimensions as a standard lambda probe. It is the snag that is capable of adjusting the values of the lambda probe.
Another method is flashing the electronic unit. However, it is better to do this operation at a service station. The essence of the process is to install software for Euro-2. Thus, the ECU will not have information about the catalyst, and the engine will operate normally without additional interference. This method is relevant if the catalyst is removed at a service station. After all, in the service, the installation of a flame arrester is carried out in conjunction with the firmware of the electronic unit.
Also note that the length of the common exhaust system pipe does not change. Therefore, you should not install a new rear bumper on the Chevrolet Niva (whether it is restyling or pre-restyling, it does not matter). The system will operate normally. The only thing that will change for the worse is the smell of gas.
How to make the muffler sound quieter
You can do all the work listed below with your own hands. So, how to make the exhaust quieter:
- install an additional resonator;
- replace the old resonator with a new one;
- replace the muffler with a new one.
If everything is clear with the third method, then the first two need additional clarification. Let's start with what a resonator is and what it is responsible for.
What is the function of the resonator?
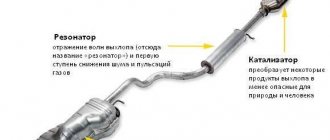
The resonator as part of the exhaust structure dampens (dissipates) sound vibrations that arise as a result of the release of loud exhaust gases from the combustion chamber. Structurally, the resonator is a multicomponent device through which gas flows pass. In everyday life it is often called the “middle muffler”, since it is located precisely in the middle part of the exhaust system. Gases under pressure enter the resonator, lose some of their energy and move further with less momentum. Later, passing through a system of labyrinths in the jammer, they are further dispersed.
The sound volume is influenced by several parameters of the resonator: its size, shape and design. If the operation of this device is disrupted, the entire exhaust system suffers, and first of all the driver: he not only listens to loud sounds, but also breathes gases that penetrate into the car's interior. At the same time, the engine suffers and its service life decreases.
The performance of the resonator depends on three factors: the condition of the catalyst, which reduces the concentration of harmful substances in the exhaust gases, the diameter of the pipes and the cleanliness of the muffler itself. If the device operates stably, it means that gas passes freely through its cavities, but at the exit its energy is several times less than at the entrance. For foreign cars, exhaust system components are usually made of denser and heavier materials that are less susceptible to vibration. This also needs to be taken into account when assessing its operation and, most importantly, the “loudness” while the car is moving.
How to install a resonator
Above we wrote about how to reduce the exhaust sound - install an additional one or replace the old resonator with a new one. Here's what you need to do in the first case:
- cut out a fragment of the pipe that connects the main resonator and muffler;
- install and weld an additional resonator in the vacant space;
- Check the correct operation of the ignition and fuel supply system.
Basics of safe repair work
Despite the fact that the work is carried out with the engine turned off, there is a high probability of suffocation from exhaust gases. Therefore, the work room must be equipped with excellent ventilation or be easily blown to allow oxygen to enter. Before performing any activity, ensure that sufficient time has passed for the system to completely cool down. Otherwise, you may get severe burns. It is worth noting that the cooling of the catalyst in relation to other elements is longer. It is strictly prohibited to carry out repairs in close proximity to fire. When performing work, you should not use a jack; it is dangerous and can lead to undesirable consequences.
Also interesting: New Niva Travel 2022: review, specifications, configurations and prices, photos of the interior
Replacing an additional muffler and catalyst
As mentioned above, the additional muffler and catalyst are a non-separable unit, which is replaced entirely in the event of failure of one or another element.
Let's consider the procedure for removing this unit. We drive the car into the inspection pit and wait some time until all elements of the exhaust system have completely cooled down. It should be remembered that the catalyst heats up to a much higher temperature than the mufflers, and accordingly it takes longer to cool down.
After the car's exhaust system has cooled down, you can begin to remove the catalyst and additional muffler. First of all, we clean the bolted joints with a wire brush, and then treat them with VD-40.
Then, using two “17” keys, unscrew the bolts securing the unit to the exhaust pipe of the exhaust manifold. Remove the bolts and spring washers.
Now we need to disconnect the resonator and catalyst from the main muffler. To do this, use two “13” keys to unscrew the bolts of the coupling clamp, remove the clamp and remove the graphite ring-spacer.
We remove the rubber suspension clamps from the corresponding brackets on the body and remove the entire assembly. Installing a new part is performed in the reverse order.
It should be noted: of course, if any of the elements fail, the car owner does not always have the opportunity to replace the entire assembly. In such a situation, you can go a slightly different way: use a grinder to cut off the element that has become unusable and install a new one in its place by welding. This solution is especially advisable in the event of failure of the additional muffler. The fact is that it costs slightly less than a catalyst, and often it will be much more profitable to purchase and install it separately (without touching the converter).
Cylinder head structure of VAZ engines
The block head performs all the functions described above using parts and entire assemblies built into it. The head is based on a solid cast part made of durable aluminum alloy, which has high thermal conductivity, as well as some viscosity - it is necessary for a firm fit of the head through the gasket to the cylinder block.
The cylinder head has a number of holes, cavities and recesses of various shapes and purposes:
- Combustion chambers;
- The cavities of the water cooling jacket (in heads of modern types, stiffeners are also located there);
- Inlet and outlet channels;
- Channels for installing valves;
- Shaft for the timing chain (in the cylinder head of VAZ “Classic” engines);
- Holes for installing spark plugs, sensors (temperature, phases, oil pressure) and other parts;
- Holes for bolts with which the head is screwed to the block;
- Oil channels;
- Oil bath for lubrication of timing parts;
- Place for installing a pencil case with a camshaft (on VAZ “Classic” models);
- Bed for installing the camshaft (on later VAZ models).
A number of parts and entire assemblies are installed on the cylinder head in one way or another, including:
How to replace the exhaust pipe of a VAZ 2107
- Valve guides are pressed into special channels;
- Valve seats are installed in the upper part of the combustion chambers (in early models - cast iron, in later models - cermet);
- Valves, springs, valve drive levers, etc.;
- A camshaft (or two shafts in modern models) with bearings, seals and plugs, in VAZ “Classic” models - a shaft with a pencil case, in later models - an aluminum camshaft bearing housing (in VAZ-2108, 2109, 21099 and some models of the tenth family there are two such cases, in the engines of current Lada models there is one, but of a large size);
- Intake manifold or throttle body;
- An exhaust manifold;
- Tee for connecting the cylinder head to the cooling system;
- Spark plug;
- Sensors for coolant temperature, emergency drop in oil pressure, timing and others;
- Timing chain or timing belt tensioner and tensioner;
- Ground wire;
- Fuel line;
- On many models of heads there is a distributor, a generator and other parts.
From above, the cylinder head is closed with a cover that performs protective functions - it protects timing parts from external influences. The cover has a neck for filling oil, as well as holes for bolts with which the cover is attached to the cylinder head. The cover is installed through the gasket.
The VAZ block head itself is installed on the cylinder block through a gasket, installation is carried out with ten bolts (in all models), many heads also have an eleventh bolt, screwed on the side. The gasket ensures the necessary tightness of the combustion chambers, and also regulates their volume within certain limits.
In general, the cylinder heads of VAZ cars, especially the early models (“Classics”), have a fairly simple design, and therefore are highly reliable and durable. And thanks to their design, they can be serviced and repaired independently, without the help of specialists. This is used by many owners of old Zhiguli, Samara, Sputnik, VAZ of the tenth family, modern Kalin, Prior and Grant, as well as Niv equipped with the same engines.
Catalyst malfunctions and their causes
Manufacturers write that the service life of the neutralizer is 100–150 thousand kilometers. But in practice, problems can arise even with less mileage, especially in large cities, where you often have to get stuck in traffic jams.
Depending on the operating conditions, the catalytic converter can be replaced every 3–7 years.
The main cause of the malfunction is the burnout of the layer of metals covering the honeycombs. This is a natural process as a result of which the quality of the exhaust deteriorates. The on-board computer shows a lit “check”, and in some cases does not allow the engine to work at all, turning off the ignition.
Low-quality fuel also accelerates the burnout process. Often the octane number of gasoline is increased by adding lead, this increases the load on the catalyst, reducing its service life. In a situation with diesel fuel, failure can be accelerated by the owner himself, using “antigel” additives in winter.
In some cases, the cause of the breakdown may be a faulty engine. If the ignition is incorrectly set and there are problems in the power system (the latter is especially important for diesel engines), the burnout of the catalytic layer accelerates.
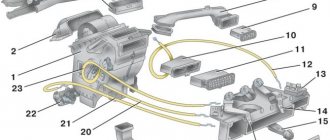
Chevrolet Niva Manual
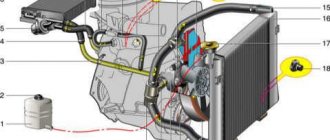
Exhaust systems: 1 — exhaust pipe; 2 - sealing gasket; 3 - control oxygen concentration sensor; 4 — metal compensator; 5 - sealing gasket; 6 — neutralizer with additional muffler; 7 — main muffler; 8 — system suspension cushion; 9 — diagnostic oxygen concentration sensor. The exhaust system consists of an exhaust manifold, a downpipe, a catalytic converter with an additional muffler and a main muffler. The exhaust pipe flange is attached to the exhaust manifold flange using four studs. The connection is sealed with a heat-resistant metal-reinforced gasket. The fastening nuts are brass or copper-plated and are secured against unscrewing by locking plates (one per two nuts), the edges of which are bent at the edges of the nuts. A threaded bushing for the control oxygen concentration sensor (lambda probe) is welded into the exhaust pipe. The exhaust pipe is additionally attached with a clamp to the gearbox bracket. A bellows-type metal compensator is welded into the rear part of the exhaust pipe, allowing the power unit to oscillate on the supports without transmitting them to the exhaust system. The exhaust gas catalytic converter flange is attached to the rear flange of the exhaust pipe with three bolts and nuts. A sealing gasket is installed between the flanges. The neutralizer serves to reduce emissions of carbon monoxide and nitrogen oxides into the atmosphere. It consists of ceramic blocks with many pores, coated with so-called afterburning catalysts: rhodium, palladium, platinum. Passing through the pores of the neutralizer, toxic carbon monoxide (CO) is converted into low-toxic dioxide (CO2), and nitrogen oxides are reduced to harmless nitrogen. The degree of gas purification in a working neutralizer reaches 90–95%. For normal operation of the converter, the composition of the exhaust gases (in particular, the oxygen content in them) must be within strictly specified limits. This function is performed by the controller, changing the amount of fuel supplied depending on the readings of the control oxygen concentration sensor. A sleeve for a diagnostic oxygen concentration sensor is welded into the pipe connecting the converter to the additional muffler (see Engine management system). The neutralizer and sensors are very sensitive to lead compounds - if they are “poisoned” by them, they stop working. Therefore, it is strictly prohibited to operate a car (even for a short time) on leaded gasoline. Another reason for the failure of the converter is interruptions in the ignition system: unburnt fuel burns out in the converter, damaging its blocks. This can cause the exhaust system to become clogged and the engine to stall (or severely lose power). The main muffler is located at the rear of the body. The pipes of the additional and main mufflers are suspended from the body brackets on two rubber cushions. To protect the body floor from excessive heating, protective screens are installed above the converter and additional muffler. Maintenance of the exhaust system consists of inspecting pipes and mufflers for corrosion, replacing failed parts, tightening connections and periodically replacing sensors.
We get rid of vibration and extraneous sounds of the Niva transfer case forever
The characteristic howl and hum of the transfer case on VAZ-21213 cars, alas, is familiar to many owners of such cars. Let’s figure out what is the reason for these problems, and most importantly, how to get rid of them without using “collective farm” methods, such as additional noise reduction.
Content
- Let's understand the terminology.
- We study problems and repair methods. Vibration and how to deal with it.
- We remove the howl and hum.
- We remove the possibility of oil leakage.
- Niva (LADA 4×4)
Understanding the terminology
Let's start by diving into the materiel. Transfer case (TC) is a separate unit of an all-wheel drive vehicle, which provides multi-mode power distribution from the engine to the front and rear axles.
Externally, this is a mechanism located under the bottom of the car, in the body of which a multiplier (divider) is placed in series to obtain an intermediate gear ratio in the transmission and a splitter of one power flow into two. It is with the help of this device and its controls (levers) that go into the vehicle interior that the LADA 4×4 driver selects the all-wheel drive operating mode.
The RK directly connects the front driveshaft and the intermediate shaft (shaft) with the vibration damper to the vehicle’s gearbox. As is probably already clear from the description, this element is connected to the rear axle of the car via a rear propeller shaft.
We study problems and repair methods.
Any car owner definitely doesn’t need to be told why howling and humming are bad. Vibration of the transfer case on a Niva at low speed is quite common. The driver, of course, gradually gets used to many extraneous sounds in the car, but the noise level is high enough to make it impossible to carry on a conversation with passengers while traveling. Due to excessive noise pollution, you will inevitably have to deal with the problem.
Vibration and how to deal with it.
The main reason for the occurrence of unnecessary sounds is multi-frequency vibrations of the components of the transmission. In general, the vibration of the transfer case on a Niva is one of the most common cornerstones that other car owners are forced to fight (or put up with) constantly.
- Check the cushions (supports) on which the power unit, gearbox and other parts are attached to the body, including the muffler. Any worn-out pad or rubber band can easily cause excessive shaking of the iron and accompanying rumble. It is better to replace worn silent blocks and pillows immediately.
- Be sure to pay attention to the intermediate shaft (inlet shaft). If you see signs of “fatigue” - change the elements that have become unusable, or the entire part!
Perhaps this is the most complete set of measures that experienced auto mechanics advise when the transfer case on a Niva hums and vibrates!
Removing the howl and hum
We will assume that we have dealt with the vibration, but an equally significant problem remains - how to remove the howling of the transfer case on the Niva. Vibrations of the mechanism are not always the only reason for the appearance of extraneous irritating sounds. And the characteristic noise of the transfer case, alas, is one of the “trademark” shortcomings of one of the best domestic SUVs.
- The first thing you should pay attention to is the levers. It is better to immediately replace them with silent ones - with anti-resonance bushings inside. They won’t eliminate all the noise, but they will definitely extinguish some of it.
- The result will be even better if you install a small-module transfer case - with front and rear covers equipped with double-row bearings. In 2010, AVTOVAZ introduced new double-row bearings for output shafts in order to get rid of backlash and runout, as well as extend the life of the seals and, in general, increase the reliability of the mechanism. Here logic is man’s friend: less shaking and hesitation means higher service life and reliability.
Removing the possibility of oil leakage
In an effort to resolve the question of how to get rid of the howling of the transfer case, even before the 2010 update, the manufacturer began assembling this mechanism using silicone sealant instead of cardboard gaskets. And he introduced an improved crankcase ventilation system with an open breather, which was located under the hood. Again, the reliability of the vehicle when passing fords has increased slightly, and most importantly, the load on the seals has also decreased.
We mention them again to point out that the fewer vibrations and shocks, the longer it will not take to detect an oil leak on the transfer case housing due to deteriorated seals. Moreover, the flange in the RC covers can cause noise - during operation, the bearing seats are simply broken.
We hope that the steps listed above will become complete step-by-step instructions on how to eliminate transfer case noise on a Niva.
A universal remedy that will definitely eliminate the noise of the transfer case?
For people who do not want to spend a lot of time modifying the components of their SUV, there is a proven solution. A fairly reliable universal option for how to remove the howling of a transfer case on a Niva, one might say, know-how from the SV-PARTs company, is the installation of a steel four-satellite differential.
Components
The exhaust of a Chevrolet Niva car is made by analogy with the previous model - VAZ 2121. But some units and components were also added to it, which increased efficiency and reduced the amount of harmful emissions. Main nodes:
- Downpipe
- Catalyst
- Lambda probe
- Resonator
- Muffler
- Fastenings
- Outlet pipe
Let's try to take a closer look at each component and understand their purpose.
Reception pipe. Sometimes also called the knee. It is made of durable materials, resistant to high temperatures, since it is exposed to the hottest gases and sparks of incompletely burned fuel. It has a curved shape, which is how it got its name. Studs and heat-resistant gaskets are used to connect to the engine. The main purpose is to remove gases from the engine and direct them down under the bottom to other components.
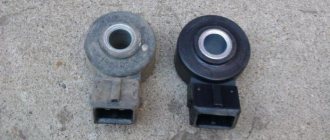
Lambda probe. It is installed at the junction of the exhaust pipes and screwed into the system. This is a sensor that measures the oxygen content in exhaust gases. These parameters are affected by the ratio of the fuel and air mixture that enters the cylinder.
Repair
Chevrolet Niva muffler
The repair process for the Chevrolet Niva is quite simple and does not require any skills. You will need a set of keys and an overpass or “pit”. There is a certain problem with the selection of system elements. The car has changed them several times over the years of production. Therefore, you need to be careful when purchasing parts.
Safety precautions
- Gas poisoning can occur even when the engine is turned off. It is necessary to provide the repair site with an influx of fresh air.
- Do not carry out repair work on a vehicle that is turned on or just turned off. Hot exhaust pipes can cause burns.
- The system has a catalyst, which in operating mode heats up to a temperature of over 500 degrees. It will take longer to cool down.
- A hot neutralizer may cause a fire. There should be no dry grass, paper or other flammable objects under it.
- Do not carry out repair work near an open fire due to the presence of gasoline vapors in the exhaust gases.
- It is highly undesirable to jack up the car for repair work. This is life-threatening.
When is repair needed?
Everything here is elementary. Has the operating sound changed? The first thing to check is the exhaust system. Perhaps one of the mufflers is leaking. They may burn out. The catalyst usually bursts or cracks. You can't always see her. Most often, clamps and gaskets at joints deteriorate. In this case, repairs will be inexpensive.
Despite Chevrolet's commitment to preserving the environment, some car owners install a decoy instead of a lambda probe. After buying a car second hand, check its availability.
Improving the model
To improve the model, you can use methods of externally changing the design. One such example is a dual outlet exhaust system. During operation, an additional pipe is welded to the end of the muffler. Depending on the quality of the pipe and its shape, the sound vibrations may change. Of course, not every car enthusiast is interested in this type of activity.
More serious changes relate directly to the functionality of the unit and increase the power characteristics. To increase power performance, the Chevrolet Niva exhaust system must get rid of the converter and lambda probe. Instead of the latter, a snag is installed. When working with a resonator, there are two options, which involve removing it completely or replacing it with a new one. Also, a new pipe with a larger diameter should be installed. In order for gases to be extracted at a higher speed, the installation of an additional element called a “spider” is required.
The above is a system change diagram that can be used as a whole, however, selective changes are also acceptable. Everything is determined by the goals of the car owner. By performing these manipulations, you can achieve an increase in power characteristics by 15 hp. However, it is worth considering the fact that the sound of the engine will change greatly, and the amount of harmful emissions will also increase, which is not welcome in society and on the roads.
The Chevrolet Niva exhaust system undergoes profound changes extremely rarely. This is due to a number of reasons, primarily the high cost of work. The Chevrolet Niva is a relatively cheap model, not intended for racing, so creating a powerful system does not meet the common sense of the design of this car.