For proper and reliable operation of the VAZ 2110 engine, optimal fuel pressure must be maintained in it, and deviations in pressure seriously affect the operation of the entire engine.
Sometimes when a car starts poorly, jerks, or refuses to drive at all, one of the reasons for such malfunctions may be insufficient fuel pressure in the system.
In this article, we will look at ways to check the fuel pressure in the VAZ 2110 ramp, and we will also talk about the nominal pressure in the fuel system and much more.
Fuel pressure in the system
Fuel pressure is one of the important parameters in the car system; the reliability of starting and driving the car depends on it. The pressure is pumped up by a special fuel pump (gasoline pump), which pumps fuel into the rail, and a special fuel pressure regulator dumps excess fuel back into the tank, thereby regulating it.
Parts affecting fuel pressure:
- Fuel pump;
- RTD;
- Filter;
- Injectors;
These parts, if they fail, can reduce fuel pressure.
Types and symptoms of regulator malfunction
The types of RTD malfunctions are as follows. The valve does not hold - fuel begins to circulate freely throughout the fuel system, the pressure in which decreases because of this. As a result, the engine does not have enough fuel when the speed increases, and its power decreases; The pressure in the system should not change after stopping the engine, but since the valve is not able to hold it, when starting the engine, you have to work with the starter for a long time to create the required pressure.
A completely inoperative valve means fuel is not discharged into the tank, and because of this, the pressure in the system increases. As a result, the amount of fuel supplied to the combustion chambers through the injectors increases - there is overconsumption and incomplete combustion of gasoline.
Signs of a faulty RTD are the following engine operation:
- unstable;
- stalls at idle;
- insufficient pickup;
- cannot develop full power;
- the crankshaft rotates at idle speed with a reduced or increased frequency;
- dips and jerks while the machine is moving;
- difficult starting - not always;
- the content of CO and CH in the exhaust gases significantly exceeds the permissible standards;
- excessive consumption of gasoline.
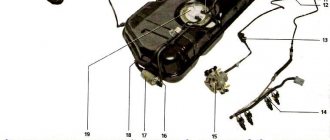
What is the pressure in the fuel system of the VAZ 2110
As you know, the VAZ 2110 was equipped with three types of engines: 8-valve carburetor, 8-valve injection, 16-valve injection. Each of these engines has its own pressure readings, except for the carburetor engine, its fuel is not supplied under pressure.
An 8- and 16-valve injection engine, with an aluminum receiver, that is, with a return line, has a fuel pressure of 2.8-3.2 bar.
A 16-valve engine (124) with a plastic receiver, has no return, the fuel pressure in it is 3.6-4.0 bar.
Preparatory work
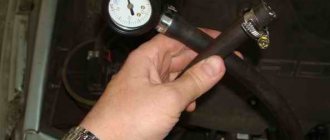
- We take a pre-prepared pressure gauge, and to prevent fuel spills and air leakage, we wrap flax or fum tape around the tip.
- We are preparing a hose with a maximum internal diameter of 9 millimeters, and clamps will be needed to secure them.
- We place the prepared rags on the engine in such a way that the hose and pressure gauge fixed on it cannot roll off the surface. This is done to prevent excess fuel from spilling over the surface of the engine.
- We wrap flax or tape around the pressure gauge, then fix the hose on it and tighten everything with a clamp.
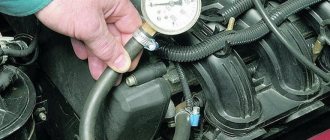
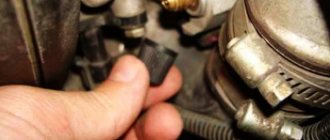
- On the ramp, unscrew the spool valve from the nipple (in this case, fuel splashes are possible due to the presence of residual pressure - approx.).
A regular wheel cap came in handy.
- We put a hose with a pressure gauge on the ramp connections and secure everything with a clamp.
Pressure gauge with pipe assembly.
We place the pressure gauge on a previously prepared rag, and the preparatory work can be considered completed.
Measurement procedure
Before you start working, you can try to relieve the pressure in the fuel system. To do this, remove the fuel pump fuse (which is located on the right side of the panel, under the front passenger’s left foot - approx.). Where 3 relays and 3 fuses are located. In the photo below it is located under the number “5”. After removing the fuse, turn on the ignition and check by ear that the fuel pump is not pumping. We start the car and wait for the engine to stall.
Additional block
- After everything is ready, we check the already attached end of the pressure gauge with the hose for a secure connection.
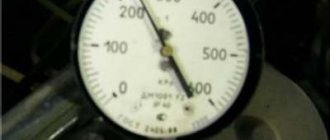
- Next, start the engine and look at the readings that appear.
Thus, we diagnose the results that appear and compare them with the results of the norm.
After all the work has been done, unscrew the hose with the pressure gauge, screw in the spool and return everything to its original state.
Note!
The peculiarity of measuring pressure using a pressure gauge is such that its initial value on the scale has a certain inaccuracy. That is, when the air analogue has a measurement period of 15-20 atmospheres, and for fuel control the required maximum value is 5-7 atmospheres, then all measurements taken will have an error equal to the initial values on the device. Therefore, pressure testing should be carried out on a pressure gauge with maximum values of up to 8 atmospheres.
We measure the pressure in the system without a check valve
If it happens that your engine does not have a check valve, then you need to know that in such a ramp there is a constant pressure of 3.6 to 4.0 atmospheres. But the order of measurements in general is completely similar to what is described above.
Checking fuel pressure
To check, you need to prepare a special tool, a pressure gauge for measuring air or liquid pressure; connect a hose with a diameter of 12 mm to the pressure gauge through a clamp.
It is advisable to cover the generator with a rag so that fuel does not get on it.
The process of measuring fuel pressure:
- We relieve the fuel pressure by removing the connector from the fuel pump in the system and starting the engine, letting it run until it stops.
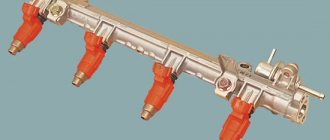
- We unscrew the fuel rail cap near the timing belt drive.
- We unscrew the spool.
- We connect the pressure gauge to the fuel rail and tighten it with a clamp.
- Turn on the ignition to activate the fuel pump.
- We check the pressure on the pressure gauge and compare them with the nominal readings.
Troubleshooting
No pressure in the fuel rail? Causes:
- Clogged fuel filter;
- Clogged fuel pump filter;
- Fuel pump malfunction;
- Malfunction of the fuel pressure regulator (FPR). And with high blood pressure too.
If the pressure in the fuel rail gradually drops, the cause may be:
- leaking fuel pump connections;
- leaking injectors;
- fuel pump malfunction.
Let's check it like this. We clamp the leading rubber hose of the fuel rail:
- the pressure has become stable - the fuel module is leaking or the pump is faulty;
- the pressure drops - the injector(s) are leaking.
Checking the RTD. Connect the pressure gauge hose to the outlet fitting of the fuel pump and turn on the ignition:
- the pressure is low but stable - this means the RTD is faulty and is releasing pressure too intensely.
If the pressure in the fuel rail is within normal limits, we look for the causes of engine malfunctions elsewhere.
Keywords: power system Lada Granta | power supply system for Lada Kalina | power supply system for Lada Priora | power supply system for Lada Largus | 4x4 power system | power supply system for Lada Vesta | power system lada xray | Lada Granta engine | Lada Kalina engine | Lada Priora engine | Lada Largus engine | 4x4 engine | Lada Vesta engine | lada xray engine | Niva power system | Niva engine | universal article
0 0 0 0 0 0
Share on social networks:
Spark Plug Inspection
If the spark plugs are wet, then gasoline flows. Dry? In this case, you need to check the signal at the harness connector of the mechanical liquid or gas atomizer (injector) with a probe (as shown in photo 6).
If the price of a new set of injectors is slightly higher than flushing, then you should choose a replacement. Injectors also experience age-related problems. Also read:
TIPS THAT MAY BE USEFUL WHEN MEASUREING PRESSURE
- When purchasing a measuring device, you should not take a pressure gauge with a large upper pressure limit (there are pressure gauges designed for 16, 25 kg/cm² and higher). In this case, the accuracy of the device readings will be insufficient, with a large error.
- When relieving pressure in the ramp, you need to stock up on rags and also cover the generator with a rag so that gasoline does not get on it.
- When tightening the pressure gauge fitting, it is advisable to wrap a little tow on the threaded connection, which is used when carrying out plumbing work. The tow will create a tight connection and prevent gasoline from leaking while the engine is running.
Replacement
Replacing a fuel pump with a new one requires careful selection of the manufacturer; each pump has its own performance. The absolute leader in this area is BOSCH.
To replace or remove for repair the VAZ 2110 fuel pump we will need: a 17mm wrench, depending on the modification, a 10mm socket, pliers, a flat screwdriver. We remove the rear seat, it is advisable to unscrew the gas tank cap to relieve excess pressure in the system. Disconnect the plastic pump power terminal.
Depending on the modification, we remove the fuel supply and return hoses, or, by pressing the spring clip and pulling the hose, disconnect it from the fuel pump housing. In the second option, use a 17mm wrench to unscrew both fittings and disconnect the tubes.
In both cases, it is necessary to disconnect carefully, since the system is under pressure and when disconnected, the pressure will be released from the injector and a small amount of fuel will leak. If the performance of the old fuel pump is small, there will be no pressure in the system.
Unscrew the 8 nuts from the studs using a 10mm socket and remove the retaining ring with the seal. Carefully pull out the VAZ 2110 fuel pump housing at a slight angle so as not to damage the fuel level sensor; repairing it is unlikely. Using a screwdriver and pliers, remove the lower part of the fuel pump housing and remove the connectors and hoses from the pump. We dismantle the pump.
Assembly is carried out in reverse order. By the way, the original BOSCH fuel pump comes with a mesh. The new fuel pump has high performance, so after replacing it, when you turn on the ignition several times, there will be extraneous sounds when the system is pumped.
Breakdowns
The following signs indicate that the sensor is broken and not working properly:
- a sharp increase in fuel consumption;
- unstable operation of the power unit, it stalls at idle, despite the serviceability of all systems and a sufficient fuel level;
- drop in engine power, feeling of lack of it;
- when driving, the speed disappears for a while;
- increased level of emissions from the exhaust system;
- high concentration of CO and CH in the exhaust;
- too high or, conversely, low crankshaft speeds;
- the engine starts with great difficulty, especially if the car has been standing for some time;
- poor response to the gas pedal.
When to change the fuel filter on Priora
As experts advise, you should not wait for the moment when various malfunctions begin to appear in the operation of the Lada Priora with 16 valves, which will certainly lead to the replacement of the cleaning element. It should be taken into account that the filter itself is not expensive at all, and replacing the fuel filter is quite possible even for a person who has no experience in this matter, the main thing is to know where this element is located and follow the replacement instructions. It is best for yourself to set the interval between filter replacements at around 10 thousand km. This is the best option. However, we list the signs that already indicate that it is time to change the filter element:
- The electric fuel pump begins to make a lot of noise. While driving, you are unlikely to hear this noise, but if the 16 valve engine is idling, you may notice a high-pitched buzzing noise. This indicates that the pump is working under increased load.
- So-called failures sometimes occur in the operation of the engine, this is especially felt when acceleration occurs. The reason for this is a clogged cleaning element. Due to a clogged filter, it also happens that the engine stalls, and then it becomes difficult to start.
If you identify such signs, then your Lada Priora needs to replace the fuel filter. A clogged filter always resists the flow of fuel, plus it allows particles of debris to pass through it directly into the injector nozzles. Already there, all this debris settles on the surface and a film is formed from the dirt.
If you clean the injector, the injectors will begin to leak. Most likely, many car owners of the domestic Lada Priora with a 16-valve power unit noticed that after ultrasonic cleaning, the “engine” begins to work worse. And all this is a consequence of the fact that the fuel filter element was not replaced in a timely manner.
Replacing the Priora cabin filter
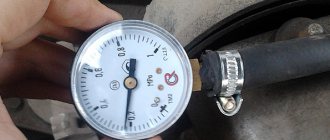
Measuring pressure using improvised means
Homemade design for measuring pressure in the fuel rail using a conventional tire pressure gauge
It’s easy to measure the pressure using available tools; you just need to have a regular tire pressure gauge on hand (which is used to monitor tire pressure - approx.). All you have to do is follow our instructions exactly. We will tell you how to carry out this operation correctly, and what the correct pressure should be in the fuel rail of the VAZ-2112.