For normal engine operation, timely supply of fuel at the required pressure is required. If interruptions or vibrations occur in the engine, it begins to “trouble”, very often this is due to the supply of fuel to the combustion chambers. One of the main tests that will help identify and fix the problem is measuring the pressure in the fuel rail. In the service, such diagnostics cost at least 900 rubles, but in order not to waste money and time, you can do everything yourself.
What is a fuel rail
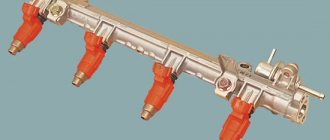
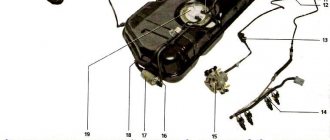
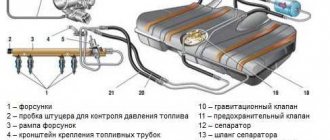
A fuel rail is a special hollow rail through which fuel passes, being distributed through smaller diameter pipes and then through injectors before being supplied to the combustion chambers. This structural element is installed on both diesel and gasoline engines with an injector. That is, it is found in every modern engine.
The fuel rail is located on the intake manifold and is securely attached to the block. Since its operation requires high fuel pressure in the fuel system, it is made of high-quality, durable and corrosion-resistant steel. A fuel pressure regulator is also installed here, which holds it when the ignition is on but the engine is not running. This is necessary for the timely supply of fuel at startup.
When should measurements be taken?
The operation of the power system is structured as follows:
- An electric fuel pump located in the tank pumps fuel along the line into the fuel rail and further to the injectors.
- The regulator limits the gasoline pressure at a certain level, releasing excess into the tank through the return pipeline.
- The injector mixes fuel with air, then the mixture is directed to the nozzles, which open at the command of the controller.
When the wear of the regulator (abbreviated as RTD), pump or injectors reaches a critical level, the pressure in the gasoline circuit will change towards a decrease or increase. There are 2 possible scenarios: there is not enough fuel mixture for normal engine operation, or there is an excess of it - the spark plugs are literally flooded with fuel.
In both cases, checking the pressure in the fuel rail located next to the cylinder head will help identify the problem. The element is a manifold with branches for injectors, to which the main gasoline line is connected.
The fuel pressure in the manifold should be measured if the following symptoms occur:
- the car accelerates poorly, after sharply pressing the accelerator pedal, jerking and deceleration are felt;
- the engine of a loaded car “does not pull” and starts poorly when cold;
- shots are periodically heard in the exhaust manifold;
- a warm engine does not start after a short period of parking (especially in summer); the starter needs to be turned for 20–40 seconds.
The first two signs indicate a clear lack of gasoline, resulting from a drop in pressure in the ramp. The third case is unburnt fuel entering the exhaust manifold with subsequent combustion (a popping sound is heard). The fourth symptom indicates leaking injectors when the cylinders are filled with pure gasoline during parking. Until the pistons release excess fuel, the engine will not start.
When is it necessary to check the fuel pressure in the rail?
There are several signs that indicate problems with the fuel system:
- Increased fuel consumption in all operating modes.
- Unstable operation at idle speed, the engine may often stall, especially after sharply pressing the gas pedal.
- All cylinders do not start - the engine “troubles”.
- Long-term starting after inactivity due to reduced pressure in the injectors.
- The intensity and toxicity of the exhaust increases.
Similar symptoms often occur with other breakdowns, but before making more complex and expensive diagnostics, it makes sense to check the fuel pressure in the rail yourself. If it is low, you need to react immediately, identifying the malfunction.
Checking individual elements
When measuring the pressure in the fuel rail shows a deviation from the norm, the following reasons must be considered:
- the electric fuel pump is unable to develop the required performance;
- the regulator has failed, causing the gasoline pressure in the circuit to decrease or increase above normal;
- the fine filter is completely clogged, preventing the normal passage of fuel;
- Worn injector valves leak – the engine “floods” with fuel.
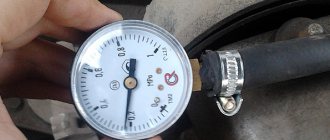
One way to check the fuel pump is to press the return hose located in the engine compartment with pliers. When the return line is blocked, the pressure gauge should show at least 5 Bar, with a new pump - 6 Bar. A pressure of 4 bar is critically low. Since the above method does not give an absolutely accurate result and is not applicable to all car models, it is advisable to check the fuel pump by directly connecting a pressure gauge. Other elements of the system should be excluded - pipelines, fine filter and regulator. Remove the back seat of the car, get to the unit and connect the meter directly to the outlet fitting.
If the readings on the ramp and on the pump fitting are equally low, change the pumping unit. Otherwise, the problem needs to be looked for elsewhere, following the algorithm:
- Purge the fuel line and change the filter, then test again.
- Reconnect the pressure gauge to the ramp, start the engine and remove the vacuum pipe (coming from the suction manifold) from the RTD fitting. If the pressure does not change, install a new regulator.
- To make sure that the injectors are working properly, you need to measure and compare two indicators: the pressure on the manifold with the return hose pinched and the maximum pressure created by the pump when connected directly. If the second value is much higher, part of the pressure is lost at the injectors.
If you find problems with loss of pressure on the manifold itself, remove the ramp and check each injector separately. Faulty parts cannot be replaced one by one - you will have to buy and install a complete set. The easiest way to check injectors for leakage is to test them in operation together with the manifold. Remove the ramp without disconnecting the fuel line, place a rag and turn on the ignition. If the injector valves are worn out and lose their tightness, gasoline will begin to drip from them. The working elements should be checked again - with the return hose crushed.
A device for measuring pressure
The main part of the device for measuring pressure is a liquid pressure gauge with a measurement limit of no more than 8 atmospheres. It costs 300-400 rubles. Next, you will need fuel pipes of a suitable size, possibly from a VAZ, a tee, a set of clamps and quick-release fittings that can be removed on old fuel pumps.
If desired, you can buy a special kit that can be used to measure pressure in the fuel system. It works on the same principles, but will cost slightly more than a homemade assembly. Its advantage is that the set includes several sets of fittings for various fuel supply systems, and the price of the device depends on this.
Fuel pressure regulator repair
After the diagnostics of the system is completed and the sealing ring is inspected, the umbrella is unscrewed from the fitting. You can unscrew it using the metal valve cap. The pressure gauge hose is then connected to the fitting, then the entire structure is secured using clamps. Pressure measurements are carried out only when the engine is running. Standard pressure readings should be 2.9-3.3 kg/cm2. Then the hose is carefully disconnected from the fuel pressure regulator, and the pressure gauge readings are recorded: the pressure should increase to 70 kPa from 20 kPa.
The fuel pressure regulator is changed if the readings remain too low or zero. Replacing this part is not difficult: you can do it yourself in a regular garage. Before starting the procedure, all pressure is released from the engine power system. To do this, unscrew the nut securing the fuel pipe, after which the bolts that secure the regulator itself to the fuel rail on most cars with injection engines are unscrewed.
Subsequently, the regulator fitting is carefully removed from the hole in the fuel rail, after which the RTD is completely dismantled. Before this, the fuel pipe is completely disconnected. The last stage is the installation of a new or working regulator into the ramp, after which the functionality and serviceability of the entire fuel system is checked using a pressure gauge.
Before installing a new fuel pressure regulator, experts recommend lubricating the O-rings with gasoline: this will make installation of the new part easier. A similar procedure is performed when replacing the o-rings themselves.
Measuring process
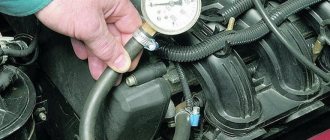
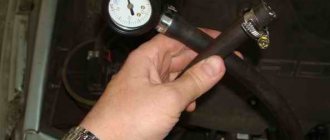
Before starting the measurement, you need to turn off the engine and cover the place where the ramp is connected to the fitting with a rag, which will quickly absorb the gasoline that spills out when disconnected. In this case, you need to be prepared for the fact that the fuel may splash out, since it is under residual pressure.
After disconnecting the fitting, you need to insert the device into the resulting gap, after which the reliability of the connection is checked. In this case, the pressure gauge will show zero pressure - this is normal, since the tightness of the fuel line has been broken. Only then can you check the pressure in the fuel rail.
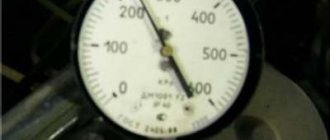
After installing the device, the ignition is turned on, the pump begins to pump fuel and the pressure gauge shows a certain pressure. In this case, the established value should not decrease, remaining stable in the region of 2.5-4 atmospheres. At the next stage, the engine starts, the pressure of the fuel pump increases by several tenths of an atmosphere, which is reflected on the pressure gauge. After stopping the engine, the pressure should return to the previous value, but not drop to zero.
If, when you disconnect the fitting before installing the device, the pipe is empty, this indicates reduced pressure, which is the first sign of problems with the fuel system. This indicates a breakdown of the pressure regulator. Another sign of failure of this unit is a drop in pressure shortly after turning on the ignition, as soon as the fuel pump stops pumping fuel into the system.
After starting the engine, the pressure can be stable, since the pressure regulator does not play any role in this case. The regulator needs to be replaced and can be done at little cost. If the engine is unstable and the pressure decreases as the speed increases, the problem is in the fuel pump.
Video: Measuring the pressure in the fuel system
Measuring devices
To check the pressure of the fuel pump with your own hands, you need to prepare a set of simple devices:
- a pressure gauge designed for a maximum pressure of 10 Bar (1 MPa), a suitable device for checking tires;
- gasoline hose with an internal diameter of 8 mm;
- a cap for unscrewing spool valves from wheel valves;
- clamping clamps 10–15 mm – 2 pcs.
To take measurements at other points in the fuel supply circuit, you will need homemade adapters to connect a gasoline hose with a pressure gauge. If the line is assembled with quick-release plastic connections, you need to buy one such clamp with a fitting. To connect to a threaded joint, purchase the appropriate tube with nuts and cut it into 2 parts. From tools and accessories you will need:
- pliers;
- screwdriver;
- cut plastic bottle of small capacity (up to 1 liter);
- rags.
Connecting the pressure gauge and measuring the gasoline rail is carried out in any convenient place - an open area, a garage or on an overpass. If you need to check the fuel pump itself, you need to prepare a standard set of tools for disassembling the unit located under the rear seat of the car. To replace the fine fuel filter, the car will have to be driven into an inspection ditch.
What are the causes of pressure drop in the fuel system?
A drop in fuel pressure in the system is one of the signs that its components are failing. After this, additional diagnostics will be required to help identify the problem and replace the part. The main reasons for the drop in pressure in the fuel line:
- damage or wear of the fuel hose or rubber seals;
- nozzles do not hold;
- the fuel pump is worn out;
- pressure regulator failure.
Despite certain discomfort, for example, the car will start up worse, accelerate less, or smoke during operation, it will still be possible to drive it. But the fuel pump will already work in extreme conditions, since the sensors will require to maintain the nominal pressure and will wear out faster. As a result, it will fail. If the problem is identified in a timely manner, you can limit yourself to simply replacing the pipe, seal and fuel pressure regulator.
Thus, by making a simple device with your own hands, you can significantly extend the service life of the fuel pump and injectors, promptly identifying problems that lead to a drop in pressure in the fuel system. This will significantly reduce the cost of operating the car.
Seal
Electronic circuit for regulating fuel pressure
The fuel pressure in the system is adjusted using an electronic circuit, the design of which does not imply the presence of a mechanical regulator. The pressure in such systems is controlled by an electric fuel pump. The electronic control system installed in it records the voltage and regulates the volume of supplied fuel. The advantages of using a fuel pressure regulator sensor are maximum savings and reduced fuel heating.
Only a strictly limited amount of fuel is supplied to the engine injectors, necessary for the selected operating mode of the engine and the specific conditions of its operation. Excess pressure does not rise to a critical level due to the presence of a relief valve.
How to check and adjust the pressure of the Priora fuel pump
Normal pressure of the Priora fuel pump is necessary for the process of supplying the combustible mixture to the carburetor and its normal spraying through the nozzles. The slightest disruption in the operation of this system leads to the fact that either an excessively saturated or lean mixture is supplied to the combustion chamber, which is why the engine operates abnormally. How to check the fuel pump pressure, and what should be done if it is abnormal?
Checking the fuel pump pressure
The first thing to do is to specifically check the operation of the pump. To do this, just turn the ignition key not to the extreme position and listen to whether the electric fuel pump turns on (and this is exactly the variation that is installed in the Lada Priora car). If you hear a noise for a few seconds, followed by a click, everything is fine.
Using a pressure gauge, the check is performed on the ramp - this is where the protective valve cap is hidden, which does not allow air to get in, but presses the fuel out with pressure. The first step is to unscrew the cap and check whether the rubber in it is broken - this may be the main reason for the inoperability of the fuel pump. If it is damaged, it is better to completely replace it; fortunately, it is cheap. Then the spool is twisted. Next, a pressure gauge is connected to the outlet of the safety valve from the pump. Normal pressure is in the range of 380-400 kPa. If it is lower, then either the pump has failed or there is a blockage in the system. If it is more, then it is quite possible that the internal pressure gauge of the fuel pump is faulty and it is simply pumping fuel excessively to the carburetor. Replacing it is easy.
Different measuring methods
In addition to measuring against the wall, there are many other ways to measure yourself. One of the options for checking the fuel supercharger is the “plug” diagnosis. In this case, the return line is clamped for two seconds, the engine starts, and the pressure reading is taken.
Another testing option. The speed of the power plant increases to three thousand revolutions per minute. At the same time, you need to monitor the instrument readings. If the pressure drops to 0, this is a sign of a “dead” pump.
The pressure on the ramp is measured as follows:
- fum tape is wound around the pipe;
- the device hose is reinforced with a clamp (if homemade);
- a rag is placed on nearby parts to prevent fuel from spilling (especially carefully you need to close the generating device in order to avoid a fire hazard in the engine space);
- there is a cap on the fuel rail that needs to be unscrewed;
- access to the hole with the nipple is opened - the latter is unscrewed with a cap from the car wheel;
- To prevent gasoline from splashing too much, it is necessary to release the pressure in the vehicle in advance;
- the end of the meter hose is threaded into the ramp hole and is also secured with a clamp;
- The rag is removed, the engine starts, and readings are taken.
Article on the topic: Gasket for the fuel pump: which is better
On a vehicle without return.
- It is necessary to measure the pressure at the outlet of the fuel pump module (located on the fuel tank). For measurements, a hose with a diameter of eight millimeters is suitable, which must be resistant to gasoline. An ordinary pressure gauge is suitable as a meter.
- The original hose is removed from the pressure gauge and an 8 mm one is inserted. Pressure readings are taken, which should be within 5-7 atm.
Measurements are made in different ways:
- with the ignition on, watch how much the scale needle jumps;
- measurements are carried out with the RTD (fuel sensor) hose removed;
- separate idle pressure test;
- check with a pinched return hose.
How to measure?
- Release residual pressure in the fuel line. Remove the fuel pump fuse, start the engine and wait until it stops. If this is not done, when the standard hoses are disconnected, gasoline will spray throughout the engine compartment. To avoid increasing the fire hazard, cover the hose disconnection area with a rag that will absorb gasoline.
- Connect a pressure measuring device to the gap in the standard line.
- Turn on the ignition. The pressure gauge needle should rise rapidly and stop in the range of 2.8-4 atm.
- Turn off the ignition. If after turning off the pressure immediately drops, the RTD or the fuel pump fuel return valve is faulty.
- Start the engine. The pressure in the rack must be maintained at a given level in all modes of engine operation. If the car jerks, loses power, stalls and stalls when hot, allow the engine to warm up before taking measurements. If a drop in pressure is observed at the time of symptoms, it means that the cause is indeed in the nutritional system.
How to check the pressure in the fuel rail with your own hands Several good ways
Before taking measurements, we visually check the fuel system for leaks and see if all the clamps are tightened well. If there is the slightest depressurization, you no longer have to rely on the accuracy of the readings;
Turn off the ignition and open the hood. We find the ramp; Removing the pressure fitting plug
We take the spool and unscrew the nipple (attention: when unscrewing the nipple, splashes from residual pressure are possible, so you need to prepare a rag and a bowl just in case); Pull the hose onto the fitting and secure it with a clamp; We connect the purchased pressure gauge to the hose on the other side.
- We take pressure gauge readings in four positions;
- When you turn the key, trying to start. Readings are approximately 3 atmospheres;
- With the engine running at idle. It should show about 2.5 or slightly higher;
- Gas pedal. In this case, the readings are approximately 3 bar, and then drop to 2.5;
- Try squeezing the drain hose. In this case, if the ramp is working properly, the pressure should jump to 7 or even 8 bar.
AutoFlit.ru
Preparatory work
- We take a pre-prepared pressure gauge, and to prevent fuel spills and air leakage, we wrap flax or fum tape around the tip.
- We are preparing a hose with a maximum internal diameter of 9 millimeters, and clamps will be needed to secure them.
- We place the prepared rags on the engine in such a way that the hose and pressure gauge fixed on it cannot roll off the surface. This is done to prevent excess fuel from spilling over the surface of the engine.
- We wrap flax or tape around the pressure gauge, then fix the hose on it and tighten everything with a clamp.
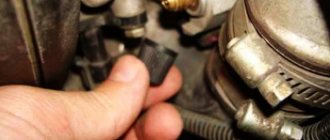
- On the ramp, unscrew the spool valve from the nipple (in this case, fuel splashes are possible due to the presence of residual pressure - approx.).
A regular wheel cap came in handy.
We put a hose with a pressure gauge on the ramp connections and secure everything with a clamp.
Pressure gauge with pipe assembly.
We place the pressure gauge on a previously prepared rag, and the preparatory work can be considered completed.
Measurement procedure
Before you start working, you can try to relieve the pressure in the fuel system. To do this, remove the fuel pump fuse (which is located on the right side of the panel, under the front passenger’s left foot - approx.). Where 3 relays and 3 fuses are located. In the photo below it is located under the number “5”. After removing the fuse, turn on the ignition and check by ear that the fuel pump is not pumping. We start the car and wait for the engine to stall.
- After everything is ready, we check the already attached end of the pressure gauge with the hose for a secure connection.
- Next, start the engine and look at the readings that appear.
Thus, we diagnose the results that appear and compare them with the results of the norm.
After all the work has been done, unscrew the hose with the pressure gauge, screw in the spool and return everything to its original state.
Note!
The peculiarity of measuring pressure using a pressure gauge is such that its initial value on the scale has a certain inaccuracy. That is, when the air analogue has a measurement period of 15-20 atmospheres, and for fuel control the required maximum value is 5-7 atmospheres, then all measurements taken will have an error equal to the initial values on the device. Therefore, pressure testing should be carried out on a pressure gauge with maximum values of up to 8 atmospheres.
We measure the pressure in the system without a check valve
If it happens that your engine does not have a check valve, then you need to know that in such a ramp there is a constant pressure of 3.6 to 4.0 atmospheres. But the order of measurements in general is completely similar to what is described above.
After reading this article, you can easily take measurements in the fuel rail and compare the results with standard indicators of serviceability in the fuel system.
Signs of sensor failure
In all cars produced after 2000, the RTD is integrated into the engine control unit and in case of any malfunction, a “Check” will light up on the dashboard. There are old diesel engines that are equipped with mechanical regulators; diagnostics of the elements is carried out as planned or after a malfunction of the internal combustion engine occurs. Characteristic symptoms of a faulty sensor:
- In addition to the “Check Engine” signal, the following error codes appear: P0190-P0194.
- A sharp decrease in internal combustion engine power, loss of traction, is often detected during overtaking; the car does not have the power to dynamically accelerate even up to 120 km/h.
- Excessive fuel consumption.
- The car starts poorly, regardless of whether the engine is warmed up or not.
- Diesel internal combustion engines are characterized by the appearance of dips at high speeds, when the engine does not respond to speed reduction.
Using a pressure gauge
To carry out the measurement procedure, we need a special tape, which is used by plumbers to seal joints (thumbka), or construction flax. The pressure gauge itself is a measuring device with a pipe; it is on this pipe that tape or flax is wound.
The pipe must have a diameter of 9 mm
. To ensure fire safety, the generator must be covered with something. Next you need to get to the fuel rail. The location of the ramp can be determined from the technical instructions for the machine.
The ramp is usually closed with a special plastic cap that must be unscrewed. Under the cap you will see a wheel nipple that looks like it. You can remove the nipple itself using the same tools that are suitable for working with wheels. Remember, when you unscrew this part of the ramp, gasoline will flow out due to pressure - prepare for this.
To relieve the total pressure in the engine
, you will need to remove the fuse for the fuel pump; it is located on the general fuse panel (its more precise location should also be clarified in the instructions for the car, section “electrics”). After which the car starts, and because... the fuel pump does not work, the engine will soon stall.
What devices are used
Converted tire pressure gauge
Several instruments can serve as devices for taking pressure readings.
- A special device purchased from an auto parts store. It comes complete with an adapter, drain hose and pressure gauge. Costs about 1.5 thousand rubles.
- Converted tire pressure gauge. The instrument scale and tube are subject to modification. As you know, the air pressure gauge shows a value of up to 20 atm, and the fuel measurement limit is around 5-7 atm. For this reason, reading errors may occur, and the device is modified to take this into account. Regarding the tube: you need to change it to a gas-resistant version.
What should be the pump pressure on a VAZ
The pressure created by the electric pump should vary within 5-7 atm. As a rule, the fuel pump is tested “into the wall”. In other words, the net pressure developed by the fuel pump is measured.
- As a rule, if the readings are in the region of three atm, this is evidence of problems with the engine of the car, which cannot keep up with the powerful fuel supercharger and is “stupid.”
- If the pressure is in the four atm zone, it’s time to change the pump, although it may last for several tens of thousands of kilometers.
- The condition of a working pump should be within five or seven atm.