Error P0141 is an OBD II code indicating a failure of the heater of the second oxygen sensor (OS), installed after the catalytic converter. The first sensor is characterized by error code p0135.
It manifests itself by “swimming” speed at idle on a cold engine and an increase in fuel consumption. When the error is detected again, the Check Engine light comes on.
It can appear on any car, but more often it occurs on VAZ, Toyota, Renault, Opel Astra, Chevrolet Cruze, Ford, VW, Honda, Gazelle or Mitsubishi models.
Why does it occur
Modern cars have two oxygen sensors: one installed before the catalytic converter, and the second after.
Let's look at the features of each device:
- DK1 is a sensor installed upstream of the catalyst. Controls the amount of O2 in the engine exhaust. The information is sent to the control unit and used for further preparation of the combustible mixture. The principle of operation is based on comparing the volume of oxygen in the exhaust gases with its amount in the surrounding air. Taking into account the changes made, a certain voltage is created and directed to the controller. Subsequently, the ECU ensures that the required amount of fuel is supplied to the combustion chamber.
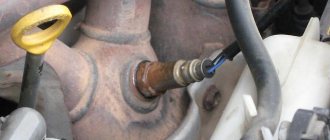
- DK2 - sensor installed after the catalyst. Used to check the efficient operation of the device due to the O2 content in the exhaust gases after cleaning. If the catalyst does not perform its functions, then oxygen disappears from the exhaust gases as it is completely absorbed as a result of the latter’s chemical reaction with harmful substances. In this case, the ECU receives an increased voltage signal from the sensor.
In addition to lambda probes, other monitoring devices can be mounted in the exhaust tract: exhaust gas (exhaust gas) sensors, nitrogen oxides, etc.
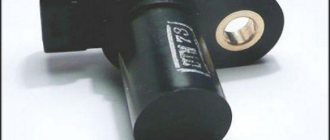
New cars are equipped with heated oxygen sensors, one of the elements of which is a heater. Its task is to warm the device to the desired temperature.
This, in turn, helps the control unit process commands faster and make timely decisions to change the composition of the air-fuel mixture or reduce emissions.
The heater starts working when the engine starts, and the control unit monitors the electrical circuit and activates the Check light when a break occurs in it or other problems occur.
The occurrence of error P 0141 indicates a breakdown of such a heater in DK2. The code with funny characteristics is P 0161. It indicates a breakdown of the heater of the second lambda probe and problems in the electrical circuit.
Failures in the idle speed system (IAC) and ESC
- P0500 - speed sensor is broken.
- P0506 - very low engine speed at idle.
- P0507 - too high speed at idle.
- P0511 - the XX regulator network is faulty.
- P0560 - BS voltage is below the minimum threshold.
- P0562 - very low voltage in the BS.
- P0563 - very high voltage in the BS.
- P0601 - ROM checksum error.
- P0615 - the wires of the additional starter relay are broken.
- P0616 - the same wires are shorted to ground.
- P0617 - they shorted at the BS.
- P0627 - the fuel pump relay wires are broken.
- P0628 - the same wires are shorted to ground.
- P0629 - they shorted it to the BS.
- P0645 - break in the wiring of the air conditioning compressor clutch relay.
- P0646 - the same wiring has shorted to ground.
- P0647 - she shorted to BS.
- P0650 - Malfunction indicator light circuit does not operate.
- P0654 - Tachometer control circuit is faulty.
- P0685 - the main relay electrical wire is broken.
- P0686 - the same electrical wire has shorted to ground.
- P0687 - he shorted it to the BS.
- P0691 - the electrical wiring of the fan control relay is shorted to ground.
- P0692 - the same wiring has shorted to the BS.
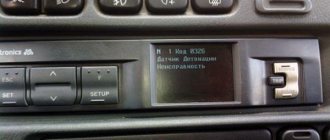
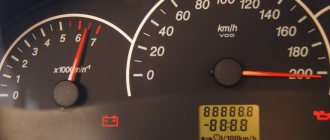
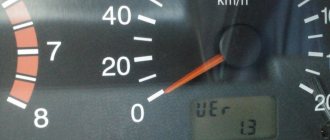
So, when self-diagnosis is carried out and error 4 lights up on the panel, then most likely the car has a problem with the coolant temperature sensor. Many people immediately ask the question “Which sensor should I change?”, but first you need to find out what exactly the problem is.
Note that in order to start self-diagnosis, you need to press and hold the daily mileage reset button + turn on the ignition. After a few seconds, the on-board computer displays an error code.
It is noteworthy that codes in different firmware versions may indicate different problems. Therefore, we recommend that you stock up on an up-to-date reference book. In our case, the software version is 1.0.
How other error codes are deciphered:
- code 2 indicates that there is high voltage in the on-board network;
- code 3 indicates a fuel level sensor error;
- error number 5 indicates incorrect operation of the outside temperature sensor;
- code 6 is engine overheating;
- code 8 - problems with the brake system;
- error number 9 indicates that the battery is discharged;
- P0441 - high or low air flow through the valve;
- P0443 - faulty canister purge valve control circuit;
- P0480 - cooling fan relay failure No. 1;
- P0481 - failure of the cooling fan relay No. 2;
- P0500 - incorrect vehicle speed sensor signal;
- P0503 - intermittent car speed sensor signal;
- P0506 - low idle speed if the idle speed control is blocked;
- P0507 - high idle speed when the idle speed control is locked.
You can get acquainted with all error codes in more detail if you purchase a special book or on the official website of the manufacturer.
Common reasons
There are several breakdowns that could lead to such a malfunction:
- Deterioration of the contact connection in the supply block of the oxygen sensor.
- Damage to the DC heater coil.
- Installation of an oxygen sensor of the wrong model.
- Problems with the ground wire in the DC heating circuit.
- Break in the supply wire in the lambda probe heating circuit.
- High resistance of the heating element.
- Open circuit in the heater circuit.
- Damage to the wire at the contact connection.
- Lack of contact due to dirt getting inside.
Deciphering faults in the fuel and air systems
- P0030 - the oxygen sensor heater wire to the exhaust gas converter has broken;
- P0031 - the same electrical wire has shorted to ground;
- P0032 - the same wire has shorted to the on-board network (BS);
- P0036 - the wiring of the oxygen sensor heater is broken, after the converter;
- P0037 - the same wiring has shorted to ground;
- P0038 - it has shorted to BS;
- P0102 - weak signal in the mass air flow sensor network;
- P0103 - very strong signal in the network of this device;
- P0112 - weak signal in the air temperature sensor network;
- P0113 - very strong signal in the network of the same device;
- P0116 - antifreeze temperature sensor signal is out of operating range;
- P0117 - poor signal from the antifreeze temperature sensor network;
- P0118 - very strong signal from the antifreeze temperature sensor;
P0122 - poor signal in the throttle position sensor circuit;
P0123 - very strong signal in the same circuit; P0130 - the oxygen sensor before the converter does not work; P0131 - weak outgoing signal on the network of this device; P0132 - signal too strong on the same network; P0133 - slow response to changes in mixture quality in the network of the same device; P0134 - oxygen sensor circuit inactive; P0136 - the oxygen sensor after the converter is broken; P0137 - poor signal in the circuit of this device; P0138 - signal too strong in the same circuit; P0140 - the same sensor circuit is inactive; P0141 - the oxygen sensor heater after the converter is broken; P0171 - there is a lot of air in the fuel mixture; P0172 - there is a lot of gasoline in the fuel mixture; P0201 - injector wire No. 1 is broken; P0202 - injector wire No. 2 is broken; P0203 - injector wire No. 3 is broken; P0204 - injector wire No. 4 is broken; P0217 - engine overheated; P0230 - failure in the electric fuel pump relay network;
Here we are looking for an electrical problem that has arisen.
P0261 - the injector circuit of cylinder No. 1 has shorted to ground;
P0263 - injector driver No. 1 does not work; P0264 - the injector circuit of cylinder No. 2 has shorted to ground; P0266 - injector driver No. 2 does not work; P0267 - injector circuit No. 3 has shorted to ground; P0269 - injector driver No. 3 does not work; P0270 - injector circuit No. 4 has shorted to ground; P0262 - the injector circuit of cylinder No. 1 is shorted to the BS; P0265 - injector circuit No. 2 is shorted to BS; P0268 - injector circuit No. 3 is shorted to BS; P0271 - injector circuit No. 4 is shorted to BS;
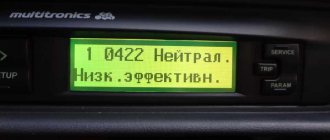
P0338 - the network of the same device is interrupted; P0342 - weak signal in the phase sensor network; P0343 - the signal in the network of this device is too high; P0346 - the readings of the same device are out of the permissible limit; P0351 - break in the wiring of the ignition coil of cylinder No. 1; P0352 - open circuit of coil No. 2; P0353 - break in the wiring of coil No. 3; P0354 - open circuit of coil No. 4; P0363 - lack of spark and fuel supply in faulty cylinders; P0422 - the converter is broken; P0441 - incorrect air flow through the canister purge valve; P0444 - the canister valve wire is broken; P0445 - it has shorted to ground or BS; P0480 - open circuit in fan relay wiring;
Diagnostics
To determine the exact cause of the breakdown, it is necessary to carry out a number of diagnostic measures.
Take the following steps:
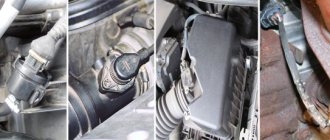
- Inspect connectors and wiring for contamination and damage. Pay attention to DK2, which is installed after the catalytic converter.
- Use a scanner to check the parameters of the oxygen sensor to monitor the condition of the heating chain.
- Make sure that the DC heater is receiving voltage.
- Check the resistance of the sensor heater and compare the resulting parameter with what was declared by the manufacturer.
Error codes associated with P0141
In addition to the main error P0141, there are also a number of codes that are associated with such a malfunction. Here you need to understand the term that is typical for the designations - Bank No. 1 and Bank No. 2.
The first refers to the part of the engine where the 1st cylinder is located, and the other is installed on the opposite side. If you have a 4-cylinder engine, there is only one bank.
For convenience, we present the errors and their features in the table.
| № p/p | Code | Type malfunctions | Bank number | Sensor no. |
| 1 | P0030 | DC heater control circuit | 1 | 1 |
| 2 | P0036 | 1 | 2 | |
| 3 | P0053 | Lambda probe heater resistance | 1 | 1 |
| 4 | P0054 | 1 | 2 | |
| 5 | P0135 | Performance of the DC heating element | 1 | 1 |
| 6 | P0141 | 1 | 2 | |
| 7 | P0050 | Oxygen Sensor Heater Control Circuit | 2 | 1 |
| 8 | P0056 | 2 | 2 | |
| 9 | P0059 | Lambda probe heater resistance | 2 | 1 |
| 10 | P0060 | 2 | 2 | |
| 11 | P0155 | Performance of the DC heating element | 2 | 1 |
| 12 | P0161 | 2 | 2 |
Diagnostic methods for Lada Xray
There are two methods for reading errors from the internal memory in the vehicle’s on-board computer:
- Self-diagnosis - on-board computer indicators can identify existing errors for the motorist. An easy process will allow you to carry out repair work without the use of specialized equipment. The main disadvantage of this method is the not entirely accurate determination of the location of the fault - the on-board computer will only determine the path to the breakdown, where the fault should be determined;
- Using a specialized scanner is not an easy process, carried out in a room prepared for diagnostics. For the purpose of productive diagnostics, it will be necessary to connect a personal computer or laptop with a program installed to detect errors to the car. As a rule, special workshops have all the necessary equipment.
How to resolve error P0141
Depending on the diagnostic results, the error can be corrected in one of the following ways:
- Clearing the ECU memory of accumulated fault codes and conducting testing for verification. There are situations when the error appears only once and subsequently does not appear.
- Installing a new lambda probe instead of a failed one.
- Repair or replacement of DC wires/connectors.
- Replacing the safety element in the oxygen sensor heating circuit.
- Installation of a lambda probe decoy.
As you can see, troubleshooting can be related not only to the wiring or contact group, but also to the sensor itself.
And here you need to understand that four wires go to the lambda probe: two to the heating circuit and another pair to supply voltage and ground.
To resolve the error, proceed in two steps.
Step #1 - Checking the Heating Circuit Wiring:
- Discard the DC connector and measure the voltage and ground of the heating element using a multimeter.
- By studying the circuit diagram for the machine, determine which contact is the power contact and which is the ground contact.
- Move the switch of the digital device to measure DC voltage - letter “V—”.
- Touch the black wire to the housing and the other to the power on the connector.
- Look at the voltage, which should be close to the parameter on the car battery. If this parameter diverges greatly, look at the diagram on the battery side to determine another fault.
- Connect the red wire of the digital device to the “+” of the battery, and the black wire to the “ground” on the connector. If everything is normal, the device should show 12 V. If this is not the case, look for a break in the wiring diagram on the ground conductor side.
Step #2 - Checking the heater:
- Prepare your multimeter and set it to measure resistance. Set the limit to 200 ohms for greater accuracy.
- Connect wires to both contacts on the sensor connector side.
- Look at the official parameters for the lambda probe and make sure that the resistance meets the manufacturer's requirements. If the parameter is higher than normal, the DC will have to be changed. The appearance of infinity on the screen indicates a broken chain. In such circumstances, the lambda probe will have to be changed or a fake installed.
On which cars is this problem most common?
The problem with code P0141 can occur on different machines, but there are always statistics on which brands this error occurs more often. Here is a list of some of them:
- Acura
- Alfa Romeo
- Audi
- BMW
- Chevrolet (Chevrolet Aveo, Cavalier, Captiva, Cruz, Lanos, Lacetti, Orlando, Epica)
- Chrysler
- Citroen (Citroen C4, C5)
- Daewoo (Daewoo Matiz, Nexia)
- Dodge (Dodge Caravan)
- Fiat (Fiat Albea, Punto, Stilo)
- Ford (Ford Maverick, Mondeo, Focus, Escape)
- Geely (Geely MK)
- Honda (Honda Accord, SRV, Stream, Civic, HR-V)
- Hover
- Hyundai (Hyundai Accent, Getz, Santa Fe, Sonata)
- Kia (Kia Rio, Sorento, Spectra, Sportage)
- Lexus (Lexus gs300, rx300)
- Lifan (Lifan Solano)
- Mazda (Mazda Millenia, Tribute)
- Mercedes (Mercedes w203, w210)
- Mitsubishi (Mitsubishi Outlander, Galant, Karisma, Colt, Lancer, Montero, Pajero)
- Nissan (Nissan Almera, Qashqai, Maxima, X-Trail)
- Opel (Opel Astra, Vectra, Zafira, Corsa, Meriva, Omega)
- Peugeot (Peugeot 107, 206, 207, 307, 308, 406, 407)
- Renault (Renault Duster, Laguna, Logan, Megan, Sandero, Scenic, Fluence)
- Skoda (Skoda Fabia)
- Subaru
- Suzuki (Suzuki Grand Vitara, Liana)
- Toyota (Toyota Avensis, Camry, Corolla, Rav4, Highlander, Harrier, Yaris)
- Volkswagen (Volkswagen Golf, Passat)
- Volvo
- Gazelle Business, Next, umz 4216
- Zaz Chance
- Lada Kalina, Largus, Niva, Priora
- UAZ
With fault code P0141, you can sometimes encounter other errors. The most common ones are: P0036, P0130, P0132, P0135, P0136, P0138, P0155, P0161, P0171, P0174, P0300, P0301, P0302, P0303, P0304, P0314, P0400, P0443, P1409.
How to place a decoy
On the Internet you can find many recommendations on what to do if an error occurs. Many recommend replacing the oxygen sensor, removing the catalytic converter and installing a blende.
But everything can be made simpler - you need to “convince” the ECU that the heating circuit is operating as usual.
To do this, take the following steps:
- Buy a resistance suitable for your car. For example, for a Honda Civic Hatchback, a 15 Ohm resistor with a power of 25 W is suitable (15 W is possible), and for a Mitsubishi Lancer - a power of 10 W, with a resistance of 30 Ohms.
- Take small brass terminal blocks from the store to make high-quality connections and avoid soldering.
- Cut the resistor into the heater circuit. Determining the installation location is not difficult. The DC uses four wires, two of which have the same color (this is heating).
- Clear the error using a scan tool and make sure it no longer appears.
Chassis Lada X Ray
The walker is not X Ray's trump card. The engineers borrowed everything that was possible from Sandero, “seasoning” the arsenal of capabilities with increased ground clearance.
Before plunging into the world of suspension malfunctions, it should be noted that in front it is represented by the expected MacPherson strut, and in the rear by its semi-independent brother. This solution has some advantages, namely:
- significantly reduces the cost of repairs;
- creates the possibility of availability of spare parts.
Roughly speaking, the chassis is made in such a way that you don’t mind driving on not very good roads. Now to the “diseases”. It is necessary to mention that all the data given below are, rather, the norm, since the operating mode of most models leaves much to be desired.
Excessive wear of CV joints
“Changing grenades for our brother is like going out for bread,” one respected compatriot once said, and it’s quite difficult to disagree with him! The hinges, which ensure the transmission of equal angular velocities, work in conjunction with the entire suspension, and it, in turn, has a “habit” of finding itself in “indecent” conditions.
Some owners claim that thanks to the selection, they found other options from foreign manufacturers that show better results. However, it is stupid to recommend this action, since if a foreign body “wedges” into Lada’s “organism”, it may respond with failure of other systems.
Noisiness
It is what it is. The walker works mercilessly, absorbing the blows of fate from our roads. Naturally, the sounds of its “struggle” with the road can be heard in the cabin (apparently, the designers decided that this was a kind of piece of boasting - they say, listen to how great the chassis works). This feature is not easy to treat - the owner will have to deal with sound insulation, which involves ripping out the interior, followed by installing everything back.