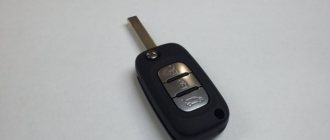
Budget segment car manufacturers rarely equip their cars with fog lights. This fate befell Vesta and X-Ray in the minimum configuration, but many owners solve this problem by buying non-original Lada Vesta PTFs.
The market for auto parts and additional equipment sells many parts from unofficial manufacturers. Their purchase and installation allows you to save money, but there may be a risk of a factory defect or poor-quality assembly, in which case it is necessary to choose equipment from trusted manufacturers with a guarantee.
Over the 5 years of production of the Lada Vesta, some models of foglights have already proven themselves well during long-term use and are in high demand among owners.
How do fog lights work?
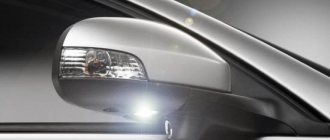
The presence of fog lights in a car gives the driver the opportunity to feel calmer while driving in poor visibility and fog. Due to the location of the PTF in the lower part of the bumper and below the level of the head light (and fog, as you know, spreads above half a meter from the road), the light passes through the curtain and is visible to other road users.
LED fog lights for Vesta. Photo source: https://www.drive2.ru/l/476399147935597172
Also, such headlights have a clear cut-off line due to their placement and the shape of the reflector, and the light-optical design has a screen of direct rays that prevents light from scattering and reflecting from small drops.
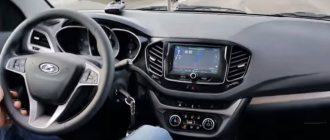
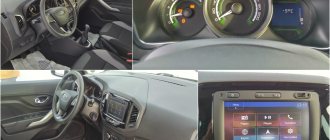
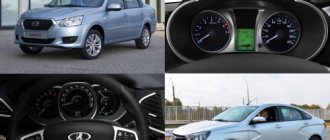
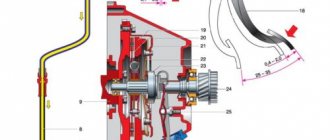
Dashboard Lada Vesta
On a Lada Vesta, the instrument cluster is very different from older Lada models. Therefore, this description will help you understand the meanings of indicators and instrument readings.
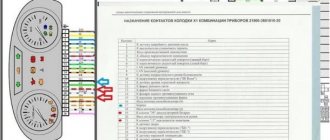
- Tachometer. Shows the engine crankshaft speed (x1000 min-1). The presence of the tachometer needle in the red scale area warns of increased engine speed. To prevent damage to the engine, its maximum speed is limited by the electronic engine management system software. Above approximately 6200 min-1 the fuel supply will be limited. Possible interruptions in engine operation and jolts in the movement of the vehicle are not a malfunction. When the rotation speed decreases, the fuel supply will resume. Also, do not allow the engine to operate when starting and while driving at an engine speed below 800 min-1. (ATTENTION! It is prohibited to operate the engine in a dangerous mode (at engine crankshaft speeds above 6200 min-1 and below 800 min-1).
- "Seat belt" warning light
- Warning light "Airbag system"
- Brake failure indicator
- "Electric power steering" warning light
- "Engine fault" indicator
- Battery indicator
- ABS warning light
- Speedometer
- Warning light "Unclosed hood"
- Signal indicator "Hazard alarm"
- Signaling device "Unclosed doors"
- Right and left turn signal indicators
- LCD indicator with functions
- Index "Coolant temperature". Operating a vehicle with a faulty warning light is prohibited. When the operating temperature of the coolant is exceeded (more than 115 °C), the indicator lights up red constantly, and a short-term intermittent buzzer sounds. Do not allow the engine to operate in overheating mode. (WARNING: Do not operate the vehicle with an overheated engine. The vehicle must be taken to a dealer to determine and correct the cause of the engine overheating.)
- Fuel level indicator and indicator
- Signal indicator "Parking lights"
- Signal indicator "Low beam headlights"
- Signal indicator "High beam headlights"
- Signal indicator "Front fog lights"
- Signal indicator "Rear fog lights"
- "ESC" indicator
- "ESC OFF" indicator
Which fog lights to choose for Vesta
Owners of Lada models: Vesta, SW Cross from 2022, X-ray are faced with the lack of standard foglights in all trim levels except Comfort Winter, Luxe and Exclusive. According to forecasts, restyled cars will also not have PTF. Owners of the “classic start” and “comfort” versions have to select and install the necessary equipment themselves. So far, no leader has been identified on the market, so the choice of model depends on the budget and specific wishes. Among the popular brands of foglights on Vesta are:
- Wesem;
- Gamma;
- Luch;
- NSP
- Valeo;
- Vestatec;
- "Osvar"
- "SeViEm" ("Sivy").
In addition to the brand, the owner needs to choose the light source of the headlights. There is no definite correct option here either, since many people prefer to install halogen lamps due to affordability, but LED LED lamps are considered more technologically advanced. Opinions agree on one thing - xenon and bi-xenon with a bi-module, installed in Vesta fog lights, not only do not work according to the standards, but also blind oncoming traffic, so their installation is prohibited by law.
There is also a choice between single-mode and dual-mode headlights, which are often represented by diode lensed PTFs. When turned on they shine with a rich white light, but when turned off and re-activated they switch to yellow diffused lighting.
How much does installation work cost?
If you don’t have enough time to install fog lights yourself, you can turn to specialists for help. An official Lada dealer carries out such work for an amount approximately equal to 60-70 thousand rubles. Of this, at least 10 thousand rubles will have to be paid to an electrician for installation. The price consists of the cost of original spare parts required for installing the PTF and complex work that will completely copy the luxury version.
Installing foglights yourself will reduce the required budget. In addition to the headlights themselves, you will need to purchase other equipment, with a total cost of at least 5,000 rubles. To summarize, we can say that installing PTF on fret 2180 without outside help is about 5 times cheaper than from an official dealer.
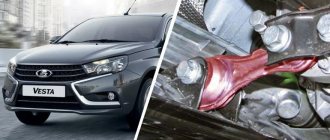
Fog lights on the Lada Vesta are an integral part of the appearance and a necessary detail. Their main purpose is to provide the driver with good visibility of the road, even in conditions such as fog, heavy rain, snowstorm, etc.
On most of the latest models of the domestic automobile industry, PTFs are not installed by the factory on all modifications, but special holes and fastenings are provided for their installation. The exception is the Lada Vesta model. Factory fog lights are not suitable for everyone. Also, the quality of their lighting is average. Therefore, many owners of this model try to replace the factory headlights with better ones.
Review of Manufacturer Prices
Lada Vesta fog lights vary in characteristics and price. Often the difference in cost can be due to the popularity of the brand, as is the case with Valeo. For information, you can refer to the site with reviews, the DiaLUCH catalog with detailed photos or videos, reviewers, for example, Kulagin. There are prices and article numbers of different PTF models:
- for PTF Wesem on Vesta, sellers ask from 1650 rubles (article number - 46100);
- Gamma – 980 (GM-FL-15432);
- "LLC Luch" - 1650 (132532123);
- NSP – 1900 (nsp07261500097r);
- Valeo – 3800 (088358);
- "Osvar" - 1940 (36020374300000);
- "SeViEm" - 1700 (261500097).
All prices indicated are approximate and are calculated for a set of 2 headlight brackets, wires and trims, chrome or plastic. It is better to find out how much the price of fog lights for Vesta will be in stores.
How much does it cost for a dealer to install fog lights for a Lada Vesta?
The installation of fog lights on a Lada Vesta by an official representative of AvtoVAZ is considered as a partial upgrade of the car’s equipment to a top-end one. Typically, such a procedure costs no less than 60 thousand rubles.
This exorbitant amount is due to the complexity of installation using the “dealer” method and the need to use original parts from AvtoVAZ. The dashboard wires alone will cost about 20 thousand rubles.
Therefore, installing it yourself will allow you to save a lot of money. The only trouble is that in this case, the car’s warranty support may be voided.
Cost of installation kit for connecting PTF
Many drivers, wanting to install additional equipment on their car, try to save money and do not turn to official dealers, but do everything themselves. To ensure that installing a PTF on a Vesta with your own hands does not turn out to be a failure, auto tuning companies or additional production companies. equipment and other components are produced in mounting kits. They include detailed instructions for proper installation and connection of headlights, wiring harnesses, connection board, standard center console switch button and power relay.
The following sets are common:
- set with article number 235816;
- “Assemble it yourself” set with active block (7ml19121801302);
- kit "DiaLUCH" (pv273-v1).
Using catalog kits helps you avoid buying counterfeits, gives you an understanding of headlights, and teaches you how to do it yourself, which can save you money.
How to turn on the fog lights on Vesta
Depending on the configuration of the Vesta, the foglights will be controlled differently. In the top version of the car, you can activate their operation by turning the ring on the left steering column switch. When you turn one notch, the headlights start working, and when you turn two, the front and rear lights start to work.
Fog lamp. Photo source: https://spares63.ru/catalog/optika_vaz/protivotumannye_fary_vaz/protivotumannye_fary_na_lada_vesta/protivotumannye_fary_na_lada_vesta_xray_original.html
In trim levels where there is no PTF in the database, owners have a choice of how to connect the PTF. The most common option is to connect via a button on the center console. For this purpose, the installation kits contain a block of buttons and a frame so that the owner himself can assemble and adjust the operation of the headlights. Another option for non-luxury versions is to buy a steering column switch assembly from the top-end Vesta.
Replacement
As practice shows, if there are lamps, then there is no need to expect any difficulties. But with LEDs everything is not so simple. If such a turn signal burns out, it must either be replaced as an assembly or repaired. It is the second option that needs to be considered in more detail.
It is worth noting that the design of the mirrors of Vesta, Kalina, Priora and Granta is the same, and therefore independent replacement of LEDs in the turn signal of the mirror of Lada Vesta and other listed models is carried out according to the same scheme.
Materials
For work carried out following the example of one of the Drive participants, known there under the nickname Rusl01 with his “Lada Vesta I'm ROBOT”, the following materials will be needed:
- Hot melt adhesive;
- Orange nail polish;
- LED strip in silicone shell.
How to adjust PTF on Vesta
A new car usually doesn't need any adjustments, but over time something goes wrong and the light hits the road unevenly. To correct this situation, the designers have provided the ability to adjust the PTF light level using an adjusting screw, accessible through a hole in the bumper. You can do this yourself by following the procedure:
- Place the car with the light on opposite the wall at a distance of about 5 meters.
- Place an assistant in the front seat or place a load weighing 70 kg.
- You need to make markings on the wall or place a screen to adjust the light.
- Cover one of the fogs with a sheet of cardboard to properly adjust the second one.
- Turn the adjusting screw through the hole in the bumper and align the upper limit of the light with the horizontal marking line.
- The same operation with the second fog.
If the adjustment is unsuccessful, you need to check the correct installation of the bumper, the housing of the fog lights and the light bulbs themselves and, if necessary, replace them.
Fuse
The very first step in diagnosing this problem is to check the fuses. The block is located on the left side of the instrument panel, under the plastic shield. You need to find three protective elements in it:
- F9(3A) – responsible for the turn signal in the left mirror;
- F18(3A) – for the right repeater;
- F12(15A) – BCM controller (body control module), responsible for the rest.
Each of them should be removed and checked for integrity. If a blown fuse is detected, it is replaced with a similar one. But it must be remembered that the protective elements do not simply burn out; there may have been a network overload or short circuit. If the situation repeats, contact the service center.
How to install fog lights on Vesta with your own hands
Replacement or initial installation of PTF on Vesta should be carried out in specialized workshops, but if it is not possible to go there, then you can do the work yourself:
- Remove the button cover on the central panel above the climate control and dismantle the board.
- Replace the board with a four-button one and install all the buttons in place, including the new one for controlling the fog lights
- Remove the bumper by unscrewing 2 screws on the fender liners, 4 screws near the wings and the same number in front of the protection below.
- Next, unscrew the 2 screws numbered and 5 under the hood, but leave one to hold the bumper.
- By removing the clips under the headlights and disconnecting the ambient temperature sensor, you can unscrew the last screw of the bumper and remove it completely.
- In place of the plugs, install the cladding assembly.
- Attach the brackets to the press washers, and the headlights themselves to the screws, but the bottom one should be shorter so as not to damage the frame.
- First install the bumper and, using a set of radio components and electrics, connect the wiring according to the formula.
- Install a square-shaped relay, pulse if desired, into the fuse block, making a tap from fuse f10.
- Finally install the bumper.
When performing these operations, inexperienced car enthusiasts may encounter a number of problems.
Why don't the lights light up?
Malfunctions that occur in the operation of side lights worry every motorist because it makes it difficult to use the car at night. After all, the traffic rules clearly state the requirements when stopping the car and turning off the ignition at night to indicate the car with illuminated side lights. Failures in the side light circuit can manifest themselves in different ways.
One of the side light bulbs does not light up. The most likely cause is a burned out light bulb. Less common problems with poor contact are oxidation or poor connection. And very rarely - a breakdown in the wiring to the contact group of this light bulb. Although rare, this also happens. If the light bulb burns out, it needs to be replaced. To do this you need:
We recommend: How to change a low beam light bulb on a VAZ 2114 – all the subtleties and nuances of the procedure
a) when replacing the marker lamp in the front headlight:
– turn off all exterior lights and open the hood
– unscrew the screws securing the plastic casing on the headlamp with inoperative headlights
– having pulled out the socket with the burnt-out light bulb, remove it and replace it with a working one, without disconnecting the block with wires
– install the cartridge and casing in place
b) when replacing the side light bulb in the rear light unit:
– turn off the lights and open the trunk
– remove the decorative upholstery and pull out the block with wires from the contact group
– squeeze the side clamps and pull out the contact panel for the rear light with the non-working bulb
– remove the burnt out lamp by pressing it and turning it counterclockwise
– install a new lighting fixture and install the panel in the reverse order
- The side lights button does not turn on (the indicator lamp on the button does not light up). The reason is mainly due to oxidized contacts, which must be cleaned and washed with alcohol by removing the key block from the socket. Fuse F10 may fail, but then the sidebar lamps on the left side should not light up. On a VAZ 2114, an oversized fuse does not blow out very often, especially since wide plastic fuses with good contacts are currently installed in the mounting block.
- Blinking when the lights are on or a weak glow of the lamps. The main reason for such manifestations is the oxidation of the contacts in the circuit. First of all, you need to check and clean the contact group in the mounting block in the fuse circuit. The same is possible in contact groups of specific side light lamps. Do not forget that the machine is operated in conditions of high humidity and oxidation is a normal physical phenomenon that must be taken into account.
- The headlight fuse is constantly on. The reason must be sought in the mounting block. Possibly bad contacts in the fuse contact group.