High-voltage vehicle armored wires require regular inspection. In the event of misfires, misfires and a decrease in power, such a check should be more detailed, and using a multimeter. A preliminary answer can be obtained without the use of tools by using one of the publicly available visual inspection methods. If you don’t know what the resistance of serviceable car HV wires should be or how else you can find out their performance, read the article.
inspecting armored wires for possible damage on average once a month . Depending on the frequency of symptoms of faulty spark plug wire armor, it is worth using different testing methods.
| Fault Frequency | Possible cause of problems with wires | Test method |
| Irregularly | Breakdown or break | Visual inspection and diagnosis without tools |
| Regularly | Increased resistance or break | Multimeter |
| Breakdown, increased resistance, break | Oscilloscope |
The easiest way to determine the location of the breakdown is in the dark or using a piece of wire - you will notice a bright spark. When checking with a multimeter in ohmmeter mode, pay attention not only to whether the device shows “1” (or infinity for an analog one) or some value, but also to how much it differs from the nominal value or varies from its length.
Wiring characteristics
In this case, a basic skill is required on how to check high-voltage wires with a multimeter. By the way, you can probably check in another way, but this is the most correct and logical. But for now let’s talk about something else, even if you realized that the explosive wires of the VAZ 2114 are dead, in any case, you will have to buy new ones.
Operating conditions are also special:
- Operating temperature varies from -60 to +110 degrees
- Resistant to oiling and other substances.
The technical specifications are as follows:
- Maximum voltage 22 kV
- Breakdown voltage minimum 40 kV
- Electrical capacity maximum 100 pFm
- Service life 8 years
GOST standards are old, from the Soviet period, but since the fourteenth ones were basically discontinued, the spare parts for them are those that remain in stock. These parameters do not quite adequately fit the Euro 2 standard, much less a higher class. Such standards require greater power and special requirements in terms of electromagnetic compatibility. But, whatever one may say, even old wiring can be adjusted to fit the engine of the fourteenth.
The main points that are needed for a competent choice of explosives are the following:
- Resistance of high voltage wires
- Breakdown voltage
- Electromagnetic force
- Price issue
After you have decided on the quality of high-voltage wires, you can master checking high-voltage ignition wires with a multimeter.
Fault indicators, primary diagnostics
The driver can draw conclusions about the probable malfunction of high-voltage wires based on the following factors:
- difficulty starting the engine, especially in wet weather;
- "triple" of the engine, which appears when cold, at idle and sometimes while driving;
- an increase in the level of radio interference in the receiving and amplification path of car radios and audio amplification equipment;
- increased fuel consumption
;
- change in color, appearance of darkened breakdown and leakage zones on them.
Typically by appearance
It is impossible to find out which one has stopped working. The simplest method of initial diagnosis is to turn them off one by one. If, when a particular high-voltage wire is disconnected, the engine operates without transformation, therefore, there is a sufficient possibility of failure of this conductor.
But, disconnecting the wires during engine operation should be done with extreme caution, using high-voltage protective equipment: a dielectric mat, high-voltage insulating gloves. Simple electric gloves have a breakdown voltage of 6.3 kilovolts, and the ignition pulse can be more than 20,000 volts.
It is also possible to check the high-voltage wire by connecting a known-good spark plug to its output, connecting its iron base to the car engine housing. The absence of a spark plug when the engine is running is an indicator of a faulty wire.
Video - how to check the ignition wires:
The presence of a breakdown in a high-voltage wire can be easily determined at night by turning off the lighting devices and starting the engine. A spark should be observed at the breakdown site.
The most reliable method of preliminary verification is to connect a new, serviceable high-voltage wire in place of the “suspected” one. For this
Skilled motorists have a long-length spare ignition wire in their own mobile repair kit (to fit any cylinder).
Wiring check
Checking high-voltage ignition wires begins with a simple diagnosis, because all of the above symptoms of problems may indicate a breakdown of other parts of the engine system or something else. For a simple check it is better to wait until dark. Then you need to expose a small section of the wire on one side and the other and close one end to the body of the car or battery, and the second is needed for maneuver: we move it along the wiring joints, plugs, and so on. When there is a hole there will be a spark immediately. The result is obvious - replacement is required. But this method is primary; it concerns direct current leakage, which is not always the reason for the non-operating state of high-voltage devices. In the case of voltage, such a number will not work.
To measure it, you need to know what resistance the high-voltage wires should have. After all, each wire from a specific manufacturer has its own resistance, technical characteristics and dimensions:
1) Tesla - 6 kOhm, it is often counterfeited, then you can squeeze out as much as 8 kOhm
2) Elephant - from 4 to 7 kOhm
3) ProSport tends to zero
4) Kargen - 0.9 kOhm
Checking high-voltage ignition wires with a multimeter
For measuring work, you need a simple multimeter, which we switch to ohmmeter mode. We measure one wire at a time, removing one by one from the cylinders from left to right and from the coil itself. The procedure is simple:
- make sure the car is turned off
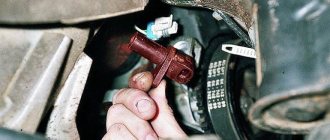
- remove the end of the wire from the fastener on the cylinder
- remove the opposite end from the ignition coil mounting
- you need to connect both ends to the multimeter
- read the readings
- write them down so as not to forget
- We do this three more times with the remaining wires
Normal resistance is numbers in the range from 3.4 to 9.8 kOhm. Of course, all this depends on the manufacturer; this parameter is printed on the rubber skin of the wire. If you have a difference with the permissible value, which varies from 2 to 4 kOhm, this is normal. But no more! If more, then the wires are not suitable for driving, they need to be changed.
We always replace wires as a set! Even if one has fallen into disrepair, and the rest are in good technical condition.
That's basically it. Now you should replace the old wires with the purchased new ones.
They break through armored wires, what does it affect?
Basic malfunctions of ignition wires
The main faults of the wires include electrical circuit breakage and current leakage.
An electrical circuit break usually occurs at the point where the metal contact of the wire is connected to the conductor, as well as to other elements of the ignition system. This happens when the wire is removed, when the wire is destroyed or oxidized, as well as when there is poor contact with the terminals of the elements in the ignition system. The place where the connections are broken heats up and sparks, which aggravates the situation and causes the core or metal contacts to burn out. Electricity leaks through contaminated wires, ignition coil, distributor cap, spark plugs, caps and damaged insulation, which contributes to the deterioration of their dielectric properties during operation.
Low temperatures increase the rigidity of high-voltage wires, which increases the possibility of damage to their insulating layer and caps. Constant vibrations from a running engine loosen the contact points, which leads to their deterioration. Rising temperatures have the greatest impact on the spark plug caps, as they are located closest to the heated engine parts. In addition, very often they become unusable when removed. Over time, dirt, dust, moisture, and secretions of fuels and lubricants, which serve as current conductors, collect on the elements of the ignition system. Leaks become even more noticeable when the insulation is damaged and in humid weather. In addition, dirt and moisture increase microcracks.
How to choose high-voltage wires - what to look for
When choosing high-voltage wires, you need to focus on the recommendations of their manufacturer, as well as the engine manufacturer. First of all, you need to study everything that is written on the package. It would be good if it indicated in Russian the models of cars or engines for which the wires were intended.
Do not rush to buy them if the packaging does not contain the manufacturer’s “coordinates” and instructions for their use. Spelling errors in captions are also a warning. There is a very common mistake in the word silicon. It should be taken into account that the international standard ISO 3808 applies to wires for cars, so all inscriptions are determined by the manufacturer.
Wire resistance is measured using a tester. But this method is not acceptable for wires with a current-carrying core wrapped around them, since due to their design features, the resistance value on the motor changes.
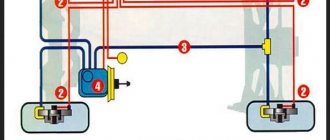
The level of interference from the vehicle's electrical equipment and from high-voltage wires is assessed using a car radio. The verification procedure can be seen in the diagram.
The insulation of the wires should not allow breakdown, therefore, when choosing it, take into account the maximum voltage that can be in the ignition system. The insulation and caps must be made of a material that retains its properties over large temperature differences, for example, silicone.
Many car enthusiasts consider car wires to be of secondary importance, and specialized publications do not pay due attention to them. The sellers also cannot say anything intelligible. Nevertheless, this detail is important and deserves attention, both when choosing and operating a car.
Briefly about the structure of conductors
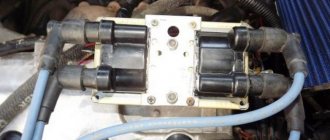
Previously, traditional explosive wires with a copper stranded core (in jargon - armored wires) were used to supply a discharge from the coil to the spark plugs. The disadvantage of such products is the gradual breaking of thin wires due to low elasticity. In modern cars, manufacturers install flexible cables with a non-metallic core made of carbon-impregnated fiberglass. The current-carrying part is wrapped in several auxiliary shells:
- polymer shielding layer;
- silicone-based internal insulation;
- frame in the form of a braid made of durable synthetics;
- external silicone insulation.
Old products with copper conductors had practically zero resistance, causing the radio installed on the car to “wheeze” from interference. Today's high-voltage wires have increased resistance, allowing them to screen out interference.
To connect to the spark plug “cradle” contact, the carbon core is brought out beyond the insulation and bent in the opposite direction. From the outside, the core is crimped with a copper terminal placed on the spark plug contact. The connection is protected from above by a dense dielectric cap. The second end of the conductor is connected to the ignition coil in a similar way.
An important advantage of the new high-voltage armored wires is elasticity and flexibility. Thanks to these qualities, the product lasts much longer than its copper predecessors. But sooner or later there comes a time when the carbon-silicon explosive wires wear out and begin to “mope.”
Typical ignition cable faults
There are 3 main problems associated with high-voltage wires:
A break or fracture of the carbon core does not always lead to complete failure of the explosive wire. Since a high voltage pulse with a nominal value of more than 20 kilovolts is applied to the spark plug, the current still “breaks through” the break point and reaches the spark plug electrodes. But the power of the spark noticeably weakens, hence problems arise with the high-quality ignition of the air-fuel mixture in the combustion chamber. In the worst case, there is no spark at all and the cylinder fails completely.
Note. Complete cylinder failure in a car is characterized by a drop in idle speed, “shaking” of the power unit and a significant decrease in power. Accordingly, gasoline consumption increases by 25%.
A similar picture is observed with weak contact of copper conductors at the joints. Due to an oxidized or poorly fitting terminal, the power of the electrical impulse is lost to overcome this obstacle, and the discharge on the spark plug electrodes weakens.
How to check high voltage ignition wires
Checking high-voltage ignition wires for breakdown is carried out in one of three ways.
- Visual inspectionVisual inspection is the easiest way to check and detect damage to the insulating layer of high-voltage wiring.
During this inspection, you need to make sure that there are no cracks, cuts or noticeable abrasions on the insulation surface. A breakdown can be determined visually by sparking. To do this, in the dark, just open the hood of the car, start the engine and turn off the lights. An insulation breakdown will be noticeable to the naked eye by sparks running through the wiring.
How to use a multimeter to check spark plugs and various car components
“Candles” How to use a multimeter to check spark plugs and various components of a car. A multimeter is a tester that allows you to check the performance of many components and assemblies in a car. This device is an indispensable assistant for every automotive electrician. How to check spark plugs with a multimeter, module, generator and other car devices? You can find the answers to these questions below.
A multimeter is a combined electrical measuring device designed to perform diagnostics and includes several functions. In particular, this device can be used as an ammeter, ohmmeter, and voltmeter. Today you can find analog and digital testing devices on sale. Based on their design features, such devices can be divided into portable and stationary, which have significantly more capabilities.
Measuring with a tester: what do you need to know?
How to ring wires in a car? We will tell you more about diagnosing various devices below.
Diagnostics of spark plugs
First, let's talk about checking spark plugs with a tester for short circuits. To check the spark plug, you will need to connect the multimeter probes to the device - one of the contacts is connected to the spark plug output, and the second to its base. In particular, the base itself is located in the thread area. If you see a spark when connecting, this indicates that the spark plug itself is 100% working.
Module diagnostics
To check the ignition module with a tester, you must perform the following steps:
- First of all, you need to turn off the ignition and open the hood of the car, and then find the module itself.
- The tester is directly configured into resistance measurement mode before diagnostics. After this, one of the probes of the device must be connected to the contact located on the coil, and the second to ground, that is, we are talking about ground, this probe is connected to the car body. As a result of the connection, the tester can give readings - if these are numbers, then the device is faulty, but if it is infinity, then this indicates that there is no short circuit in the device. Accordingly, the module operates in normal mode.
- Next, it will be necessary to diagnose the module for the presence of an open circuit in the primary circuits. When checking this, the tester probes should be connected to the contacts of the module itself, which are located at the edges. If, as a result of the connection, the readings displayed on the tester display have not changed, this indicates that there is a break in the primary circuits. Usually, with such problems, the module needs to be replaced, since repairing the primary circuits is a procedure that usually does not give the desired results. As practice shows, a break is usually associated with harsh operating conditions of the ignition system as a whole.
- At the final stage, it will be necessary to check the secondary windings. When performing such diagnostics, the module itself should be rotated so that the terminals of the high-voltage wires are facing you. Having done this, the tester probes must be connected to the contacts of the high-voltage wires of cylinders numbered 1 and 4. Diagnostics of cylinders numbered 2 and 3 is also carried out. If, as a result of the test, the readings remain the same and have not changed, then most likely it’s time to change the module (author video - channel Auto Electrician's Diary).
Starter diagnostics
If necessary, you can check the functionality of the starter device, in particular, we are talking about testing the stator and rotor. In the absence of a tester, the check can be done using a test light; this method is considered one of the simplest to implement. But more accurate results can still be obtained with a multimeter, in particular, we are talking about a megohmmeter.
The procedure for checking the starter is as follows:
- Open the hood and locate the location where the starter unit is installed. One probe of the tester must be connected to the mechanism body, that is, to ground, and the second one must be connected in turn to the winding contacts. If the starter unit is functioning normally, the test will show a resistance of about 10 kOhm, but no more. If the results obtained are significantly lower, this indicates that the starter assembly must be removed and repaired or replaced.
- Having completed these steps, you can begin testing the winding of the rotor device. In order for the test of this component to be more accurate, before connecting, the surface of the housing should be thoroughly cleaned from dust and dirt. One of the tester probes is connected to the core of the so-called armature, and the other to the collector plates. When the tester is activated in megohmmeter mode, the corresponding values will appear on the display - 10 kOhm or less. If the obtained values are too high, the rotor mechanism must be replaced. The use of a megohmmeter is very important, since it is this device that will allow you to obtain the most accurate indicators (the author of the video is the Auto Electrician HF channel).
How to choose correctly
When replacing high voltage wires, it is better to buy ignition wires as a complete set. To choose the right set of high-voltage wires, you need to carefully study the car’s operating instructions.
For older cars with contact ignition, it is not advisable to use wires with distributed resistance; this can lead to difficulty starting the engine.
If the car is operated in harsh climatic conditions, attention should be paid to wires with silicone insulation. They do not lose elasticity even at extremely low temperatures.
It is very difficult to find unique high-voltage wires, so in most cases the motorist independently decides on the choice of a specific brand of wire set.
Attention should be paid to the following points:
- for high-voltage wires there is a Western standard ISO 3808 and a domestic GOST 28827-90, it is necessary that a link to one of them is on the packaging;
- the packaging must indicate the brands of machines on which they are likely to be installed, all accompanying inscriptions must be in Russian, which indicates the legitimacy of the supplier;
- pay attention to the operating temperature range, not less than minus 40 to plus 200 degrees Celsius;
- they should not have any cracks, damage, or color changes (this may indicate long-term storage);
- Counterfeit high-voltage wires in most cases are made from high-quality cable, but the tips for the distributor and spark plugs are made in a homemade way, so you should pay attention
to the level of quality of these elements.
In order for the ignition wires to last for a long time, you need to:
- systematically clean them of dust and oil contaminants using non-aggressive solvents;
- monitor the condition of the assembly of high-voltage wires;
- when replacing spark plugs and repairing the engine, do not apply more reinforcement to the connections of the wires with the caps;
- systematically diagnose the car, paying attention to misfires.
How and where it is possible to select Denso spark plugs by car brand online.
Before purchasing, it will be useful to check a used car by VIN code.
In what cases is it beneficial https://voditeliauto.ru/poleznaya-informaciya/oformlenie/darstvennaya-na-mashinu.html to give a car as a gift.
Video - checking high-voltage ignition wires with a multimeter:
Required reading:
High-voltage wires Nailya Poroshin. Review from a Subscriber.
Articles on exactly the topics you are interested in:
Purpose of high-voltage wires, non-specialized information. The main task of high-voltage wires is to transmit electrical impulses from the ignition coil to the spark plugs. Based on this, they should: -…
The ignition coil is one of the main units in the control system of gasoline internal combustion engines. Its malfunction will necessarily lead to failure to start the engine. Computer…
A car generator may fail due to the following circumstances: wear of the excitation coil rotor bushings; voltage regulator malfunction; breakdown of rectifier bridge diodes; small...
The device is designed to diagnose the operating condition of high-voltage ignition circuits of cars: high-voltage coil, distributor, spark plugs and high-voltage wires...
The serviceability of the anti-lock brakes is the basis for reliable driving, especially in difficult road conditions. If while driving a vehicle on...
Source: iru-cis.ru
How to check high voltage wires
Finding high-voltage wires under the hood is not difficult, and diagnosing them is not fraught with any difficulties. There are three ways to check high-voltage wires, each of which allows you to determine whether there is a breakdown in them.
Visual diagnostics
The easiest way to check spark plug wires for insulation damage is to visually inspect them. It is necessary to carefully check that there are no cracks, cuts or severe abrasions across the insulation area.
Another way to visually check spark plug wires is to observe their operation at night. It is necessary to open the hood of the car at night, start the engine, turn off the headlights and watch the high-voltage wires. If they have strong insulation breakdowns, in the dark the “crickets” will be visible to the naked eye.
Wire check
To check the spark plug wires, an ordinary wire with stripped ends on both sides can be used. In the dark, with the engine running, it is necessary to short-circuit one part of the wire to ground (the car body), and run the other part along high-voltage wires in search of a place where the stripped tip will begin to produce a spark. It is important to check not only the insulating material around the conductor, but also the plastic caps.
Diagnostics with a multimeter
A multimeter in automotive diagnostics is most often used as a voltmeter, but it also has another useful function - the ability to measure resistance. To take measurements, you must completely remove the high-voltage wires (or disconnect one wire on both sides). Next, with the probes of the device set to ohmmeter mode, you should touch both sides of the wire, as a result of which the multimeter will display information about the resistance.
The resistance of serviceable high-voltage wires is up to 10 kOhm. At the same time, it can vary practically from zero. This depends on the type of wires themselves, the insulation used in them, the length, the presence of microdamages, and so on.
Connecting new wires
Each engine cylinder, when the wire is connected, corresponds to the number of the ignition module socket. All landing slots are numbered. Ignition coils may differ depending on the VAZ model, before 2004 or after 2004, but the socket numbers always match the numbers of the cylinders to which the wiring is connected. The cylinder numbers for connection are counted from left to right when viewed from the open hood.
To connect the wiring, you need to perform the following sequence of actions:
- Ignition off. Open the hood and remove the terminals from the battery.
- Removing old explosive wires from the coil and cylinder sockets.
- Connecting new wiring according to the diagram.
To check the correct connection, return the terminals to the battery and start the engine.
Methods for checking high voltage cables
Diagnosing a high voltage wire is not particularly difficult. There are three verification methods.
Visual inspection
It is necessary to carefully inspect the insulation for cracks and abrasions. The malfunction can be determined by ear - when the engine is turned on, characteristic clicks will be heard. If you conduct an inspection in the dark, you will notice sparks.
Checking resistance with a multimeter
Using the device, you can identify which cable has a problem. If one or more of them malfunctions, voltage to the spark plugs begins to be supplied intermittently, which causes engine malfunctions.
To check high-voltage wires with a multimeter, you will need to disconnect one line on both sides and attach probes to it on both sides. The resistance should be on high-voltage wires in the range from 0 to 9.8 kOhm. A difference of 2-4 units is not considered critical.
Spark plug diagnostics
In the event of a high-voltage breakdown, there is a possibility of failure of these batteries. During operation, the spark gap increases, so it is necessary to periodically perform diagnostics. For normal operation, the resistance at the spark plugs should be no more than 10 kOhm.
Wire check
To check, you can use available means, for example, a regular cable whose insulation is stripped on both sides. One end should be shorted to the car body (“to ground”), and the other should be moved along the cable in search of the place where the spark will “jump out.” It is also necessary to check the caps and the conductor. If there is a large difference in resistance or another malfunction is detected, it is necessary to replace the entire set of high-voltage wires.
Signs of faulty armored wires
When high-voltage wires fail, the operation of the ignition system is disrupted. This will affect engine operation with the following symptoms:
- problems when starting the engine, especially in rainy weather;
- noticeable interference in the operation of electrical appliances, such as a radio;
- unstable operation at idle;
- “triple” of the engine;
- misfires;
- uncertain operation of the engine during acceleration;
- general reduction in power.
Only the first two signs clearly indicate a malfunction of the wires. All others can occur when there are problems with the spark plugs or when the fuel-air mixture supply settings are violated. Therefore, to be sure, you should definitely check the armored wires. You can do this in three ways:
- by visual inspection;
- using a multimeter;
- using an oscilloscope.
Below we will describe in detail each of the methods and the features of its application. But first, let's talk about why the wires fail.
Checking with a multimeter
Even the cheapest device will be suitable for ringing the wires and identifying a fault. The task is to measure the resistance of the conductor by removing the wire completely. See the photo for an example of connection.
Your task is to remove the wire, turn the multimeter into ohmmeter mode with measurements up to 20 kOhm and insert the probes.
The correct indicator depends on the specific car, here are some examples:
- AvtoVAZ - from 3.5 to 10 kOhm;
- Daewoo Nexia - from 3.1 to 12.8 kOhm;
- Chevrolet Lacetti - no higher than 3 kOhm.
Why does the number change with each wire - in most cars, each wire is longer than the previous one so that they do not bend. Length affects resistance - a law of physics.
If the values obtained are too high, then the central core has burnt out and the spark plugs will work less well. At the same time, it is not necessary that compliance with the resistance indicator indicates proper operation, but it must necessarily correspond to the standard.
Checking with an oscilloscope
This is the most accurate method of checking, but its use requires you to have the device itself and knowledge in deciphering the values. If you have this, you can check this way, otherwise the previous methods of checking armored vehicles are enough for you to conclude about replacement or repair.
Procedure:
- attach the inductive and capacitive sensor of the device to the wires;
- turn on the oscilloscope;
- start the engine;
- watch the readings.
A professional will immediately understand the presence or absence of a problem using an oscillogram. Look at the photo of the graph; if yours is similar or identical, then the wire is broken and requires replacement.
The spark line must be smooth and without noise, otherwise the wire is broken or the spark plug is faulty. If the line reaches the maximum value of the coil, this is a complete break in the wiring.
Studying the operation of an oscilloscope is quite useful, since in the future you can diagnose the operation of the entire ignition system and electronic sensors, for example, the operation of the crankshaft position sensor.
Adjusting the ignition of the VAZ 2107
Acceleration dynamics, fuel consumption, trouble-free engine starting and exhaust toxicity of carburetor VAZ 2107 directly depend on correctly installed ignition. If the ignition system (IZ) of newer injection models does not require special adjustments, then cars with an older contact system require periodic adjustment.
In what cases is ignition adjustment required?
Over time, the factory ignition settings get lost or no longer correspond to the operating conditions of the vehicle. Thus, the need to adjust the SZ arises when using low-quality fuel or fuel with a different octane number. To assess the feasibility of this procedure, the ignition timing is determined. This is done as follows.
- We accelerate the car to 40 km/h.
- We sharply press the accelerator pedal and listen to the sound of the engine.
- If noise appears and disappears when the speed increases to 60 km/h, then there is no need to adjust the SZ.
- If the noise and detonation do not disappear as the speed increases, then the ignition is early and requires adjustment.
If the ignition timing is set incorrectly, fuel consumption will increase and engine power will decrease. In addition, a number of other problems will arise - an incorrectly installed ignition will reduce the service life of the power unit.
If a spark forms on the spark plug earlier than expected, the expanding gases will begin to counteract the piston rising to the top position. In this case, they talk about early ignition. Due to too early ignition, the rising piston will expend more effort to compress the resulting gases. This will lead to an increase in load not only on the crank mechanism, but also on the cylinder-piston group. If a spark appears after the piston passes the top dead center, then the energy generated from the combustion of the mixture enters the exhaust without performing any useful work. In this situation they say that the ignition is late.
The ignition system consists of the following elements: 1 - spark plugs; 2 — ignition distributor; 3 - capacitor; 4 — breaker cam; 5 - ignition coil; 6 — mounting block; 7 - ignition relay; 8 — ignition switch; A - to terminal “30” of the generator
Required Tools
To adjust the ignition of the VAZ 2107 you will need:
- key to 13;
- screwdriver;
- spark plug key;
- special key for crankshaft;
- vol (12V lamp).
Carburetor Feature
On a carburetor engine, you can unscrew the spark plug and place it on the cylinder head together with the armored wire. Next, crank the crankshaft a little with the starter and watch for a spark. The engine is a mass, so a strong spark must be produced. If there is little or no spark, then the problem is in the wire.
But, the method will work if all the candles are in excellent condition. After checking, you can additionally inspect the wire visually or “pierce” it with a multimeter.
We also recommend that owners of carburetor internal combustion engines initially check the central high-voltage wire going to the distributor. This will help identify the problem if the engine does not start or the power has dropped very much. Perhaps the central one does not supply enough voltage to the others through the distributor.
A similar procedure cannot be carried out with an injection engine, because the electronic switch and engine control unit will fail.
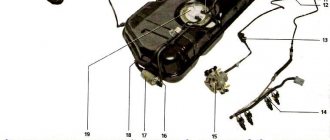
Purpose
The high voltage wires in a vehicle are designed to carry high voltage from the ignition coil to the spark plug. The wire is a kind of connecting link between the spark plugs and the ignition module. Each spark plug has its own wire connected, which is phased with a coil or distributor. In the carburetor version of the VAZ 2107 engine, 5 pieces of high-voltage wires are used, 4 from the distributor to the cylinders and 1 from the coil to the distributor. In the injection version of the engine, only 4 wires are used from the ignition module to the spark plug.
Field repair
If urgent repairs are needed, then after identifying the problem wire, find the damaged area and clean it with a knife. Next, you will need a copper-based connector, which is secured with regular twisting.
Afterwards everything needs to be isolated, which is the main problem. Regular electrical tape requires 8-10 layers for safety, plus moisture forms between the layers during winding.
The method will not return all the power, but it will easily allow you to get to the nearest service station or postpone repair of the ignition system for a couple of days.
Causes of damage
There are few of them and for the most part they are natural:
- Aging - due to constant temperature changes and engine vibrations, the insulation gradually wears out, after which it is easily broken through. The same applies to the attachment points to the spark plugs. The core itself also wears out naturally due to the constant supply of high voltage.
- Damage occurs most often due to repairs. That is, the mechanic either severely snagged the wire during the repair process, damaging it, or replaced the wires incorrectly altogether. They are specially located separately and do not touch other engine parts. If you place them differently, they will be damaged at least by a hot internal combustion engine.
- Other malfunctions - most often associated with a broken ignition coil, which causes more power to be supplied to the wires. Neither the wires nor their insulation are designed for this, so penetration occurs.
Reasons for failure of armored wires
Why do armored wires stop working altogether? The most common cause is normal wear and tear and aging . Working under conditions of strong temperature changes, vibrations and under the influence of high voltage, the insulation of high-voltage wires eventually ceases to perform its function. Also affected are the connections to the spark plugs and coils or distributor, that is, the “caps”.
As a result of this effect, the wires begin to “punch”, losing part of the voltage transmitted to the spark plug. Also, under the influence of electric current, the central core burns out and becomes thinner over time - so the resistance of the wires increases.
Often the results of aging can be seen visually - by cracks and damage to the wires. But if they are not visible, other diagnostic methods will help determine the breakdown.
The second common reason is mechanical damage . They arise as a result of incorrect replacement of wires or unsuccessful actions during repairs. Therefore, it is important to always lay the wires using clamps so as to prevent them from coming into contact with other parts under the hood. In this case, most often there is a break inside the wire, although a breakdown is also possible - that’s why diagnostics are needed.
Remember that if the wire is damaged, repairing it yourself with electrical tape or silicone sealant will not restore the insulation to factory specifications.
More rare causes are malfunctions of other components of the ignition system . For example, if a coil breaks down, the maximum voltage for the wire may be exceeded and it will completely fail. Or defects in the operation of the spark plug can lead to an increase in the resistance of the corresponding wire.
Experts recommend replacing high-voltage wires every 80-90 thousand kilometers or after replacing every third set of spark plugs (provided that regular nickel spark plugs are used).
How to make temporary wire repairs
Let's say a check of the high-voltage ignition wires reveals damage to the wiring, and the nearest service station is far away. What to do in this case? First you need to accurately identify the damaged area.
Next, on both sides of this area, the cores are stripped using a knife. The stripped areas need to be connected, creating an electrical circuit, for which any conductor is suitable, preferably copper-based. The connection is made by ordinary twisting.
The main difficulty here is the creation of a high-quality insulating layer. A layer of ordinary electrical tape can withstand voltages of up to 6 kW. In this case, reliable insulation is required for voltages reaching 40 kW. Therefore, to provide this protection, you will need at least 8-10 layers of electrical tape without taking into account the fact that moisture can penetrate between the layers. The tape itself must be of high quality. To ensure that the insulation is also of high quality, it is worth covering the area to be repaired in a plastic box. Before repairing and checking, all wiring must be thoroughly cleaned of dirt and traces of oil.
Timely repairs
What to do if the spark plug wire breaks off or breaks far from populated areas.
First, using the methods outlined in paragraph 2, find the location of the damage, breakdown or break. After this, use a knife to strip the conductive wires on both sides of the damaged area.
The next step is the electrical connection using
any conductor (wire), preferably bronze. It can be produced by simple twisting.
The most difficult thing is to perform high-quality insulation. Simple electrical tape has a breakdown voltage of 2,000 to 6,000 Volts. It is necessary to provide insulation for voltages up to 40,000 Volts.
It is not difficult to calculate that along with this
you need to lay down at least eight to ten layers of electrical tape. And this does not take into account the penetration of liquid between the layers. The insulating tape must be of high quality.
To increase the quality of insulation, it is possible to place the repair site in a plastic box.
The damaged wire has been found. Now what?
If the check shows that the current-carrying wire is broken, but the insulation of the high-voltage wire is intact, then the most reasonable option is to purchase a new wire. If the wire core is intact and only the insulation is damaged, then you can use electrical tape (this is important if the damage is discovered on the road). But you need to understand that duct tape is only a temporary measure to get you home. After this, the car owner will still have to go to the store for new wires.
As can be seen from the article, even a novice car enthusiast can check the serviceability of high-voltage wires, since there is nothing complicated about it. The main thing is to be patient, have a high-quality multimeter and know the rated resistance of the high-voltage wires in your car.
Wire lifespan
According to the recommendations of the manufacturer (AvtoVAZ), the wiring should be replaced every 30 thousand kilometers. Most often, car enthusiasts ignore these recommendations and do not change them for 100-150 thousand kilometers when there is no mechanical damage.
However, when the service life is exceeded, even if there is no visible damage, the internal resistance increases, which affects the transmission of the electrical impulse. There may be problems with ignition and acceleration. Due to the delay in supplying current to the spark plugs, the normal rhythm of engine operation is disrupted. It is necessary to follow the manufacturer's advice, changing the wiring every 25-30 thousand kilometers.
When connecting new wires, do not use plastic clamps for fixation. It is imperative to separate them using the comb holder that is included in the delivery package.
When do you need to replace high voltage wires?
Most cars do not indicate routine replacement of explosive wires. But there are several main signs that indicate that there are problems in the operation of the ignition system and the wires are to blame:
- The car started to have difficulty starting, this happens especially often in rain, fog or simply damp weather.
- When the engine reaches medium or high speeds, it begins to work intermittently.
- If the center wire is damaged, the engine simply stalls.
- The engine power is significantly reduced, it becomes dull, and accelerates poorly.
- Gasoline consumption increases, sometimes by 30-50%.
- After starting the engine, the Check Engine light remains on.
All of these signs indicate that high voltage wires may have broken through and should be replaced. This happens because the insulation dries out over time and becomes outdated, cracking due to high humidity and temperature changes. In this case, it is better to check the explosive wires with a multimeter to assess their resistance.
Another reason for the problem is oxidation of contacts. This occurs at the junction of the spark plugs and the high voltage unit. If it is not possible to check the high-voltage wires with a tester, you can attach the tip at a short distance from the metal parts of the engine and turn on the ignition. The quality of the spark can be used to assess the condition of the wire. An important parameter is the resistance of armored wires, which can only be assessed using special equipment.
Checking wires for breakdown
Checking for breakdown of explosive wires is carried out using a special device. This is a loop of thick copper wire on a dielectric handle 30-40 cm long. The loop is short-circuited to the ground of the car.
The copper loop is carefully placed over the wire so that it can slide along it. The wires remain connected to the spark gap, which is switched on to simulate engine operation at 2000 rpm. The loop is placed on a wire connected to the spark gap and drawn along its entire length.
If there is a breakdown on the wire, it will be visible by the discharge between the wire and the loop. Be sure to check the quality of the insulation near the spark plug tip and cap connected to the high voltage coil.