Replacing headlights for a VAZ 2110 is a relatively common occurrence. This is usually due to one of the following reasons:
- mechanical damage to headlights;
- breakdown of old lighting system components;
- desire to change the appearance of the car.
Headlight for the VAZ 2110
The choice of headlights for the VAZ 2110 is small - there are 2 types of lighting system components for it:
- components from the German company Bosch;
- components from the Russian one in the city of Kirzhach (“the popular” name is simply Kirzhach).
It would seem that in terms of quality comparison, the domestic analogue should lose to the German one. However, due to its features, many car enthusiasts, despite the price, choose “Kirzhach” for their 2110 car model.
The lighting complex from the Russian company consists of:
- glass;
- reflector;
- hydrocorrector;
- lenses;
- curtains;
- lamps;
- various fasteners (screws, springs for hydraulic corrector).
Headlight lighting "Kirzhach"
What to choose?
It would seem that we are talking about German quality products, which by definition should be better than their domestic counterpart. But in reality things are somewhat different.
Let's look at the key features of Kirzhach and Bosch headlights to determine which ones you should choose for your VAZ 2110 model.
- The purpose of any low beam is to provide good visibility of the roadway at night, while at the same time avoiding dazzling oncoming traffic. Headlights from German and domestic manufacturers cope equally well with these functions.
- The headlights from Kirzhach have a low beam lens, and a reflector is provided for the high beam. German products have two reflectors - for low beam and high beam. The lighting is ultimately the same, but Bosch has better brightness.
- Lenses are actually better than reflectors. They create a clearer line of light and allow the installation of xenon optics.
- As a study of reviews of VAZ 2110 owners using German devices shows, they are characterized by worse illumination in low beam mode.
- Bosch headlights have a very important advantage for many - when the car is driving in cloudy and rainy weather, it provides a better quality glow compared to Kirzhach devices. It's all about the larger surface of the low beam reflector.
- This Bosch plus also comes with a minus - you are deprived of the opportunity to install xenon optics.
- Note that, regardless of the manufacturer, these headlights contain H1 format lamps.
- If we take into account all other characteristics, then the undisputed leader here will be the products of the domestic manufacturer.
It is noteworthy that this is one of the few exceptions when domestic products turned out to be better than foreign ones. Sad but true.
Model features
Experts assessed possible headlight options for VAZ according to several parameters:
- ensuring excellent visibility at night. At the same time, the light should not blind oncoming drivers. In this parameter, both Kirzhach and Bosch are approximately the same;
- features of reflectors. The German analogue of the headlight has reflectors for low and high beam, while the domestic one has a lens for low beam and a reflector for high beam. This ensured almost the same level of illumination during the tests. The lens, which is installed in the headlights of the Russian manufacturer, provides better brightness (helps create clear lines of light, and is also suitable for installing xenon optics). In addition, some drivers note that the illumination is not very high-quality when the low-beam headlights are on; the product, due to the reduced lighting area, does not have such a drawback.
Differences between the Kirzhach headlights
Another feature of the Kirzhach headlight is that it can be easily bought in city stores, because the sales market for such headlights is in Russia. This and other features of the headlight make it more attractive to VAZ 2110 drivers and determine a slightly higher price for components from this company.
Sometimes it happens that, having purchased new headlights from a Russian one for your VAZ, you notice that their glow is not very good. Inexperienced drivers may attribute this to a defect or poor quality of the purchased product.
However, most often the problem is in the usual setting of the headlights. It is advisable to adjust the new lighting components that you install in place of the optics you just removed.
To do this, you will need, in addition to the skill of a draftsman, a flat surface. But if you do not have the necessary skills and time, entrust the adjustment of the Kirzhach headlights to specialists.
Removing a headlight from a VAZ 2110
The problem with new headlights
It happens that after installing new headlights, purchased for a lot of money from a reliable, excellent manufacturer, the quality of the glow leaves much to be desired.
Inexperienced drivers attribute everything to a defect or the purchase of a fake disguised as a trusted company. But in reality everything is completely different.
Headlights shine efficiently and efficiently not only depending on the manufacturer. Settings that some people don’t know about or simply forget play a big role
Procedure for replacing bulbs in Bosch headlights
Drivers often encounter a problem when headlights do not illuminate the road very well at night. This is due to the fact that the manufacturer installs H1 lamps. Experienced craftsmen assure that after replacing the standard lamp with an H 7 analogue, the situation improves significantly.
Such work is performed quite simply:
- all switching is disconnected from the headlights;
- the radiator grille is dismantled, for which you only need to unscrew the mounting bolts;
- the wiring blocks are disconnected from the rotating elements;
- the hydraulic correction device is removed. You just need to press on the locking element and turn it ninety degrees;
- the headlight bolts are unscrewed, the headlight moves back, the eyelash moves to the center to free it from the hook with the wing;
- the buffer bolts are released, the eyelash is dismantled;
- Now, by unscrewing one more of the nuts, you can remove the light source;
- After heating the sealant, open the headlight with a knife;
- the hole for the lamp will have to be slightly expanded with a drill, since the diameter of H 7 is slightly larger than that of H 1;
- The terminals are changed for the lamp; four of them will be required;
- a new lamp is inserted and secured with a fastener;
- the reflector will have to be slightly adjusted to better stay in place;
- some drivers install LEDs;
- The headlight is assembled in reverse order and then adjusted.
Now the road will be illuminated better.
A little about the features of headlights
These cars were equipped, as mentioned earlier, with headlights from the Russian JSC Avtosvet and manufactured by German manufacturers. They represent several devices in one housing. In addition to low and high beams, the housing contains side lights and turn signals. The design of lighting devices from different manufacturers has some differences.
In the headlight with low beam of JSC "Avtosvet" there are lenses and a flat screen between the lamps and lenses; in the block headlight it is glued to the body. The light bulb that indicates the side light is located in the high beam headlights. The German manufacturer offers a slightly different design for such a product. For low beam, no lenses are installed, and the screen, in the form of a cap, is located on the glass bulb of the device. Because of such differences, experts do not recommend installing headlights on cars from different manufacturers.
“Alternative light” on the VAZ-2110
Tuning enthusiasts enthusiastically accepted the appearance of “alternative optics” for 2110-2112. Mass purchases of headlights with “angel eyes” have begun. But beauty, as we have heard, requires sacrifice.
And a lot was sacrificed:
- Quality of light - the low-beam beam shines in a spot, blinds oncoming drivers, the illumination of the road surface is unsatisfactory.
- Electrical safety - thin wires with plastic connectors melt during prolonged use.
- Maintainability - in this headlamp you cannot change the glass or turn signal separately - you will have to buy everything assembled.
- Economic attractiveness - products are offered mainly in pairs; finding one piece is a great success.
- Problems with technical inspection - the design does not provide for a position corrector.
- Difficulty in adjusting - there are 3 screws for each lamp, difficult to access with a key.
- Plastic, unlike standard glass, is more easily scratched by stones.
We cannot recommend such crafts for installation on cars used on public roads.
Replacing headlight bulbs
The owners' complaints about the lighting of this car mainly relate to electric lamps. An effective replacement can be found if you find and install devices that generate a luminous flux that has increased brightness and intensity. Manufacturers of these devices, both domestic and foreign, have mastered several types of such products:
- Halogen lamps. They are distinguished by a large selection of their sizes and a long period of operation, as well as reasonable cost. As a disadvantage, it is necessary to note their high energy consumption, as well as some features of their installation;
- Xenon lamps. This type of lamp has a high light beam intensity, is environmentally safe, and has a pleasant spectrum close to daylight. However, due to the high likelihood of blinding problems for drivers of oncoming cars, they were prohibited from use;
- "GT" type of lamps. They are classified as a new type of lighting devices; they embody all the best factors of previously produced devices, and therefore are very popular.
Article on the topic: “Which is better xenon or halogen.”
“Angel Eyes” - a new type of tuning
Installing “angel eyes” on a car yourself is not at all difficult. There are several options for this procedure:
- buy finished products;
- make them yourself using LED strip;
- make it yourself using a transparent tube.
As practice shows, it is much better to make “angel eyes” yourself, since stores sell very low-quality and short-lived products. You can buy a ready-made LED strip and glue it to the inside of the optics with special glue or sealant. But it will still be more effective and brighter if you use an LED ring made of a plastic tube.
The work in this case consists of the following stages:
- To begin with, the plastic tube is heated using a hair dryer. This must be done so that it bends well. However, you also need to understand that if the product is overheated, it will become deformed.
- After this, use pliers to bend the tube around the can, so you get an even circle.
- When the part has cooled, the edges are sawed off.
- Resistors and LEDs are assembled using the same scheme. It is important to sand the ends thoroughly.
- Then, using a hacksaw, notches are made around the perimeter at approximately a distance of 2-2.5 mm. The ends are covered with foil and a special tube.
- Next, the made ring is attached with glue around the optic lens. It is important that the notches are on the inside.
If you clearly follow the instructions and correctly carry out all stages of the work, the updated headlight will have a very presentable appearance and will be able to last about 7 years without replacement.
Application of “GT” devices in VAZ 2110 headlights
Before installing such lamps in “tens” headlights, let’s look at their technical and other features:
- The glow temperature, its coefficient is approximately 4000-5000 Kelvin;
- The maximum luminous efficiency coefficient has been achieved, which is approximately 45-50%;
- During manufacturing, the lamp bulb was enlarged, its body was made chrome;
- The spiral began to be installed with an increased length.
These lamps are widely used in retail chains; purchasing them is not difficult.
Available offers
Unfortunately, you cannot find LED rings that are suitable for the VAZ 2110 to create the angel eyes effect in regular auto parts stores. But they are available in numerous online stores. Therefore, there should be no problems with the search.
Just remember that the inner diameter of the ring is 54 millimeters, and the diameter of the outer ring is 70 millimeters. These parameters are suitable specifically for installation in Kirzhach.
Although you may well go the other way - make your own rings from LEDs. You will need a transparent rod filled with LEDs. You will find similar components...in a building materials store. Just keep in mind that they need to be bent into a ring. To do this, use a hair dryer. It will soften the rod. The procedure requires precision handling, but it is quite possible to do it yourself.
The third option is to purchase at least 8 LEDs for each headlight and buy a plastic rod separately. This is the most complex approach and will require bending the rod, connecting the LEDs evenly and getting them to work.
The choice is yours. Go for it! And if you don’t want to take risks or waste time making your own LED rings a la angel eyes, then order them online. There are more than enough offers there now.
You happen to have LED rings in stock. Therefore, it’s time to start tuning directly, that is, installing LED rings in the headlights. If you have tinted optics, paint the rings black. But don't touch the LEDs themselves. The effect of such modernization will be more impressive.
The installation procedure is as follows.
- Remove the Kirzhach headlights. You will need to remove the glass. To do this, insert a flat screwdriver into the corner of the glass, and insert a sharp stationery knife into this gap with your other hand. This will remove the layer of sealant, allowing the glass to be removed. If you can't, just break the glass and buy a new one. It's quite cheap.
- Handle the optics carefully, do not touch the reflectors, and remove any remaining debris. If this is not done, you will soon have to completely change your headlights. And these are already significant expenses.
- Let's try out the tuning option. To do this, attach an LED ring to the lens.
- We correct inaccuracies. Decorative inserts can interfere with, or rather partially block, the glow from the LEDs. They can be trimmed and filed a little. A completely natural procedure for such tuning.
- Installing angel eyes. They are usually glued to the lens. Use super glue or high quality silicone caulk.
- Connect the power. Power to the LEDs must come from the side lights. Another option is to use a fuse and a separate switch.
- Reinstall the headlights. We put the glass back, just use a simple silicone sealant or liquid nails. The main thing here is to prevent the presence of cracks, due to which the inside of the glass will begin to fog up and condensation will be deposited on it. Over time, this leads to a short circuit.
- There is another option for mounting LEDs - not around the lens, but on the mask using silicone. Then the tape needs to provide the shape of a ring. For this, available means are suitable - a bottle, a glass. You just need to fill it with silicone in the selected place on the mask. The connection is similar to the previous installation option.
A few words about tuning tricks
Activities to modernize the head lighting of the “tens”, giving it uniqueness and inimitability, may require the purchase of some special materials, such as phosphor. Its unique properties are close to those of phosphorus, which has the ability to emit light in the dark.
This feature is widely used to obtain original tuning options. Most often, headlight curtains are coated with a pre-prepared mixture, which consists of phosphor and varnish. This needs to be done on both sides of the curtains, and after drying them, you can put them in place. Such actions allow you to get a completely new and unique look. As you can see from the story, tuning VAZ 2110 headlights with your own hands is not difficult. Carefully consider the design of the upcoming renovation, prepare the materials necessary for the work, and get to work.
How to improve headlights on a VAZ without the help of others2110
There is no such person who realizes that the safety of not only the driver and passengers, but also pedestrians and oncoming cars depends on the correct selection of the studio, how the headlights are set in any car, including the VAZ-2110. Adjusting the light is quite easy if you follow the advice of professionals and do this step by step. How to make the headlights on a VAZ-2110 better in just a few hours without the help of others, we will then try to analyze.
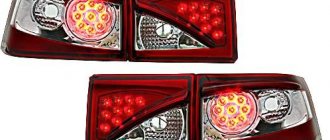
Tuning the rear lights
Such work will give the car style and elegance. If you want to save money, you can do everything yourself. There are two options for finishing the rear lights:
- varnish composition for tinting;
- tint film.
Having purchased a special varnish, the lanterns should be thoroughly washed and dried. After this, their surface is degreased with an alcohol-containing composition. The varnish is sprayed from a distance of thirty centimeters; after each applied layer, time is allowed for it to dry completely. The tuning effect will depend on the number of layers. At the end, some drivers polish to achieve a matte effect.
But after a certain time, the varnish is washed off, and the work has to be repeated, having first removed the residue with an acetone solution. Film that can be removed at any time is considered more convenient. When using it, the headlight is washed, dried, and degreased. Having cut the material, the surface of the lantern is moistened with water and soap diluted in it. Having removed the film backing, apply the tint to the lamp, press it with a rubber spatula, and smooth it to remove water and air bubbles. When tinting headlights, you should remember that there may be problematic issues with the police. So it is recommended to observe moderation in these actions.
Preliminary preparation for adjusting the luminous flux of headlights
Read
Headlights need to be adjusted not so much for good illumination, but so that the luminous flux does not cause discomfort to oncoming drivers, in other words, does not blind them, especially at night. Both low and high beams are adjusted in a car service center, under the supervision of experts. If you have, albeit small, unfortunately, the ability to repair cars, you can actually perform this process independently in your garage, performing it step by step:
- Checking serviceability. First you need to check whether the car headlight range control is working properly. What exists is that this mechanism plays an important role, one might say, in lighting. In order for the light flux to be adjusted correctly, you should make sure that it is in good working order and is functioning normally.
- Choosing the right site. The headlights are adjusted on a completely level area. Having chosen a suitable place, you should check how even it is using a special level; if there is no skew, you can safely park the car on the site.
- Having measured approximately 6 meters from the car, it is necessary to free up space on the wall in order to use it for a typical screen where you can make notes with ordinary chalk.
- Of course, the headlights can be adjusted correctly only in such a situation if the car’s tank is filled, the tire pressure is normal, and a person in the same weight category as the driver sits in the driver’s seat.
Lada 2110 Black bride › Logbook › Bosch headlights VAZ 2110
Everyone knows that Bosch headlights do not illuminate the road well at night. When driving in the near one, it’s hard to see - the road runs away, but when driving in the far one, you interfere with oncoming cars. I invite you to go with me on an unforgettable journey of tuning Bosch VAZ 2110 headlights. Let's start with the fact that we need to remove and disassemble the headlight. I won’t tell you how to remove and disassemble the headlight. There are many posts on this topic on the Internet, step by step. We need to slightly change the design of the headlights, namely, replace the H1 lamps with H7 ones. In my opinion, the H7 lamp fits perfectly into this headlight. The dimensions of the lamp H1 and H7 are the same both in height and in the location of the chrome filament. Look at the photo:
You can drill the required hole with a circular saw like this.
We disassemble and remove all the saws we don’t need. The one closest to the center is our saw, which will drill a hole in the headlight reflector. You need to drill a hole so that the H7 lamp is completely immersed in the hole and rests only on the collar. Taking my son as an assistant (he held the reflector), armed with a drill and loading our saw into the chuck, I drilled a hole. The smell from drilling is not very pleasant, so it is better to drill outside. This is what happened.
By the way, you can drill with another tool. For example, I have this thing. In our store it costs 30 rubles!
Let's try on our H7 Lamps. They fit perfectly and are locked with the same clamps that held the H1 lamps. That's basically it with drilling. Now we take a soldering iron and plug it into a socket, and in the meantime we cut off the “+” and “–” terminals that supply the H1 lamp with electricity. We strip the wires, solder other terminals (mothers). We will need 4 of them per headlight. We also need heat shrink casing. Taking advantage of the moment, I inserted LEDs into the dimensions in place of the lamps. This is what happened.
I don’t know about others, but my reflector kept falling off. Here's how I solved this problem:
I simply drilled a hole in advance and screwed in the screw and washer without fully tightening it. Now it's not going anywhere. As for the lamps, I took “Novator” and “Narva” at 55 w each.
Having installed the headlights on the car and adjusted them (by the way, I installed the lamp with the beads facing up), I drove out into the dark on an unlit section of the road. I was very surprised by my result. Now everything is very clearly visible at close-up - not only the road itself, but also the edges of the side of the road. The headlights do not shine 10 meters from the bumper, but further and better. Here's a photo from the car. This is the neighbor.
In the photo the high beam is on, about 35 steps from the car.
I called a friend - he also has a “ten” with Bosch headlights. We compared my headlights and his on the same section of the road. This is what happened. This is the low beam on a friend's car.
I took this photo standing between the cars. There is a difference and what a difference!
This photo is also from about 35 steps closer. On the right is a friend's car, on the left is mine!
Maybe many will start to judge me for ruining the headlights, etc. I'll tell you honestly: before tuning, I tried to install lamps from Osram, Philips, and many others - the result did not suit me. If you find the same article on the Internet, you should know that I wrote it. I received a fee for it, but it was small. And I’m just posting it here because it’s not here. And finally, I want to say (well, just food for thought): now you can insert H4 instead of H7 lamps. But that's a completely different story! Good luck to everyone on the roads! Not a nail or a rod!
H1 diodes are money down the drain, headlights Bosch VAZ 2110-11-12
Subscribe to the group on Subscribe to Instagram.
Next, vertical stripes are drawn on the previously constructed shield. Three stripes must be marked on the wall and marked with various signs, for example:
- line F must be drawn parallel to the middle of the car;
- line “A” parallel to the left car headlight;
- line “B”, respectively, is right.
Read
Horizontal stripes are marked. A horizontal mark is made through the F line, which we will call H, and stepping back approximately 60-65 cm from it, we draw an additional horizontal mark R. Next, we proceed to adjusting the light flux at home.
Design features
The design of the hydraulic corrector includes the following components:
- The master cylinder, which is mounted on the dashboard;
- Actuator cylinders, which are mounted on the headlights and turn them;
- Connecting pipelines of the hydraulic corrector, fixed with clamps;
- A working fluid that is characterized by increased frost resistance.
A hydraulic corrector works like this: a normal, working corrector maintains the pressure required for operation. If the driver needs to direct the headlights downwards, then the pressure in the system decreases. In this case, the rod turns the optics down using a piston. If the liquid leaks, the corrector pistons are fixed in one position, and adjusting the direction of the headlights becomes impossible.
VAZ 2110 headlight hydraulic corrector diagram
Step-by-step adjustment of headlights on your own car
Before you improve the headlights on the VAZ-2110 at home, you need to independently adjust the luminous flux . This is quite easy to do if you follow the following tips:
- the headlight located on the right side must be covered with at least some convenient material that will not transmit light, for example, cardboard;
- the corrector should be turned to the first position;
- Under the car hood you need to find special screws designed to adjust the light output. By turning them in the desired direction, the adjustment process is carried out;
- a correctly adjusted left headlight illuminates the H line from above, and the lower stream of light is displayed on the P stripes.
The right headlight is also adjusted using the same method, while the left one is closed. You should definitely make sure that the luminous flux does not fall too low. When a difficulty is detected, the headlights will certainly rise higher so that when driving the driver can perfectly see pedestrians, especially in the dark .
.
But under no circumstances should they be raised very high, because such placement will blind oncoming cars, which often leads to emergency situations on the highway. Only correct adjustment of the light flux , which will be carried out taking into account the above tips, will help you avoid unpleasant situations.
Website about joints
Everyone knows that Bosch headlights do not illuminate the road well at night.
When driving in the near one, it’s hard to see - the road runs away, but when driving in the far one, you interfere with oncoming cars. I invite you to go with me on an unforgettable journey of tuning Bosch VAZ 2110 headlights. Let's start with the fact that we need to remove and disassemble the headlight. I won’t tell you how to remove and disassemble the headlight. There are many posts on this topic on the Internet, step by step. We need to slightly change the design of the headlights, namely, replace the H1 lamps with H7 ones. In my opinion, the H7 lamp fits perfectly into this headlight. The dimensions of the lamp H1 and H7 are the same both in height and in the location of the chrome thread. Look at the photo: You can drill the required hole with a circular saw like this.
We disassemble and remove all the saws we don’t need. The one closest to the center is our saw, which will drill a hole in the headlight reflector. You need to drill a hole so that the H7 lamp is completely immersed in the hole and rests only on the collar. Taking my son as an assistant (he held the reflector), armed with a drill and loading our saw into the chuck, I drilled a hole. The smell from drilling is not very pleasant, so it is better to drill outside. This is what happened.
By the way, you can drill with another tool. For example, I have this thing. In our store it costs 30 rubles!
Let's try on our H7 Lamps. They fit perfectly and are locked with the same clamps that held the H1 lamps. That's basically all there is to drilling. Now we take a soldering iron and plug it into a socket, and in the meantime we cut off the “+” and “–” terminals that supply the H1 lamp with electricity. We strip the wires, solder other terminals (mothers). We will need 4 of them per headlight. We also need heat shrink casing. Taking advantage of the moment, I inserted LEDs into the dimensions in place of the lamps. This is what happened.
I don’t know about others, but my reflector kept falling off. Here's how I solved this problem:
I simply drilled a hole in advance and screwed in the screw and washer without fully tightening it. Now it's not going anywhere. As for the lamps, I took “Novator” and “Narva” at 55 w each.
Having installed the headlights on the car and adjusted them (by the way, I installed the lamp with the beads facing up), I drove out into the dark on an unlit section of the road. I was very surprised by my result. Now everything is very clearly visible at close-up - not only the road itself, but also the edges of the side of the road. The headlights do not shine 10 meters from the bumper, but further and better. Here's a photo from the car. This is the neighbor.
In the photo the high beam is on, about 35 steps from the car.
I called a friend - he also has a “ten” with Bosch headlights. We compared my headlights and his on the same section of the road. This is what happened. This is the low beam on a friend's car.
I took this photo standing between the cars. There is a difference and what a difference!
This photo is also from about 35 steps closer. On the right is a friend's car, on the left is mine!
Maybe many will start to judge me for ruining the headlights, etc. I'll tell you honestly: before tuning, I tried to install lamps from Osram, Philips, and many others - the result did not suit me. If you find the same article on the Internet, you should know that I wrote it. I received a fee for it, but it was small. And I’m just posting it here because it’s not here. And finally, I want to say (well, just food for thought): now you can insert H4 instead of H7 lamps. But that's a completely different story! Good luck to everyone on the roads! Not a nail or a rod!
How can you improve your headlights yourself?
Only when the luminous flux
adjusted, with slight modifications you can improve the headlight illumination on your own car without the help of others.
First, the headlight
is removed, and the improvement is carried out in this order:
- The protective glass is removed. To make it easier to remove the protection, it is recommended to heat the glass using a regular hair dryer for this purpose. A warm air flow will warm up the sealant, after which the panel, of course, can be easily separated from the headlight using a sharp knife;
- carefully remove the reflective gasket;
- When using the appropriate tool, it is necessary to move the lens approximately 15 mm towards the reflector or slightly shorten the modular ring on a lathe.
Such actions will help not only improve the light of the headlights, but also increase the luminous flux and make it much wider. Both adjusting the headlights and improving the luminous flux , as you can see, is a fairly common process that is available to every car enthusiast.
There is a special offer online on our website. It is possible to get a free consultation with our corporate lawyer by simply asking your own question in the form below.
Headlight modernization
Despite the slightly higher performance indicators for the 2110 model, many car enthusiasts want to improve its equipment. The improvement requires disassembling the headlights, which occurs as follows:
- Remove the glass from the headlight, which is attached using sealant. Use the utility knife;
- remove the reflector. To do this you will have to unscrew a few bolts;
- on the back side of the headlight, remove all the wires, as well as the spring that secures the hydraulic corrector;
- remove the module from the headlight by pulling it towards you.
Adjust your headlights correctly
That's why we will respect other road users and adjust our headlights exclusively according to the rules :
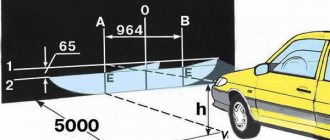
- As soon as it gets dark, we find any vertical plane that we can approach strictly perpendicular to a distance of at least 5 meters. It can be a wall, a fence, a fence, a shield, anything, with dimensions of at least two meters per meter. Main. install the car at a distance of five meters from the screen strictly perpendicularly, exactly in the horizontal plane .
Headlight adjustment diagram.
Turn the knob to position "0".
We achieve complete coincidence of the location of the light spot on the screen with the presented diagram.
After this, close the right headlight and adjust the left one with the same screw 1 and 2. If the headlights are adjusted correctly, the upper limit of the light spot should run along line 2, that is, at a distance of 525 mm from the ground, not higher.
Eliminating headlight shake
Many owners of the VAZ 2110 find that the light flickers when the car is moving. Such a breakdown most often occurs in Kirzhach headlights, but in Bosch parts such a breakdown rarely occurs. There is only one reason: reflector rattling. To eliminate light flicker, check:
- Is the reflector in place in the latch;
- The presence of an adjusting bolt rod;
- The emphasis is on the seating recess of the hydraulic corrector rod;
- We check the sagging of the thread (swap the high beam and low beam bulbs);
- Integrity of the tube in the hydraulic corrector (it may fray).
The most successful ways to eliminate jitter:
- We replace the hydraulic corrector with an electric corrector;
- We increase the length of the hydraulic corrector rod to tighten the spring.
This method allows you to get rid of light flicker by placing a cap on the hydraulic corrector rod.
Instead of a cap, use:
- Plastic dowel, eight millimeters long;
- The cap removed from the brake fitting;
- Different plastic cap.
Here's what we do:
- We remove the hydrocorrector itself from the illuminator;
- Place the cap tightly on the corrector rod. The main thing is that the cap does not jump inward;
- Install the corrector into the mounting socket
Changing the type of optics (tuning)
Car enthusiasts often tune their car headlights to improve their appearance. High-quality tuning gives the car a fashionable look and beauty. If you choose the right accessory, the appearance of dozens will change completely . The most popular among car enthusiasts is tuning headlights in the form of tinting. It is carried out in a variety of ways that have virtually no effect on the brightness and quality of road lighting. Types of headlight tinting:
- Painting of the headlight mask;
- Glass painting;
- Glass tinting film.
The process of such tinting is best shown in a video. For those who don't want to paint or tint their headlights themselves, there are ProSport headlights. They are already sold in black or chrome. You just need to install them instead of the standard headlights. Only they cannot boast of high quality or bright light.
