VAZ 2110 Location of units in the engine compartment
2.3. Location of units in the engine compartment
| GENERAL INFORMATION |
Location of units in the engine compartment of the 2F engine
| 1. Ignition coil 2. Oil dipstick 3. Windshield washer reservoir 4. Ignition distributor 5. Air filter 6. Spark plugs 7. Brake booster 8. Manufacturer's certificate plate | 9. Brake master cylinder reservoir 10. Clutch hydraulic reservoir 11. Fan 12. Power steering reservoir 13. Coolant reservoir 14. Engine filler cap 15. Oil filter 16. Radiator cap 17. Battery |
Location of units in the engine compartment of the 3F-E engine
| 1. Air filter 2. Windshield washer reservoir 3. Junction box 4. Ignition coil 5. Oil level dipstick 6. Automatic transmission dipstick 7. Spark plugs 8. Manufacturer's certificate plate 9. Brake master cylinder reservoir 10. Brake booster | 11. Fan 12. Headlight washer reservoir 13. Engine filler cap 14. Coolant reservoir 15. Ignition distributor 16. Oil filter 17. Power steering reservoir 18. Radiator cap 19. Battery |
Location of units in the engine compartment of the 1FZ-FE engine
| 1. Oil level dipstick 2. Brake master cylinder reservoir 3. Automatic transmission dipstick 4. Fuse box 5. Battery 6. Power steering reservoir 7. Ignition distributor | 8. Crankcase ventilation valve 9. Engine filler cap 10. Radiator cap 11. Coolant reservoir 12. Windshield washer reservoir 13. Air filter |
Bottom view of the front of the car
| 1. Filler plug for the front gearbox 2. Drain plug for the front gearbox 3. Cross rod 4. Steering gearbox 5. Spring 6. Shock absorber | 7. Anti-roll bar bracket 8. Engine drain plug 9. Automatic transmission pan 10. Front driveshaft 11. Exhaust pipe 12. Steer limiter |
Bottom view of the rear of the car
| 1. Cross rod 2. Exhaust pipe 3. Caliper 4. Shock absorber | 5. Rear gearbox inspection and filler plug 6. Rear gearbox drain plug 7. Muffler 8. Rear driveshaft |
Messages 7
1 Topic by 4istoff 2015-12-15 20:40:30
- Registration: 2015-12-13
- Messages: 85Thanks: 7
- Car: VAZ 2111
Topic: Resolved: The hood latch latches on the first click but does not close completely
The hood latch latches on the first click but does not close completely((what should I look for the reason? Thank you
- Denis Artyukhov
- Local
- Inactive
- From: Penza
- Registration: 2015-10-21
- Messages: 1,391Thanks: 279
- Car: VAZ 21124
Re: Resolved: The hood latch latches on the first click but does not close completely
4istoff, lift it up a little.
3 Reply from 4istoff 2015-12-15 21:50:29
- Registration: 2015-12-13
- Messages: 85Thanks: 7
- Car: VAZ 2111
Re: Resolved: The hood latch latches on the first click but does not close completely
- klimashov.roman
- Connoisseur
- Inactive
- From: Kasimov
- Registration: 2014-04-21
- Messages: 743Thanks: 143
- Car: GAZelle 33023 dv 405.22, 2.4 16kl 140hp
Re: Resolved: The hood latch latches on the first click but does not close completely
Lock.
5 Reply from 4istoff 2015-12-16 05:07:00
- Registration: 2015-12-13
- Messages: 85Thanks: 7
- Car: VAZ 2111
Re: Resolved: The hood latch latches on the first click but does not close completely
Ok, I'll try it today, thanks
6 Reply from Denis Artyukhov 2015-12-16 10:30:27
- Denis Artyukhov
- Local
- Inactive
- From: Penza
- Registration: 2015-10-21
- Messages: 1,391Thanks: 279
- Car: VAZ 21124
Re: Resolved: The hood latch latches on the first click but does not close completely
4istoff, at the same time center the lock. Or maybe it goes sideways.
- Registration: 2015-12-13
- Messages: 85Thanks: 7
- Car: VAZ 2111
What cars was it used in?
The 2111 engine was installed on the following models of front-wheel drive VAZ cars:
- 2108 – three-door hatchback;
- 21083 – three-door hatchback;
- 2109 – five-door hatchback;
- 21093 – five-door hatchback;
- 21099 – sedan;
- 2113 – three-door hatchback;
- 2114 – five-door hatchback;
- 2115 – sedan;
- 2110 – sedan;
- 2111 – five-door station wagon;
- 2112 – five-door hatchback.
The engine was installed on the “eights” and “nines” after 1987, respectively.
Modifications of the VAZ-2112 car
VAZ-21120. Modification with a 16-valve injection engine with a volume of 1.5 liters and a power of 93 horsepower. 14-inch wheels were installed on the car. This modification has a problem with valves bending when the timing belt breaks. The problem can be solved by increasing the depth of the grooves in the piston bottoms.
VAZ-21121. The car was equipped with a VAZ-21114 8-valve injection engine with a volume of 1.6 liters and a power of 81 horsepower.
VAZ-21122. Budget modification with an 8-valve injection engine VAZ-2111. The car was produced without electric windows, the wheels were 13 inches in size, and the brakes were unventilated from a VAZ-2108 car.
VAZ-21123 Coupe. Three-door, five-seater hatchback. The only two doors for entering the car are 200 millimeters wider than those of the five-door hatchback, and they are mounted on new, durable hinges. The rear arches of the car have become wider. The engine was installed with a 16-valve injection engine with a volume of 1.6 liters and a power of 90 horsepower. The car was produced from 2002 to 2006 in small quantities, the reason for this was the high cost of the car.
VAZ-21124. Modification with a 16-valve injection engine VAZ-21124 with a volume of 1.6 liters. Produced from 2004 to 2008. For this type of engine, the problem with valve bending was solved. To do this, the depth of the grooves in the piston heads was increased (up to 6.5 mm). In addition, the design of the cylinder block was changed to achieve a working volume of 1.6 liters, for which its height was increased by 2.3 mm, and the radius of the crankshaft was increased by 2.3 mm accordingly. There were also a number of other minor changes.
VAZ-21128. The luxury version of the car, produced by Super-auto JSC, was equipped with a 16-valve VAZ-21128 engine with a volume of 1.8 liters and a power of 105 horsepower.
VAZ-2112-37. A racing modification of the VAZ-2112, prepared for the “ring” in the Lada Cup qualifying group. The car was equipped with a 1.5-liter VAZ-2112 engine with a power of 100 horsepower. The racing car was equipped with a safety cage, an external aerodynamic kit and a front extension of the strut support cups.
VAZ-2112-90 Tarzan. All-wheel drive modification with a VAZ-2112 body on a frame chassis with transmission and suspension parts from a VAZ-21213 Niva. It was also equipped with a 1.7 or 1.8 liter engine from the Niva.
Design features
After many years of modifications, the 2111 engine has the following design nuances:
- engine diagram - electronic control of distributed injection;
- engine block – has holes for fixing brackets for attachments;
- cylinders – bored to size 82 mm;
- crankshaft - with a long 71 mm piston stroke, reminiscent of the 2108 model, but the counterweights are more powerful to reduce vibrations;
- piston - oval recess on the bottom so as not to bend the valves, floating pin fit;
- connecting rod – length 121 mm, lower head is heavier;
- camshaft - the cam profile has been changed, the landing dimensions are the same as option 2108;
- Timing belt – copied from 21083, belt transmission;
- flywheel – the teeth are wider, the profile has been changed, the clutch seat diameter is larger (208 mm), the crown is wider than that of 2110 (27.5 mm);
- starter – gear with 11 teeth;
- belt – 742 mm in the basic version, 1115 mm with power steering, 1125 mm when the car is equipped with air conditioning;
- ECU - GM, Bosch or January;
- injectors – Siemens VAZ 6393 (nozzle with 4 holes, yellow color) with controller January 7.2 or M 7.9.7 or Siemens 6238 (nozzle with 2 holes, color gray) with controllers January 5 or MP 7.0.
Thanks to these design solutions, engine performance is noticeably improved.
Hood lock of a VAZ 2110 car.
Hood lock
non-demountable design. Only two return springs can be replaced. The lock springs are the same.
You will need a key "10".
1.Remove the radiator trim.
2.Mark the position of the washers relative to the body. This will make it easier to further adjust the lock position.
3.Unscrew the two bolts securing the lock. Spring washers are installed under the bolts.
4. Rotate the lock 180° and remove it from behind amplifier 1 with a spacer to gain access to the place where the rod is attached to lever 2 of the lock. Disconnect the rod from the lever.
5.Replace broken, cracked or stretched springs. To do this, use a screwdriver to disconnect the spring first from the lever and then from the hinge on the lock body. Install the new spring in the reverse order of removal. In this case, it is more convenient to connect the spring to the lever with pliers.
6.Install the lock
in the reverse order of removal. After this, check the ease of opening and the reliability of locking the hood lock and, if necessary, adjust the position of the lock.
7. To replace the hood safety hook, mark the position of its bracket relative to the hood. This will make it easier to further adjust the hook position. Unscrew the two hook mounting bolts (there are spring washers underneath them) and remove the safety hook. When installing the hook, adjust the position of the hook using the enlarged holes in the bracket before final tightening the bolts. Finally tighten the bolts after making sure that the hook holds the hood securely in the closed position and that the hood opens freely when the hook handle is pressed.
Adjusting the position of the hood lock of the VAZ 2110.
1.The position of the hood lock is adjusted due to enlarged holes for mounting bolts in the bracket on the body. To adjust, loosen both mounting bolts.
2.If there is a hard impact when closing the hood and it is difficult to open, move the lock across the car.
3.If there is a lot of force when closing the hood or there is vertical play in the hood in the closed position, move the lock vertically (up or down, respectively). After adjustment, tighten the lock bolts.
Your reviews, comments, questions and answers on LADA-10.ru
Everyone is welcome to participate in the discussion about the causes of the malfunction and other problems. If you know what to answer, write and thereby help other VAZ 2110 owners in searching for the truth.
Comments on LADA-10.ru from VKontakte were launched in August 2013
We also have Lada
The site was created in 2010 — 2019
gg. In accordance with the law on copyright and related rights, reprinting of any site materials is possible only with the permission of the administration (Contacts)
and when specifying a direct link
lada-10.ru
What should a car enthusiast do?
First of all, carry out a complete diagnosis of the car's cooling system. This can be done in the garage, without complex devices and without special knowledge and skills. But you need to carefully remove the smell of antifreeze. Open the hood, check the pipes, hoses and covers for visible damage. Absolutely all system conductors must be checked. We replace damaged parts.
Another cause of a leak may be a malfunction in the engine crankcase. Failure leads to disruption of the functionality of the power unit. To diagnose, just look at the oil tank cap from the inside. If coolant gets on the engine crankcase, a white coating forms on the cover.
As a result of the leak, coolant can penetrate directly into the passenger compartment. This indicates a malfunction of the radiator. If a leak forms in it, some of the coolant penetrates into the cabin, where a characteristic sweetish smell is felt. We replace the radiator with a new one and remove the liquid. This can be done by placing newspapers on the puddle, which we throw away as they become soaked. Someone uses a plastic bottle. We make a hole in its lid, then squeeze the bottle to release air from it and apply the hole to the spilled moisture. In 3-4 passes, you can “suck out” the entire puddle in this way, and wipe off the remaining moisture with a rag.
The cause of the leak can be difficult to determine. If the source of suspicious traces cannot be identified, look at the radiator of the heating system. Coolant may also leak from the heater. Then an unpleasant burning smell is felt in the cabin. Leaking liquid will get under the mat. To fix the problem, you will have to replace the stove radiator by first disassembling its body.
The reason may not be in the radiator itself, but in the tubes connected to it. The joints can be treated with sealant. But it is better to immediately replace the problematic tubes with new ones.
To prevent the appearance of coolant vapors in the cabin, you need to check the level in the radiator from time to time. The evaporated liquid should be replenished, and if the evaporation is too intense, the cause of the problem should be urgently determined.
On thematic forums, it is advised to use the coolant of the brand that is recommended for use in your specific car model. It is not recommended to mix coolers of different types. Timely diagnostics of the cooling system will allow you to identify faults and increase the service life of the power unit elements.
Necessary tool for replacement on VAZ-2110
For dozens of older pre-2003 editions, the replacement is a little more complicated than the upgraded post-2003 2110 edition, but in any case, for the replacement we will need the following tools and supplies:
- container for draining antifreeze (with a wide neck);
- a set of screwdrivers with a square, extension and ratchet;
- Screwdriver Set;
- four new screw clamps;
- if you plan to replace antifreeze, use new antifreeze;
- correctly modified heater core (not interchangeable).
Replacing the heater radiator of the tenth family of a new model
Before disassembling, drain the antifreeze into a prepared container - if you have not completely replaced the fluid, you only need to drain it from the cylinder block by unscrewing the cap and placing the container under the engine. If you are replacing it, also drain the antifreeze from the radiator.
If a complete replacement of antifreeze is not planned, it can be partially drained, as shown in the photo (the expansion tank cap must be closed).
Before draining, remove the expansion tank cap and get to work:
- After draining the liquid, you can and should disassemble the expansion tank - loosen the screw clamps, remove the hoses, and unscrew the bolts securing the tank.
- The hood gasket should be in the way, remove it.
- Remove the sound and heat insulation from the engine casing. To do this, use a Phillips screwdriver to unscrew all the screws on the insulation from above. From below, the insulation is attached to the body with two bolts with a 10-mm head. It is more convenient to unscrew them using a high head with a cardan and an extension.
- Unscrew the plastic clamps from the insulating layer.
- We remove the finishing elements.
- Disconnect the connectors from the brake fluid level sensor on the reservoir cap.
- Remove the power steering vacuum tube from the body and set it aside.
- Using a 17mm socket and a ratchet, unscrew the master cylinder and carefully turn it forward without disconnecting the brake hoses.
- Go inside and disconnect the brake light switch connectors.
- Using a high head (13), unscrew the nuts securing the brake pedal and vacuum booster.
- From under the hood we take out the power steering with the pedal. There is no need to remove the plastic trim at the bottom of the windshield; everything can be lifted without it. Lift the vacuum unit and pull the pedal out through this hole. Move the vacuum valve to the side.
- The heater housing of the new copy is assembled from two parts, which greatly simplifies its dismantling. All you need to do is unscrew the three threaded bolts and first remove the right and then the left part. Remove the heater housing.
- Gain full access to the heater hoses by unscrewing the screw clamps on the inlet and outlet hoses and one steam vent.
- The radiator is installed at four points - a screw on top at the edge of the glass, two nuts at the height of the collector and one on the left near the filter. Find the screws that secure the radiator and remove them.
- Remove the old radiator, clean and rinse the cavity from dust and dirt, install a new or repaired old radiator. Assembly is carried out in reverse order. Pull out the old radiator. Clean the heater body from dirt.
- Remove the cover gasket and threshold plate.
- Remove the hose from this fitting.
- Remove the brake master cylinder.
- Remove the brake pedal mounting nuts.
- Remove the heater housing.
- Disconnect the connectors from the old radiator.
- Find the screws that secure the heating element and unscrew them.
After reassembly, check the operation of the heating element; the joints should be hot. If they do not heat up in the air seal system, remove it and check again.
We are replacing the stove 2110 of the old modification
Therefore, after draining the fluid and disconnecting the fan hoses, remove the frill, wipers and windshield trim. The radiator is held in place by clamps, 4 of which need to be removed.
Removing the windshield trim and heater casing clips.
After that:
- Unscrew the cabin filter mounting bolts; when unscrewing the bolts, remember their position (among them there are 4 long ones).
- Remove the fan with part of the casing. Remove the front part of the casing along with the fan.
- Pull out the filter housing and the back of the fan housing.
- Loosen the clamps and remove the three hoses (inlet, outlet and exhaust). Disconnect the hoses and pull out the old radiator.
- Pull out the heater core.
- When unscrewing the screws, remember their position (4 of them are long).
- Remove the front part of the case with the fan.
- Pull out the filter housing and the back of the fan housing.
- Disconnect the hoses and pull out the old radiator.
Why is this happening?
The main source of this problem in a car is moisture. Moreover, it can happen not only in wet weather. In combination with cold glass, moisture produces condensation. As a result, small drops of water form on the inside surface of the window and windshield. Of course, this negatively affects visibility and, as a result, traffic safety.
Often, excess moisture is removed from the interior by turning on the heater or blowing on the windshield. But this does not always give the desired result. Condensation still forms on the windows. If your car windows sweat, there may be different reasons. Let's look at ways to solve this problem.
Best answers
Natalya Maslova: If a girl knows how to open the hood, she is a priori a Master!
Ilfat: Ha! Where!
Madness_of_female_logic: The engine, for example, at least)
Irina Ryabinina: All sorts of things...
Scorpio: They guess. For example - motor
Knopkina button: I know)))
I came to my senses...: Do we need this?! Oh yes, to bend over and make you feel good!
Yulchik: I know :)))
Yulia Sbitneva: Tell me?
Mystique: Engine...
BEZOOM-ZOOMEN: Better than you think
...: For example, a motor! This is enough for me)))
Oksana Frolova: mostly only approximately. Well, check the oil and top up the antifreeze, they can even do that.
Pavlinka new: We know! But we won’t tell!))))))))))
Valentina Izvekova: Of course we know. Don't you know what's under the hood?? ? We can tell and show.
Fanthom: I think they guess, UZBEKS!!!
User deleted: they still think there are live horses there
Italianka: Engine! And there are some other candles there. And there is also a little thing where they pour oil into! That's how much I know!!! xDDDD
Daria Guseva: yes. Under the hood of a car is what makes the car work.
Uncle Sasha: they open the hood and want to see a big mirror
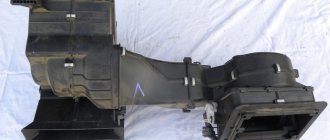
How to repair the heating system of a VAZ 2112
An indispensable device for any car in cold weather is the stove. Sometimes it is necessary to replace the radiator heater on a VAZ 2112 with all the elements. The interior of the VAZ 2112 has built-in supply and exhaust ventilation. Air enters the cabin through special holes made in the windshield linings. Air can be supplied spontaneously or forcefully. In the second case, the supply is provided by the heater fan. It can exit the passenger compartment through cracks between the panels located inside the doors and holes in their ends. Built-in valves allow air to pass out and prevent it from getting in, which improves thermal insulation in the cabin. If necessary, the heater radiator preheats the air before entering the cabin.
What are the features of the VAZ 2112 heater radiator?
- The heater radiator of a VAZ 2112 car is located in a plastic casing under the dashboard in a horizontal position.
- The design consists of two rows of tubes made of aluminum with two plastic tanks pressed onto them. On the left there are two fittings: one for draining, the other for supplying coolant.
- The position of the dampers regulates the flow of part of the air that is taken in by the radiator. Its main flow passes by the radiator. If the damper is in its extreme positions, no air flows at all.
- A design feature is the absence of a tap, which should shut off the flow of coolant, which ensures constant heating of the heater radiator when the engine is running. In this case, the required temperature in the cabin is achieved faster, and the absence of a tap reduces the number of joints, places that can leak and create a lack of tightness in the entire system.
Dismantling the heater radiator of a VAZ 2112 car
If the heater radiator leaks, it must be replaced. Replacing the heater radiator in a VAZ 2112 begins with dismantling the entire dashboard and steering column. The work must be carried out carefully, which is due to the manufacture of most connectors from fragile plastic latches and clamps that can easily be broken. The radiator can be removed without dismantling the panel. Replacing the heater radiator on a VAZ 2112 is easier to do with the evaporator removed, but this requires preliminary depressurization of the main air conditioning system and removal of the refrigerant. The radiator removal instructions suggest:
Disconnect the battery.
- Disconnect the hoses installed on the heater bulkhead from the engine compartment side.
- Push the rubber seal on the partition into the interior of the cabin. To do this, you need to disconnect the edges of the seal from the edges of the hole in the partition.
- Remove the cover, the ashtray, the receiver, for the center pillar, and the front panels.
- Remove the heater and air conditioning control panel.
- Remove the electronic control unit without disconnecting it from the connector block.
Dismantling the control unit of a VAZ 2112 car
- Unscrew the bolts securing the left pillar to the base of the body and the bolts securing the ground wires; you do not need to completely remove the pillar.
- Unscrew the bolts that hold the right strut, then it is removed from the car.
- Use a Phillips screwdriver to unscrew the self-tapping screws that secure the stand to the front plastic panel from its reverse side.
- Remove the central air duct duct.
- Above the heater core, slightly shifted forward, there is a dividing damper, which must be removed along with the air duct section to increase the working space.
- Loosen the nuts on the studs that secure the left side of the evaporator housing.
- Unscrew the nut on the stud located near the upper pedal lever for controlling the throttle valve.
- Remove the bolts holding the lower right corner of the heater housing.
- Remove the heater lugs from the studs.
- Move part of the air conditioner evaporator housing to the side.
- Remove the heater from under the front panel; its general appearance is shown in the photo.
General view of the heater of the VAZ 2112 car
- Remove the clamps holding the heater pipes to the housing.
- Remove the radiator from the housing.
How does a malfunction of the electronic control unit affect the operation of the injector?
The electronic control unit of the VAZ-2110 car consists of 3 high-precision components:
- ROM – devices for storing data (memory);
- PROM – a device for transmitting dynamic data;
- RAM is the regulating memory of the block.
Advice: the entire complex of presented elements will function only if there is voltage in the circuit. If there is no voltage in the wiring, then it is necessary to eliminate the faults in the fuse box on the VAZ-2110.
Thus, the electronic control unit acts as a kind of microprocessor that is responsible for the operation of the entire fuel supply system. If it breaks down, even an experienced motorist cannot fix it with his own hands. For repairs, contact your nearest car service center and wait for the result. If the unit does not have any malfunctions, the breakdown must be looked for among the elements of the injector and controller.
Tip: in the center of the dashboard on a VAZ-2110 car, a warning light called “CHECK ENGINE” may light up. In this case, the problem definitely does not lie in the control unit, the problem is related to malfunctions in the controller.
Sound insulation of the hood of VAZ 2110
First you need to prepare not only materials, but also important tools. So, let's begin:
- Soundproofing material must be purchased in quantities of at least two sheets.
- You will definitely need sharp scissors or other suitable cutting tools.
- You will need good glue, not quite ordinary, but heat-resistant. In a store before purchasing, it is better to ask the seller in advance.
- A set of common motorist tools, including screwdrivers, pliers, wrenches, etc.
- Pieces of cardboard or thick paper.
- Any detergent.
- A flat table or floor on which the manipulation will be performed.
Removing the hood
So:
To carry out all work at a high quality level, it is necessary to dismantle the hood.
Removing the hood
This way we also get full access to the engine compartment.
Factory insulation
After removing the hood, you need to look for the factory insulation. If there is one, you will have to remove it. The plastic casing must also be dismantled.
Sample
So:
- Paper and cardboard are needed to make a template of the required hood planes. The forms are then transferred to cardboard and then onto insulating material.
- We cut out pieces from the soundproofing material carefully and as accurately as possible.
Sound insulation on the hood
- Next you will need to lubricate the material with glue. It is necessary to lubricate from the reverse side, where there is no foil.
- We wait until it dries (about an hour).
https://youtube.com/watch?v=p_CpOs64yas
Complete sound insulation
The above instructions are not the only one of their kind. You can make sound insulation with your own hands in other ways. The main thing is to study photos and videos, diagrams and drawings during the work process. Thus, the cost of repairs will be significantly reduced.
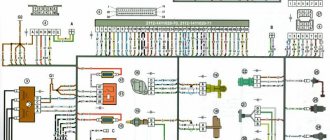
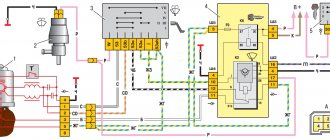
VAZ-21124 engine control circuit
Connection diagram of the VAZ-21124 engine control system with distributed fuel injection under Euro-2 toxicity standards (controller M7.9.7): 1 - ignition coils; 2 — nozzles; 3 - controller; 4 - main relay; 5 - fuse connected to the main relay; 6 — cooling system electric fan relay; 7 - fuse connected to the cooling system electric fan relay; 8 - electric fuel pump relay; 9 - fuse connected to the electric fuel pump relay; 10 — mass flow and air temperature sensor; 11 — throttle position sensor; 12 — coolant temperature sensor; 13 — solenoid valve for purge of the adsorber; 14 — oxygen sensor; 15 — knock sensor; 16 — crankshaft position sensor; 17 — idle speed regulator; 18 — immobilizer control unit; 19 — immobilizer status indicator; 20 - phase sensor; 21 — vehicle speed sensor; 22 — electric fuel pump module with fuel level sensor; 23 — oil pressure warning lamp sensor; 24 — coolant temperature indicator sensor; A - block connected to the wiring harness of the ABS cabin group; B — diagnostic block; B - block connected to the air conditioner wiring harness; G - to the “+” terminal of the battery; D — to the side door wiring harness block; E - block connected to the instrument panel wiring harness; G1, G2 - grounding points; I - the order of conditional numbering of plugs in the block of the immobilizer control unit; II - the order of conditional numbering of contacts in the diagnostic block.
Connection diagram of the VAZ-21124 engine control system with distributed fuel injection under Euro-3 toxicity standards (controller M7.9.7): 1 - ignition coils; 2 — nozzles; 3 - controller; 4 - main relay; 5 - fuse connected to the main relay; 6 — cooling system electric fan relay; 7 - fuse connected to the cooling system electric fan relay; 8 - electric fuel pump relay; 9 - fuse connected to the electric fuel pump relay; 10 — mass flow and air temperature sensor; 11 — rough road sensor; 12 — throttle position sensor; 13 — coolant temperature sensor; 14 — idle speed regulator; 15 — control oxygen sensor; 16 — diagnostic oxygen sensor; 17 — solenoid valve for purge of the adsorber; 18 — knock sensor; 19 — crankshaft position sensor; 20 — immobilizer control unit; 21 — immobilizer status indicator; 22 - phase sensor; 23 — vehicle speed sensor; 24 — electric fuel pump module with fuel level sensor; 25 — oil pressure warning lamp sensor; 26 — coolant temperature indicator sensor; A - block connected to the wiring harness of the ABS cabin group; B — diagnostic block; B - block connected to the air conditioner wiring harness; G - to the “+” terminal of the battery; D — to the side door wiring harness block; E - block connected to the instrument panel wiring harness; G1, G2 - grounding points; I - the order of conditional numbering of plugs in the block of the immobilizer control unit; II - the order of conditional numbering of contacts in the diagnostic block.
Speed sensor
This sensor is designed to transmit readings to the engine ECU about the speed of the vehicle. It is involved in adjusting the engine speed when driving, namely, if the car is rolling in neutral, you will notice that the speed is slightly higher than the idle speed when the car is standing still. The DS is also responsible for the performance of the speedometer and odometer.
Signs of malfunction:
Why does the windshield constantly sweat from the inside: the main reasons
The windows in the car fog up from the inside due to the fact that the temperature in the cabin exceeds the outside temperature. As a result, the moisture contained in the cabin condenses on the glass. If the air humidity is high, then the windows cease to be transparent at all. This is why the inside of the windshield fogs up especially heavily when it rains (although this can happen in dry weather).
WATCH THE VIDEO
From all of the above, it follows that in order to eliminate condensation in the car interior, it is necessary to minimize the moisture content in the air. Its amount may be increased for several main reasons:
- Water on rugs or damp shoes
- Large number of passengers (breathing releases a lot of water)
- Wet interior
Most often, the windows in the car's interior sweat because of this. The recommendations in this case are simple: you need to take care of your shoes and cleanliness in the car, and also, in case of fogging, wipe the windows. In addition, before accepting passengers, you should warm up the car. However, there are other reasons why car windows sweat.
The cabin air filter is dirty
- Google+
- LJ
- Blogger
Foggy glass may be a sign that the air filter needs to be replaced. If it is dirty, moisture simply cannot escape from the car. In addition, air pollution appears in the cabin, and when the ventilation is turned on, no air flow is felt. Experts recommend not to wait for such consequences, but to replace the element every 10,000-20,000 km.
Problems with climate control
Due to a clogged drain hole, the moisture content in the cabin increases. This is what causes the car windows to sweat. All that needs to be done in this case is to clean the system.
Water entering the cabin
Moisture can enter the car not only through the doors, but also through the ventilation. All cars have drainage holes under the hood. If they become clogged, water will accumulate and enter the ventilation system. Because of this, the windshield sweats from the inside.
Wet sound insulation
Materials used for sound insulation in cars can absorb water well. This is especially common after driving through puddles or in rainy weather. To prevent the windows from sweating in the car, it is necessary to dry the material.
What to do if the glass sweats when the air conditioner is running
Quite often, motorists experience windows fogging up when the air conditioner is running for a long time. In this case, moisture forms outside. In fact, this process is normal (again, there is a large temperature difference). Therefore, there is no need to worry in this case.
The windows of the VAZ 2109 are sweating
Fogging of car windows is a common occurrence, which makes itself felt in the rain and when cold weather sets in. The reason for glass fogging is when it is blown by moist air. Moreover, a well-functioning stove does not always prevent fogging. If some compromise can be found regarding the rear window and side windows, then fogging of the windshield is a serious problem that directly affects road safety. Absolutely nothing is visible through foggy glass; constantly wiping it is also not an option. This problem is especially aggravated at night, when the headlights of oncoming cars begin to glow in the foggy spot. And if the car is not warmed up and there are a couple of passengers sitting in the back, then you are guaranteed to have foggy windows. Some drivers warm up the engine until warm air comes out and only then start driving, because blowing cold air does not prevent fogging.
The VAZ windows are sweating
The main reasons for fogging up the windows of a VAZ: - The cabin filter is clogged. Because of this, there is insufficient air flow to the windshield. After shaking out or replacing the filter, the air flow will increase and the glass will fog up less. This point is relevant for VAZ drivers starting from 2110, since older models, including the Nine, do not have a cabin filter. — Insufficient stove fan performance or problems with the air ducts. This point can be easily checked by stretching your hand forward and checking the intensity of the windshield blowing. — High humidity in the cabin. If the car is parked on the street and is not driven much, then the inside will be damp. Because of this dampness, the windows sweat more. As a rule, to correct this issue, the rugs are dried. — Cooling system leaking on the passenger compartment side. Sometimes you can even see not air coming out of the air ducts, but fog. In this case, it is necessary to check the heater faucet, heater radiator, and pipes for leaks. — Water getting into the car interior during rain. Perhaps due to bad door rubbers, clogged gutters, or holes in the bottom, water enters the interior and wets it. If you have gone through all these steps, but the windows are still sweating, then special anti-fog liquids will come to your aid. After treatment with this liquid, glass sweats significantly less. The problem of glass fogging is especially pressing for the VAZ 2110. PS As you already understand, the key word in the fight against glass fogging is dampness. In many foreign cars with air conditioning or climate control, when the glass blowing mode is turned on, the air conditioner automatically turns on. Why do you think? During operation, the air conditioner DRYS the air for blowing, so fogging of the windows disappears instantly. Unfortunately, VAZ air conditioners are installed only in new models.
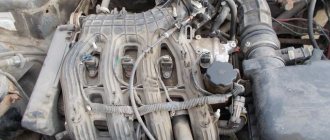
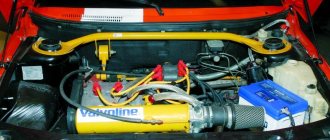
Tuning the engine compartment. Engine lighting
In continuation of the materials on tuning, we would like to present an unusual option for decorating the engine compartment of your car.
The source of illumination for the engine elements in this case is LEDs and LED strips. And so let’s imagine, it’s getting dark outside, you approach the car and open the hood, the hot-looking engine shocks the people around you. This effect is created using red LED sources. Beautiful. And at the same time it looks impressive.
In the example presented, the LEDs were installed under the motor protective casing.
The result of such tuning will look impressive on cars that have a protective casing. In the presented example you can see how this was done on a VAZ 2110 engine.
For illumination, an LED strip was used, the length of which is 85 cm. It was also secured to iron corners in the radiator area
When connecting the LED backlight, you should pay attention that all the wiring that you used must be insulated and corrugated. The power source must be connected through a fuse (for convenience, use a plug-in fuse) Also make sure that all wiring is at a certain distance from very hot engine elements