AutoNews / Reviews / Tests
How to Remove the Exhaust Manifold of a VAZ 2109 Injector
The exhaust manifold is a component of the exhaust system of accounting programs that carries out the process of removing exhaust gases from the cylinders of the unit into the exhaust pipe.
If the collector malfunctions, the culprit is both the element itself and its gasket. Changing the exhaust manifold (exhaust manifold) gasket is a common event when repairing a VAZ 2109.
In order to change the manifold or its gasket, in any case you will have to dismantle the VK. But to get to the element you are looking for, you will first need to go through some preliminary stages. Specifically, tighten the fasteners, and then remove the air filter and carburetor if step 1 does not help.
Your deeds
Often, loose fastenings of the collectors became a prerequisite for the ingress of contaminants, which disrupted the performance of the exhaust system. In that case, the tightening did not give any result, then the gasket was definitely burned out or the collector itself was damaged, which is the least possible
Removing the air filter
- If the engine is injection, to remove the air filter you will need to unscrew the four mounting screws of the filter housing cover. The filter itself is located under the cover. If difficulties arise when lifting the cover, disconnect the mass air flow sensor and remove the filter device.
- If you have a carburetor under the hood, then the filter and housing will be held in place by 3 latches. There is a screw in the center of the iron cover, which is often unscrewed by hand. Once you remove it, you can lift the lid without any problems. Underneath there is a filter, which should be removed carefully. Examine its condition carefully. If the filter has been working for quite a long time, it is recommended to change it during the return assembly.
The carburetor is dismantled in the following order:
- Disconnect the antifreeze supply hose from the fitting to the engine starting device. For this purpose, you unscrew the clamps;
- Be sure to drain the coolant into a prepared container;
- Disconnect the exhaust pipe that comes from the exhaust manifold and the BC bracket;
- Disconnect the throttle cable bracket. To do this, you need to remove one end of the spring from the damper control rod, and then remove the entire spring. Now loosen the nut on the bracket, which will allow you to remove the cable from the engagement;
- Disconnect the EPH sensor from the power plug;
- Disconnect the vacuum tube and a pair of hoses from the carburetor heater unit;
- Remove the crankcase ventilation hose;
- Remove the four mounting nuts holding the carburetor and intake manifold;
- Remove the carburetor carefully without tugging. It must be evenly removed from the studs.
Now it’s time to remove the intake and exhaust manifolds. Having dismantled them, you can easily understand how you can get by by changing the gasket, or whether you will need a complete change of the collectors themselves.
The gasket is a consumable item, the purchase of which will cost you almost 50-250 rubles, depending on the manufacturer and region. Services for replacing gaskets for 100 cost more than 1,500 rubles. Add to this the price of a high-quality gasket and you get quite a lot of money. You will avoid such costs if our client can do it on his own.
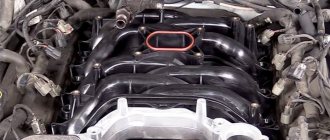
By removing the air filter and carburetor, you gain access to the intake manifold.
To dismantle it you will need a certain set of tools:
- Ratchet with 10mm head;
- Collar;
- Ratchet;
- Deepest head at 13;
- Row head for 13;
- Open-end wrench 13.
When our client is ready, we get to work.
- Unscrew a couple of mounting nuts to bend back the platform located under the carburetor.
- Disconnect the hoses that are connected to the intake manifold.
- Remove the 6 mounting nuts that are located on the intake manifold.
- Remove the manifold itself from the studs. To do this, simply swing the knot to the sides. Often it sticks to the gasket, which causes problems with removal.
- Inspect the condition of the unit. If there is damage, the collector is replaced.
- If the problem lies solely in the gasket, put the intake manifold aside for now and start removing the outlet.
To remove a graduate, you will need:
- Ratchet;
- Open-end wrench 13;
- Socket wrench 13;
- The deepest head is 13.
Is our client still ready? Then let's get started.
- Unscrew the four exhaust pipe mounting nuts from our exhaust manifold.
- Pull the so-called trousers off their heels and take them to the side. Now you can unscrew three more fastening nuts securing the VK.
- Carefully, without sudden movements or jerks, pull the graduate off the stiletto heels.
- Often, during the dismantling of this unit, the manifold or its mounting nuts become stuck to the seats. To prevent this, treat the assembly with WD40 in advance, let it react, after which there will be no problems with dismantling work.
- If the studs break off during removal, you will need to drill out the old element, make a new thread and install a fresh stud.
Replacing the exhaust manifold of a VAZ 2109
Burnout of the gasket under the exhaust manifold is a rather unpleasant and common malfunction on the VAZ 2109.
A product that has become unusable will allow exhaust gases from a running engine to pass under the hood, and the characteristic chattering sound when the engine is under load also does not greatly contribute to a comfortable ride. Replacing the manifold gasket on a VAZ 2109 will help avoid such problems.
The collector gasket is made from a specially compressed asbestos mixture reinforced with steel thread; it can be purchased at any spare parts store. The price of the product, depending on the manufacturer, varies from 50 to 200 rubles. For a VAZ 2109, replacing the intake manifold gasket at a car service center will cost approximately 1,500 rubles and more, not counting the cost of the gasket itself.
Collegium of Advocates
The exhaust manifold on a VAZ 2109-2108 most often has to be removed to replace the gasket, because if it burns out, then it starts leaking in this place and the exhaust gases will go under the hood, and the sound of operation will be quite loud. In general, this problem will not lead to anything good.
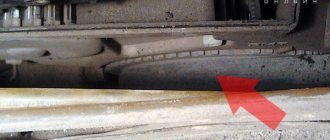
In order to remove the exhaust manifold, you must first perform the following steps: After this, we will need very few tools, namely: an open-end or socket wrench 13 deep head 13 extension ratchet handle So, first you need to unscrew the 4 nuts securing the exhaust manifold to the pants (intake pipe), which are shown in the photo below: And move the pants a little to the side, pulling them off the pins.
Then you need to unscrew the three remaining nuts securing the manifold, since the remaining 6 were unscrewed when removing the intake manifold. And now you can remove the VAZ 2109-2108 exhaust manifold from the studs without any problems, moving it back: If the gasket is stuck to the cylinder head, you can carefully pry it off with a knife blade or a thin screwdriver, then completely remove it from its seat: After This results in such a rather unpleasant picture: You can remove traces from the old gasket on the surface of the cylinder head using a special spray, applying it to the entire area and waiting at least 15 minutes: The remaining traces can be removed using a thin blade, and you can finally restore it to ideal condition having treated the entire surface with the finest sandpaper, the so-called zero sandpaper.
Symptoms that the exhaust manifold gasket has burnt out.
Full list and action plan »
UncategorizedApril 24, 2022 Symptoms that the exhaust manifold gasket has burned out. Complete list and action plan In this article, we will discuss the symptoms when the exhaust manifold gasket has burned out. For an exhaust device, the gasket is one of the main parts on which the entire correctness and accuracy of the exhaust system will depend.
If the manifold seal is not replaced in a timely manner, the safety conditions for operating the vehicle are greatly reduced. In general, a manifold is a device designed to remove exhaust gases from a car engine. The second function of the collector is to improve the filling of the working chambers and enhance the ventilation of the working space.
All operation of the exhaust device is carried out at elevated temperatures and high gas pressure.
This element is attached directly to the head (cylinder head) and the other side is in contact with the exhaust pipe or converter. The most important task of the exhaust manifold gasket is to prevent exhaust gases from entering the valve space. These gases, in turn, can cause fire of parts or elements of the power unit.
The weak link of the system and signs of its failure Symptoms that the exhaust manifold gasket has burned out can be identified as follows: exhaust gases begin to flow into the car interior or their smell is felt; the car engine begins to start poorly; Strange sounds appear in the engine compartment.
If these ailments are detected, you should begin to inspect the exhaust system.
Preliminary work
Replacing the VAZ 2109 intake manifold gasket with your own hands is not very difficult and does not require specific knowledge or expensive tools - the required set of keys is usually present in the trunk of every car enthusiast.
But before replacing, you should try to tighten the fastening of the intake unit - if the gasket is not burned out, it is the loose fastening that may cause exhaust gases to get under the hood. If tightening the fastening does not help, it means that the gasket is completely burned out and needs to be replaced. Replacing the VAZ 2109 manifold gasket will require preliminary work to dismantle the air filter, remove the carburetor and the manifold itself. All of the above work is carried out exclusively on a cold engine.
Removing the air filter with housing
On the injection engine of a VAZ 2109 car, to remove the air filter, it is enough to unscrew the four self-tapping screws securing the cover of the filter element housing - for this, use a 10mm wrench or a ratchet. There will be a filter element under the cover. If the cover is difficult to lift, you can disconnect the mass air flow sensor from the plug.
On a carbureted engine, there are three latches under the hood that can be easily opened. There is a screw in the middle of the metal cover, which can also be unscrewed by hand, after which the cover is removed. Under the cover there is a filter element that must be carefully removed. Subsequently, during reassembly, the filter element can be replaced - if the time has come or if the filter element is very dirty.
Removing the carburetor
After the air filter has been removed, you can begin to remove the carburetor. To remove the carburetor on a VAZ 2109, you will need the following tools:
Instructions for dismantling the carburetor will be as follows:
The work of removing the carburetor is completed. The presented photos and videos will help you clearly follow the process of removing the carburetor.
Removing the intake manifold
After the work of removing the air filter and dismantling the carburetor is completed, you can begin to remove the intake unit. To do this you will need the following set of tools:
The work order will be as follows:
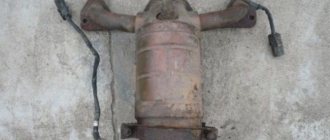
Removing the exhaust manifold
Removing the VAZ 2109 exhaust manifold will require the following tools:
When removing the collectors, a problem may arise such as sticking of the studs and nuts - since the metal is constantly heating and cooling, a souring process occurs.
To make work easier, the fastening studs can be filled with WD 40 liquid in advance, about a day before starting work. This will make it much easier to remove the manifold for subsequent gasket replacement.
If the pin breaks off when unscrewing, you just have to drill it out, and then cut a new thread and screw on a new pin.
Your lawyer
I didn't find any antifreeze in the cylinder block. :/ I suspect that it leaked into the crankcase. I unscrewed the stud using a nut cutter, clamped it and slowly turned it out.
I assembled everything, started it, warmed it up - it doesn’t hold the idle speed, and the timing belt is burning, I’ll look into it. And so, rushing like an airplane (flying, only, low) I felt, after the broken gasket, that I had gone deaf!
As it turned out, the main thing is not to lose faith!
I'm afraid that there is antifreeze in the crankcase, does anyone know how to check?
_Lelik_ 05 Jul 2009
Systemus July 06, 2009 Look at the oil on the dipstick.
If it has whitish inclusions, then there is antifreeze in the oil. When cold, there are no inclusions, the oil does not separate, when starting the engine and running for 5 minutes.
Very small inclusions appear (they look like bubbles - possibly antifreeze). I'll change the oil. I didn’t change the oil. Everything ingenious is simple, the idle speed was due to an unconnected air sensor.
Everything became normal. The check engine light burned a little and went out.
And happiness came to me. The repairs were done according to the Murzilka ZR. What is not included in the gasket replacement description: 1.
When dismantling the intake pipe (pants), you need to disconnect the lambda probe from the terminal. The nuts on the bracket of the pants were stuck to death - the bracket had to be cut off with a hacksaw blade, a new one costs 150 rubles.
2. Drain about 5 liters of antifreeze so that the flooded cylinder block does not cause excruciating pain.
3. To disconnect/attach the intake manifold
Removing the VAZ 2109 injector manifold. Removing, replacing, installing exhaust manifold gasket
A gasket consisting of several layers is installed under the VAZ 2109 exhaust manifold. For various reasons (uneven tightening of nuts, aging), it fails and requires replacement.
The first sign of burnout is the appearance of a characteristic noise. Yes, you can drive if you don’t spare your ears.
But it is better to replace it in a timely manner, since ignition in the engine compartment is possible. The gasket is made of pressed asbestos, which is reinforced with steel thread.
We recommend reading: Extension of the deadline for placing an auction from a request
The price of such a gasket, depending on the store and manufacturer, ranges from 50-200 rubles. The cost of replacement in car services is not less than 1000 rubles.
And this does not take into account the cost of gaskets, nuts, and other components that may require replacement. Therefore, it will be much more effective to do the repairs yourself, saving a decent amount. Before replacing the manifold gasket, it is necessary to understand how the process itself proceeds.
You don't need special tools or the experience of a great 80-level mechanic.
A standard set of tools that are found in every garage is sufficient. The work procedure can be briefly divided into several stages: removing the air filter; dismantling the air filter housing; removing the carburetor;
Replacing the gasket
After the preparatory work is completed - the air filter, carburetor and intake and exhaust manifold are dismantled, you can begin the main work, for which all previous steps were done - directly replacing the gasket itself.
The work order will look like this:
Replacement of the exhaust manifold gasket on the VAZ 2109 has been completed. The exhaust pipe of the muffler is secured with brass nuts, preferably new ones. And don't forget to fill in the coolant that was drained when dismantling the carburetor!
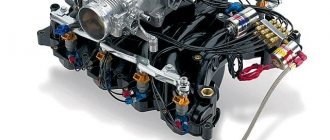
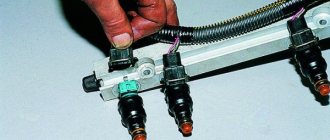
Removing and installing the fuel manifold and injectors
The Multiport Fuel Injection (MFI) system is a device controlled by the ECM. It measures the fraction of fuel under pressure in each cylinder.
The ECM provides control pulses to the fuel injector solenoid.
Fuel enters the top of the injector through the ball or valve needle and a recess in the guide plate at the injector outlet.
The guide plate has 6 holes that control the fuel flow, which creates a conical spray of fuel towards the intake valve. The atomized fuel evaporates before entering the combustion chamber.
Conclusion Attention: the fuel system is under pressure. To reduce the risk of personal injury or fire, the fuel system must be relieved of pressure before disconnecting fuel lines.
1. Release fuel pressure.
2. Disconnect the “-” battery cable.
3. Remove the fuel injector harness connectors.
4. Remove the exhaust gas recirculation valve.
5. Remove the supply line.
6. Remove the fuel manifold mounting bolts.
Before removal, the fuel manifold should be spray cleaned according to the included instructions.