Did you like the article? Follow our channel for new ideas of useful car tips. Subscribe to us in Yandex.Zen. Subscribe.
The technical capabilities of the Niva family of cars are such that they can cope with any off-road conditions.
But the volume of the luggage compartment is not enough for servicing the subsidiary farm. And a trailer could have solved the problem, but the automaker did not provide standard places for installing a towbar in the car’s design.
For reference: A towbar, also called a towbar, is designed to articulate a towed trailer and a vehicle. Its design must comply with OST 37.001.096-84.
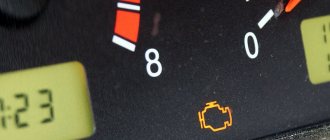
Operational risks
For this reason, towbars were not produced either, which provoked the growth of all kinds of handicraft industries.
Their “products” suggested 2 types of do-it-yourself installation of a trailer hitch on a car:
- Attaching the towbar to the rear bumper guides;
- Attaching the trailer hitch to the side members and the car body.
In addition, the “handicraftsmen” also took into account the desires of the owners to equip their Nivas with gas cylinder equipment, which included installing a cylinder in the rear of the body. For this reason, the design of the trailer hitch attached to the side members looked rather unusual.
Note! Naturally, no one has carried out any dynamic tests of the trailer hitch, carried out according to GOST R 41.55-2005 standards. And car owners exposed their cars to danger, which often caused accidents.
Useful tips
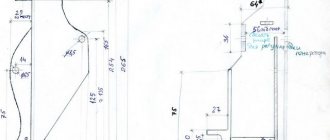
- Due to the fact that a breakdown of the structure while driving can cause a lot of trouble. Avoid butt welding metal. Therefore, it is preferable to attach steel strips to the edges of the beam by cutting holes in them to the size of the pipe section, putting them on its ends, and then welding them.
- Do not use an angle grinder without protective glasses, and do not cook without a mask: take care of your eyes.
- If you want to paint a new towbar with your own hands, then first, thoroughly prepare its surface for painting. To do this, pickle it with any product that contains phosphoric acid to convert rust. Then sand the surface with waterproof sandpaper, pouring water on it to wash away the waste. Dry the assembly, degrease it with solvent for nitro paints or acetone, and cover it with adhesive primer from a spray can. Dry the soil according to the instructions. Sand with 400 grit sandpaper and water until the surface is evenly matte after the water dries. The surface is ready - dry, degrease with alcohol or B-70 gasoline (the solvent will smear the fresh soil). Then you can paint. After this preparation, your paint will last a very long time.
The emergence of a new Niva
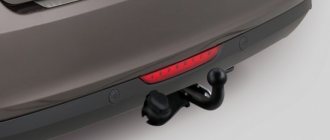
Everything changed with the appearance of a new model in the AvtoVAZ lineup - the Chevrolet Niva:
- The manufacturer has provided attachment points for the trailer hitch;
- They have been reinforced and equipped with threaded connections;
- For operation without a towbar, the attachment points were initially sealed with special tape.
Note! The automaker entered into agreements with trailer hitch manufacturers, which led to the unification of parts for the coupling device, thereby protecting the cars and their owners. This applies not only to the Chevrolet family - installing a towbar on a Priora station wagon has also become safer.
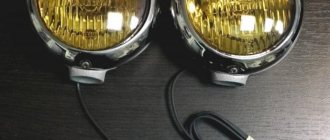
Thanks to this, every owner of new AvtoVAZ cars can independently purchase and install a trailer hitch kit. In addition to towing, the towbar often serves as additional protection for the underbody, as well as making stickers for the headlights, protecting the glass from flying stones.
Several recommendations for using the device
When using the towbar, you must adhere to the following recommendations:
- when towing a trailer, do not exceed the recommended speed of 90 km/h;
- It is prohibited to tow cargo weighing more than 1300 kg;
- the load on the coupling ball cannot exceed 50 kg;
- the loads in the trailer must be evenly distributed, but the center of gravity must be above the axle if the trailer is single-axle, or between the axles if it is a two-axle trailer model;
- When carrying out a technical inspection, the connecting thread must be tightened.
Following these simple rules will extend the life of your trailer, so do not ignore them.
In conclusion, it should be noted that, despite the fact that towbars for a Chevrolet Niva can be different (collapsible, non-collapsible or semi-collapsible, under LPG), the principle of their installation is almost the same. Installing the tow bar will take you about two hours. The main thing when performing such work is to make all connections correctly and make sure that all components work well.
Towbar installation
The process of installing a purchased trailer hitch is quite simple and consists of two stages:
- Direct installation of power elements;
- Connecting a plug socket to the electrical wiring diagram of a Niva Chevrolet car.
Installation of power elements
- Place the car on a pit (overpass or lift);
- Clean the mounting points from dirt and dust;
- Tear off the factory tape covering the threaded holes;
- Apply the tow bar;
- Coat the bolts supplied with graphite lubricant;
- Tighten them, securely installing and fixing the towbar to the car body.
Advice! Experts advise treating the joints of the trailer hitch parts with the car body using an anti-corrosion coating.
Electrical connection
A more difficult stage of the work will be the integration of the electrical components of the towbar with the standard wiring. Because the cost of an error can be too high - from a short circuit and failure of electrical parts to ignition of wiring insulation.
To work, you will need a wiring diagram for the Niva Chevrolet, for example, from the factory instructions, as well as a pinout diagram for the plug socket.
Note! If you are going to use European trailers (camping campers, caravans), then they have 9-pin sockets. Two additional contacts are responsible for power supply to the trailer's household appliances.
The procedure for connecting the outlet will be as follows:
- Disconnect the battery;
- Remove the rear headlight;
- Determine the wire color you need from the electrical diagram;
- Strip the insulation;
- Screw and carefully solder the connecting wire using a soldering iron;
- Connect the free end to the desired contact of the plug socket;
- Repeat the operation for the remaining 6 contacts;
- Insulate the insertion point with electrical tape;
- Reinstall the headlight;
Installation
Installation of the towbar is carried out in the following sequence:
- The car is driven onto an overpass or inspection hole. De-energize the vehicle wiring; to do this, disconnect the battery.
- Remove everything in the trunk. We are talking not only about personal belongings, but also a repair kit and a spare wheel. You should also remove the upholstery by disconnecting all the clips.
- Place the towbar at the installation site. Fix the device, correctly mark the places where the fasteners will be installed.
- Next, you need to drill holes wherever the fasteners will be installed. To avoid possible malfunctions in the future, the holes for fastening components must be treated with an anti-corrosion agent. This will help increase the service life.
- Using bolts and washers, install them into the holes and tighten them well using the appropriate wrench.
- Then, you need to make two more holes inside the trunk and at the bottom of the spar; use reinforcing pads while working. This will not only strengthen the fastening, but will also help relieve the load from the body.
- Next, the bolts are inserted and the linings are installed. The final stage will be the installation of the electrical part. To do everything right, we recommend that you listen to the tips you will learn about below. Choose one of two methods. You can learn more about installing a towbar in the video below.
Direct connection diagrams
If the towbar and trailer of a passenger car (and truck) are equipped with the appropriate connectors, then the electrical connection diagram will not be needed at all, since you just need to insert the socket into the socket.
Pinout of 7-pin trailer socket Euro and RF
- Left side turn signal.
- Reversing lamp.
- Earth.
- Right side turn signal.
- License plate light and right side marker light.
- Brake light bulbs.
- Right side marker light.
US 7 pin trailer socket pinout
A special feature of the connector is the presence of a reverse contact and the absence of separation between the right and left rows of side lights. In some models of American cars, there is no separation between side lights and brake lights (they run on one wire).
Features of the socket connection
To connect the towbar to the vehicle's electrical wiring, we recommend using stranded copper wire. The ideal option is a wire in which each core has a cross-section of at least 1.5 square meters. mm. The wire must have a double layer of insulation.
Features of connecting the trailer hitch, connection diagrams for the 7-pin device, color designations, plug connection diagram, towbar socket connection diagram.
To understand whether you have sufficient information about the trailer hitch.
- How many types of sockets are there?
a) Three types of sockets are available for passenger cars. Thirteen-pin, used in Russia. American or European 7 pin. And there is a special connector.
b) There are two types of sockets on sale. Russian for 13 pins and American for 7 pins.
- What does contact mean, oh?
a) wire going to the left turn signal.
b) Right turn signal wire.
c) A wire that turns on the right and left turn signals.
- Why do they put caps on sockets?
a) The cover is needed to prevent unnecessary wires from being connected to the device.
b) It serves as a protection that protects the outlet from external influences. The cover is needed when the tow bar is not connected to the trailer.
- What contacts can be spliced to simplify the assembly process?
a) You can splice the contacts of two headlights, reverse lights, brake lights, fog lights and side lights. They all turn on synchronously.
b) Any contacts are allowed to be connected. This will make the work easier.
- What does contact mean, oh?
a) Connection to the rear fog lamp.
b) Connection to the vehicle's brake lights.
Answers:
- a) There are three types of sockets - Russian with 13 pins, American or European with 7 pins, as well as a special connector.
- A) The letter “L” indicates the wire connected to the left turn signal.
- B) The cover on the socket serves as protection against various influences. It is closed when the tow bar is not connected to the trailer.
- A) To simplify the work, the following contacts are spliced: two headlights, reverse, brake lights, fog lights and side lights. The connectivity is due to the fact that they all turn on synchronously.
- A) The designation “54G” is a connection to the car’s fog lights.
To transport bulky cargo, a reliable trailer is attached to the vehicle. The connection occurs through the trailer hitch and tight contact with its socket. It is necessary to connect the contacts correctly so that the rear lights on the trailer turn on when driving, signaling to road users that the driver is performing various actions, for example, turning. To connect the signals correctly, you will need to study the trailer connection diagram, as well as the pinout of the towbar socket.
Definition: A trailer socket pinout is a diagram of the connectors needed to connect a vehicle to a trailer with your own hands. An electrical connection is required so that all lighting equipment on the trailer works, in accordance with traffic regulations.
Varieties
It is not difficult to install the metal component of the tow bar, that is, this entire structure, on the car. Plus, some cars come from the factory with a trailer hitch, that is, a towing device (this is our tow bar, but you already know that).
But you need to connect the towbar socket to the car. Otherwise, it will be impossible to connect the trailer. More precisely, you will perform a mechanical connection with a special lock. Only the trailer lights will not be able to function. If you drive out onto the road in this condition, you risk receiving a serious fine.
When buying a trailer plug or a car towbar socket, be guided by what type of connector they have. By purchasing everything at the same time, there will be no problems with the choice. And when purchased separately, the connector may turn out to be different.
In general, towbar sockets are of two types:
- 7-pin. This is a European standard scheme that is widely used on domestic cars and our trailers. The connection is quite simple, which is why this type of wiring has gained such popularity;
- 13-pin or 13-pin socket. A variation designed to connect a car's towbar to trailers such as a motor home. That is, towed devices that need to provide not only connection to lighting devices, unlike 7-pin ones.
Since in most cases a conventional trailer is installed for transporting goods, it is logical to use 7-pin connectors.
But don't be alarmed if the factory trailer plug or the standard towbar socket differ in the number of contacts. For such situations, a special adapter or adapter is provided according to the 7/13 or 13/7 scheme. Accordingly, if the pinout is the same, you won’t have to use any additional adapters.
Answers to 3 frequently asked questions about connecting a towbar socket
Where is the additional socket attached?
If you need to install an additional trailer hitch socket, it must be mounted in the towbar socket.
How to connect contacts?
The contacts are connected using a pinout diagram. If the manufacturer is conscientious, then the box will definitely include instructions for proper placement. If there is no pinout, then the car owner will have to independently determine the identity of all contacts.
What materials are needed to install an outlet?
List of required materials:
- Socket for towbar.
- Various tools for removing the bumper.
- Heat shrink and electrical tape.
- Mounting plate and other fastening elements.
- Wrenches and screwdrivers. You will need to use different sizes.
- Good soldering iron.
- If the kit does not include wires, then you need to find copper ones with a suitable thickness.
- Terminals that will connect to the wires. Usually they are sold together with a towbar, but if they are not included in the package, then you need to visit the market or construction hypermarket to purchase.
- Connection diagram. It is best to have it on paper. It is not advisable to connect from memory. If you were unable to print, then download the diagrams to your smartphone to constantly check the correct connection.
Motorists who decide to independently install a trailer hitch and install a socket need to remember one rule: each core in a multi-core cable must be at least one and a half millimeters thick.
It is also important to know 5 nuances about connecting the towbar socket:
Figure 4. 5 nuances about connecting the towbar socket
Look at the picture of the towbar connector. Switching off will not be particularly difficult, especially if there is a universal component element, which is a towbar connector. It is very convenient to make the connection if the plug and socket match the connectors. Accordingly, a seven-pin socket must be connected to a seven-pin plug. In this option, you can make a normal connection, do not forget to combine the required sockets with the corresponding sockets.
Figure 5. 7 pinFigure 6. Cover
First familiarize yourself with the location of all seven connectors. If they coincide visually, then you can simply try to connect one to the other. If the towbar socket is of high quality, then it must have a cover. It is needed to protect against various external influences. Such protection will be required at a time when the towbar is not connected to the trailer.
Figure 7. Splicing
You can connect electronics in a simpler way. To perform such an operation, it is necessary to combine several leashes into a group and create an effective symbiosis of the supply of electrical signals. You can splice the contacts of two headlights, reverse lights, brake lights, fog lights and side lights. This is explained by the fact that when operating the car they will be used synchronously. Fastening is provided using brackets.
The next method involves changing the car's electrical system. This change consists of combining several wires that lead to the rear light and signal electrics of the trailer. They must be connected to the wires from the coupling device. If the vehicle has a complex electrical circuit, then you will have to spend a little more effort than in previous options. If the car's signal and light bulbs work without a special microprocessor, then you can connect a 7-channel towbar connector. Before you begin the operation, you should make sure that there are enough wires. If necessary, you can make the wiring elements yourself using a three-core copper wire of one and a half millimeters. They should be marked “PVS”.
Top 5 best manufacturers of towbars for cars such as VAZ 2110, Toyota Hilux
Very often, motorists have to transport large loads. Placing them on the roof of a car like a VAZ 2110 is inconvenient and unsafe. That is why you have to deal with connecting the trailer. This must be done correctly - through the tow bar. But in order to make a reliable connection, you will need to buy a device from good manufacturers who have long proven themselves on the market on the positive side. Poor quality equipment will lead to serious consequences - if the turn signals on the trailer turn off, a traffic accident may occur.
List of the best manufacturers:
- Bosal. The manufacturer provides its customers with a wide range of products. All components are qualitatively connected. The best components are used. Instructions for use are always provided with the device. It is clear and visual.
- Thule. The company is also known under the Brink brand. The models are quick-release, so you don’t have to spend a long time fiddling around with connecting and disassembling. The quality of materials and workmanship is very good. The brand has reliably proven itself.
- Auto-Hack. This model has reasonable prices, but the quality of construction is one of the best. You can find a wide selection of products in stores. Quick release models are also available.
- Baltex. People with domestic as well as Chinese cars can purchase. The workmanship is good, but somewhat inferior to previous models. The fasteners are made of stainless steel, and therefore you can drive with a trailer in the rain without any problems.
- Avto S. Suitable for Chinese and Russian cars, both Toyota Hilux and Lada Vesta. The prices are very low.
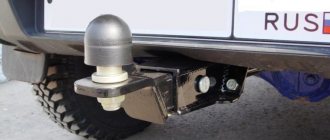
Chevrolet Niva 80 tired ponies › Logbook › Installing a towbar socket with your own hands
Having seen a towbar for a Chevy car in a local BBC store and priced at 2,300 rubles, it was decided to take it, because a trailer is sometimes a very useful thing