Hello, dear friends! Today we will talk about the tow bar for the Niva. We have already talked about the trailer hitch on the Chevrolet Niva, so today’s material will be devoted to the classic domestic SUV.
The Niva tow bar must meet the vehicle specifications. That is, the load on the tow bar itself, its carrying capacity, and the type of trailer used are taken into account. Here you better start from your specific car, since it could be 2131, 2121, 21214, 21213, Urban version or even Bertone. This is not a complete list of Niva variants that our plant produces and has produced.
Structurally, you should get a towbar coupling ball, which will connect to the coupling head installed on the trailer drawbar. This device replaced a conventional hook and became a real breakthrough, since it was possible to get rid of the play between the hooks and the drawbar.
How to make a towbar with your own hands
How to make a tow bar yourself ?
Let's consider the option of making a tow bar using an “A” ball; let us remember that it is attached to two bolts and can be removed. The type of car to which the towbar will be attached does not matter, since they are individual in their features and dimensions.
First of all, let's prepare the tools that will be needed:
You will also need materials without which it will not be possible to make a towbar:
- hook with ball and two eyes;
- metal sheet 2 mm;
- corner;
- pipe or square profile;
- trailer power socket;
- several meters of five-core cable;
- soldering iron
First of all, you need to remove the car’s bumper, no one will have any problems with this, after that you will be able to understand what we will attach the tow bar to. Basically it is attached under the bumper reinforcement, for this you will also need to remove it.
When we have removed everything we need, we begin measuring the future fastening of the tow bar; it is advisable to do this carefully, measuring everything several times. We start by measuring the plates for mounting the bumper amplifier to the size of the mounts and drilling holes in them for the amplifier mounting bolts.
What to do if the hydraulic compensator is knocking: we’ll look into the reasons here.
How to assemble a headlight washer with your own hands: selection of materials, assembly, installation. All this is in our material.
When these blanks are ready, we proceed to the manufacture of fasteners, for this we take a tube and a square profile and, using corners, weld them to the plates that we made earlier. This is best done using gas welding. When we have welded the plates to the pipe, using pieces of angle, we try on the fasteners along the holes on the bolts of the bumper amplifier.
Lada 4×4 3D М4х4 › Logbook › Tow bar bosal 1207-A VAZ Niva 2121,21213,21214,2131,2129
I thought for a long time which tow bar to buy, new or used. From time to time I looked at advertisements for the sale of used trailer hitches on various websites. There weren’t many of them, and the ones that came across, I didn’t like the design. I started to consider purchasing a new trailer hitch. It also has its own nuances: cheap and “not beautiful” or beautiful, but expensive) In the end, after looking at photos of the Niva with various towbars, the choice fell on bosal.
Price tag in the city: 2690 rubles - 1207-H (not removable ball); 2740r - 1207-A (with removable ball). As you already understand, I purchased a bosal hitch with a removable ball. For a difference of 50 rubles, I can remove the ball at any time (for various reasons) and move on, or not remove it. The towbar was delivered to order, on the 4th day. Go.
I don’t know how things work with the configuration of towbars from other manufacturers, but here is a complete set of fasteners, including a socket, 5-wire wires and a cap. Overall I liked it!
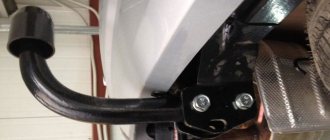
Subsequently, it was necessary to remove the casing completely, because... I had to drill a hole on the right side too
But in order to drill the holes I had to remove the rod halfway. On the left we unscrew the bolt completely, and on the right we “loosen it”. As a result, the rod hangs and does not prevent us from drilling holes.
I drilled first with a 6 drill from the bottom, then on both sides with drills: 8.10 and then, from above, with a 16 drill + machining the hole with a roller cutter, for a diameter of 16.5 mm. And all for the purpose of getting the bushings through.
You need to drill carefully, because... We may subsequently rest the nut against the towing eye mounting bolt. You can, of course, drill a hole closer to the “standard” bolt securing the bracket to the spar, but then the additional bolt won’t be of much use. Or vice versa, closer to the rear apron, but apparently there is no additional patch there, which means the body metal there is thinner. Everyone has their own taste and color, but personally I approached the location of the additional bolt with such arguments.
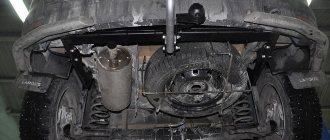
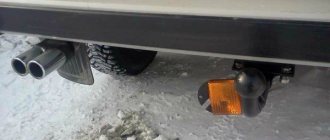
On the left side, in order to drill a hole, I had to “throw off” the muffler from the rubber band.
I inserted the harness through the elastic band at the bottom of the apron, which I had previously drilled. The cable itself was laid inside the apron and led to the left headlight.
Source
Installation nuances
Before installing the towbar on the Niva, a number of preparatory measures should be carried out:
- Place the car on an overpass, inspection hole, or raise the rear of the car using a jack.
- Disconnect the car.
- Remove moldings, mudguards, and plastic covers from the car.
- Remove the wheels.
- Empty the trunk and remove the trim.
Many Niva models are equipped with standard places for attaching a tow bar.
After completing the preparation, proceed directly to the installation of the part:
- Using two bolts, a cross member is attached to the rod.
- A tow bar is placed under the bumper. It is important to consider that when installed correctly, the rear corner of the trailer hitch rests against the transverse beam of the car, but does not interfere with the operation of the vehicle components.
- Using two clamps, attach the cross member of the draft device to the bumper holder.
- The rear part of the towbar is pressed from below to the transverse spar, two holes with a diameter of 1.05 cm are drilled through it. From the interior side, the resulting holes are drilled to a diameter of 1.08 centimeters and a depth of 0.5 cm. Four bushings that come with the kit are installed in the resulting niches towbar.
- In the trunk area, two holes with a diameter of 1.25 centimeters are also drilled in the bumper holders. Further, by analogy, they expand to 1.8 centimeters, and bushings are inserted into them.
- Next, the socket box is mounted and the ball itself is installed directly.
At the end of the work, the previously dismantled parts and a protective cap on the trailer hitch ball are installed on the machine.
It is generally accepted that a towbar does not reduce the vehicle's ground clearance. Except for those cases when a reinforced bumper is installed on the car along with a tow bar.
Installation
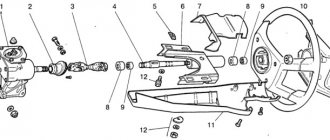
Figure 2-18 shows the main version of the trailer hitch installed on a LADA 4×4 vehicle:
Figure 2-18 – Design and delivery set of LADA 4×4 trailer hitch: 1 – mounting plate; 2 – bushing; 3– rod assembled with brackets; 4 – socket box; 5 – hook
Unscrew bolt 2 on the right and left sides, Figure 2-19, securing bracket 1 of the bumper (replaceable head 19, knob).
Unscrew the rear bolt 3 securing the towing eye 4, if the vehicle has one (replaceable head 17, knob).
Connecting the device outlet
As for the connection diagram of the socket designed to provide current to the towbar, it is designed so that the second and fifth contacts remain free . The yellow trailer hitch wire is soldered to the first contact, it is responsible for the left turn, and the yellow-green wire is soldered to the third (acts as the trailer mass). The fourth contact will be used for soldering a white wire, which will ensure the operation of the right turn, the sixth is red, responsible for the brake light, and the side lights function thanks to the blue wire soldered to the seventh contact.
Preparing car trailer wires for soldering is carried out according to the following instructions:
- The wires (with the exception of blue) protrude from the cable by 2 centimeters.
- They are stripped of 7 millimeters of insulation (blue by 13-14 millimeters, in addition, it is cut off at the end by 0.5 centimeters).
- Power is supplied from connectors located on the rear lights.
We recommend: The VAZ-2114 stove does not heat well - causes and solutions to problems
When connecting an outlet, care must be taken to ensure good insulation . If water gets on the contacts, oxidation will occur and it will become inoperative. There is a high risk of a short circuit . The insulating materials are the rubber gasket that comes with the socket and the sealant.
Connection
| Contact | Connection point |
| 1 | Left turn |
| 2 | PTF |
| 3 | Weight |
| 4 | Right turn |
| 5 | Reverse |
| 6 | Stop signal |
| 7 | Dimensions |
Let us remind you that you will find other improvements to the LADA 4×4 in this category.
Key words: 4x4 trunk
Share on social networks:
Found an error? Select it and press Ctrl+Enter..
Source
Operating rules
In order for the part to last long enough and to avoid problems with the traffic police, the following rules for operating a trailer hitch on a vehicle must be observed:
- Before installing the trailer hitch, you should clarify whether the vehicle manufacturer provides for the installation of this equipment. If you do not do this and do not register changes to the design of the car, then problems with the traffic police may arise.
- When transporting a trailer with a gross weight close to the maximum value, the maximum permissible vehicle speed should not exceed 90 kilometers per hour.
- Regularly check the tightness of the trailer hitch connections. Experts recommend carrying out this operation. Experts recommend carrying out this operation every 1000 km of the vehicle.
- To protect a product that has not been used for a long time from destruction, and to protect it from the negative effects of the environment, use a protective cap and a special lubricant.
- Scratches and chips that occur on the part during operation are covered with a special restorative composition. In addition, moisture, salt and dirt should be removed from it regularly. This is necessary to protect the trailer hitch from corrosion.
With careful use of the trailer hitch, the part will last 10 years.
Do-it-yourself trailer hitch
You can make your own towbar for a passenger car using an angle grinder and a welding machine. We present the basic algorithm for the manufacturing process:
- remove the rear bumper;
- find the holes that lead into the voids of the side members;
- measure the length of the segment between the holes found;
- cut a section of steel pipe 50x50 mm according to the obtained length;
- make a mark in the middle of the workpiece;
- take two pieces of 5 mm thick sheet steel measuring 20x7 cm and make holes 5 cm in size at the edge of each;
- place the strips on the pipe with the holes and weld them - the distance should allow you to place a coupling hook with a ball between them;
- secure the hook with nuts and bolts 10;
- then we move on to working on the attachment to the side members - weld steel strips 5 mm thick and 30x7 cm in size onto the ends. The direction should be opposite to the hook, and with the hook bracket the angle should be 900;
- insert these strips into the side members;
How to make a homemade towbar for your car
- drill holes with a diameter of 12 mm in the rear side members and inserted plates;
- weld nuts of the same size to them;
- take a 3 mm thick plate and mark the holes for the socket, then drill them;
- weld the plate to the hook bracket, install the socket on it.
The product is ready - you can install it and connect it to the machine’s electrical network.
Kinds
Before installing a towbar on the Niva 2121 and other modifications of the Lada 4×4, you should familiarize yourself with the types of trailer hitch:
- Removable.
The towing hitch is secured with two or more bolts. If necessary, the part can be completely dismantled. Suitable for installation on VAZ 21213 and other models.
- Non-removable.
This version of the tow bar is quite difficult to dismantle, since it is fixed on special platforms using large bolts (the part is also often “tightly” welded to the fastening mechanism). Can be installed on models 2121, 21213 and other Nivas.
- Quick release.
The hook and the hitch ball of the trailer hitch are easy to remove. These Components are stored separately from the rest of the towbar structure and used when necessary. The locking coupling extends slightly beyond the rear bumper of the car. The part is installed on many Niva models. For example, the VAZ 21214 car with a removable trailer hitch ball is especially popular among car enthusiasts.
- Quick-release, equipped with a vertical mount.
In this design, the hook is removed downwards. After dismantling, the fastening is not visible, as it bends under the bottom of the car. This towbar is installed on the VAZ 2131 and other Lada 4x4 models.
When choosing a towbar, you should pay attention to the numbers indicated on the part. They indicate the maximum draft load and are confirmation of the originality of the product.
When choosing a towbar for the Niva, you need to pay attention to the products, "Auto-Hack".
What should you consider when installing the device?
Installing a tow bar involves taking into account parameters such as vertical and horizontal loads. The first value is determined based on the maximum permissible pressure that the trailer exerts on the hook (the weight of the cargo is taken into account). The second is based on the maximum permissible weight of the trailer itself. These indicators must be considered for the Niva taking into account the surfaces on which the combination will move, since on unpaved roads both types of load increase significantly, which can lead to problems when braking or sliding on the highway.
Niva 21214 is often used for trips to the country, fishing, hunting, and everything goes in the trailer: from household equipment and potatoes to boats, therefore the fastening must be reliable. The modern car market offers many options for towbars for Niva 21214 and other models, including:
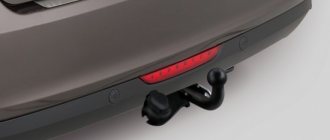
Part installed on the machine
- non-removable, where the hook is welded to the base;
- removable, which is secured with two or more bolts;
- quick-release, on which the hook with the ball from the tow bar is removed and stored separately (the coupling itself, intended for fixing, protrudes slightly);
- quick-release with vertical fastening - the hook is removed downwards, the fastening is not visible;
- machine with a hook that deviates under the bottom, non-removable.
It is unlikely that you will be able to make a high-quality towbar on a Niva with your own hands, so you should pay attention to inexpensive samples of the VAZ 1207 (A) at a price of about 3,000 rubles. The kit includes wires and an electrical outlet. This sample can be installed with your own hands on a modern Niva, as well as on cars that began running on Russian roads back in the 80s of the last century. The towbar is a removable mechanism, has a dead weight of 12.7 kg, a permissible vertical load on the ball is 75 kg, and is suitable for trailers with a maximum permissible weight of no more than 800 kg.
Selecting a trailer hitch
Is there an option for installing towbars on Nivas if the car originally came from the factory without one? Yes. These domestic crossovers have special holes, so the trailer hitch is mounted in standard places. But you will also need to drill a few additional holes. Now look specifically at your car.
Niva car owners are offered the installation of several trailer hitch options:
- non-removable or non-removable, in which the hook or coupling ball is welded to the base;
- conditionally removable, fastened with several bolts;
- quick-release, having a slightly protruding coupling for fixation, which allows you to store the hook with the ball separately;
- quick-release with a vertical type of fastening, where the hook is pulled down and the fasteners are not visible;
I will say right away that a removable ball is more preferable for me, since this design allows you to use the trailer hitch only when necessary. Moreover, it is better to take quick-release devices, because unscrewing several bolts will take quite a lot of time.
For VAZ Niva 4×4, they usually prefer to choose the simplest towbar options. They are inexpensive and can be purchased for several thousand rubles. Although this has its drawbacks.
Alternative trailer hitch options
There are alternative solutions that I would like to discuss with you.
- Reinforced bumper with towbar. Nowadays, the Chevrolet Niva towbar with bumper protection is very popular. But no one is stopping you from installing it on the classic Niva. This is a ready-made bumper with a trailer hitch mounted into it. Products from Bosal (Bosal) or RIF will cost about 30 thousand rubles. This cost is justified because you get a bumper with a powerful gate and reinforcement, providing a high degree of rigidity and resistance to loads. Allows you to carry heavier loads. In this case, installation is carried out on conventional crossover body brackets and no modification is required;
- Square towbar. Another option for the rear bumper. It costs about 2 times less than the previous trailer hitch. But you will need to buy a ball joint separately. It is in great demand due to price, ease of use and load-bearing capacity. And it looks quite original compared to standard towbars. Just look at the numbers indicated on the trailer hitch. They indicate permissible traction loads and additionally help to make sure that what you are looking at is not a fake.
We recommend: Why do you need a KMB check?
In general, the topic of the power bumper for the Niva deserves special attention.
Each towbar comes with a connection and installation diagram; the kit includes a towbar socket and instructions on how to connect the socket and all electrical components.
Some people prefer to assemble the towbar with their own hands, relying on drawings, photos and video instructions. Personally, my opinion is that this is not the best option. To assemble a full-fledged high-quality tow bar, you need to take into account all dimensions, select high-quality materials, use the appropriate wires for electrical equipment, and so on. And how much does it cost to assemble a homemade trailer hitch? If it’s high quality and reliable, then it’s about the same as a standard factory tow bar. This is an imaginary saving of money. The price will be the same, but the quality of construction will not. Plus, it is more difficult to register a homemade towbar; problems may arise during registration.
I advise you to first familiarize yourself with whether it is possible to install a trailer hitch and what the traffic regulations now say about this.
Bumper towing options
How to install a part on a car
A slightly different price will have to be paid if the car enthusiast wants to install a ready-made bumper with a built-in tow bar on models 2121 or 21213. The cost of such equipment, for example, from the “RIF” series, is about 30,000 rubles without taking into account labor. This price is due to the fact that a powerful gate with reinforcements is installed on the bumper, which gives increased rigidity to the bumper, and is equipped with a strong gas stop.
The materials for the manufacture of the bumper and additional elements are a 6x6 cm profile pipe with a wall thickness of 5 mm, which makes it possible to transport cans, oversized wheels and carry the maximum possible loads. The bumper with a towbar is installed on regular body brackets and does not require modification; you can use it to pull the car on cables using a higet.
A rear bumper with a so-called square for a towbar from the same “RIF” will cost twice as much. In this case, you will have to buy a ball joint separately, which, however, can be quickly installed and removed (inserted and secured with a cross pin). When purchasing branded imported products for the Niva 2121, it is better to pay attention to the presence of numbers on the tow bar indicating the permissible draft load. This is additional evidence that the product is not a fake.
Installation recommendations
You have already decided what you are installing on the Niva, you have found the product article, purchased it and are ready to begin installation.
How did you do it? Did you buy the trailer first and then the towbar, or vice versa? Write in the comments. And don't forget to read up on the pitfalls of buying car trailers online.
If you want to buy a used tow bar, carefully check its quality and condition. However, long-term operation could have a negative impact on the reliability of the trailer hitch. That's why it's better to buy a new Niva tow bar.
Well, okay, it's up to you to decide. We move on to the question of how to install a towbar on a car.
- First, remove all the moldings, mud flaps, bumpers, fog lights, rear amplifier and muffler. That is, everything that can interfere with you during the installation of the trailer hitch;
- In some Nivas or with some modifications, you have to remove the rear wheels, hang the car with jacks or put it on a pit;
- Remove all unnecessary items from the trunk. This is where problems may arise for cars with HBO. If the SUV is converted to use gas, then there will probably be a gas cylinder in the trunk. It is difficult to dismantle it, and carrying out work with a welding machine and drill is not the most sensible idea. You will either have to abandon the idea of installation, or entrust it to specialists. I cannot afford to advise working in such conditions with my own hands;
- If everything is fine with access to the trunk, lift the floor and remove the trim;
- The cross member is attached to the rod using two nuts and bolts (their size will be M12x40). Then the tow bar is inserted under the bumper so that the rear corner rests against the crossover beam. This way you can fix the hitch cross member with two clamps to the holder of your bumper on the car;
- The rear corner of the towbar is pressed against the crossbar from below, and a pair of 10.5 mm holes are drilled through it. From the interior, the holes are drilled further to obtain a diameter of 18 mm and a depth of 5 mm. The bushings included in the kit are installed in them. Only 4 pieces;
Congratulations, you did everything yourself! Hooray!
How to exit from the main road correctly
Congratulations, you did everything yourself! Hooray!
Do-it-yourself square towbar
The American towbar differs from the European one in that it is made for a square, and not for a ball clutch. Instead of a ball hitch hook, there is a square measuring 50x50 mm - below we will look at how you can make it yourself:
- Cut the edges from a 200 mm channel to get a plate of the required length - drill holes in it for fastening to the frame;
- For additional vertical fastening, weld a corner 50x50x4;
- Bore the holes in the frame that already exist - drill through them in the upper part;
The strength of the structure allows you to carry a full trailer
- Insert pieces of half-inch pipe inside the frame so that it does not flatten when tightening the mounting bolt;
- For a horizontal section, weld half-meter plates 8 mm thick and 10 cm wide;
- Make a pipe from two corners 75x75x6 and weld to the fasteners;
- take a 60x60x4 profile pipe 20 cm long and weld a strip of steel 4 mm thick and 30 mm long onto the working end;
- cut out a square section in the power frame and place it there. Weld and reinforce with slopes;
- Next you will need to drill holes for the locking pin;
- Now you can move on to sanding, puttying and priming, after which painting is done - the paint has dried, the product is ready.
General information about the tow bar
Not everyone knows what a towbar is for. But the word towbar or towbar is always associated with connecting a trailer to a car. In addition to the fact that you can connect a trailer to a Niva Chevrolet, the towbar also allows you to tow. If the Chevrolet Niva is used primarily in rural areas, then the presence of such a device simply becomes vital. The towbar protects the exhaust system, as well as the bumper, from the negative influence of the ground surface. With a tow bar, the Niva Chevrolet is practically irreplaceable, so it is important to find out how to install such important equipment on a car.
A towbar is not an LPG, but its installation still has its own characteristics and nuances. It consists of a metal base with places for attachment to the car body and a ball to which the trailer is attached. Also in the design of the towbar there is a special socket, which serves to transmit a light signal to the trailer.
So, let's move on to the actual installation of the product, but first let's find out what the installation kit consists of.
What is included?
A towbar is not installed on the Chevrolet Niva from the factory, but this can be done at a car dealership or independently, which is what many resort to. From the factory, holes are made in the car body that will serve to install a towbar if the vehicle owner needs it. This is very good, since drilling holes yourself can violate the integrity of the car’s structure and lead to some dire consequences.
A tow bar kit can be purchased either at a car dealership, in a store, or even at a car market, but, most importantly, before purchasing, make sure that this product is manufactured specifically for the model of your car. To do this, you need to know the year of manufacture of the car. The cost of the kit ranges from 1000 to 5000 rubles. It all depends on the manufacturer. For example, an original trailer from BERTONE costs between 3500-5000 rubles. And they differ not only in design, but also in the quality of the metal used in the design of the product, the presence or absence of welds, the thickness of the product, and most importantly, reliability.
If you purchased a towbar for a Chevrolet Niva, you should know that the product package includes:
- The device itself;
- Socket (made of plastic or steel);
- Wires;
- 2 nuts and screws for fastening;
- 6 bolts;
- Washers and cap for the ball.
We recommend: Replacing antifreeze Daewoo Nexia: instructions, draining, flushing, filling
Each kit must also include installation instructions.
Lada 4×4 3D Raspberry Baroque › Logbook › Installing a tow bar on a Lada 4×4 Niva
Hi all!
Even before buying the Niva, I ordered a new towbar from Bosal, because I often have to transport something. I bought it on the recommendation of Seryozha Romanov, if you are interested in modifications to the Niva, then you obviously know who he is. In general, his Niva has exactly the same one. If you are too lazy to read this text on installing a towbar, then everything is the same in video format. But I know that not everyone can watch the video because they are sitting at work, so I will describe everything the same in text format. Here's the package
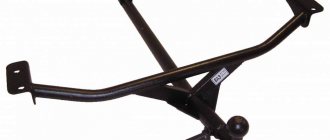
First of all, install the pipe and lightly tighten the bolts without tightening them
The pipe must be placed at a 90-degree angle to the outside, otherwise it will rest against the body of the car
Next, we take the power part, and lightly tighten the bolts, connecting them to the pipe
There are 2 holes in the beam where you insert the bolts and tighten them
After this, you can tighten the bolts, connecting the power part to the pipe
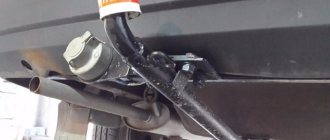
After this, tighten the bolts securing the tow bar pipe to the pipes that hold the bumper.
As you can see, on the left one bolt rests on the exhaust pipe, so you simply cut it off with a grinder. Next, insert the removable square itself and secure it all with a cotter pin.
Insert the ball and spin it
Please note this tow bar has 2 positions. If you have a tall trailer with large wheels, then this position may suit you
My trailer is low, so everything will remain as in the previous photo. We lubricate the whole thing with lithol, and put on the cap, that's it! The towbar is ready!
There is a bolt on the bottom of the towbar to which you can attach the trailer chains, so that if the drawbar becomes detached from the ball, the trailer remains on the towbar.
But what I liked about it were the two holes at the bottom. It is very inconvenient to unscrew the bolt each time, so I will simply snap 2 carabiners into these holes.
Well, the most important thing is to check how it all works.
Since the trailer was in this condition at the time the tow bar was installed,
then I borrowed a trailer from friends
2.5 years ago the trailer was like this new
Source
How to attach the towbar
The coupling device is attached to the power parts of the body, but in no case to the bumper - the latter is not able to withstand the loads associated with moving the trailer.
Below we provide several examples of where the coupling device is attached in some cars.
To "Niva"
The Niva towbar is a design consisting of a coupling ball, which is placed on the car, and a coupling head, which is placed on the trailer drawbar.
Towbar installation method
For ease of explanation, it is necessary to divide the towbar design into two parts:
- front;
- back.
To attach the tow bar, it is convenient to use a bolted connection, since it is foldable. In other words, the tow bar can always be removed if necessary.
Installation is carried out as follows. The front part is mounted on a spar. Holes are drilled there into which the bolts will be inserted. Two holes will be enough.
Of course, we are talking about the rear cross member, which sits directly between the wheels of the Niva. It is recommended to attach the back of the hook to the rear bumper tubes. This is the simplest and most reliable installation method.
Direct connection diagrams
If the towbar and trailer of a passenger car (and truck) are equipped with the appropriate connectors, then the electrical connection diagram will not be needed at all, since you just need to insert the socket into the socket.
US 7 pin trailer socket pinout
A special feature of the connector is the presence of a reverse contact and the absence of separation between the right and left rows of side lights. In some models of American cars, there is no separation between side lights and brake lights (they run on one wire).
Pinout of 7-pin trailer socket Euro and RF
- Left side turn signal.
- Reversing lamp.
- Earth.
- Right side turn signal.
- License plate light and right side marker light.
- Brake light bulbs.
- Right side marker light.
Pinout diagram for 13-pin socket
- Left side turn signal.
- Rear fog lamp.
- Ground for terminals 1 to 8.
- Right side turn signal.
- Left side of dimensions and number plate illumination.
- Brake light lamp.
- The right side of the dimensions and number plate illumination.
- Reversing lamp.
- Constant voltage 12 volts 35 amps.
- The voltage is 12 volts 35 amps, supplied after the ignition is turned on.
- Ground for terminal.
- Signal wire.
- Ground for terminal 9.
When the car is not equipped with a modern electronic control unit. Thanks to this, electrical wires can be directly connected to existing electrical circuits. That is, the wires that come from the connector are connected to those connected to the rear lighting equipment.
Technical features
The dimensions of the future unit and the number of wheel pairs depend on the purpose of its operation. So, to transport large-sized cargo and long items, you will need long biaxial equipment with folding sides. And for the transportation of bulk substances, a single-axle truck with increased side height, equipped with an awning, is suitable. For trips through rural areas at low speed on a road train, including a trailer with a gross weight of up to 0.3 tons, brakes are optional. But to increase load capacity and safety, it is better to give preference to models equipped with a braking system.
Trailer MZSA 817730.012
As for the towing capabilities of the machine, that is, the total weight of the towed equipment, the manufacturer provides clear restrictions, voicing an indicator of 600–750 kg. The information is written down in the vehicle's operating manual. Another indicator is ground clearance. The Niva car is a crossover with high cross-country ability, which means high ground clearance. Based on this, the trailer is selected with the appropriate indicators.
Additional equipment includes:
- Winch.
- Tipper mechanism.
- Hubs from Niva.
- Tent.
- Folding sides.
- Locks.
- Drawbar extension.
- Lighting equipment.
Some of this is included in the basic kit, others are purchased separately as an add-on.
Requirements for a towbar on a Niva Cheverol
The proprietary device that is planned to be installed on this car model must meet all the necessary standards. Typically, before it goes on sale, it undergoes tests that check metal fatigue and all important loads.
Before the towbar is installed on the Chevrolet Niva, you need to ensure that it meets the following requirements:
- Be sure to purchase an original tow hitch.
- Towing weighing more than 1300 kg is not allowed.
- When traveling, you must not exceed a speed of more than 90 km/h.
- It is imperative to monitor the load on the coupling ball - it should not exceed 50 kg.
- With each subsequent maintenance, tightening of thread connections is necessary - it is better to do this at a service station.
Towbar on Niva Chevrolet
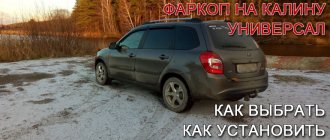
Towbar for Niva: which one to choose and how to install it yourself
Hello, dear friends! Today we will talk about the tow bar for the Niva. We have already talked about the trailer hitch on the Chevrolet Niva, so today’s material will be devoted to the classic domestic SUV.
The Niva tow bar must meet the vehicle specifications. That is, the load on the tow bar itself, its carrying capacity, and the type of trailer used are taken into account. Here you better start from your specific car, since it could be 2131, 2121, 21214, 21213, Urban version or even Bertone. This is not a complete list of Niva variants that our plant produces and has produced.
Making your own tow bar
Despite the sale of ready-made towbars, motorists independently manufacture trailer hitches for the Niva. To design a product yourself you will need:
- Prepare a drawing of the future part. You can create it yourself, order it from a specialist, or download it on the Internet. The technical documentation must indicate the dimensions of all components of the trailer hitch and the type of fasteners.
- Purchase high quality materials. The use of low-quality metal will lead to rapid failure of the tow bar.
- Ensuring reliable connection of all parts of the trailer hitch to each other. One of the most popular types of homemade towbars is non-removable. This choice is explained by the relative simplicity of the design and the absence of moving mechanisms and elements in it.
The quality of a homemade trailer hitch will be an order of magnitude worse than a serial one. In addition, there will be significant problems with registering a homemade part with the traffic police. You also need to take care of proper installation. Otherwise, using the towbar may damage the rear of the vehicle.
Niva is an off-road passenger car. The vehicle is used for trips out of town, fishing and hunting trips. The car also often acts as a tug for stuck vehicles. By installing a towbar, you will be able to fully enjoy the operation of your car.
Some variations in the towbar design itself
this is very convenient when the hook part of the device can be disassembled. Typically, threaded connections are also used here. After all, it is not always necessary to accurately perform a hook using a ball holder.
So, to change the towbar, in fact, you will only need to replace part of the hook; the towbar itself remains in place. It's fast and convenient. Especially if the company has several trailers (trolleybus, trailer for towing a boat, etc.).
Of course, according to the rules, there must be a socket on the towbar itself. This is necessary so that the turning lights and dimensions can be controlled from inside the car.
There is only one technical solution here, and it is used in almost every tow bar in use today: the European tie-down. Finding a diagram on the Internet is easy.
The socket has only six signals + ground.
See also:
- Learn what a towbar is and how it can be used.
- Practical tips for creating a tow bar - https://yakauto.ru/kak-sdelat-farkop/
Andrey Lapochkin will tell you which towbar is best suited for use on the Niva:
Useful tips
- Due to the fact that a breakdown of the structure while driving can cause a lot of trouble. Avoid butt welding metal. Therefore, it is preferable to attach steel strips to the edges of the beam by cutting holes in them to the size of the pipe section, putting them on its ends, and then welding them.
- Do not use an angle grinder without protective glasses, and do not cook without a mask: take care of your eyes.
- If you want to paint a new towbar with your own hands, then first, thoroughly prepare its surface for painting. To do this, pickle it with any product that contains phosphoric acid to convert rust. Then sand the surface with waterproof sandpaper, pouring water on it to wash away the waste. Dry the assembly, degrease it with solvent for nitro paints or acetone, and cover it with adhesive primer from a spray can. Dry the soil according to the instructions. Sand with 400 grit sandpaper and water until the surface is evenly matte after the water dries. The surface is ready - dry, degrease with alcohol or B-70 gasoline (the solvent will smear the fresh soil). Then you can paint. After this preparation, your paint will last a very long time.
Sources
- https://ProDemio.ru/farkop-na-nivu-svoimi-rukami-chertezhi/
- https://okuzove.ru/modifikacii/pricepnoe-ustrojstvo-dlya-avtomobilya-svoimi-rukami.html
- https://7road.ru/drugoe/podklyuchenie-farkopa-niva-21214.html
- https://nadouchest.ru/farkop-na-nivu-chertezh-razmery/
- https://chnivaremont.ru/tyuning/farkop-na-chevrole-nivu.html
- https://avto-idea.ru/remont/ustanovka-farkopa-na-shevrole-niva-otlichiya-ot-ustroystva/