Adjustment methods
The control rack can be adjusted in 2 ways.
Adjustment method
Peculiarities
If the rack is removed and adjusted, in most cases we are talking about repair, in other words, replacing the unit with a new one. It is recommended to carry out similar settings only in almost all situations
Without dismantling the unit
This adjustment method is vital if you need to tighten the rack a little, remove free play, and get rid of knocking. It is possible to do without dismantling work, in other words, set up the mechanism specifically on the car
Do-it-yourself Audi 80 steering rack repair.
Malfunctions
There are several corresponding defects in the control rack that owners of the VAZ 2109 encounter. In some situations, many get by with a simple adjustment, in others a more detailed intervention in the design of the unit and its components will be necessary.
Failures of the control rack are as follows:
- The control rack fastenings have become loose;
- The rack
itself or its gears have worn out; - The pair engagement is not adjusted as expected;
- The bushings at the junction of the rack and the control rods have worn out.
Read
The feasibility of installing EUR and power steering
Does it make sense to install an electric or hydraulic booster on your car? The only, but most important thing that such an installation can provide is to provide more comfortable driving. But you need to take into account that installing such a system is a rather complicated task that not everyone can cope with. At the same time, its cost is quite high, and if you cannot install the unit yourself, you will also have to pay a substantial amount for installation
Therefore, you need to decide whether it is profitable for you to install an amplifier from an economic point of view (video author - Gennady Martynyuk)
At the same time, its cost is quite high, and if you cannot install the unit yourself, you will also have to pay a substantial amount for installation. Therefore, you need to decide whether it is profitable for you to install an amplifier from an economic point of view (the author of the video is Gennady Martynyuk).
Adjustment
What is necessary, the situation develops in such a way that tightening the control rails nevertheless gives a positive result. Therefore, you need to figure out how to tighten the knot and what you will need for this purpose.
DIY Volvo XC90 steering rack repair.
You can adjust the rack through the bottom of the car, removing the engine protection, or through the top. In the second case, the work will have to be done by touch. So decide for yourself what is more convenient for you.
- To adjust the control rack, you need to tighten the adjusting screw. You can find it without any problems in the control mechanism. To be more specific, in the end cap.
- It’s normal to have a flyover, also called a pit, in the garage. In this case, there are no similar criteria; many people make do with lifting the car using a jack. Only in this case will it be necessary to additionally secure the car to avoid it sliding off the jack and possible consequences.
- While raising the body using a jack, be sure to align the front wheels straight.
- There is an option to measure the free play using a playmeter. Moreover, they can be ancient or electric. The latter are more pressing and comfortable during the implementation process, but there is no choice. What you find is what you will use.
- According to current standards and standards, for the VAZ 2109 the free play of the steering wheel should not exceed 10 degrees.
- Find the adjusting screw and begin to tighten it evenly. The operation is carried out slowly. From time to time, check the steering movement, the presence of free play, or, in other words, a knock in the control column.
- Use a special key for adjustment. It is available at every auto parts store.
- The key is inserted into the adjusting screw
and turned counterclockwise. Scroll a little and check the result. - The procedure is delayed. And don't rush any further.
- When you feel that the adjustment has reached the appropriate level, take a test drive in your own car, feel how the steering wheel moves, whether the knocking has disappeared, free movement, how tightly the steering wheel turns.
- If the steering wheel has become very tight, you will have to slightly loosen the tension of the adjusting screw.
Repair of the VAZ 2110 steering rack with power steering.
If there is no positive result after the adjustment, you will have to eliminate play and knocking by dismantling, repairing or completely replacing the unit. Now decide for yourself.
There is no need to rely solely on reiki adjustments as a cure for all its diseases. And in addition, there is no need to rush to conclusions that the rack needs to be replaced. Try to adjust, and then act according to the situation.
When you sharply turn the steering wheel from the neutral position (wheels straight) and hear extraneous knocks or noises from the steering rack, beating of the steering wheel, the car pulling to the side and spontaneous deviation from the movement, this directly means that the VAZ 2109 steering rack needs to be repaired or replaced, and urgently. The steering rack is the most important unit for controlling the direction of movement of the car; backlash and other problems make steering difficult and pose a danger to your health and life. How often do you hear in the news: a driver lost control of a car? You yourself understand perfectly well what consequences this leads to. Our instructions will help you repair and replace the rack yourself.
Let's look at the rack diagram and repair options
There are three repair methods:
- Complete replacement of the rack (if you don’t have much time to tinker and you’re happy with the price, or the mechanism is not suitable for repair)
- Replacing parts from the repair kit (here you will have to tinker, remove the mechanism, disassemble and reassemble)
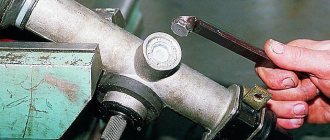
- An alternative to repair and the fastest way is to tighten the nut on the steering rack using a special wrench
This method gives a positive effect (just not always and not for long), but can have bad consequences. For example, if you tighten the nut too much, then the force required to rotate the steering wheel will increase, which makes it more difficult to control the car. More serious consequences are the steering wheel jamming while the car is moving; losing control, especially at speed, is extremely dangerous for you and others
Necessary materials and tools
Replacing the steering rack of a VAZ 21093 - 2199 requires the necessary materials:
- Aerosol "Movil"
- Clean rags
- Plastic clamps 200 mm long and 4 mm wide (three pieces)
- Penetrating lubricant WD-40 (“liquid wrench”) to unscrew rusted and soured connections
- Liter of white - spirit
- FEOL type bearing grease or something similar
The following spare parts will also be required for repairs:
- Silent blocks (see Replacing silent blocks on a VAZ: we do it ourselves)
- Reiki cover
- Tips
- Special kit (repair kit) for repair
Replacing the steering rack on a VAZ 21093 - 2109 will require the following tools:
- Tip puller
- Hammer
- Socket heads
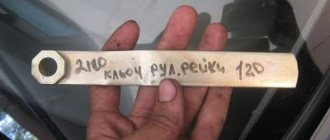
- A special key for the rack (it fits onto the pressure nut and has an internal octagon)
- Ratchet wrench extension
- A special wrench for unscrewing the bearing nut (octagonal rod at “24” with a recess)
- Metal brush
- Narrow tassel
Advice: Before starting the procedure for replacing the steering rack on a VAZ 2109, you need to process in advance (a day before) all connections with a “liquid wrench” (tip threads, four nuts securing the rack, a stop tightening nut). Then, after one and a half to two hours, repeat the treatment of all places and after a day you can begin the procedure.
Sequence of replacement and repair
To quickly and easily replace the rail, follow the procedure as stated in the instructions:
- We roll the car into a pit (inspection ditch)
- We put chocks under the rear wheels, tighten the handbrake (parking brake), and lock the steering wheel.
- Disconnect the power; to do this, remove both terminals from the battery.
- We put the car on a jack and remove the front wheels (it is advisable to put the car on supports (props in the form of wooden blocks).
- Unscrew the nuts of the tips and remove the fingers from the levers
- In this case, you will definitely need a finger puller - apply it, tighten the screw until it stops and hit the lever with a hammer, hold the puller screw with a wrench
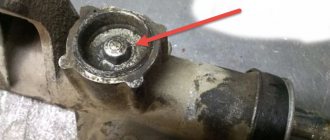
- Now that both rods are free, unscrew the clamp nuts (in the photo below the nut is indicated by an arrow)
- Inside the cabin, near the floor, unscrew the bolt on the steering shaft
- Then pull the bar towards you with a rocking motion
- The gear shank often does not immediately detach from the shaft, you will have to tinker
- Having disconnected the rack, pull out the unit through the right hole on the wheel side
Steering mechanism repair
It will be easy to repair the steering mechanism yourself if you follow the recommendations of our material:
- We clamp the mechanism in a vice and clean it with a metal brush, then treat it with Whitespirit and a rag
- As soon as the case shines like new, unscrew the mustache bolts
- We recommend checking the condition of the silent blocks first.
- If play, rubber cracks or other defects are detected, we replace them
- We bend the plate that locks the bolts using a hammer and chisel, unscrew the bolts and remove the mustache
- We tighten the plugs from both ends of the rail
- Then remove the shaft rubber bands and the cover. The cover can be thrown away immediately, the remaining elements must be thoroughly washed and dried, but not in the sun
- Remove the bearing lock washer and pry it off with a screwdriver
- We unscrew the nut with a special wrench prepared in advance, and under it we find a bearing
- We tighten our splined shaft in a vice. It is advisable to place soft pads on the jaws of the vice so as not to damage the shaft
- Gently tap the housing with a hammer until the bearing comes out
- The shaft, gears and other parts will easily follow.
- We thoroughly wash all removed elements with White Spirit using a brush.
- Finding a bearing of this exact type will be very problematic, since it is non-standard, so you should carefully wash it and save it
- If you still need to remove it, use a special puller
- We recommend not touching it unless absolutely necessary, since it functions quite well for a long time
- Shake the rack out of the housing and wash it with White Spirit. Then dry it and lubricate it
- Through the hole located in the housing, carefully remove the plastic insert and unscrew the clamping nut
- Often this action is very difficult, know that the repair kit contains a new one if you are afraid of damaging this
- Replace the seal rings, don’t forget to shake out the stop first
- We carefully examine the mustache, the tips should not play, the fingers should move with some effort, the protective covers should not contain cracks or other defects
- If you notice that any part (or several) has defects or incorrect operation, be sure to rinse the part and dry it
- If this does not help, we replace the part, but try to preserve as much as possible
- lever length
- To protect against the effects of corrosion, at this stage we recommend treating the threads with Movil
- Next we'll work on the hinges.
- We install new hinges if there is anything you don’t like about their operation or seems suspicious
- We insert a new plastic bushing into the body, its protrusions must certainly be directed into the holes. Cutting off the elastic bands
- Insert the rack from the gear side
- The approximate distance from the rack body to the end should be about 28 millimeters
- The rail itself should not stick out
- The bearing must be pressed all the way with the gear together.
- We clamp the shaft together with the housing in a vice
- Then you won't have to put in a lot of physical effort.
- Orient the rack along the gear
- Insert the stop, then the nut and spring
- Install a new rubber ring on the shaft side and screw on another nut
- We put on the cover and counter washer, align the marks
- Then we put on the rubber ring along with the cover and tighten the plastic clamps tightly
- Installing the mustache. We tighten them with great effort, bend the locking plate
- Attach rubber plugs
- Carefully drag the assembled unit into the engine compartment
- We put the rail in place, put on the clamps, tighten the nuts and don’t forget about the washers
- Further installation is easier to perform with a partner (assistant).
- We align the end of the steering shaft from the interior so that it coincides with the gear shaft
- Be sure to pay attention to the flat on the shaft, into which the coupling bolt must go (otherwise you will not insert it)
- Fit it, gently tap the coupling with a hammer, push it in deeper
- The sound of the signal in our case can serve as a criterion for correct installation
- Until the signal sounds, we continue to work with a hammer
- The signal has started working - we can assume that the steering unit is ready for use
- Insert the coupling bolt into the ears and clamp tightly
- We insert the fingers of the mustache into the levers and tighten the nuts, do not forget to tighten them
- We take self-locking nuts and tighten the slats on the clamps, treat the clamp studs with Movil
- We fasten the wheels and remove the car from the jack and stands
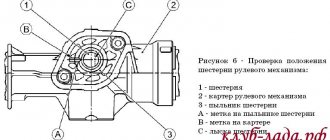
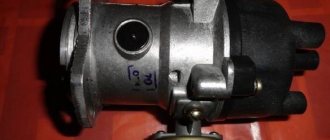
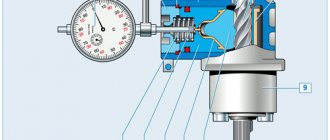
Operating principle and design of the steering rack
The steering column in the VAZ 2109 car has a simple design, including:
- a gear rack with two threaded holes for fastening the internal rod ends;
- drive gear with a splined shaft for connection to the steering clutch;
- support half rings creating smooth sliding;
- a stop mechanism that regulates the required design clearance of the gear pair;
- a crankcase into which the parts are assembled and fixedly attached to the car body;
- sealing elements and protection against dust and dirt.
VAZ 2109 steering rack diagram
Signs of breakdown
By studying the signs of malfunctions in the design of the steering rack, you will be able to promptly identify the breakdown and take appropriate action to eliminate it.
The symptoms below may indicate not only a damaged rack, but also problems with the steering column, ball joints or linkages. Therefore, be careful.
| Symptom of malfunction | Peculiarities |
| Increases free play of the steering wheel | This indicates that the gear sector has worn out due to dirt and dust getting into it. Or the gap between the rack stops and the rack itself has increased. Therefore, the engagement of the rack with the gear decreases. Plus, such a sign may indicate wear on the silent blocks of the rods or weak fastening of the supports in the steering knuckle |
| Noisy or knocking noises near the steering unit | Most likely, a gap has formed between the rack and the stop, or the plastic bushings have worn out. A knock is also a sign of wear on the traction silent blocks, ball joints, or loosening of the gear shaft to the column shaft. |
| Steering wheel turns hard | Here we can talk about possible damage to the steering rack bushing and a violation of the integrity of the gear shaft bearing. But you shouldn’t rule out the possibility of damage to the ball joint or strut bearings. |
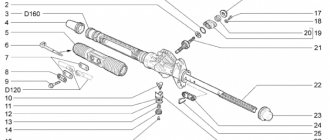
Having determined the presence of signs of malfunctions, it is important to understand what exactly caused them to appear.
Node diagram
Removing and disassembling the steering rack in a VAZ 2109 car
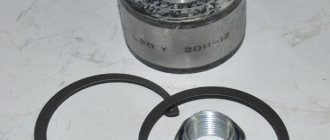
To carry out repair work, you should purchase a repair kit, which, depending on the type of fault in the steering column, may be incomplete or complete. An incomplete repair kit includes parts, disposable clamps and rubber products that require periodic replacement.
Steering rack repair kit for VAZ 2108, 2109
If the teeth and ground surface are broken or worn, you will need to purchase a complete repair kit, which may include all parts, from a gear pair, needle and ball bearings, to a pressure spring. This repair kit does not include only the crankcase.
You will also need a standard set of tools and a number of special devices and tools:
- internal octagon 24 mm with a hole in the middle with a diameter of 18.5 mm;
- octagon 17 mm;
- ball joint puller;
- ball bearing puller;
- needle bearing removal wrench;
- needle nose pliers for removing the bearing retaining ring;
- bench vice;
- grease "Fiol-1", "Litol-24" or similar lubricants that will not lose their fluidity at low temperatures.
To remove the steering rack, the VAZ 2109 car must be placed above the inspection hole to provide free access to the front wheels and the engine compartment.
Then you should tighten the handbrake, support the rear wheels, and set the front wheels straight. Use a jack to raise the front wheels until they sag and place supports under them. After this, unscrew the mounting nuts and remove the right wheel.
To gain access through the engine compartment, remove the air filter and disconnect the battery. All removed parts and fasteners must be placed in specially prepared containers. This will ensure the safety of the parts and simplify the assembly process.
Steering column removal steps:
- Inside the cabin, between the pedals, using the hinged head, unscrew the locking bolt two turns, which tightens the steering coupling on the splined shank of the gear shaft. If the clutch does not release, you can loosen the splines by gently tapping with a hammer;
- Remove the tie rod ends by straightening the bent end of the tie rod ends with pliers. The cotter pins are pulled out with a 19 mm spanner. After that, the nuts are tightened and the ball joints are squeezed out of the swing arms of the suspension struts with a puller;
- The protective cover is removed through the engine compartment, secured with three nuts with washers and engravers. Using a 13 mm socket, unscrew two self-locking nuts that hold the bracket securing the steering rack housing to the car body;
- The crankcase must be clamped through aluminum plates in a bench vise;
- Using a chisel and hammer, bend the corners of the locking plate that protects against spontaneous unscrewing of the bolts securing the inner tie rod ends;
- Using a 22 mm socket, unscrew the bolts, remove the locking and connecting strips, disconnect both rods;
- Remove the rubber support, the spacer ring on one side, and on the other, disconnect the rubber cap and detachable support, use a screwdriver to pull out the rubber boot that protects the gear shaft;
- Using pliers, cut off the two plastic clamps and remove the protective cover.
Replacing the steering column of a VAZ 2107
Replacing a steering column is a rather difficult task, but it can be done independently if you have some experience in car repair. You will need the following tools:
- Wrenches 17 (socket and open-end).
- Socket heads for 17 and 30.
- Handle with ratchet.
- Mount.
- Hammer.
- Collar.
The column is removed in the following order:
- Disconnect the battery.
- Remove the steering wheel.
- Remove the steering shaft housing.
- Remove the wire block from the ignition switch.
- Remove the ignition switch.
- Remove the steering column switches.
- Remove the steering shaft clamped in the column.
- Using a 30mm socket and a powerful wrench, unscrew the steering column mounting nut. The tightening force here is significant, so the knob must be a fairly long lever. If you can’t unscrew it, you can lengthen the knob by putting a piece of pipe on it.
- Unscrew the 3 bolts securing the column to the body. The procedure is not easy - the distance between the parts and the body is too small, the bolts are difficult to keep from turning. A handle with a ratchet will come in handy here, which will speed up the process.
- Remove the column from the shaft. To do this, you need to knock the column off the tie rod splines using a pry bar. This must be done in jerks, resting your feet on the body.
- Unscrew and remove the shaft seal installed at the bottom of the column.
After dismantling the old column, it is necessary to clean the seat from dirt. Before installing a new column, you should check the condition of its hinge joints and needle bearings. If everything is in order, you can begin installation, which is done in the reverse order of removal.
When installing a new VAZ 2107 steering column, you must pay special attention to ensure that all fastening bolts and nuts are well tightened. Considering how important this unit is for driving a car, play, and even more so, slippage of the steering column splines can lead to tragic consequences
When installing the steering wheel, pay attention to the position of its spokes. After completing the installation of parts and connecting the wire block to the ignition switch, you can connect the battery
Column replacement completed
After completing the installation of parts and connecting the wire block to the ignition switch, you can connect the battery. Column replacement is complete.
Repair of the steering rack in a VAZ 2109 car
If the wear on the working part of the steering rack is small, then it can be slightly tightened without complete disassembly, increasing its service life by another few tens of thousands of kilometers.
The 17 mm nut that needs to be tightened secures the steering shaft to the rack; to tighten the nut, you need to use a special wrench of the appropriate size. The rack adjustment process is as follows:
- Install the car above the inspection hole or on an overpass for easy access to the steering mechanism;
- Remove the crankcase protection;
- Clean the rack from dirt;
- Find the nut responsible for adjusting the mechanism;
- Tighten the nut;
- Check the resistance force by turning the steering wheel and, if necessary, tighten the nut more;
- Set the optimal steering force.
Tightening without complete disassembly will eliminate knocking and remove slight play. If the steering rack parts are heavily worn, you will need to completely disassemble and buy a complete repair kit to replace the worn parts of this unit.
If such procedures do not affect the negative effect of the steering rack knocking, you will have to move forward and check the steering ends and rods. Often knocking occurs in these parts of the mechanism.
The knocking noise can also be caused by the tie rod ends and rods. In this case, it will be necessary to completely tighten the fastenings of the rods and tips to eliminate play.
Tightening of the tips should be carried out taking into account the following features:
- Strong fixation of the entire mechanism to prevent wheel alignment displacement;
- When tightening all the way, do not overtighten;
- After the tip bolts, check the wheel alignment;
- If the knocking noise remains, then the problem is in the inner part of the rack, or in the steering rods.
You should also check the condition of the steering rack boots every 500 - 1000 km, taking into account the operating conditions of the car. The boot on a Russian car has to be replaced more often than on foreign cars.
Video: repair of the steering rack of VAZ 2108, 2109, 2113, 2114, 2115
While tightening the steering rack and replacing boots and rubber parts can be done independently, repairing steering linkage fastenings in most cases causes difficulties for car owners. Labor-intensive dismantling and the need to use special equipment force owners of a Russian passenger car of this brand to contact experienced specialists at a car service center. It is better to accurately diagnose, disassemble and reassemble the unit in a specialized workshop with the help of qualified personnel. A complete replacement of worn steering rack elements can only be carried out in an equipped garage by an experienced driver with extensive experience in repairing domestic cars.
Work technology
Now let's get to work.
ATTENTION: Wait until the engine has completely cooled down; under no circumstances begin repair work when the engine has not cooled down.
- First of all, remove the heat protection, which is held on by three nuts.
- To unscrew the tie rods, you will have to arm yourself with a combat arsenal - a hammer, pliers and a screwdriver.
- Now, taking the key 22, we turn the bolts and pull the rods out of the rack.
- Next, you will need another key, size 13, with which we remove the clamps securing the rail to the entire structure.
- To dismantle, you will need the smallest key of 10. They need to unscrew the absorber.
- Usually a clogged boot is difficult to remove, so you can help yourself with key 13. Unscrew the rack a little and remove the boot.
- The steering mechanism faces such a serious test of strength every day as road dust. Therefore, when you dismantle the rack, clean it thoroughly and treat it with lubricant so that when installing a new boot you do not tear it.
IMPORTANT! Replacing the steering rack boot of a VAZ 2109 is a simple job, but the most important step is the final stage - installation of a new part. The main thing here is not to twist or deform the boot.
Now that the part is ready for installation, take the bolts and screw them into place, but under no circumstances turn the steering wheel at this moment, since otherwise the operation of the entire system will be disrupted. The bolts are tightened with a 22 key. Next, installation is carried out in reverse dismantling is in order. The steering rack repair is completed. Good journey and fair wind!
Have you ever heard knocking noises from the steering wheel when driving on gravel or broken roads? If so, then the steering rack was most likely the cause. It gets loose quite quickly and on all front-wheel drive cars, including VAZ 2109-2108, it sometimes has to be tightened. If the tightening does not help, then repair or replacement can be done. In this article I will talk about the second option, that is, the complete replacement of this mechanism.