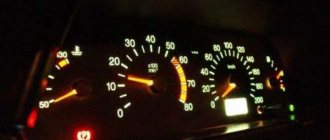
The instrumentation of the VAZ 2110 has remained virtually unchanged. The board displays basic information about the status of on-board systems to the driver in real time. Depending on the configuration, the old-style dashboard has a simplified design than the versions on new cars.
The differences in configurations are also minimal. Cars with engines with 8 valves or 16 are identical. The only difference will be on engines such as injector or carburetor.
The most common “tens” device has only 19 indicators and gauges. Each element is responsible for its own part of the on-board equipment.
DESCRIPTION OF LAMPS AND INDICATORS
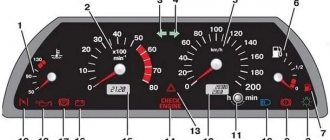
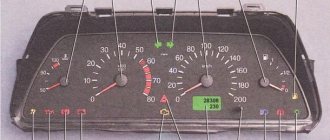
The description of the indicators is deciphered by the numbers marked in the photo:
- 1 – dial indicator of coolant temperature;
- 3-4 – indicator lamps for turn signals;
- 6 – dial indicator of fuel level in the gas tank;
- 7 – if the indicator is constantly on, urgent refueling is needed;
- 8 – if the indicator lights up, it means the dimensions are on;
- 9 – monitoring the condition of the brake system;
- 10 – headlight operation indicator;
- 11 – daily mileage reset;
- 12 – odometer display;
- 13 — emergency lights are on, working in conjunction with turn signals;
- 14 – it is necessary to check the engine;
- 15 – second display, the time and temperature outside are displayed here;
- 16 – correct battery charge;
- 17 – parking brake activated;
- 18 – when you turn on the ignition, it lights up, when you give gas it disappears;
- 19 – only on the dashboard where the carburetor is used, it indicates that the air damper is closing.
Knowing the name of each symbol on the board, you can operate the car more comfortably.
Installation and repair instructions
Replacing the panel, especially if you are installing it on an old VAZ 2112, is a certain difficulty. Older machines do not have some of the functions for which the panel has buttons. The wiring may need to be worked on.
Tools and materials
Standard tools will be required.
But a certain amount of additional materials is needed:
- you will need plugs for extra buttons that are not needed on an old car;
- air duct;
- various inserts, buttons (5 pieces) and pads;
- a new wiring harness suitable for the wiring diagram;
- brackets for mounting the instrument panel;
Algorithm of actions
First you need to remove the old panel. This is done in the same way as on other models of VAZ cars.
When installing, you need to replace the ignition switch with a decimal or Kalinovsky one, depending on how many terminals there are on the block to the lock. You can leave the old one and rearrange the wires, but the new one will work and look better.
The instrument panel wiring needs to be replaced. Also, connect the dimensions with additional two wires in Ш4/13 and Ш3/13 on the mounting block. This applies to older units with 11 relay spaces.
Depending on whether it is an injector or a carburetor, the connection has its own nuances. If you bought a solid factory panel, then instructions should be included with it. Briefly, it can be noted that the injector is not equipped with a speed sensor, please take this into account when installing.
The car's electrical circuit can be of great help. If it is not there, you can find it on the Internet. There are some differences between the VAZ 21124, 2111 and other car variants, so find yours.
If the instrument panel does not work after turning it on, check that the wiring is connected correctly - this is usually the error.
ICONS ON THE DASHBOARD OF VAZ 2110: WHAT DO YOU MEAN
Along with the description, all designations require decoding. Knowing the names of the indicators will not provide a complete understanding of the situation. Below, under similar numbers, is the decoding of each sign:
- 3-4 – lamps indicate the turn signals are on;
- 7 – the gas station icon indicates that there are less than 8 liters of fuel left in the tank;
- 8 – symbol confirming the normal operation of the dimensions;
- 9 – exclamation mark indicates incorrect brake operation;
- 10 – dimensions included;
- 13 – emergency stop mode activated;
- 14 – a critical engine failure has been detected, urgent intervention is needed;
- 16 – critical drop in battery charge;
- 17 – handbrake lamp, indicates that the lever is raised;
- 18 – possible oil leakage from the engine crankcase;
- 19 – the symbol indicates the closing of the carburetor damper.
By deciphering the symbols, you can independently determine the essence of the problem and fix the problem.
Removal and modification
Here's a quick look at the device and control panel icons. If for some reason she refuses, don’t immediately panic. Most often, the reason is the absence of contacts in some place in the wiring. But of course, if you wish, you can completely change or tune the panel.
For example, remove the cover and replace the light bulbs with brighter LEDs. Such a panel works brighter and the signals sent by the car will be more noticeable to the driver. If desired, you can install a more solid europanel, which will transform the interior.
To remove the panel you need:
- Disconnect the “-” wire from the battery;
- Remove the shield by unscrewing the screws;
- Remove the fastenings of the control panel to the trim, remove the instrument cluster from the socket;
- Remove the glass mask;
- Disconnect the wires from the block;
- Make changes to the instrument panel or replace it with a new one. Reassemble everything in reverse order.
Many car owners would like to replace the VAZ 2112 instrument panel with a Europanel. This replacement brings more comfort and capabilities to driving a vehicle. What a Europanel is and how to install it on a VAZ 2111 and the twelfth model will be discussed in the article.
INSTRUMENT ERROR CODES
Standard errors in car self-diagnosis do not accurately indicate a breakdown. Due to the simplicity of the on-board computer, the device can only indicate the direction where to look for the problem. The decoding of standard errors looks like this:
- 0 – no errors detected – the system is in perfect order;
- 1-2 the voltage in the on-board network is exceeded or too low;
- 3 – malfunction of the float sensor in the gas tank;
- 4/5 malfunction in the antifreeze and ambient temperature sensor circuits, respectively;
- 6 – critical overheating of the power plant, it is necessary to wait for the antifreeze to cool down;
- 7 – not enough oil in the engine crankcase;
- 8 – the problem lies in the brake system;
- 9 – the battery is dead or the part is damaged;
- E – error in the firmware, EEPROM data packet is broken.
It should be taken into account that in some cases, the error code may be two-digit. For example, if 15 is displayed on the display, this may indicate the presence of breakdowns in circuits No. 7 and 8. Having found out what each error means, you can independently determine the source of the problem and correct the breakdown.
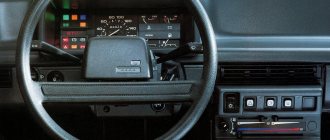
What standard trip computers exist?
Option 1. In the instrument cluster.
Option 2. Installed instead of a small plug next to the ACS unit
These were installed on “luxury” dozens. There are models AMK 211000 without diagnostics, and AMK 211001, AMK 211002 with diagnostics. You can find out which one you have by looking at the numbers on the back cover. To do this, naturally, the MK must be removed. If on the back there are the inscriptions AMK-211001 or AMK 211002, and in clock mode, when you press the “clock” button, the inscriptions Err appear and then two more - great. You have a full-fledged bookmaker.
If these are the inscriptions:
Unfortunately, this is a BC that either lacks diagnostic capabilities or has “cut-off” firmware.” Craftsmen resolder and reflash such models, but in my opinion they are not worth it.
It is very easy to remove such a MK. Disconnect the negative cable terminal from the battery terminal. We pry it off with a screwdriver...
remove the MK from its seat....
....disconnect the wire block from it.
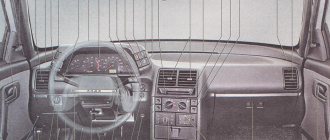
Instrument panel layout of VAZ 2110
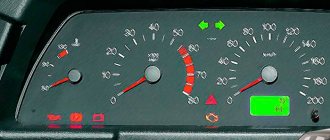
The instrument panel of the VAZ 2110 is made in the form of a combination of instruments, indicator lamps, and in some modifications with the ability to accommodate an on-board computer. Traditionally, the plastic from which the panel is made is not of the highest quality, therefore, during operation and overheating, its deformation is possible, affecting not so much the appearance as the performance of the devices.
The standard tidy includes four dial gauges, a trip computer display, an odometer reset button and a set of warning lights. The first on the list, the leftmost device is the coolant temperature indicator, it is shown in the diagram under the first number. The pointer device has a division value of approximately 50 degrees. The red stripe marks the zone of critically high temperature at which the coolant may boil. The additional panel contains control lights and an indication of the climate system.
Replacement - order
- First of all, you will need to disassemble the shield. The radio tape recorder, heater and ventilation control levers are removed from it.
- Then unscrew the screws holding the decorative panel trim. Before doing this, the steering wheel should be moved to the lowest possible position - this way it will not interfere.
- Find the screws - there are five of them, and they are closed with plugs. Carefully pry the latter with a knife and pull it towards you. After removing the screws, pull the VAZ-2114 panel towards you.
- Now you need to unscrew the two screws holding the instrument panel itself. This is done with a Phillips screwdriver.
- Afterwards, the panel is lowered and the opened terminals of the wire loops are disconnected. Then the element is freely taken out.
- Next, the damaged light bulb is pulled out - turn it 90 degrees in any direction until the protrusions on the socket fit into the grooves. Then all that remains is to remove the product from the base and put a new one in its place.
As noted above, so that the 2114 panel does not have to be disassembled again after some time, it is advisable to immediately replace all the lamps. This will also ensure an even glow of all elements.
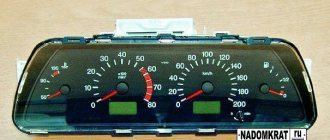
Speedometer and tachometer
The speedometer on the instrument panel (2) is a dial instrument, but not with a mechanical drive, as was the case in older cars, but with an electric one. Essentially, it is a voltmeter that responds to an impulse generated in the speedometer sensor, and it is installed in the gearbox. The higher the voltage at the sensor output, the higher the speed the device displays. The factory error is approximately 5 km/h, but it is necessary to take into account the diameter of the wheels, which greatly affect the accuracy of the electric speedometer.
The tachometer on the instrument panel is indicated by the number 5 and it is also an electrical device that responds to an impulse generated by the crankshaft speed sensor. The sensor first transmits the readings to the electronic engine control unit for analysis and correction, after which the pulse is sent to the tachometer control circuit. The red zone of the tachometer scale indicates unacceptably high speeds, at which rapid wear of engine parts, incorrect operation and an increase in coolant temperature are possible. Long-term operation of the engine in the red zone of the tachometer is extremely unacceptable.
Possible malfunctions: signs and causes
What problems can a car owner encounter:
- Some of the light bulbs on the dashboard do not work. If one or more light sources fail, then most likely this is due to burnt-out lamps. The problem is solved by replacing devices.
- The backlight has stopped functioning altogether, while all instruments and indicators light up. Apparently, the reason must be sought in the inoperability of the brightness control itself; it could have broken down. With constant use of this regulator, its connection contact with the on-board network may have come loose, so you need to check the wiring. The reason may also be a blown fuse located in the mounting block.
- The backlight does not turn on, and none of the indicators or sensors work. Perhaps the panel itself was “covered” or the block with the wires connected to the panel was damaged. You need to remove the device and carefully check all circuits.
- The speedometer does not work - the needle does not rise or rises, but very slowly and jerkily. With such a problem, the cause should be sought in the speed sensor, which can be electronic or mechanical. If it is mechanical, then check the condition of the tips that go into the speedometer itself and the gearbox. The end of the cable connected to the speedometer often wears out; you can try to solve the problem by wrapping a piece of food foil around this end. If the sensor is electronic, then you need to check the quality of the contacts.
- Indicators, for example, turn signals or optics, do not turn on. It is necessary to check the functionality of the steering column switches for low and high beam headlights, as well as turns.
- The fuel volume sensor does not function, the needle does not move or has risen all the way and does not fall. In the first case, the reason may lie in the failure of the controller itself, located in the fuel tank. You need to find the sensor and check its functionality. In the second case, the possible cause is a short circuit in the electrical circuit; you will need to test the wiring with a tester.
- The tachometer does not work. Again, the reason must be sought in the crankshaft position sensor - it could have failed, or the contact could have come loose from it. Most often, the reason for the malfunction of the sensors on the device is associated with oxidation of the contacts; they should be checked first.
Dial indicators on the VAZ 2110 panel
The number 6 indicates the fuel level indicator in the gas tank. The readings of the device are not particularly accurate, but it is logically clear that at mark 0 the tank is practically empty, a few reserve liters of fuel remain, at mark ½ the tank is half full or empty, as you like, and at mark 1 the gas tank is full. The light indication of the fuel level is assigned to control lamp 7, which begins to flash when the vehicle’s range on the remaining fuel is about 100 km, which is approximately 9-9.6 liters. To ensure that the fuel pump does not fail, it is not allowed to completely drain the fuel from the tank.
Indication symbols
As you know, all the lights on the control panel come on when the ignition is turned on, and then, when the engine is already running, most of them go out. But when one remains on or blinks, this cannot but be alarming, because not everyone can immediately figure out what malfunctions this indicates, which of the systems needs urgent repairs.
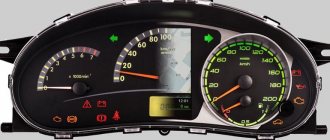
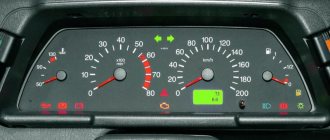
Let's look at the designations of the instrument panel of the VAZ 2110. You should know that regardless of whether the panel is new or old on your car, the designations are almost the same, but the indicators may be located slightly differently.
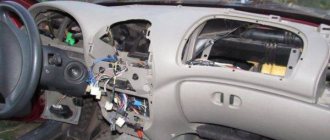
Instrument panel VAZ 2110
Tidy indicator lamps 2110
Lamps 3 and 4 indicate that the direction indicators on the outside of the vehicle are turned on and they light up and flash immediately after the right or left indicators are turned on. At the end of the maneuver, the power key returns to its original position and the pointer should turn off automatically. If this does not happen, you should look for the reason in the return mechanism of the pointer switch key.
The lamp that deserves special attention is located in the center of the tidy and is indicated by the number 14 in our diagram. This is a warning lamp that signals malfunctions and incorrect operation of the electronic engine management system; it is otherwise called the Check Engine lamp, by analogy with imported cars. When this warning light is activated, computer diagnostics of the engine should be carried out and error codes identified. Some errors are removed by software, while others require intervention in the engine control systems: the power supply system, ignition and other systems that could lead to errors.
Number 12 in the diagram shows the digital odometer display and the daily mileage indicator, which is reset by a button located directly on the instrument panel. The top line shows the total mileage of the car, and the bottom line, which can be reset, shows the mileage for a certain period.
The instrument panel of the VAZ 2110 is a description of the lamps and indicators of which we will complete with simple and familiar warning lamps for any car:
- position 8 indicates the lamp for turning on the outside light;
- lamp number 9 indicates that the brake fluid level in the reservoir is reduced to a minimum;
- high beam - lamp 10;
- triangle under the number 13 - hazard warning lamp;
- position 18, as a rule, remains in reserve, and in cars equipped with airbags, there is a sensor activation lamp in this place.
The remaining warning lamps: handbrake, emergency oil pressure in the lubrication system and critical battery discharge are located in the bottom row in order. Let the hazard lights light up less often on your dashboard, better and cleaner roads for everyone!
Bottom part
Let's look at the indicators at the bottom of the control panel. If they don’t light up, it means the machine is working normally, and when any of them lights up, this indicates a malfunction in certain components. Most often, this is a signal that repairs are needed, and the sooner the better. From left to right:
- The indicator on the far left at the bottom is the air damper light (if you have a carburetor engine);
- Icon in the form of an oil can. If this light comes on, it means there is insufficient oil pressure in the engine. An alarming signal. You need to stop, find the reason;
- A round icon with the letter P inside on the control panel indicates that you have the parking brake on, which, as you know, should be turned off when moving away;
- Indicator of a fault related to the generator or battery (a symbolic image of the battery is shown on the indicator). Perhaps the battery is not charging from the generator, there is an open circuit, or the generator belt is loose or broken. In any case, your intervention and repairs are needed, otherwise troubles cannot be avoided;
- If the engine is running and the Check Engine indicator is on on the control panel, this is the most unpleasant thing for the driver, since it indicates serious malfunctions in the engine. In general, when this indicator lights up, it is recommended to stop driving and turn off the engine. Most likely it needs repairs;
- Typically there is a red triangle above the Check Engine. It lights up when the “hazard light” is on - an emergency signal sign;
- The headlight light indicates that the high beam is on. Designed to control headlights: when an oncoming car appears, do not forget to switch to low beam;
- A very important indication icon on the front panel (in a red circle) is a signal that there is not enough brake fluid. Perhaps it is leaking somewhere, which it is advisable to find out as soon as possible and, if necessary, carry out urgent repairs and replenish the level;
- The icon of a burning light is a control for turning on the dimensions;
- In addition to the indicated lights, the front control panel has time indicators (and a button for setting hours and minutes) as well as a display that shows the total and daily mileage. On the new panel, this display may be narrow.
Decoding of vehicle error codes is presented in this material: https://vazweb.ru/desyatka/elektrooborudovanie/kody-oshibok.html
When the engine heats up, the oil pressure lights up: consequences for the engine
Let's start with the fact that any problems with lubricant pressure mean that the power unit is experiencing oil starvation. Simply put, the rubbing surfaces do not receive enough motor oil and their wear begins to increase. Oil also plays the role of a cleaner and cooler, washing away wear products and lowering the temperature in the area where the surfaces of rubbing pairs work.
Also, when the efficiency of the oil system decreases, knocks and noises appear in the engine, which subsequently lead to more serious damage or even engine seizure. In this case, jamming may well be accompanied by a “fist of friendship,” which greatly complicates the repair of the damaged unit and increases the overall costs of restoring the internal combustion engine.
Fuel level indicator
The device indicating the fuel filling level of the tank operates in combination with a control sensor; it is installed in the fuel tank. If the lamp shows a resistance of 284-334 ohms on the board, then the indicator needle will be located near the beginning of the scale.
If the sensor reports a resistance identical to the level of 102-136 ohms, then the needle will move to the middle of the scale. If the sensor value is 8-26 ohms, the needle will move to the very end of the scale. If the resistance and the needle level on the scale do not match, then repair of the machine is inevitable.
Source
Why the check light on the VAZ-2112 16 valves lights up and flashes: the main reasons
Reasons for the appearance and blinking of the “check” on the VAZ-2112 If we consider engines with a volume of 1.5 liters, we can talk about one of two internal combustion engines: VAZ-2111 (8v) or 21120 (16v). In the first case, the ignition module 2111-3705010 is used, in the second - 2112-3705010. These modules are not capricious and do not often require repairs. We have already written about diagnosing the ignition module and repairing it. Ignition system of the “tenth” family The following two tabs change content below. About the expert: Francois “experienced owner” A car enthusiast with extensive experience. First there was the VAZ-2107, then the Russian front-wheel drive, then foreign cars, there were even right-hand drive ones. I try, like a “doctor,” to look and listen to the car completely. I give each of my vehicles a name. The modules themselves, as you can see, are different, but they have the same “disease”. It is not the module that is to blame here, but its high-voltage connectors. The terminal may move away from any of the four connectors, but nothing will change externally. And after a while the terminal on the cable will burn out. Then the engine will start to “trouble” and misfires will be noticed by the controller. Therefore, constant checking of the ignition module is necessary. Let's clarify: at first the terminal comes off, but the current is carried out. Then charring occurs. On the dashboard of any car, including the VAZ-2112, the check will not light up immediately. And as soon as it lights up, check the contacts! Two cases from practice This is what happens in reality. Owners write: For some reason, the check light starts flashing when the speed exceeds 100 km/h; The lamp blinked only after warming up to 100 degrees; Etc. There are many cases, but the reason is one. Contact can be disrupted by vibration, although in the first case they talk about speed. Well, thermal expansion also cannot be discounted.
What exactly needs to be done Check the cap on each of the wires: if the copper is burnt, clean it with ASIDOL, ammonia and ordinary chalk. The taps on the module should also be cleaned. For better protection, you can apply lithium grease (Litol-24). Litol will help us. But here’s what you can’t do: Check for the presence of a spark by bringing a “grounded conductor” to the tap; Connect the “+” terminal removed from the battery to ground with the engine running; Apply voltage “+12” to any of the module contacts. How to perform an express check: the key is at “0”, then we measure the resistance between taps 2-3, 1-4. Both values must match. By the way, the multimeter must be a pointer
Precautions: When connecting the multimeter to the module, do not touch two probes with your hands at the same time. Measurement limit – 100 kOhm or 10 kOhm
How to distinguish “gaps” from everything else Let’s consider the situation: it’s difficult to start when hot. If it starts when cold, the check light then turns on, but after 20-30 minutes it goes out. In this case, we can conclude that there is a misfire. Well, they can even be caused by an insulation breakdown. And above we looked at what is typical for the 2112 family (but not for the 21124 engine). This block is too smart. They may say that the check for the VAZ-2112 caught fire for no reason. This happens in cases when: The indicator turns on, then the engine is turned off and the battery is disconnected (disconnect the minus terminal for 10 minutes); After connecting the battery, no defects are observed. Start the engine - the check lamp does not light up. In fact, the ECU actually remembers any defect (the occurrence of any error). But the “reset” is also performed by the system itself: When the engine starts; After the next test cycle. For each error, one of two methods is used. And, in theory, there is no point in disconnecting the battery. If the “check” is constantly on, then you need to look for a defect. And “terminal tricks” usually don’t help.
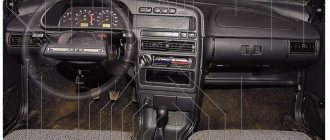
Vehicle controls
1,29 – door handle.
2.28 – handle for adjusting the outside rear view mirror.
3.27 – side ventilation grilles.
4.26 – ventilation grilles for blowing door glass.
5 – button for the light switch and headlights. The key has three positions: I – off, II – side light lamps, backlight lamps for control devices and switch keys are on, III – side light lamps and headlight lamps are on.
6 – plug. Some vehicles have a fog light switch in this location.
7 – sun visor.
8 – left steering column switch lever. This switch is designed to turn on the direction indicators and switch the headlights.
9 – steering wheel.
10 – dashboard.
11 – lever of the right steering column switch. This switch is designed to control the operation of the windshield wipers and washers. The lever has five positions: I – windshield wipers and washers are off, II – the windshield wiper is on. The mode is intended for short-term activation of the windshield wiper. The blades will make three full strokes and stop, III – the windshield wiper is switched on in intermittent mode, IV – the windshield wiper is switched on in continuous mode at low speed, V – the windshield wiper is switched on in continuous mode at high speed. When you move the lever towards you, the position is not fixed and the windshield washer turns on. After releasing the lever, the brushes will make another three to four full strokes.
12 – control knob for instrument lighting.
13 – indicator lamp for turning on the rear fog lights.
14 – rear fog lamp switch button.
15 – indicator lamp for turning on the heated rear window.
16 – rear window heating switch button.
17 – air distributor damper control lever. By moving this lever, you can direct the air flow to the windshield, to the feet of the driver and passengers and to the upper part of the cabin.
18 – individual lighting lamp.
19 – rear view mirror control key (“day-night” switch).
20 – interior rear view mirror.
21 - central ventilation grilles. They are designed to change the direction of air flow passing through the filter element of the cabin ventilation system and the heater.
22 – ventilation grille for blowing the windshield. Designed to direct the flow of air entering through the heater to blow on the windshield.
23 – heater control unit.
24 – hazard warning switch button.
25.37 – plugs. Reserved spaces for installing switches for additional equipment.
30 – glove box cover.
31 – hours. On some vehicles a trip computer can be installed here.
32 – niche cover. A car radio or other audio system head unit can be installed here.
33 – cigarette lighter.
34 – ashtray cover. To clean the ashtray, remove it from the lid by pulling it up.
35 – display unit of the on-board control system.
36 – gear shift lever. The gear shift pattern is printed on the lever handle.
38 – gas pedal.
39 – socket for connecting a portable lamp.
40 – immobilizer sensor with indicator. The immobilizer blocks the engine from starting without using the electronic key that comes with the car. To disarm, you need to bring the black key to the sensor. The sensor has an LED indicator that informs the driver about the status of the electronic anti-theft system. If the immobilizer is not activated, then with the doors closed and the ignition off, the LED will flash twice per second.
Coolant temperature indicator
The device operates in combination with a coolant temperature sensor, which is installed in the cylindrical heads. When the temperature indicator shows a resistance of approximately 650-1340 ohms on the board, the arrow should be located at the initial marks of the scale.
If the resistance results on the dashboard have reached 76-88 OM, then the arrow should reach the section of the scale marked in red. The arrow reaches the end of the red scale when the sensor resistance is 41-51 ohms.
The VAZ 2112 instrument panel does not work - reasons
If the panel suddenly stops working:
- When the engine does not start and the dash does not work, inspect the ignition switch. Here the contact often burns out or oxidizes.
- If the machine is working and the panel has failed, you will need to check the corresponding fuse, wiring and lines.
- If the manipulations do not help, you will need to remove the device and test its circuits.
https://youtube.com/watch?v=8wVWIZlFZOk
Panel backlight does not light up
There may be damage to the light activation key. It is recommended to check the corresponding fuse.
The panel is blinking
Consequence of deterioration of electrical wiring contacts. The user should inspect the supply wires for cracking or damaged insulation. The contact groups should be disconnected and cleaned of oxides and dirt. Treat the terminals with special oil.
Tidy 2112 stuck
This kind of problem is unexpected, but it occurs everywhere. As a repair, users are suggested to reset the electronic equipment. Remove the terminals from the battery and wait 15 minutes.