From what year do they put gur on the field?
Power steering did not appear on cars right away, because the very first cars (and some modern cheap models in the basic configuration like ZAZ Chance) did not particularly need this element due to low speeds, low weight, small contact patch with the road (the first the tires were quite narrow). However, the automotive industry, including the truck industry, developed, and in the 30s of the last century, pneumatic power steering appeared on mining dump trucks. A little later, this idea “migrated” in the form of a hydraulic system to passenger cars. In the USA, the first power steering appeared on the Chrysler Crown Imperial in 1951, and in Europe - in 1954 on the Citroen DS 19. Power steering on the Niva appeared decades later.
Operating principle of EUR and power steering
Before installing the amplifier in the VAZ 2121 with your own hands, let's look at the operating principle of the systems, starting with the power steering. When the steering wheel is in the central position, it is fixed using centering springs. In this position, the liquid circulates through all elements of the system, provided that the distributor is positioned correctly. In this case, the power steering pump operates in enhanced mode, which is due to the need to pump fluid through the system. Moreover, it always functions, regardless of whether the steering wheel is turning or not.
When the steering wheel is turned, the spool moves, as a result of which the element blocks the drain lines and liquid begins to flow into one of the cylinders. In this case, the piston, as well as the rod, are exposed to oil under pressure, which leads to the rotation of the wheel, as well as the housing, in a certain direction. The spool overtakes the device body when it stops moving, which indicates that the driver has completed the turning maneuver. In this case, the spool returns to its original position, and then the hose opens to drain the liquid.
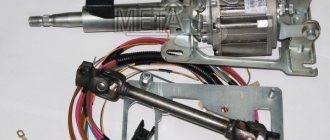
As for the principle of operation of the electric power steering, the amplifier itself is mounted on the steering shaft of the vehicle. Its component parts are connected to each other using a torsion shaft, with an installed engine speed reading controller. When the driver turns the steering wheel, the torsion shaft twists, which is detected by the torque sensor. In accordance with the information received from the torque, speed and engine speed controller, the control module determines the compensation force, as a result of which it sends a command to the amplifier electric motor.
The feasibility of installing EUR and power steering
Does it make sense to install an electric or hydraulic booster on your car? The only, but most important thing that such an installation can provide is to provide more comfortable driving. But you need to take into account that installing such a system is a rather complicated task that not everyone can cope with. At the same time, its cost is quite high, and if you cannot install the unit yourself, you will also have to pay a substantial amount for installation. Therefore, you need to decide whether it is profitable for you to install an amplifier from an economic point of view (the author of the video is Gennady Martynyuk).
Technical characteristics of Niva with carburetor
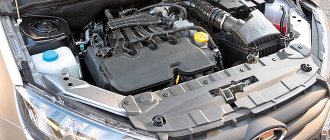
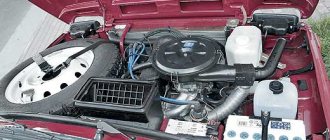
At the very beginning of production, the engine for the Niva was the one that was installed on the classic Zhiguli. The engine remained the same, but the volume of the combustion chamber was increased.
The first Soviet SUV received a 2121 engine, the displacement of which was 1580 cubic centimeters. This engine could produce up to 80 horsepower. The car accelerated from 0 to 100 kilometers per hour in 21 seconds, but fuel consumption was indecently high. In the passport data this figure was 13.1 liters, but reality indicated that it was greatly underestimated.
A few years later, the car began to be equipped with a more modern engine. The new engine bore the index 21213. Its displacement was 1690 cubic centimeters and its power was 83 horsepower. Acceleration to 100 kilometers per hour decreased to 18 seconds.
Detailed instructions for installing electric power steering on a Niva
The procedure for installing the EUR with your own hands is as follows:
- First you need to disconnect the battery.
- Then the plug is removed from the steering wheel, the fixing nut is unscrewed, and the steering wheel itself is dismantled. You also need to unscrew the four screws and remove the plastic cover.
- The mounting bolts are unscrewed and the instrument panel is dismantled. Disconnect the steering column switch plug, unscrew the bolt that secures it, and then remove the device.
- Then the ignition switch wiring is disconnected, the device itself is removed, to do this, unscrew the two mounting screws and turn the key to position I.
- The next step is to dismantle the steering column; to do this, you need to unscrew the steering shaft screw, as well as several mounting screws and nuts. Please note that Nivas use screws with shear heads, so the best option would be to apply notches using a chisel and unscrew them with pliers. Next, the column itself must be lowered down and then dismantled.
- After this, unscrew the nuts on the mounting blocks with fuses and remove them. Also remove the relay cover located under the instrument panel.
- The interior and engine compartment are separated from each other by a partition; it has an elastic plug, which must be removed. The EUR wire is pulled through the hole. Make sure that the installed wire does not come into contact with moving components of the wiper motor.
- Under the dashboard itself, to the left of the steering wheel, there is an 8-pin connector, two gray wires are connected to it. The yellow-blue one from the EUR should be connected to this connector. Then, to the red block, which comes from the tidy, you need to connect the orange and blue-pink wires from the electric amplifier. Here, behind the instrument panel, you can find a ground bolt; you should connect the minus to it.
- An amplifier bracket is installed under the tidy; the wiring from the ignition switch should be threaded into it.
- Next, an intermediate shaft should be installed on the splines of the amplifier itself; remember that a ground should be connected to it in advance. The shaft itself should be securely fixed to the steering gear shaft and the EUR should be attached to the bracket. The shaft must not be pinched or too tight.
- The assembly itself is fixed to the plate using two bolts and two studs; it is advisable to install nuts under them.
- Next, the power and information connectors are connected to the amplifier.
- In fact, the installation procedure can be considered complete. Now you need to reinstall the ignition switch and steering column switch. To install the steering column trim, it will need to be cut, for example, with a hacksaw. The steering wheel and dashboard are put in place. Then the wiring is pulled from the EUR to the battery. Please note that in the existing plug in the partition between the engine compartment and the passenger compartment, it will be necessary to increase the size of the hole. Perform a functional check of the equipment and check all connections again.
Steering
The steering on the Niva can be with power steering (starting from 2009), without power steering, and also equipped with an airbag. Since November 1998, to improve passive safety, a telescopic intermediate shaft has been installed on cars instead of a cylindrical intermediate shaft, and the steering wheel has been secured with a self-locking nut.
Steering mechanism assembly with drive
(without hydraulic booster)
| 1 – bipod; 2 – average thrust; 3 – body of the pendulum arm bracket; 4 – lever axis; 5 – pendulum lever; 6 – bushing; 7 – adjusting nut; 8 – inner rod end; 9 – adjusting coupling; 10 – lower ball joint; 11 – steering knuckle; 12 – upper ball joint; 13 – rotary lever; | 14 – outer rod end; 15 – clamp; 16 – right spar; 17 – upper crankcase cover; 18 – steering gear housing; 19 – seal; 20 – worm shaft; 21 – shaft bracket; 22 – intermediate shaft; 23 – upper shaft; 24 – steering wheel; 25 – left spar. |
Upper steering shaft 11 - upper shaft bearing; 12 — bracket for mounting the steering shaft; 13 — lock bushing; 14 — pipe of the steering shaft mounting bracket; 15 — upper steering shaft;
Power steering device (since 2009)
Bottom view of the car showing the steering controls
Location of steering control elements on the vehicle: 1, 7 - outer tie rod ends; 2, 6 — adjusting couplings; 3, 5 — inner tie rod ends; 4 — power steering pump; 8 — steering mechanism; 9 — average thrust; 10 — pendulum lever
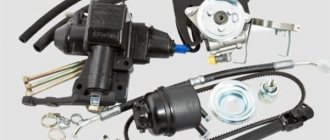
The hydraulic booster system includes a vane pump, a reservoir for working fluid, fluid inlet and outlet hoses, and a steering mechanism.
Power steering system: 1 — power steering pump; 2 - gasket; 3 — bolt fitting; 4 — high pressure hose; 5 — supply hose; 6 — tank plug with liquid level indicator; 7 - tank; 8 - clamp; 9 — steering mechanism; 10 - low pressure hose
See also Steering equipped with an airbag
Description of steering
Steering – with mechanical linkage, without amplifier. Steering mechanism – “globoidal worm – double-ridge roller”, gear ratio – 16,4.
In a variant version, the car is equipped with power steering, which significantly reduces the force on the steering wheel. If the power steering is not functioning (for example, when towing a vehicle with the engine not running), you can still steer the vehicle, but you will need to apply significantly more force to the steering wheel to do so. The steering linkage is formed by three steering rods (one middle and two side), a bipod, a pendulum arm and steering knuckle arms. The side rods consist of two tips connected by a threaded split coupling. The internal (short) tip has a right-hand thread, and the external one has a left-hand thread. The threads on the coupling are also of different directions, so when it is turned, the length of the side rod can increase or decrease, which is necessary to adjust the wheel toe. The coupling is fixed on the ends with clamps.
There are ball joints at the ends of the tie rods. Their fingers have a conical fit in the levers and are fixed in them with nuts and cotter pins. The ball head of the pin rotates in a plastic insert, pressed by a spring to the hinge body. The other end of the spring rests against a steel plug rolled into the hinge body. Due to the taper of the outer surface of the liner and the inner surface of the hinge body, when the liner is pressed, a backlash is selected between the liner and the ball head of the pin.
To make sure that the liner is not jammed in the body, press the hinge body in the direction of the finger with your hand or a mounting spatula - in this case, the finger should go 0.5–1.5 mm inside the body. If the hinge jams or there is noticeable play in it, the steering rod (steering end) is replaced. The hinge is protected from moisture and dirt by a rubber cover pressed onto the body. If the cover is damaged, replace it immediately by removing the old grease from the joint surface and adding new one (ShRB-4).
The swing arm bracket is attached to the right side member with two bolts and self-locking nuts. The bracket body is cast aluminum alloy. It contains two plastic bushings in which the axis of the pendulum arm rotates. There are washers placed on the top and bottom of the axle, which press the bushings against the bracket body. The lower washer rests against the pendulum arm, secured to the axis with a self-locking nut, the upper one rests against the nut with a cotter pin. This nut is tightened on the removed bracket so that the pendulum arm does not rotate under its own weight, but only under a load of 1–2 kgf. Litol-24 lubricant is placed on the working surfaces of the bushings and in the space between the axle and the body. To protect against dirt, there are two rubber O-rings installed between the washers and the lever body. When the bushings are worn out, they are replaced; when the housing or axle is worn out, the bracket is replaced.
The steering gear is attached by three bolts with self-locking nuts to the left side member. Its body is cast aluminum alloy. Two bronze bushings are pressed into its lower (elongated) part, in which the steering bipod shaft rotates. The steering bipod is secured to the lower splined end of the shaft with a nut (it is installed on the shaft only in a certain position). The upper part of the shaft has a boss with a cutout; it contains a double-ridge roller rotating in ball or needle bearings. The T-shaped groove at the upper end of the shaft includes a screw head, which adjusts the gap between the roller and the worm (see below). The axial play of the head in the groove should not exceed 0.05 mm; this is achieved by selecting the thickness of the adjustment plate placed on the screw. The screw moves along the threads in the steering mechanism cover and is locked with a nut and a shaped washer.
There are two options for installing the bipod shaft roller: on a needle or on a ball bearing.
The steering gear worm rotates in two angular contact ball bearings, the gap in which is adjusted by selecting gaskets between the body and the bottom cover (in this case, oil pours out of the mechanism; after adjustment, its level must be restored). With a correctly adjusted gap, the torque of turning the worm shaft (with the bipod shaft removed) should be in the range of 20–49 N.cm. If it is smaller, reduce the thickness of the gasket package; if it is larger, increase it. After installing the bipod shaft, adjust the gap in the engagement of the roller with the worm: the moment of resistance to turning the worm shaft when turning 30° to the right and left from the middle position should be 88–118 N.cm, and at large angles - no more than 69 N.cm. In practice, the simplest control is as follows: with the steering mechanism removed, the worm shaft should rotate by hand with a noticeable increase in force near the middle position; there should be no axial play of the shaft.
To fill the steering gear housing with oil, there is a hole in the top cover that is closed with a screw plug. Transmission oil is poured to the edge of this hole (0.215 l), and the level is checked using it. Oil leakage is possible from under the lower bearing cover of the worm shaft (due to its deformation) or through the oil seals of the bipod and worm shafts. Repairing the gearbox at home (except for adjusting gaps and replacing seals) is not recommended.
The steering shaft is two-link and consists of an upper and intermediate shaft. The upper shaft rotates in two bearings with rubber bushings, rolled into the shaft bracket pipe. In the lower part, a ring with a groove is welded to the shaft, into which the locking bolt of the anti-theft device fits. The steering wheel is fixed to the upper splined end of the shaft, its fastening nut is cored.
The intermediate shaft has cardan joints at the ends with split spline ends, tightened with bolts; the lower one is connected to the worm shaft, the upper one is connected to the upper steering shaft.
Injury safety of the steering is ensured by folding the steering shaft due to universal joints and special fastening of the steering shaft bracket. The latter is attached to the body bracket at four points: at the top - with welded bolts with nuts and washers, at the bottom - with special tear-off bolts with fixing plates. In a collision, the edges of the retaining plates are deformed and slip through the rectangular holes in the steering shaft bracket. At the same time, due to the folding of the steering shaft, the steering wheel does not move back, but up and forward, reducing the likelihood of injuries to the driver's chest.
Video
Features of installing power steering
Briefly about the features of installing power steering on the Niva:
- First, the central nut of the steering wheel is unscrewed, after which it is dismantled. A puller may be required to remove the nut. The universal joint is also removed from the steering wheel.
- Then the fan strap is loosened.
- After installing the hydraulic booster, you need to fill the system - to do this, unscrew the expansion tank cap and fill the system with oil to the required level. After this, the steering wheel should be turned to its extreme positions several times with the engine turned off, this will get rid of the air lock in the system.
- When bleeding the system, it is recommended to jack up the front of the car or disconnect the steering rod from the bipod. Next, the engine is started and the required amount of liquid is added to the system. If you notice that after adding the oil it begins to foam, this indicates that air has entered the power steering hoses. Then you will need to turn off the engine and wait a while until the bubbles stop coming out.
- The procedure is carried out almost identically to installing the EUR, only there are some nuances. Before you begin the process, carefully read the service book that comes with the kit (the author of the video is the Andrew Humm channel).
The nuances of adjusting the steering wheel position
As for the adjustment, it is usually performed if the driver is not satisfied with the height position of the steering wheel. To adjust the EUR, you need to grind off the edges of the shaft to the required dimensions or install a gasket between the mechanism body and the plate.
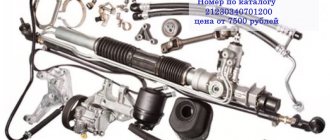
Price issue
As for the price, it depends on the type of amplifier, as well as the store where the kit is purchased. The cost of an ESD kit today averages about 27-32 thousand rubles. As for the hydraulic booster, on average the installation kit will cost the buyer from 31 to 40 thousand rubles. You can assemble a power steering system from different parts from different cars, for example, install a column from an Opel or Nissan, and a pump from a BMW or other car models. But you will have to tinker, since you will need to perform more than one alteration.
Operating principle of the hydraulic control system
How does power steering work? Its main element is a pump, which, using a belt from the crankshaft, sucks in oil and pumps it into the distributor. The latter, in turn, monitors the force applied to the steering wheel and, using a torsion bar (follower device), helps turn the drive wheels. When moving in a straight line, the torsion bar does not twist, so the distributor channels are blocked and the oil drains back into the reservoir.
Power steering is most often useful when parking and turning, making the work of your hands three times easier. We can also say that the mechanism weakens the transmission of microshocks from the road surface to the steering. The mechanism is also useful in case of a sharp drop in tire pressure. The disadvantages of power steering include the fact that it interferes with “feeling the car”, so designers need to achieve a compromise between informativeness and tightness of the steering wheel.
Foreign manufacturers conduct a lot of research in order to make the hydraulic booster light at low speeds and elastic at high speeds. To do this, German hydraulic boosters from ZF are equipped with pressure modulators, which limit the oil pressure in the operating circuit as speed increases. In addition, circuits with power steering driven by an electric motor are acceptable, which makes it possible to change the pump performance in accordance with the rotation of the electric drive. Sometimes the gear ratio is also changed.
Video “How power steering installed on a Niva works”
In the video below you can watch how a self-installed power steering works (the author of the video is Vladislav Mantula).
ONE LEFT
POWER STEERING
It is clear that you can do without not only a hydraulic booster - all sorts of cigarette lighter air conditioners are also, to some extent, elements of luxury. However, today you will find a hydraulic steering wheel even on very light foreign cars, and an all-terrain vehicle without it is the exception rather than the rule. This is understandable: it’s one thing to slightly move the steering wheel on the highway, and quite another to turn it from lock to lock on a broken forest road. And since the Niva, although inexpensive, is a real all-terrain vehicle, a hydraulic booster is still desirable for it.
HISTORY AND PRESENT
The opportunity to equip their car with such a useful option appeared to Niva owners probably ten years ago. Then, for this purpose, they adapted the hydraulic booster of the famous German company ZFLS model 8052. Only the price of under 2000 dollars completely discouraged the desire for such tuning.
Today is another matter. Togliatti has mastered the production of the Nivov amplifier at a very reasonable price. The joint development of Steering Systems, VAZ and ZF turned out to be almost four times cheaper than the foreign analogue. (The product is certified for the Niva family, see ZR, 2003, No. 11, p. 184).
The fact is that the body and cover of the steering mechanism for the Niva differ from the original ZF8052, so the Germans made them almost individually. The cost of the kit in this situation, naturally, has increased significantly. Having established the production of these parts at home, but leaving the serial components German, we managed to get a very reasonable price for the entire set.
Delivery by transport company (cash on delivery, no prepayment)
Advantages:
- the cost of delivery of heavy and large-sized orders is much cheaper than that of Russian Post;
- There are practically no restrictions on the weight and dimensions of cargo;
- There is a wooden crate service - this is an additional guarantee of the integrity of the order.
Disadvantages: unfortunately, there are branches only in cities.
The estimated cost of delivery for an order up to 30 kg is 450 rubles.
List of transport companies with which we cooperate:
- TC "PEK" (cash on delivery service available);
- TC "Business Lines";
- TC "Energia";
- TC "KASHALOT" (KIT) (cash on delivery service available);
- TC "SDEK" (cash on delivery service available);
- TC "DPD";
- TC "ZhelDorExpedition";
- TC "VOZOVOZ";
- TC "Baikal-Service".
To send your order by transport company:
- Place an order in our online store by phone or on the website (registration is not necessary);
- After we receive it, our manager will contact you by phone to clarify the cost, delivery time and your wishes. Next, we will pack your order carefully and then send it to you;
- You will receive a shipment tracking number from us via SMS or email (if available). You can monitor the status of the order coming to you using our tracking service, as well as independently, on the transport company’s website using the track number. After the order reaches your locality and the manager of the transport company contacts you, you need to receive the order at their office or order home delivery;
- Upon receipt from the transport company, you pay the cost of delivery and order.
Installing power steering - step by step instructions
This instruction is intended for VAZ 2110 cars, which do not have power steering at all. Such models were produced a long time ago, but they can still be found on the road today. In this case, the car can be upgraded with your own hands.
Installation of power steering can be done by yourself
, for this you will need a power steering kit - today it can be purchased for about 20 thousand. From the tools, prepare a set of keys and screwdrivers; you should also take care of the amplifier fluid in advance.
- We dismantle the timing case and install the bracket on three bolts. There are already holes in the interior, so there is no need to drill new ones. Now we install the pin on which the roller will later be installed. There are no holes for it, so we make new ones. Let's put on a video.
Here you can see the fasteners that need to be removed. The photo below shows in detail what needs to be sawed off. After this, securely fix the pump on the bracket and cover it with a pillow. The assembled unit should be placed
on the engine, or rather, in the place where the generator was mounted.
You should undertake such work only if you already have experience in servicing the electrical and power plant of the VAZ 2110. Power steering is directly related to safety, so if you lack experience, it is better to turn to the experts.
Modification of parts, installation of pumps and hoses
The bipod for the power steering should also be modified. Using a circular electric saw, it is cut off by 3-5 mm in part of the front stop, placed on the lower shaft of the power steering bipod, a lock washer is installed, the fastening nut is tightened, and the nut is locked by bending the antennae of the lock washer.
The power steering assembly with bipod is installed with the steering wheel in the middle position, when the mark on the end of the steering shaft (hydraulic booster) coincides with the corresponding mark on its body. The amplifier is located on the spar using three bolts from the kit, the nuts are tightened with a force of about 35-45 Nm (you will need a wrench and a socket head “17”, a torque wrench). Next, the junction of the car body and the hydraulic booster is sealed with silicone or polyurethane foam. The ball pins from the steering rods are returned to the holes in the bipod, tightened with castle-type nuts and secured with cotter pins.
Buy only original parts
Installation of the power steering pump begins with installing the drive pulley and securing it with a special bushing to an extended nut. Next, the power steering pump bracket is installed, the cylinder head is secured through the upper platform of the bracket, and the pump itself is installed. A V-belt is put on the pump drive pulley on the crankshaft, as well as the pump pulley, which must be tensioned by moving the pump through the grooves of the bracket and tightening the fastening bolts to a torque of about 22 Nm.
When we install power steering hydraulic hoses, we need to remove the transport plugs in such a way as to ensure that no debris gets in there. The high pressure hose is connected to the supply hole in the pump and, at the same time, to the power steering high pressure hole through a hollow bolt. All bolts are tightened, the hose is positioned so that it does not touch other parts of the car. Next, we install the low-pressure pipe, drain and low-pressure supply hoses, reinstall the removed components, fill the amplifier with oil (it is strictly forbidden to start the engine without oil!), and check the operation of the systems.
Detailed instructions for installing electric power steering on a Niva
The procedure for installing the EUR with your own hands is as follows:
- First you need to disconnect the battery.
- Then the plug is removed from the steering wheel, the fixing nut is unscrewed, and the steering wheel itself is dismantled. You also need to unscrew the four screws and remove the plastic cover.
- The mounting bolts are unscrewed and the instrument panel is dismantled. Disconnect the steering column switch plug, unscrew the bolt that secures it, and then remove the device.
- Then the ignition switch wiring is disconnected, the device itself is removed, to do this, unscrew the two mounting screws and turn the key to position I.
- The next step is to dismantle the steering column; to do this, you need to unscrew the steering shaft screw, as well as several mounting screws and nuts. Please note that Nivas use screws with shear heads, so the best option would be to apply notches using a chisel and unscrew them with pliers. Next, the column itself must be lowered down and then dismantled.
- After this, unscrew the nuts on the mounting blocks with fuses and remove them. Also remove the relay cover located under the instrument panel.
- The interior and engine compartment are separated from each other by a partition; it has an elastic plug, which must be removed. The EUR wire is pulled through the hole. Make sure that the installed wire does not come into contact with moving components of the wiper motor.
- Under the dashboard itself, to the left of the steering wheel, there is an 8-pin connector, two gray wires are connected to it. The yellow-blue one from the EUR should be connected to this connector. Then, to the red block, which comes from the tidy, you need to connect the orange and blue-pink wires from the electric amplifier. Here, behind the instrument panel, you can find a ground bolt; you should connect the minus to it.
- An amplifier bracket is installed under the tidy; the wiring from the ignition switch should be threaded into it.
- Next, an intermediate shaft should be installed on the splines of the amplifier itself; remember that a ground should be connected to it in advance. The shaft itself should be securely fixed to the steering gear shaft and the EUR should be attached to the bracket. The shaft must not be pinched or too tight.
- The assembly itself is fixed to the plate using two bolts and two studs; it is advisable to install nuts under them.
- Next, the power and information connectors are connected to the amplifier.
- In fact, the installation procedure can be considered complete. Now you need to reinstall the ignition switch and steering column switch. To install the steering column trim, it will need to be cut, for example, with a hacksaw. The steering wheel and dashboard are put in place. Then the wiring is pulled from the EUR to the battery. Please note that in the existing plug in the partition between the engine compartment and the passenger compartment, it will be necessary to increase the size of the hole. Perform a functional check of the equipment and check all connections again.
We install the amplifier on the Niva ourselves
Power steering is not installed on all Niva cars as standard, so almost all Niva drivers strive to improve their car with the help of this useful unit. You can buy both the German and Russian versions, which are best installed in a workshop if you do not have significant experience in auto repair to do it yourself. The cost of parts is about 25-27 thousand rubles; for work at a service station they can charge about 8-10 thousand rubles.
The general scheme for installing power steering on a domestic Niva is as follows:
- Remove the negative terminal from the battery (key set to “10”).
- Remove the mounting bracket from the spare wheel and the wheel itself.
- Disconnect the tubes/wires from the washer motors and remove the washer reservoir.
- For injection options, remove the fuel filter from the left mudguard without disconnecting the fuel supply hoses (with a socket wrench set to “10”).
- Using a Phillips screwdriver, remove the lower and upper steering shaft housings.
- Remove the harness blocks from the wires from the three-sacrum switch, ignition, emergency lights, and brake signal.
- Using socket wrenches and wrenches set to “13”, unscrew the bolt that secures the end of the intermediate driveshaft.
- Using a chisel, hammer, socket wrench “13”, free the Niva from the shaft bracket (steering wheel), steering wheel and intermediate driveshaft.
- Using a wrench and a socket wrench set to “13”, unscrew the bolt securing the upper end of the propeller shaft and remove the latter.
- Remove the rod from the vacuum brake booster by removing the mounting bracket (done with pliers and a flat-head screwdriver).
How the part is located on the car
This is how preliminary preparation of the machine is carried out for installation of the hydraulic booster. In addition, you will have to modify the body in terms of widening the hole in the front panel and making a groove in the pedal block bracket (you will need a drill, jigsaw, electric saw, file, chisel, hammer, D9mm drill bit).
To install power steering, you need to make some changes to the engine. To do this, a mounting bracket from the power steering pump is installed on the cylinder block, the marking of the center of the side hole is determined, and a threaded hole with a depth of strictly 12 mm is made. Then the nut securing the pulley on the crankshaft is unscrewed (with 4th gear engaged and the hand brake on). For injection options, the module (ignition) bracket needs to be adjusted. To do this, the coil block is unscrewed from the bracket and its eye is bent using a vice and a hammer in a certain way.
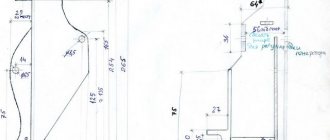
Drawings of fastenings for an injection Niva with power steering (VAZ 21214)
The author of the design proposes to move the generator to the place of the power steering, having previously installed the following bracket in its place:
Belt 1220 mm profile “A” (ZIL157), wedge angle 40 degrees. High pressure pressure hoses have a length at the centers of the fitting holes of 1450 mm. Return sleeve - 1115 mm. You will have to cut a hole for the hoses in the right protective casing. The belt is 710 mm long, other dimensions are the same. The photo on the left shows the hydraulic pump bracket, on the right - the power steering in the new place.
Drawing of its bracket:
Turn the power steering pump upside down. Result of moving the generator to the top:
There are ready-made kits for moving the Niva generator upwards on sale, but the price for a piece of iron can be greatly inflated. Thus, by making such a bracket ourselves, we extend the service life of the generator and save money.
Have you ever encountered such a modification? How did you solve a similar problem? Let us remind you that in another article we determine whether the Niva 4x4 needs a more powerful generator.
Keywords: Niva generator
We install the hydraulic booster ourselves
Now let's proceed directly to the description of the installation of power steering on the Niva. First, we dismantle the car steering wheel by unscrewing its central nut. We do all this using a special puller. Together with the steering wheel, we remove the universal joint. We save the parts that secure the latter; we will use them to secure the hydraulic booster. In order to install the power steering, you will need to loosen the fan belt and secure it to the hub.
We fill the system: remove the oil tank cap, fill the oil to a certain level. Next, turn the steering wheel from one extreme position to another with the engine not running. Thus, we remove air from the system. When pumping, you must either hang the front wheels or disconnect the steering rod from the bipod. After this, you can start the engine. At the same time, add oil to the reservoir. Try to pour it at a rate of 5.5 liters per minute so that air does not get into the suction line. You can judge whether air has entered the system by the state of the oil in the tank: if it begins to foam, it means that air has nevertheless entered the line. In this case, it is necessary to turn off the engine and let the oil settle for about twenty minutes until bubbles stop appearing.
We inspect the hoses, if we notice damaged ones, we replace them with new ones. We start the engine and let it run for about twenty seconds, bleed the power steering system. We turn the steering wheel from lock to lock, which expels air from the system. We do this three times in each direction; we do not hold the steering wheel in the extreme position for more than 5 seconds, so as not to overheat the oil.
vote
Article rating