Niva 2121 front axle
As I said earlier, at the opening of the hunt a weak component appeared in my SUV :( The most annoying thing is that it was almost out of the blue.
Due to a breakdown at the very beginning of the season, the NIV had to be restored in the shortest possible time. Therefore, the most rational option was no longer needed - installation of the RPM steel hull. If it were not for the great desire to hunt, then I would have gone the route of installing the steel hull and fixing the bridge. However, do not forget that if I had not had a passion for hunting, I would not have had a NIV at all!
So, in their city of Novomichurinsk they couldn’t find a used front axle, so they had to go the route of installing the RPM in a new building.
First of all, it was necessary to remove the old bridge. Fortunately, a friend has an inspection hole in the garage where the NIVA was parked.
Full size How nice it is when there is an inspection hole in the garage...
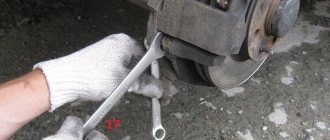
Arriving at lunchtime on April 17th at the garage, I began to disassemble it; in 4 hours alone I managed to unscrew everything to pull out the bridge. But it’s very difficult to extract it alone, so a friend came to the rescue and together we quickly extracted the “patient.”
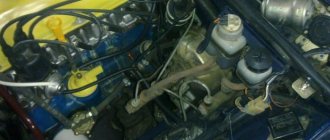
- Full sizeRemoving the front axle from a VAZ 2121 NIVA
- The sequence for removing the axle is as follows: 0) drain the oil from the RPM; 1) unscrew the lower ball joints to move the steering knuckles to the side, do not forget to jack up the levers so that the spring does not tighten; 2) remove the axle shafts from the knuckles; 3) unscrew the CV joint from the bridge; 4) unscrew the bridge from the internal combustion engine; 5) use a chisel to mark how the cardan was screwed to the bridge; 6) jack the bridge; 7) unscrew the front cardan from the bridge;
 With the help of a partner, we pull out the bridge.
Thanks, Cap!
Full size To remove/install the front axle, you need to stock up on two jacks
The next day, the search for the necessary spare parts began: RPM crankcase - 2121-2302020 - 1 pc. — RUR 3,020. Set of gaskets RPM — 2121-2301015/70/308 — 1 pc. - 40 rubles. Hairpins M12x1.25x30 - 2 pcs. — 80 r. M6x12 hairpins — 8 pcs. — 24 r. Hairpins M8x20 — 3 pcs. — 15 r. M8x25 hairpins — 3 pcs. — 18 rub.
Breather - 2101-1700020 - 1 pc. — 60 RUR. Self-locking shank nut M16x1.5 — 1 pc. — 35 r. Spacer sleeve — 2101-2402029-01 — 1 pc. — 140 rub. Bearing — 2101-2402025 — 1 pc. — RUB 397. Bearing — 2101-2403036 — 2 pcs. — 840 rubles. Shank oil seal — 2121-2302052 — 1 pc. — 100 rub.
Flange mounting bolt - 2101-2202007 - 4 pcs. — 20 rub.
M8 self-locking nut - 4 pcs. — 24 rub.
Full sizeSpare parts for rebuilding the front axle on a VAZ 2121 NIVA
After that, I went to the foreman so that he could assemble the RPM in a new building. After a major overhaul, the repairman noticed some mistakes, because of which he assembled the RPM for me in a new building for free. Otherwise, the procedure would have cost 2,000 rubles.
Also interesting: Engine VAZ 21213 Niva
I would like to emphasize that in order to install the RPM in a new case, you must definitely buy a spacer sleeve 2101-2402029-01, because it is disposable:
Full size Disposable spacer RPM - 2101-2402029-01
The bearings do not need to be changed, but in order not to climb into the RPM several times, it is better to replace them:
Full sizeRPM VAZ 2121 NIVA
Full size bearing 2101-2403036
Full size bearing 2101-2403036
The master did everything promptly, and already on the evening of April 18th the assembled bridge was in my hands:
Full sizeRPM in the new VAZ 2121 NIVA case
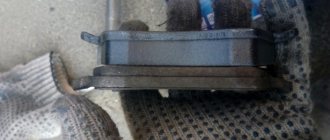
I would like to draw your attention to the fact that the studs need to be screwed in with a thread lock, which come in two types: detachable and non-detachable. I used a detachable blue thread locker:
- Full sizeFront axle VAZ 2121 NIVA
- But now I know what my main pair is:
- Full sizeGP 2101 - 10/43
It would also be desirable to change the bearings and seals on the CV joints, but I didn’t have enough zeal to do it all in one day. But I don’t see anything wrong with this, because the CV joints can be removed without removing the bridge. And someday during the next renovation I’ll definitely do this, I’ve already bought them!;)
PS Of course, it was necessary to install a steel body and immediately untie the bridge. But then I would have missed the spring hunt...
PPS Reliable units and fast, high-quality repairs to everyone!
Transfer case
The transfer case and differential control lever (multiplier) allows you to combine one of two modes with turning on or off the center lock. Together with neutral, there are 5 lever positions.
- Neutral position. There is no engagement in the main pair. The car cannot move.
- Differential unlocked, reduction disabled. Essentially, this is normal mode for everyday driving. The distribution of the moment of force occurs in a ratio of 1:2.
- Differential locked, reduction disabled. The distribution of the moment of force between the axles occurs in equal shares, but due to the operation of the cross-axle differential, the force on each wheel depends on the road surface.
- Differential is unlocked and reduction is engaged. The torque has been increased, but its distribution between the axles is 1:2.
- Differential locked, reduction enabled. Bridges work in a rigid connection. The car has the most increased cross-country ability.
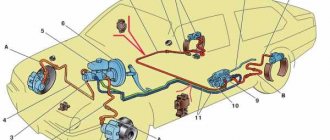
Front axle – chevrolet niva
| Rice. 5.10. Front axle: 1 – mud deflector; 2 – lower cover of the gearbox housing; 3 – drive gear bearings; 4 – differential housing; 5 – drain plug; 6 – filler and control hole plug; 7 – bearing of the internal hinge housing; 8 – oil seal; 9 – housing of the internal wheel drive hinge; 10 – spring washer; 11 – retaining ring; 12 – bearing cover; 13 – adjusting nut; 14 – differential box bearing; 15 – bearing cover; 16 – cover fastening bolt; 17 – support washer; 18 – satellite; 19 – axle gear; 20 – gearbox housing; 21 – breather; 22 – bearing cover of the internal hinge; 23 – satellite axis; 24 – adjusting ring; 25 – drive gear; 26 – spacer sleeve bearings; 27 – drive gear oil seal; 28 – flange |
Design Features
The front axle of the Chevrolet Niva consists of a main gear and a differential installed in one housing. The differential, final drive gears and gearbox bearings of the front and rear axles are the same (see “Rear Axle”). The front axle gear housing is cast, covered with covers at the front and bottom. The crankcase covers are sealed with gaskets.
Also interesting: Do-it-yourself tow bar for a Chevrolet Niva, drawings, dimensions, photos
Changing the oil in the front axle gearbox
According to the service book, the oil in the front axle gearbox must be replaced every 45,000 km.
You will need: a 17mm wrench, a 12mm hexagon, a syringe for filling transmission oil, a container for used oil.
| USEFUL TIPS It is more convenient to perform this operation on an inspection ditch or on a lift. It is recommended to drain the oil immediately after a trip, while the front axle is still warm and the oil has good fluidity. |
| 1. Unscrew the drain plug and... | 2. ...drain the oil into a container. |
| 3. Close the drain plug. |
| 4. Unscrew the filler plug. | 5. Fill with fresh oil using a syringe to the level of the lower edge of the filler hole. |
| 6. Close the filler plug. |
Replacing the front axle gearbox drive gear oil seal
Replace the oil seal with a new one if an oil leak is detected (see “Checking the tightness of the rear axle seals”).
You will need: wrenches “13”, “24”, screwdriver, torque wrench, hammer.
| NOTE The need to replace the oil seal is determined by the amount of oil leakage. Before checking the leak volume, check that the breather cap can move freely in all directions to ensure that the breather (see “Front Axle”, “Design Features”) is not causing the oil leak. Check the oil level in the axle housing and top it up if necessary. Don't forget to tighten the oil filler plug. If you are working in an inspection ditch, hang up the rear axle and place it on supports. Start the engine, engage direct (IV) gear and, with the speedometer reading steady at 90–100 km/h, let the axle run for at least 15 minutes to warm up the oil (oil temperature should be 80–90 °C). With direct transmission engaged and the speedometer reading 100 km/h, determine the amount of oil leaking. If more than 5 drops of oil leak out within 15 minutes, the oil seal must be replaced. |
| 1. Before replacing the oil seal, disengage the gear and stop the engine. |
| 2. Drain the oil from the front axle housing (see “Changing the oil in the front axle gearbox”). Don't forget to tighten the oil drain plug. |
| 3. Disconnect the front propeller shaft from the drive gear flange of the front axle reducer. |
| 4. Remove the housings of the internal hinges of the front wheel drives from engagement with the gears of the axle shafts of the front axle reducer (see “Removing and installing the front wheel drives”). |
| 5. Determine the moment of resistance to rotation of the drive gear flange nut and replace the oil seal in the same way as replacing the rear axle drive gear oil seal (see “Replacing the rear axle gearbox drive gear oil seal”). |
| 6. Install the removed components and parts in the reverse order of removal. |
Also interesting: How to bleed the brakes on a Chevrolet Niva correctly
| 7. Fill the gearbox with oil (see “Changing the oil in the front axle gearbox”). |
Replacing the bearing and oil seal of the internal drive joint housing and the front axle mounting bracket
You will need: a hammer, a bit, a circlip remover, and sealant.
| 1. Remove the front wheel drive (see “Removing and installing front wheel drives”). |
| 2. Remove the bearing retaining ring. |
| 3. Using a hammer and a wooden spacer, knock down and... | 4. ...remove the housing and bearing from the shaft. |
| 5. Using a hammer and chisel,... | 6. ...remove the oil seal. |
| 7. Lubricate the working edge of the oil seal with transmission oil... | 8. ...and apply a thin layer of sealant to the outer surface. |
| 9. Using a hammer, carefully press the oil seal into the housing. |
| 10. Install the parts in the reverse order of removal. |
Removing and installing the front axle gearbox
The front axle gearbox is removed for replacement or repair. However, disassembling, adjusting and assembling the gearbox requires the use of special equipment and requires the skills of the performer. Repairing a gearbox in a garage almost never leads to the desired result. Therefore, if it is necessary to repair the gearbox, use the services of a specialized workshop.
You will need: keys “13”, “17”, “27”, hexagon “12”, wrench for wheel nuts, chisel, hammer, syringe for filling transmission oil, container for used oil.
| 1. Remove the front wheels. |
| 2. Drain the oil from the front axle gearbox (see “Changing the oil in the front axle gearbox”). |
| 3. Disconnect the front driveshaft from the front axle gearbox (see “Removing and installing the driveshaft”). |
| 4. Unscrew the nut and remove the bolt securing the left front axle gearbox bearing cover to the front suspension cross member. |
| 5. Remove the right front wheel drive (see “Removing the front wheel drives”). |
| 6. Unscrew the three nuts securing the bearing cap of the left drive inner joint to the front axle gearbox. |
| 7. Turn the steering knuckle so that it pulls the drive,... |
| 8. ...disconnect the gearbox from the drive and... | 9. ...remove it. |
| 10. Install the front axle gearbox and the removed parts in the reverse order of removal. |
| 11. Fill the gearbox with oil (see “Changing the oil in the front axle gearbox”). |
Read news about the new Niva
- Replacing the drive gear oil seal of the front axle VAZ 2121 Niva 2131
- How to bleed the clutch on a Niva? Algorithm of actions
- Installation and reviews of Euro handles for Niva 4x4 (VAZ 2121, 2131) » Lada.Online - all the most interesting and useful about LADA cars
- How to bleed the brakes on a Niva yourself? "
- Interior heater valve VAZ 2121 Niva 2131
- Do-it-yourself Niva 2121 elevator: drawings, dimensions
- How to remove injectors from the fuel rail of a VAZ 2121 Niva 2131
- Engine VAZ 21213 Niva
Transmission
The Chevrolet Niva gearbox has no structural differences compared to the Lada 4x4 box, and they are identical in design. The difference can only be noticed in the mounting and length of the gear shift drive. Another important feature is the presence of 5th gear.
The main parameter of the gearbox is the gear ratio. By trivial definition, this is the ratio of the number of teeth of the driven shaft to the number of teeth of the drive shaft. Naturally, we talk about the gear ratio when there is actually a transfer of torque from one shaft to another. If the specified parameter is greater than 1, then such a mechanism works to increase torque. The gear ratio for IV gear is 1, and for V – 0.82. That is, in V gear there will be an increase in the number of revolutions of the secondary shaft with a parallel decrease in torque. It is more convenient to imagine the value of the gear ratio using the sprockets of a high-speed bicycle.
Leverage
The secret is that return is only possible with the clutch depressed and at low speed. Some drivers neglect the instructions and remain unaware of the generally accepted method. Through trial and error, they figure out that shifting is possible when driving in reverse in a circle at extremely low speeds. And although this method works, its convenience is highly questionable.
Symptoms of a problem
You can perform simple bridge diagnostics yourself. To do this, you need to carry out four tests, during which you need to listen to the noise:
- Accelerate the car on the highway from 20 to 90 km per hour, then smoothly brake the engine.
- Accelerate to 100 km/h, put in neutral, turn off the engine and roll to a stop.
Important: after the engine is turned off, you must immediately turn on the ignition so as not to accidentally lock the steering wheel lock.
- Turn on neutral and, without moving, let the engine run at different speeds
Resource of transmission elements
With proper maintenance, all transmission elements have service lives that comply with the regulations. The existing stereotype about unreliability is not confirmed either documentary or practically. Until now, the Chevrolet Niva remains one of the most popular cars on the market. The owners claim that the car is taking care of its 200,000 km, which the plant lays down as a resource. This means that the transmission resource is determined by the manufacturer and cannot be less than 200,000 km.
Once again, emphasis should be placed on timely maintenance as a guarantee of flawless operation of the system.
There was a breakdown
The front axle (Niva) often requires replacement, the price of which sometimes reaches 20,000 rubles, for those people who are constantly trying to improve their car or reduce its consumption. The actions of amateurs lead to increased wear of one or another bridge, and sometimes both at once. However, the bridge does not always fail due to human intervention, because no one has canceled simple breakdowns and wear of parts.
Hello! Nivovods constantly argue about the advisability of decoupling the front axle gearbox from the engine . Opinions are opposite – from “must do” to “under no circumstances.” The arguments of opponents of the operation are simple: “The factory design is the most reliable.”
Proponents of the modification believe that decoupling the bridge reduces vibrations (and therefore extends the life of the gearbox) and makes it possible to painlessly lift the suspension for the axle shafts. In addition, on the later model the axle mount is independent. I will not convince you of the benefits of this decision, or its negative consequences. I'll tell you how to do this job correctly.
The technology has been proven. On this model, the FRM (front axle gearbox) has an independent suspension as standard. To save time, you can purchase ready-made tying kits.
Many car enthusiasts make brackets and fastenings with their own hands, providing colleagues with drawings of their own design.
Types of differential lock
In the standard configuration of the Chevrolet Niva, only a center differential lock is provided.
To improve the car’s off-road performance, owners install a rear axle with two types of differentials:
- With forced locking, which is actuated by a mechanical, pneumatic or electromagnetic system.
- Self-locking. Various units are used, the differential in which is locked when there is a large difference in the speed of rotation of the axles, or is locked by default, and unlocked when the speed increases.
The differential lock allows you to overcome mud, snow drifts or other difficult sections of the road. However, it must be turned off on asphalt and at high speeds. Otherwise, the load on the axle shafts and gears increases, tire wear accelerates and the likelihood of skidding increases.
Device
The unit consists of two key elements housed in one housing:
- Main gear, consisting of drive and driven hypoid gears. It increases torque, reduces angular velocity and rotates the axis of rotation by 90 degrees.
- Center differential, which includes axle gears and satellites. They allow the wheels to spin at different speeds when turning or driving over rough terrain.
The rear gearbox also includes a flange, bearings, oil seals, oil deflector, axles, shims and other parts. There are plugs on the housing for draining and filling transmission oil.
A breather is installed in the upper part to ventilate the housing. If its hole becomes clogged, excess gas pressure can force oil through the seals.