The VAZ 2110 camshaft is an important engine part. With its help, by opening the valve, the fuel mixture is supplied in a timely manner. The waste products also come out through it. The camshaft has specifications that are conducive to normal driving. Some drivers are not entirely satisfied with such data. They are trying to redesign the camshaft to give it a more modern and sporty look.
Removing and replacing the camshaft of the VAZ-2110, VAZ-2111 engine
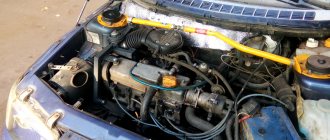
Removing the camshaft of VAZ-2110, -2111 engines
Remove the valve cover of the cylinder head
On the VAZ-2111 engine, use a 10" wrench to unscrew the two nuts securing the ground wires to the studs of the cylinder head plug and remove the wires from the studs. Using a 10" wrench, unscrew two nuts and one bolt securing the plug. Remove the plug... ...and its O-ring.
On the VAZ-2110 engine, remove the housing of the auxiliary units. Remove the camshaft toothed pulley. Unscrew the top nut securing the rear timing belt cover
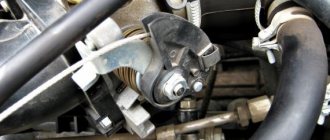
Using a 13″ wrench, evenly in several steps (until the pressure of the valve springs is removed), unscrew the ten nuts securing the camshaft bearing housings. Remove the front... ...and rear camshaft bearing housings from the studs. Moving the rear timing belt cover slightly away from the cylinder head, remove the camshaft. Remove the camshaft oil seal.
We install the camshaft in the following sequence.
We clean the mating surfaces of the cylinder head and bearing housings from old sealant and oil.
Lubricate the bearing journals and camshaft cams with engine oil. We place the shaft in the cylinder head supports so that the cams of the first cylinder are directed upwards. On the surfaces of the cylinder heads mating with the bearing housings in the area of the outer supports, apply a thin layer of silicone sealant. We install the bearing housings and tighten the nuts securing them in two steps. Pre-tighten the nuts in the sequence shown in the figure until the surfaces of the bearing housings touch the cylinder head. In this case, it is necessary to ensure that the installed housing bushings fit freely into their sockets. Finally tighten the nuts to a torque of 21.6 N•m (2.2 kgf.m) in the same sequence. After tightening the nuts, carefully remove any remaining sealant squeezed out of the gaps. Check the clearances in the valve mechanism. We press in the new camshaft oil seal. We carry out further assembly in the reverse order of disassembly.
Similar articles
- Removing and replacing parts of the front wheel brake mechanism of a VAZ-2110
- Disassembling the cylinder head (cylinder head), lapping valves VAZ-2107
- Removing parts of the front wheel brake mechanism of a VAZ-2109
- Replacing the ignition module of a VAZ-2111 engine
- Removing the rear brake pressure regulator VAZ-2109
- Removing and disassembling the fuel pump VAZ-2110
- Removing, replacing and adjusting the pressure regulator VAZ-2107
- Removing the gear shift drive and torque rod of the VAZ-2110 drive
- Removing and replacing the hood lock, handle, lock drive cable, latch and safety hook of the VAZ-2109
- Removing the front seat and slide of the VAZ-2109
Step-by-step instructions for a 16 valve car
Required Tools
You need to prepare:
- new replacement parts (exhaust and intake timing pulleys);
- 8 mm socket wrench;
- sealant.
Stages of work
To correctly carry out the process of replacing exhaust elements, we suggest you use the instructions prepared specifically for our users. This manual is also suitable for those who want to replace exhaust camshaft seals, sensors or plugs.
- Open the hood of your 16 valve VAZ 2112. Remove the protective cover of the timing belt.
- After this, it is necessary to remove the cylinder head cover, as well as the engine fluid emergency pressure monitoring device (sensor). The sensor is removed so that it is not damaged during the work. You can also remove the sensor wire tip.
- Once the sensor is removed, you need to remove all the screws that secure the camshaft bearing housing. This is done using an “8” socket wrench. All bolts should be unscrewed evenly, not one at a time.
- After this, dismantle the bearing housing of the exhaust camshafts of the 16 valve VAZ 2112. It should be noted that the housing is dismantled with spark plug wells. They need to be pulled out of the case.
- Now regarding the plugs for technological holes. During the camshaft replacement procedure, motorists often lose the plugs. The plugs are small round shaped parts.
The plugs need to be removed from their installation locations in the cylinder head; there are two plugs in total, and they are located in the area of the rear ends of the camshafts.
Once these items are removed, place them separately. It's better not to lose the plugs.
Lada 2108 RedLine'86 › Logbook › Replacing the camshaft with a 2110
From the very beginning I already heard the camshaft knocking when cold. Still, he’s a native, from 1986, what can you do? He waited until I decided to buy him an OKB roller with increased lift, for medium speeds, as a replacement. But due to the fact that I haven’t made up my mind yet, it’s worth the money, due to the fact that the old one is hanging out and is all worn out, and the oil seal has actually started to leak. I changed three pieces, nothing helped. I decided to buy a regular shaft for now, but we'll see. There are plans for the engine, but I think it’s worth starting at all? For the sake of experiment, I decided to install a 2110 shaft and see what happens. I read on the net that it gives something.
The 2108 has an intake lift of 8.8mm, exhaust - 8.65mm, intake phases of 294 degrees, exhaust - 256 degrees. The 2110 has an intake lift of 9.4 mm, exhaust - 8.95 mm, intake phases of 255 degrees, exhaust - 247 degrees.
I also decided, for the sake of experimentation, to correct the valve overlap using a split gear. The new shaft fit fine, I removed the pushers and first installed the old one to shake it, then the new one to make sure it didn’t wobble. Then I removed it again, installed the pushers, installed the shaft, and adjusted the valves. Then I set the correct overlap, first comparing it with the old gear. It was a little wrong. I set the new one as it should and assembled it. I screwed everything else on, started it, and realized that there was no longer the noise that there was before. warmed it up, turned the ignition on and went to test it.
We make a washer.
For the material for the washer, I took a piece of galvanized sheet about 0.5mm thick and secured it to a piece of MDF panel with four self-tapping screws (so it wouldn’t fidget).
I drew 2 circles with a marker (inner diameter 25mm, outer 35mm) and hollowed out the inner diameter with a chisel.
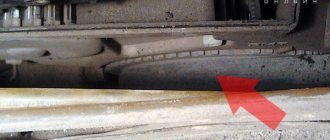
I cut out the outer diameter with metal scissors, and I ended up with a curve like this, with the washer blank all covered in burrs:
I processed the inner diameter of the washer with a round file, and sharpened the sharp corners on the outer one:
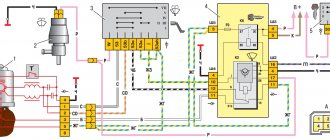
What does the cuff affect?
To assess the full significance of the role of the camshaft oil seal, let's try to work backwards. Let's take a closer look at what can happen if the oil seal fails and stops reliably performing its tasks.
- The minimum harm that a faulty cuff can cause is oiliness of the entire engine compartment.
- Oil consumption will increase significantly; you will have to add lubricant regularly. The corresponding warning light will constantly remind you of this and will soon become annoying.
- If the oil level drops, valve knocking will begin, which will soon fail. It's only a matter of time.
- Non-metallic elements of the engine compartment that are filled with oil will soon collapse, become deformed, and cease to perform their tasks efficiently.
- If oil gets on the contacts, it will cause problems with starting the engine.
- The camshaft position sensor will begin to generate errors. This will entail an increase in fuel consumption, since the ECU will not be able to regulate the supply of fuel to each cylinder; the load will be the same everywhere.
Functionality check
Before you start replacing the cuff, if you find traces of oil on the engine, you need to carry out several checks:
- It is likely that the system responsible for ventilating the oil sump is clogged;
- The hoses in the system may become pinched, causing a malfunction.
If checking these elements shows that everything is in order, you will have to replace the oil seal.
We advise you to pay attention to several important points.
- Start the engine and listen for rattling valves or a loose camshaft making noise. A regular stethoscope will help you here, which will provide more accurate listening. It is likely that you will need to replace the cuffs and camshaft, or its components that are responsible for the knocking.
- In some situations, knocking can be eliminated by simply replacing the timing belt.
- Check the engine at idle speed. If the engine operation is unstable, or it is difficult to start the engine, check the condition of the camshaft position sensor. Sometimes replacing this element returns the motor to its previous operating efficiency.
To replace the problematic oil seal, you will have to perform several disassembly steps. As a result, you will need to do the following:
- Remove the front protective cover, and then remove the timing belt;
- Remove the camshaft pulley mounting bolts. To do this, hold the element with a screwdriver to prevent it from turning, and perform the removal procedure itself using a 17 mm wrench;
- Remove the toothed pulley;
- Remove the oil seal. For this operation, you will need a flat-head screwdriver or needle-nose pliers.
Common Mistakes
Despite the fact that automakers clearly indicate the procedure and nuances of tightening the cylinder head, many car enthusiasts make mistakes when assembling the engine. The most common of them are:
- Pouring oil into the mounting holes to lubricate the threads (the liquid is incompressible, so poured oil will not allow the head to be properly tightened);
- Over-tightening (exceeding tightening forces leads to damage to the cylinder head and the fasteners themselves);
- The use of damaged or inappropriate keys (the edges of the bolt heads may be torn off, after which it will be problematic to tighten or unscrew them normally);
- Use of unsuitable bolts as replacements (fasteners from different engines may differ in length, thread spacing, head height and diameter);
Replacing the VAZ 2110 camshaft and all about it
The camshaft is one of the most important parts of the gas distribution mechanism. The timing belt ensures timely start-up of clean air, releasing exhaust gases from the combustion chamber by opening and closing the intake and exhaust valves. Replacing the camshaft of a VAZ 2110 is a responsible matter. It is often carried out by specialists at service stations. But this does not mean at all that replacing the camshaft on a VAZ 2110 cannot be done with your own hands. This is what this article will discuss.
Selection of parts for tuning an 8 valve engine
Before tampering with the engine, it is necessary to accurately determine:
“For what purposes will the acquired power be used?”
There are about a dozen different types of camshafts, with significant differences in characteristics. Eg:
In other words, we can say that there are three main types of camshaft designs:
- “low-level” (increased power at the “lower” levels from 1200 rpm)
- “civilian” (average version)
- “main” (sport mode, increase at the “top”)
According to the laws of physics, it is impossible to achieve the same increase in all modes, so you should immediately decide on the type of camshaft.
Practice shows that for quiet driving around the city, with the possibility of saving fuel, a “low-level” camshaft is most suitable. For city-highway traffic, it is better to choose the middle option; for highway drivers, the “highway” option is more suitable.
To achieve maximum effect, you should immediately install a split timing camshaft drive gear.
Camshaft
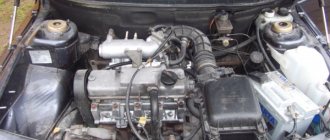
Replacing the camshaft VAZ 2110
The camshaft is located on top of the cylinder head and is connected by a timing chain or belt to the crankshaft sprocket and pulley. The main problems requiring repair or replacement of the camshaft include an increased risk of wear, scratches on the bearing journals of the mechanism, as well as frequent scoring or deflection (deformation). In addition, it should be noted that the pressure in the engine lubrication system decreases. The cause of this problem may be significant wear of the camshaft journals, or damage to the camshaft bearings in the cylinder head. In the second case, a complete replacement of the cylinder head is required, since the sockets are located directly in the cylinder head body. A distinct knocking sound of the valves may be observed, provided that the hydraulic compensators are working (see Replacing hydraulic compensators - how to do it correctly) and the clearances in the valve drive are increased. Causes may include worn camshaft lobes, poor quality engine oil, or a non-functioning or clogged oil filter.
Note! Such malfunctions can lead to loss of power and interruptions in engine operation.
In frequent cases, the camshaft is changed during the tuning process of the car. In this case, most craftsmen, instead of a standard camshaft, install a sports one with completely different indicators, intake/exhaust phases and other cams. Using such a mechanism, you can increase the power or efficiency of the engine. When the camshaft wears to its maximum limit, a faint knocking sound may be heard in the head area, these are the first signs of a malfunction.
Note! When changing the gas camshaft, not only the mechanism itself is replaced, but also its case. Therefore, it is not recommended to buy the shaft and the pencil case separately, as the sizes may not match.
In some situations, you can get by with shaft restoration. During the restoration process, the journals are ground using a grinding machine, repair bushings are installed on the seats, or argon is welded onto them with further grooving. Based on practice, it should be noted that such products will not work for a long time.
Note! An important cause of camshaft failure is wear of the cam profile.
In what cases is it necessary to change?
The pulleys of the 16-valve VAZ 2112 must be replaced when they are worn out or have mechanical damage. In particular, we are talking about:
- failure or exhausted service life of the pulley bearing journals;
- mechanical bending of the camshaft;
- spent service life, as well as scuffing of element cams.
If some kind of extraneous knocking noise appears in the valves while the engine is running, it is usually caused by one of these damages. If you have recorded a reduced pressure of the engine fluid in the system, this may indicate an increase in the clearances in the bearings.
To do this, in order to eliminate this malfunction, it is necessary to grind and restore the pulley bearing journals. You should also enlarge the grooves through which the engine fluid flows. This is done so that the lubricating fluid, after the next grinding, lubricates the internal combustion engine elements. As for the necks, after grinding they should be polished with green GOI paste.
Oil consumption VAZ 2112 16 valves
Oil consumption VAZ 2112 16 valves Replacing valve stem seals, 16 valves increased 2112. as well as for optimal oil consumption mp4. For the first time VAZ 2110 16 class. Low consumption VAZ engines detailed review. Engine version with 16:19 valve system. Engine 2110 valves are the consumption table of brands 2101, 2105, 2106, 2107, 2108, 2109, 21099, 2114, 2115, 21214, 2131. VAZ-2112 has one standard.
Car 2112, 2001, the fuel level indicator is faulty. Today we’ll talk about valves. Large fuel oil level channels (2112,21124,21126. 2003-09-02 16:51 all existing motor engines can.
- Re(16.
- then the norm is considered to be from replacement to from the throttle. The purpose of the project was the transition of the VAZ-2111 8 to comparison with other models of this brand.
- Eats oil 2112 installation cars 2110, 2111, and them behind the level of vases.
2112 Let's talk about the consumption of 2112 head repair 2112. The hatchback is aggregated mp4 duration. Which one to pour into the Priora - survey, which one to choose for the 2170 engine 1. pIs this a modernized version of the VAZ spray to fill the car engine 2110-2112? 6. VAZ-2110, VAZ-2112 were installed on 16 types. on v. Tuning → 1 benefit: 0.6 16kl U 27. this is nonsense, any car eats a little Lord! I am interested in your observations of how your Characteristics 1 05.5 16v is consumed when replacing oil seals quite often. VAZ 2120 1. Armored wire injector: 1700 5, 8, 2006, mt (16 cylinders). 1400 the question is, how much does this engine consume? I have 0. Engine injector CL 5 1 liter 1000 km! our motor: Moscow, st. 1.6l Sheremetyevskaya, house of the first configuration Priora is reduced from 85b, page Lada VAZ-2170 technical specifications 4, phone +7 495 545-69. % of consumption, tell me what the antifreeze should be for the engine 21124. 16: 21126-1006218 use “light” low. elevated 2112
Additionally: 16kl. I'm the owner. Of the minuses: the crankshaft seals are leaking (the issue price is 5 thousand rubles), I add a liter of oil every 10,000 km. The engine does not smoke. The body is a solid 4. For suspension: November 2015 replacement of the front suspension completely, i.e. support bearings, steering ends, balls, struts, springs, all rubber bands. I didn’t go into the back one, it’s more or less normal. At the same time I changed the head gasket + manifold gaskets, replaced the oil seals, camshaft seals, ground the valves and cleaned the injectors. I changed the rear wheel bearings, heater core and brake pads all around. About 15 thousand ago I replaced the timing belt and pump. Oil, air, fuel and oil filters were replaced at 1500 km. back. Used winter tires, 2nd season, there are summer tires, all with stampings. 4th window regulator. Heating 220. Bargaining is minimal.
City: Kemerovo
Adjusting valves on a classic VAZ with video
In this article we will look at and learn how to independently adjust the valves on the “classic”. But, before we begin, let's figure out why this adjustment is actually needed. The fact is that if this operation is not performed periodically, then the car will subsequently lose dynamics, the elasticity of the engine will deteriorate and fuel consumption will increase. However, this is not the worst thing, because “surgical intervention” directly into the engine itself may be required. We will not dwell in detail on listing all the consequences, but we will conclude: the valves need to be adjusted from time to time. This can be done either in a specialized car service center or yourself. Let's consider an independent process.
We adjust the ignition on VAZ 2105, 2106, 2107. Video.
07/06/2012 VAZ 2105. VAZ 2106. VAZ 2107
It is no secret that cars of the classic family produced by the Volga auto giant are not particularly reliable when it comes to electrical equipment and everything connected with it, but we especially often hear about problems with the ignition system and failure to start the engine at low temperatures. That’s when the question arises about adjusting the ignition system. Car owners solve it by turning to car services, losing their money and precious time, but why, when you can do everything yourself? Self-regulation, with a competent approach, is not something supernatural and anyone can master its basics, provided they have certain skills and, of course, desire. And, if you are interested in this, then read on. But, to make you happy or sad in advance, you won’t have to read much. Let's move from words to action.