A car water pump (or in other words, a pump) plays an important role in the normal operation of a car engine. Thanks to this device, coolant circulates through the channels of the cooling system without delay and reduces the temperature of all heated components of the power unit. A malfunction of the water pump can lead to unwanted overheating of engine parts and even completely render it inoperable. To avoid such an outcome, you must carefully monitor the condition of the pump.
The purpose and general design of the pump in the Lada Priora car
An auto water pump (VP) or pump is structurally included in the liquid cooling system (LCS) of a modern car and is its key element. The main function of this part is to ensure intensive circulation of coolant (coolant) through the engine's fluid circulation system.
Thanks to this constant movement, the temperature of the liquid decreases and its ability to cool other parts and systems of the car is restored. As a rule, the water pump on a car engine is structurally located in front of the cylinder block. Its drive is carried out from the crankshaft through a special wedge-shaped belt or from the gas distribution mechanism (timing) using a toothed belt.
A special toothed belt ensures the functioning of the car's water pump.
General pump structure
The Lada-Priora pump is a fairly simple mechanical unit, which consists of several main parts.
The pump design consists of several elements, one of which is the obligatory gasket
The main components of an engine water pump are:
- product body;
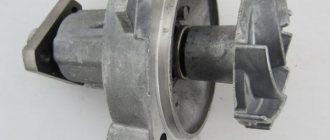
- a shaft with an impeller and a special self-regulating oil seal, thanks to which the coolant is securely retained in the structure during operation;
- pump shaft bearing on which the pump shaft is mounted;
- drive pulley;
- radiator fan (this part can be attached to the pump drive or in a separate electric drive version, without any connection with the car’s water pump);
- gasket made of cardboard or special material.
Operating principle of the device
The operation of the coolant pump is as follows:
- with the engine running, the coolant that has cooled in the car radiator moves to the pump (in particular, to its impeller);
- the gaps between its blades are completely filled with coolant;
- due to the action of centrifugal force, the coolant is thrown by the impeller into different directions of the internal cavity of the HV;
- through the technological hole, the liquid goes into the channels of the cooling jacket of the motor elements;
- constant circulation of the cooling medium in the liquid cooling system is ensured.
Design Features
To prevent possible leakage, the pump body is installed on the engine cylinder block through a special gasket (for example, made of cardboard). The cooling fan, which is sometimes structurally located on the car pump pulley and driven simultaneously with it, is usually made of metal or durable plastic. To reduce operating noise, the blades of the structure are located at certain angles, in an X-shaped position, which corresponds to 110/70 degrees.
In order to reduce the power required to drive the fan, designers use a special electromagnetic clutch. This device can turn off the fan when the coolant temperature drops to a level of 78–85 degrees Celsius. In this way, the operation of the engine cooling system is optimized, and the noise level during operation of the unit is also reduced.
Engine valves VAZ-21116
The average consumer has access to only those that come with the car from official documents. What follows from them? Open the Grants service book. Replacing the timing belt - at 75 thousand kilometers for an 8-valve engine, not a word about the 16-valve belt! The same situation is with Kalina - I came across a book where there is nothing to say about one engine, but on the other we only check the condition of the belt, but there is no talk of a planned replacement. It’s even more fun with the Priora - there are service books where there is not a word at all about the gas distribution mechanism, but the air conditioning compressor belt is mentioned in almost every maintenance coupon.
With Vesta and Xray, progress is obvious - at 45, 75, 105, 135 and 165 thousand we adjust the gaps in the gas distribution mechanism. And for the first time we plan to remember the timing belt along with the rollers for 180 thousand kilometers! This is for 16-valve engines VAZ-21129, 21179 and 8-valve Vesta VAZ-11189. I can’t do without the quote: “2.11. Replace the timing belt along with the rollers. 2.12. Replace the crankshaft and camshaft sprockets. Replace the toothed belt, tensioner and support roller (for the VAZ-11189 8-cl. engine, only the tensioner) of the engine gas distribution mechanism drive. Adjust the tension of the toothed belt." Not only is the oil oil (we change the same belt twice), but of all the parts, they didn’t remember the most vulnerable one - the pump!
Checking the serviceability of the water pump without dismantling it
To determine whether the water pump is working properly on a Lada-Priora without removing it from the car’s engine, it is necessary to take the following steps:
- start and warm up the power unit to its operating temperature;
- squeeze the upper hose from the radiator with your hand;
- By tactile sensations you can understand that coolant circulates through the cooling system, which means the water pump is working properly.
The presence of extraneous hum or noise in the pump area indicates an imminent possible failure of the device bearing. In this case, it is recommended to replace the auto pump with a new one.
During normal operation of the pump, coolant circulates intensively through this pipe.
How to change the pump on a 16 cl engine with your own hands
Before you begin removing the pump, you will need to drain the coolant. We find the drain plug, substitute a container with a volume of about 4 liters and drain.
After draining the liquid, remove the upper decorative cover, the alternator belt, and then the front timing cover, it consists of two parts.
Now you need to set the timing marks so that during assembly you do not make a mistake with the ignition value.
Next, unscrew the pulleys. To prevent the pulley from turning, engage 5th gear and press the brake. Now the pulley will be motionless, you can safely unscrew it. Unscrew the pulley bolts using a 17mm spanner.
If you have a car with air conditioning, you need to use a 13 mm socket wrench to unscrew the bracket for the generator belt tensioner pulley and air conditioner with steering wheel.
The next step is to remove the crankshaft pulley. To do this, remove the right front wheel and mudguards. Next, engage 5th gear again and press the brake. The pulley will be fixed and can be safely unscrewed. Remove the pulley and timing belt.
Next, unscrew the 6 bolts securing the cover and then carefully remove it from the engine.
We unscrew the 6 bolts securing the pump, carefully pry it up with a screwdriver and pull it out. When installing a new pump, it is necessary to coat the gasket with a thin layer of sealant and screw it into place. Next, we reassemble in the reverse order, taking into account the timing marks.
For more detailed instructions, watch the video:
Signs that indicate the need to replace a part
Experts believe that the main factors that indicate a faulty water pump are:
- coolant leaking from the housing in the oil seal area;
- wear of the built-in bearing, which is determined by increased noise, humming during operation, or jamming;
- insufficient circulation of the coolant used;
- excessive increase in the temperature of the power unit;
- reducing the level of coolant poured into the system;
- the presence of cracks, chips, chipping of the material of the pulley, housing or impeller of the water pump.
The water pump, as a rule, is a non-repairable component due to its design. Therefore, experts recommend a complete replacement of this important part.
The water pump for the Lada Priora is completely replaced if it malfunctions
Causes of malfunction
The water pump of Priora engines is a very unreliable element, so it is not recommended to neglect replacing it when changing the belt; it is better to change the complete set.
So, let's talk about the main malfunctions of the pump, in which it must be replaced:
- Flow. The water pump has a special hole to drain coolant if the seal is not tight. Over time, the sealing gland on the shaft under the influence of high temperatures becomes less elastic and begins to leak coolant. You can detect leaks by looking under the timing cover.
- Bearing wear. With such problems, the pump begins to squeak and rattle very much on a cold engine; as the engine warms up, these symptoms may disappear. It is difficult to determine this problem without removing the belt and can easily be confused with worn out rollers.
- Impeller. When the impeller breaks or rotates, the circulation of coolant in the car is disrupted, therefore, the car engine begins to overheat, which can lead to high costs for its repair.
- Wedge. The most terrible and unpleasant pump failure. The wedge of the pump is necessarily accompanied by a broken timing belt and, consequently, bending of the valves, which is quite expensive when carrying out repairs.
Pump with broken impeller
Factory service life of the pump
The service life of a water pump depends on the supplier of the product or, in other words, on the build quality of the pump, the elements and materials used. A not quite high-quality pump can fail even after 10 thousand kilometers of the car. The service life of a good part can be 100 thousand kilometers without any signs of failure of the part.
Experts recommend installing an original water pump on the car from the manufacturer TZA (Tolyatti Automotive Unit Plant), which has good quality and a significant period of trouble-free operation.
Routine maintenance for VAZ engines.
Nowadays, new engines also use Korean pumps, which are rumored to be of better quality. But even if you cut me, not a single pump of 200 thousand comes out. I do not believe! Moreover, I see complete confusion in the service books, the lack of a unified approach to servicing the same gas distribution mechanisms from model to model and, most importantly, an indifferent attitude towards the consumer. Not from all factory workers - from those who are responsible for a specific direction and are killing the work of other creators of cars at the Volga Automobile Plant with stupid pieces of paper. But if the charge is planted, and the specialists did not help, then we will clear the mines ourselves.
Possibility of installing an additional water pump on the Lada Priora
One of the disadvantages of the heater on the Lada Priora car is its low efficiency when the engine operates at low speeds in the cold season, due to insufficient coolant circulation. Therefore, the car interior warms up slowly and insufficiently, which causes some discomfort for the driver and passengers.
There are some requirements that must be met to obtain a high-quality result after installing an additional electric pump.
These include the following points:
- the installed product should not create excess pressure in the heater radiator during operation in order to avoid damage to the pipes or the formation of cracks;
- It makes sense to replace the thermostat and install this component with an increased opening temperature (90–95 degrees Celsius) due to the fact that as the speed in the coolant circulation increases, the engine parts will warm up more slowly, increasing wear on the power unit.
To solve this problem, you can install an additional water pump in the cooling system of the power unit, which will qualitatively improve the heating of the car interior even when the engine is idling. This technology is not new. Engineers have been using it for a long time. Examples include German cars BMW or Mercedes Benz.
Device selection
As a rule, devices from various manufacturers are suitable as an additional water pump for the Lada-Priora car.
These, for example, could be brands from:
- Bosch company;
- ;
- .
Video: positive effect of installing an additional electric pump on the Lada Priora
However, most often the Lada Priora is equipped with an electric water pump, which is installed on Gazelle cars. This may be an old or new design, but the principle of operation is the same for both: due to the vacuum at the inlet during operation of the product, a pumping force arises, which drives the coolant through the system. In fact, the pump from the Gazelle car is a classic centrifugal pump.
The design of the new pump version is much more successful and causes fewer complaints from car enthusiasts. And it is also less noisy during operation. The main problem that motorists encounter when using such an electric pump is its leakage.
Installation and connection of an additional electric pump
To equip a car with an additional electric water pump, you will also need a regular relay that has normally open contacts (this can be an ignition or starter relay from a VAZ 2105, VAZ 2108). It is necessary to close contacts No. o86 and No. o30. And you will also need a reinforced hose and clamps for clamping the pipes.
An additional pump can be installed in any of the gaps in the supply or outlet pipes of the car’s heating stove.
Installation of an additional electric pump is quite simple, and the efficiency of the heater increases significantly
The pump is fixed in the Lada Priora in the following places:
- stud for fastening the washer reservoir;
- studs located next to the battery;
- on the engine shield.
The device can be connected to a wide variety of systems.
It could be:
- recirculation button;
- SAUO stove block;
- heated mirrors;
- other convenient places.
Korean-made coolant pump for VAZ-21179 engine
The owner of any elderly foreign car with a timing belt will confirm that repairmen insist that during a scheduled belt change, they replace both the pump and the pressure rollers with bearing assemblies. And these parts are often sold as a set. Moreover, at a discount - the whole set is cheaper than the belt, rollers, and pump separately.
I don’t want to once again convince you that the stingy pays twice, but over the years I have come to the conclusion that Western manufacturers include in the regulations changing the belt not because of the belt as such, but because of the pump and tensioner bearings. They just needed a reason to reliably replace the entire set of parts associated with the camshaft drive, and they found it.
I propose to do the same with our engines. Why? Formally, at each maintenance it would be necessary to remove the cover and inspect the timing belt and water pump. You can see a tear in the belt, as well as a leak on the pump. In both cases, the part is changed without delay. But this is a malfunction. And if everything is outwardly normal, the ideal option is to include preventive replacement in the regulations.
Installation instructions for an additional electric pump
Installing an additional water pump on any car (including the Lada Priora has 16 valves) is, in principle, no different. It is necessary to place the electric pump in the section of the pipe, which is the input or output to the car’s stove and provide its power supply.
Step-by-step instructions for installing this additional component are as follows:
- Provide access to the heater pipes under the hood of the car by removing components that interfere with operation.
- Compress one of the rubber pipes that comes out of the heater (stove), which is done to prevent coolant from leaking out, or drain antifreeze (antifreeze) from the entire system.
- Cut part of this pipe to the length of the corresponding pump being installed.
- The length of the fittings is not taken into account due to the fact that they fit into the pipes.
- It is necessary to select the diameter of the fittings on the electric pump in advance to obtain a high-quality connection.
- Secure the rubber pipes to the pump fittings using metal clamps.
- Attach the additional electric pump to a pre-selected location under the hood of the car (indicated above) using special fasteners.
An additional electric pump can be mounted in any place convenient for installation. - Connect the power supply to the pump by selecting the options listed above, or install a separate switch.
- Start the engine and check the tightness of the connections, as well as the functionality of the electric pump.
- Install all parts that were removed before installing the pump.
Video: step-by-step instructions for installing an additional electric water pump on a car
It is recommended to install such a pump only after a thorough check of the functionality of the entire cooling system of the car, since there are often faults in the stove, thermostat, and other components, which ultimately does not allow sufficient heating of the interior.
The water pump of the Lada Priora car is designed to maintain the internal thermal conditions of the car's power unit set by the manufacturer. Operating a motor with a faulty pump is guaranteed to lead to more serious breakdowns and, as a result, to significant financial costs. Timely replacement of a failed water pump will ensure a long service life for the engine, as well as comfort when using the car.
- Author: ratico19
Rate this article:
- 5
- 4
- 3
- 2
- 1
(3 votes, average: 2.3 out of 5)
Share with your friends!
What's next?
How to fix error p0441 on Lada Kalina
In this case, the replacement of valves on the Priora (16 valves) is not completed. When you unscrew the spark plugs, you should unscrew the bolts securing the camshaft, which remains for our client to do, and then remove this part from the outside. There are two of them on the sixteen-valve Priora, and both shafts must be removed. For this purpose, you will also need to remove the plugs located at the end of the cylinder head. When the engine is disassembled, the valves are specifically replaced. On the Priora (16 valves) it is done like this.
After removing the camshaft, use a puller to remove the fastening “crackers”. In this case, it is recommended to place a small stand under the “plates”. How to replace the valves on the Priora (16 valves)? After removing these parts, the plate is removed along with the springs. You have to be very careful because the spring force is very huge
Due to carelessness, they sometimes jump off the plate. There is still one piece under the springs
These are stubborn plates. They also need to be removed. Alas, this is done only after removing the valve seals. In order to dismantle it, we will use a special grip.
The dismantling process is as follows. We clamp the oil seal with a grip and at the same time press it a little. After making a couple of turns left and right (at the moment of turning), we pull the oil seal upward. It is not recommended to make such tilts with a pressed grip, because there is a risk of damaging the seating shoulder of the mechanism on the guide sleeve. We have done most of the work. Now all that remains is to remove the old valves and install new ones.
Important points
- When reassembling the cooling system, pay special attention to the mark on the crankshaft pulley and the triangular slot located on the oil pump cover. These marks must be combined, since this is the only way the piston of the first cylinder is guaranteed to be installed at top dead center. If the mark on the pulley is difficult to see, you can apply a drop of red or white paint to it.
The mark on the pulley, made with red paint, will be better visible when replacing
As can be seen from this article, replacing the pump on a Lada Priora car is not an easy task. And if the car owner has never done this before, then it is likely that he will need the help of a partner, especially when it comes to removing the timing camshafts. Of course, you can do all this alone, but then it will take much more time.
Source
When to change
- While the engine is running, a characteristic low hum is heard from under the hood (this is a sign that the pump bearing is worn out and needs to be replaced).
- After leaving the parking lot, antifreeze stains remain on the asphalt, which indicates a violation of the pump's seal.
It is not advisable to repair the pump; it is much cheaper to purchase a new one and install it on the car. The operation is not an easy one: in order to change the pump, you will have to remove the above-mentioned timing belt . Read more about this below.
Removing and disassembling the fuel pump
The fuel supply mechanism in the Priora is located in the gas tank, so to get it you need to:
- Remove the rear passenger seat. The latches holding it in place are on the sides.
- There is a hatch in the bottom of the car, secured with two self-tapping screws. Having removed it, we gain access to the fuel pump, which is fixed in the fuel tank with a flat metal ring.
- Remove the ring, which is held in place by nuts screwed onto eight threaded pins spaced evenly around the hole in the gas tank.
- We remove the two fuel hoses and remove the retaining ring.
- We disconnect the electrical connector through which power is supplied to the pump located in the plastic casing.
- We take out the housing; this must be done carefully so as not to damage the float, thanks to which the filling level of the gasoline tank is shown on the instrument panel.
- The next step is to pull out the pump itself, bend the four latches located on the body, and take out the fuel pump, at the bottom of which there is a coarse mesh.
As a rule, the entire mesh looks quite dirty, and its central part is literally clogged with various debris. To remove the old mesh, you just need to grab it on all sides with your fingers and pull it towards you, or pry it with a flat-head screwdriver.
It comes out of its seat relatively easily. After this we install a new mesh. A mesh for the Lada Priora fuel pump can be bought in a specialized store or on the market. It costs about 50 rubles.
There is usually also a lot of debris at the bottom of the plastic cup in which the pump was located. It needs to be rinsed well and wiped with a dry cloth.
Then everything is put together in reverse order. After replacing the mesh, the engine picks up speed smoothly and runs stably. While driving on the highway, the car no longer jerks and accelerates normally.
Replacing the mesh of a Priora fuel pump is not much different from replacing the mesh on Kalina, which I wrote about in this article. Symptoms indicating the need to change this grid are the same as for everyone: interruptions in engine operation, jerking while driving, problems with starting, etc.
- Head “10”, flat screwdriver;
- Rags;
- New fuel pump mesh.
Attention! We will be working with a flammable substance, so first of all, remove any sources of fire. Do not smoke while doing this work! Some, by the way, light a cigarette out of habit while performing such work. As a result, they pay very dearly for their inattention and violation of basic safety precautions.
As a result, they pay very dearly for their inattention and violation of basic safety precautions.
- Turn off the power to the fuel pump or remove the fuse that controls the fuel pump.
- Start the engine and let it run until it stalls. This way you will relieve excess pressure in the fuel line and spill a minimum of gasoline when removing the fuel pump.
- Next you need to remove the rear sofa (seats).
- For “every fireman”, remove the “-” terminal of the battery, gasoline is highly flammable, you never know...
Note: By the way, when replacing the fuel pump mesh, it is advisable to replace the fuel filter as well, this way you can eliminate the possibility of engine malfunctions due to the fault of the fuel filter. At the very least, if after replacing the mesh the problem is not solved, be sure to replace the fuel filter, it is possible that the engine is running unstable because of it.
I have everything, I hope everything is clear to you!? If you liked the article, share it with your friends using the social buttons. networks located just below. Bye everyone!
